How to Create WhatsApp AI Chatbot [Step by Step]
Nowadays, we can utilize many tools to streamline a lot of our business's daily processes. One great tool we've seen is WhatsApp chatbots.
According to the latest WhatsApp business report, there are more than 1.26 billion enterprises and customers are using WhatsApp chatbots for scaling business as sales, support, or marketing cases.
So, in this post, we will share the detailed steps to create a WhatsApp chatbot without coding.
Part 1: What Is WhatsApp Chatbot?
A chatbot is an automated software that can either utilize artificial intelligence like ChatGPT or pre-determined 'rules', so a WhatsApp chatbot is an automated system that intercts with users through WhasApp.
Once a customer engages with your chatbot, depending on what they select or say, the chatbot will then respond with a corresponding predetermined or generated response to address the message.
Generally, there are several types of WhatsApp chatbots based on the functions:
- Customer service chatbots: provide customer support and resolve issuers from customers.
- Order processing chatbots: manage orders, process payments, and track order status.
- E-commerce chatbots: help with product discovery and recommendations.
- Lead generation chatbots: collect information from potential customers and qualify leads.
- Notification chatbots: send updates and alerts (such as appointment reminders).
Each type of WhatsApp chatbos servers a distinct purpose, so it's important to clarify your purpose of building a WhatsApp chatbot.
Part 2: How to Create a WhatsApp Chatbot
There are two main ways you can create a WhatsApp chatbot:
- A. Develop it using direct access to the WhatsApp Business API;
- B. Use with a platform that's already integrated as a WhatsApp Business Service Provider, such as Twilio or Manychat.
In this guide, we're using the second method to create a WhatsApp chatbot via Manychat as an example. It's faster, easy-to-setup, and with lower cost. More importantly, these third-party chatbot builder tools often include templates and built-in integrations.
2.1 Get a New Phone Number
The first thing to do is get a new phone number for your new WhatsApp Business account.
This is because WhatsApp recommends using another phone number that does not link to your WhatsApp account or WhatsApp Business account, in order to create WhatsApp chatbots.
Note:
- If you choose to create a chatbot from scratch via coding, the next thing you'll want to do is to get access to the WhatsApp Business API.
- Luckily, the platform we're using in this guide, Manychat is an official WhatsApp Business Service Provider, and it can directly integrate with WhatsApp Business API. So, you don't have to manually access and fiddle with the API work.
2.2 Set up a Manychat Account
You're now ready to create your WhatsApp chatbot on the Manychat platform. The next step is to create a Manychat account and link it to your WhatsApp so you can start building a bot for your WhatsApp Business account.
1. Go to the Manychat site and click 'Get started'.
2. On the sign-up page, select 'WhatsApp'. Select 'Continue with Facebook'.
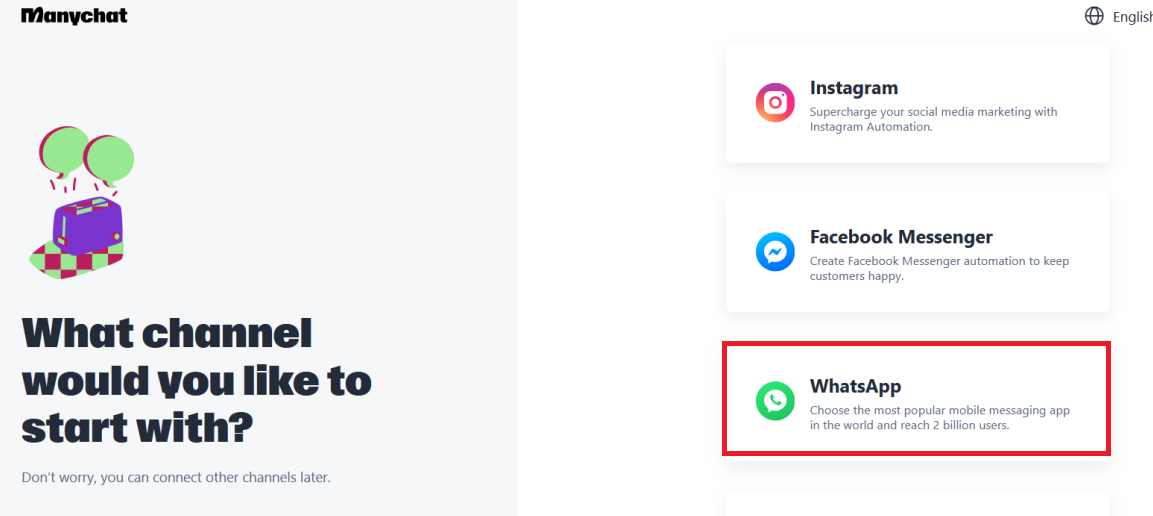
3. Complete the verification and setup process.
4. On the 'WhatsApp Channel' page, select 'Use My Own Number'. Then you can use your new phone number that isn't registered to any WhatsApp account to connect Manychat with your Facebook.
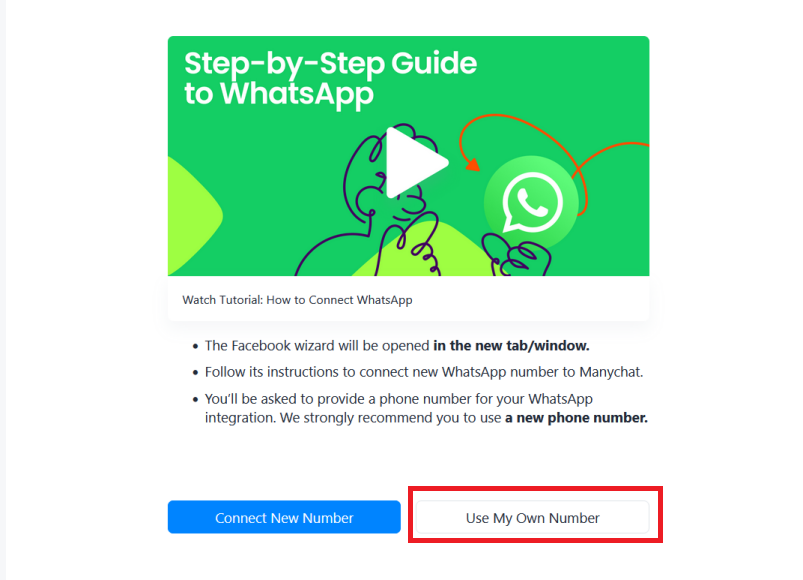
5. You'll then see a window pop-up prompting you to connect your WhatsApp Business account to Manychat. Click on 'Get Started'.
6. Fill out the pop-up with all your relevant business information, and complete the set up.
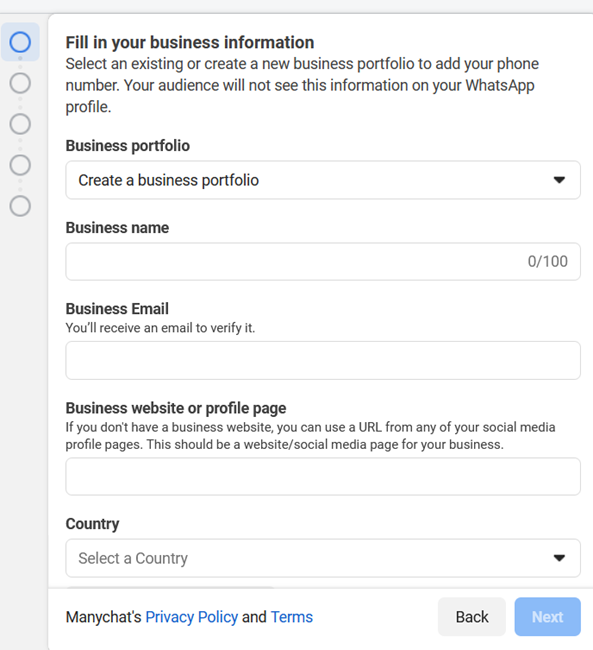
After connecting your WhatsApp Business account with Manychat, you can start creating chatbot workflow.
2.3 Create WhatsApp Chatbot Flow
Now you can start building your brand new WhatsApp chatbot. The good news is that Manychat is a no-code chatbot builder platform so it's not as complicated as coding from scratch.
Manychat offers instructions to create a automatic flow. We'll show you how to create a sample greeting message on Manychat:
1. In the left-hand sidebar of the Manychat homepage, select the 'Automation' icon.
2. Select 'New Automation'.
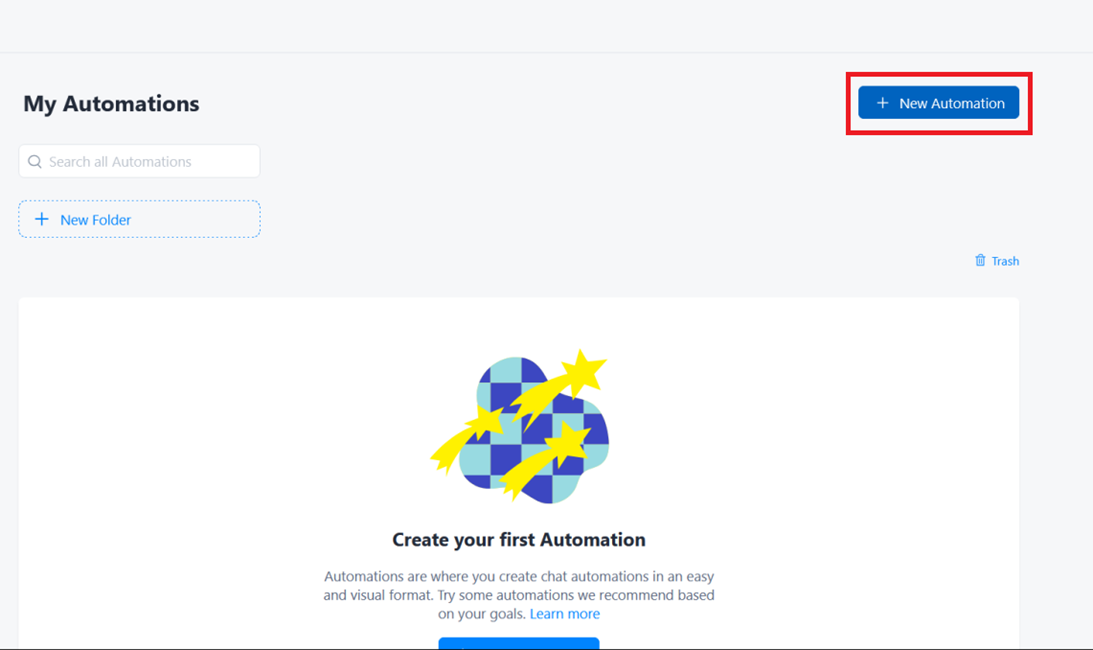
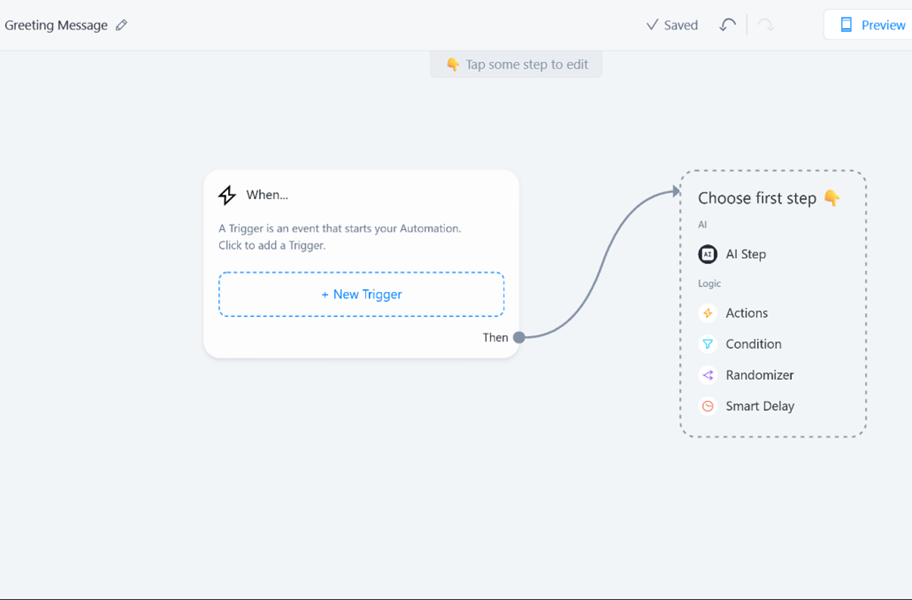
3. Rename the automation in the top-left corner to 'Greeting Message'. Select the 'New Trigger' button.
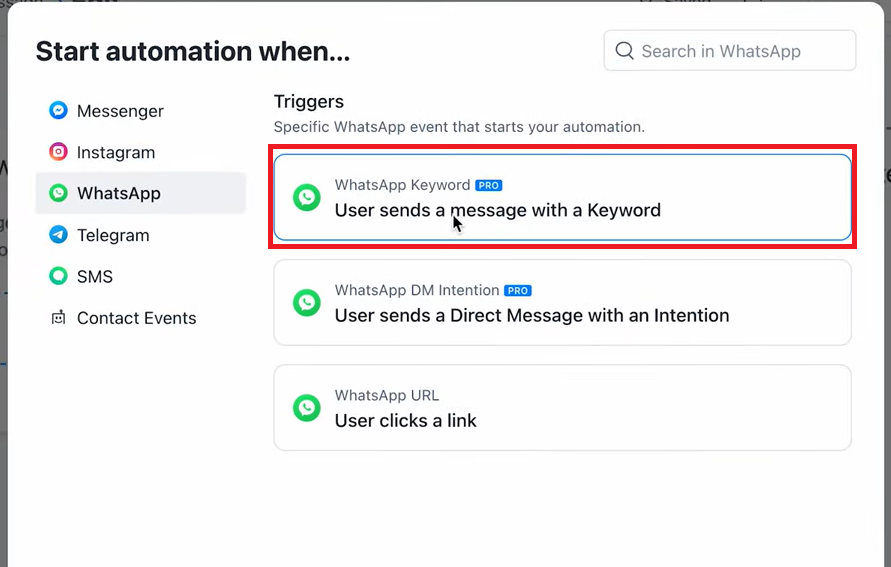
4. Select 'WhatsApp' from the list. Then select 'WhatsApp Keyword'.
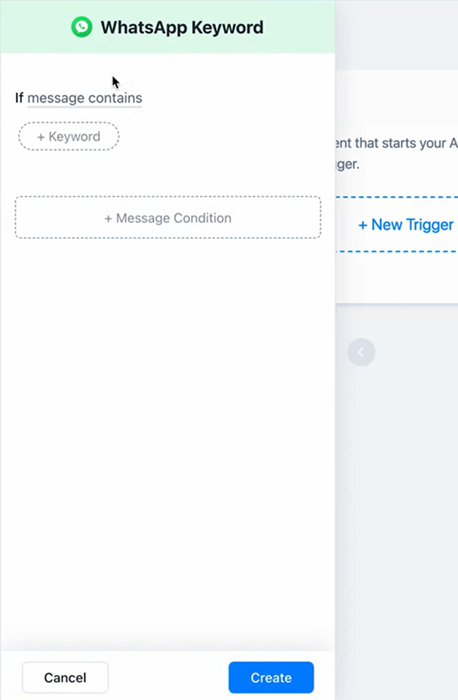
5. Type in a few greeting keywords. E.g. hi, hello, hey, etc. Click 'Create'.
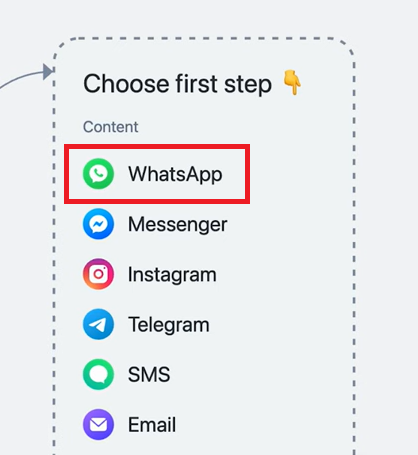
6. Under 'Choose first step', select 'WhatsApp'.
7. Now, enter a message for your chatbot to respond to the greeting message. Keep it short and sweet, introduce your chatbot, and include any relevant information.
Here's an sample: "Hello! Thanks for reaching out. I'm a chatbot assistant. How can I assist you today?"
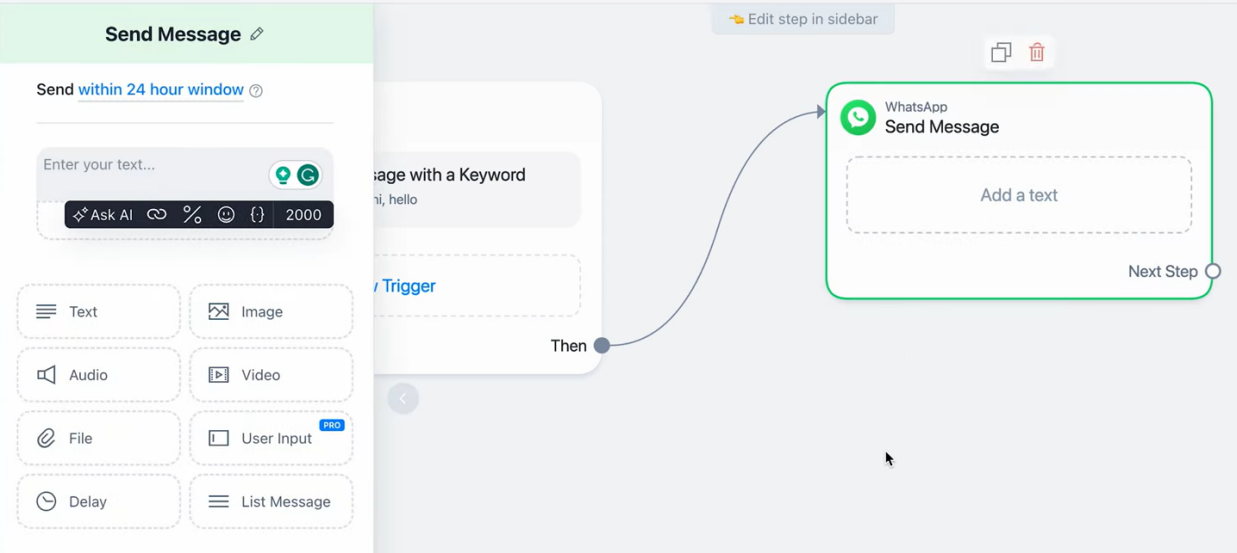
8. Once you're done setting up your greeting message, click 'Set Live' in the top-right corner to get the chatbot's greeting message up and running.
You can also set more triggers by clicking 'Next Step', or you can create another message flow by adding new keywords and repeating the above steps.
Note:
Now you have created your WhatsApp chatbot with your pre-defined keywords. If you are just want to answer the repetitive and simple questions on WhatsApp, this chatbot is good for you. You can simply skip to test your WhatsApp chatbot.
However, if you want a more advanced and versatile WhatsApp chatbot, consider integrating AI with your WhatsApp chatbot. In that case, keep on reading the next step to integrate AI with WhatsApp chatbot via Chatbase.
2.4 Integrate AI with WhatsApp Chatbot via Chatbase
Using Manychat to create automatic messages is convenient, but it can only trigger auto responses with pre-defined keywords. It still lacks of intelligent responses. So in the next steps, we will upgrade your WhatsApp chatbot with AI, to generate custom and intelligent responses.
Manychat also has AI features but currently is in the beta stage so it's not as fleshed out as other platforms. So we will use two additional services: Chatbase and Make, which allows you to train with your custom knowledge bases.
Chatbase AI helps you build your own AI chatbot with your knowledge base, and Make connects Manychat with Chatbase.
Here's a workflow image to show you how it works:
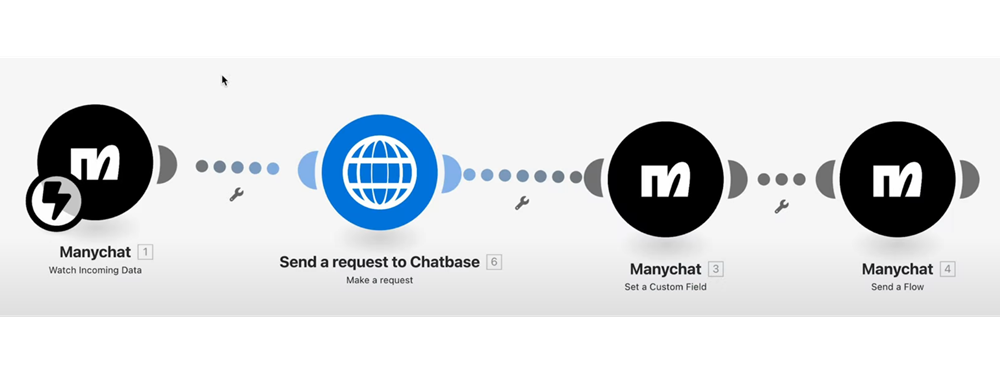
Now let's get started to make an AI WhatsApp chatbot.
Step 1. Create an AI chatbot on Chatbase
1. Go to the Chatbase site and sign up for an account. Then create your team.
2. Click 'New Chatbot' on the home page.
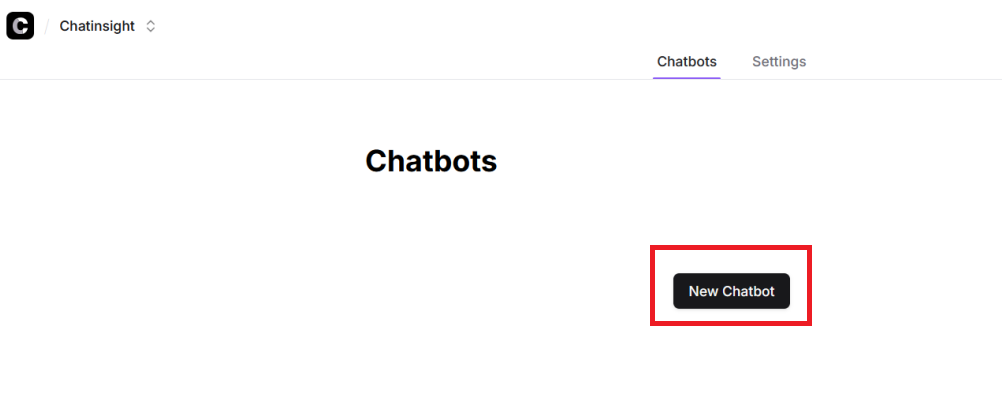
3. You'll be redirected to the 'Data Sources' page.
Here, include any relevant documents, text files, websites, or Notion pages for your chatbot to learn from. The chatbot will use this knowledge as a base for their responses.
4. Once you've uploaded enough data sources, click 'Create Chatbot'.
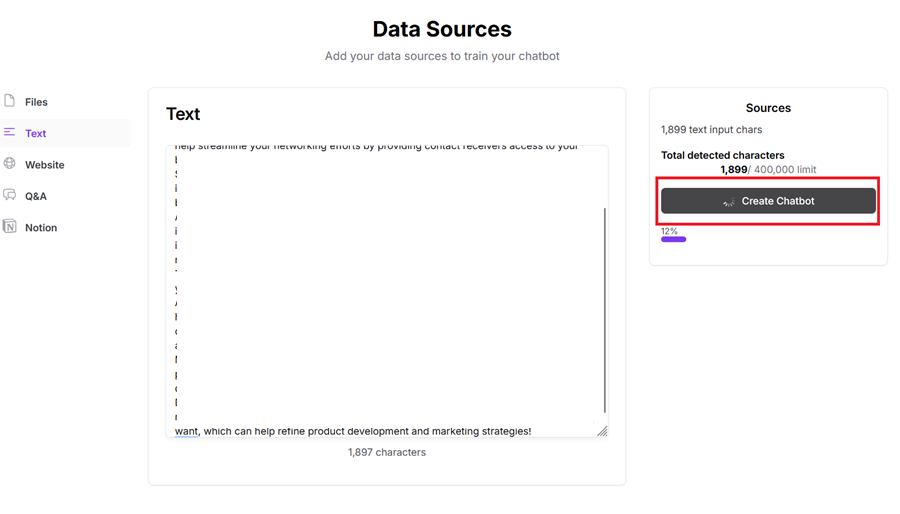
5. Now you can try out the chatbot to see how it responds to your messages.
We'd recommend including as much relevant information about your business and products/services as you can to ensure it responds with accurate information.
If you need to further finetune the AI's responses, go to 'Settings' and select the 'AI' tab. Here you'll find different AI models for your chatbot to use, you can write custom instructions for it to follow, and edit how the chatbot behaves.
Step 2. Link Manychat to Make
Now that you've got your Chatbase AI set, you'll need to use 'Make' to link your Chatbase AI to your Manychat chatbot. This way, if a customer messages your chatbot with something outside of its set rules & responses, your Chatbase AI will respond instead with information based on your training data.
1. Go to the 'Make' website. Click 'Get started free' and sign up for an account.
2. Select 'Create a new scenario'.
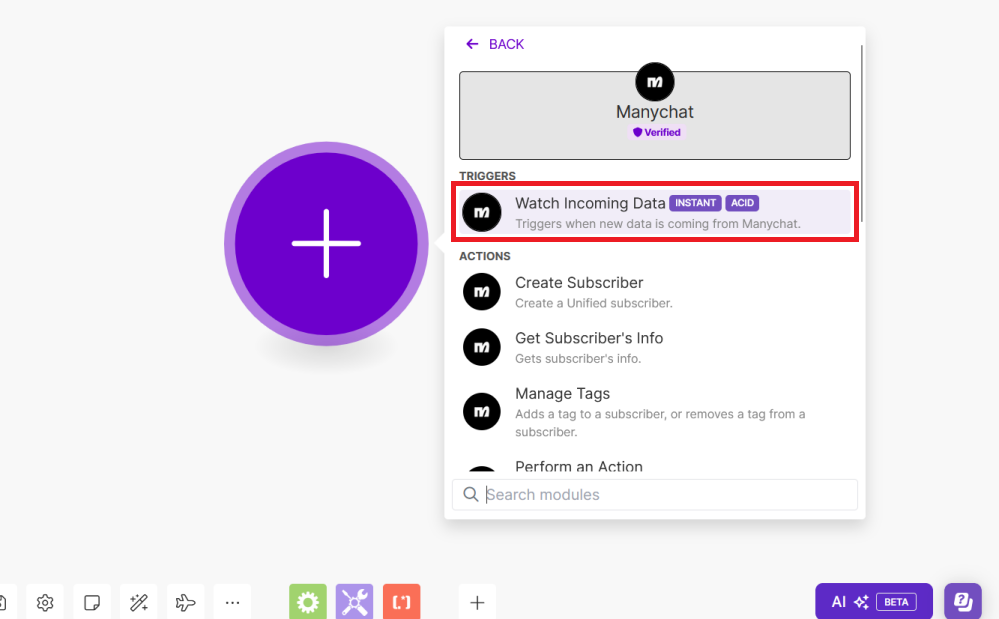
3. In the 'All Apps' pop-up, select 'Manychat'. Then select the 'Watch Incoming Data' trigger.
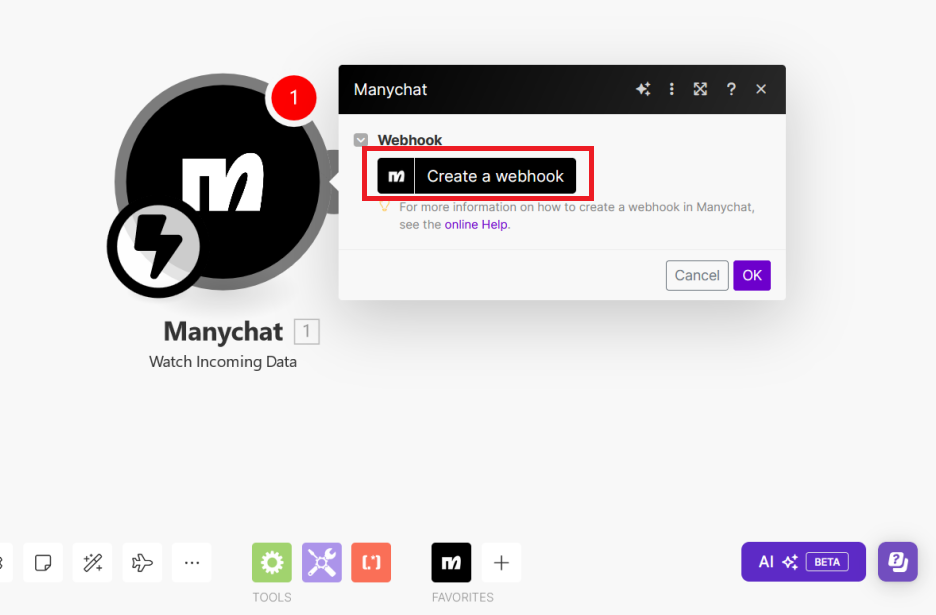
4. Click Create a Webhook > Create a Connection.
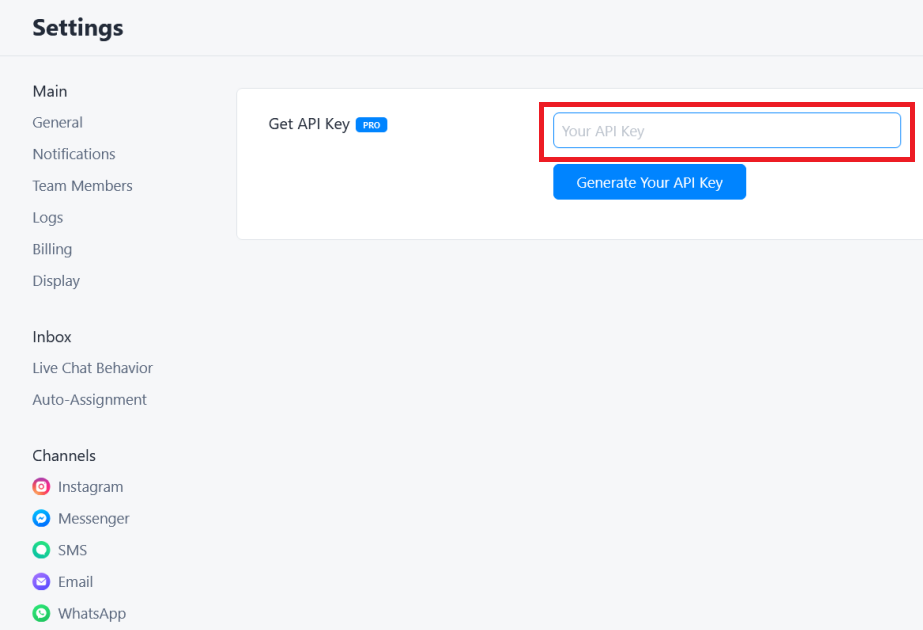
5. You'll need an 'Access Token'. Go to your 'Manychat' account > 'Settings' > 'API'.
6. Generate an API key and copy and paste it to the 'Access Token' field on the Make page.
7. Now go back to Manychat and create a new automation.
Name it something like 'Questions for Chatbase'. You will use this to redirect messages from customers on Manychat, to Make, for Chatbase to answer in the next steps.
8. Under 'Content', select 'WhatsApp' > User Input > type in your 'question', and save it to a custom field. Name it properly so you can refer to it in the next steps. For now, we'll name it 'Questions for Chatbase'.
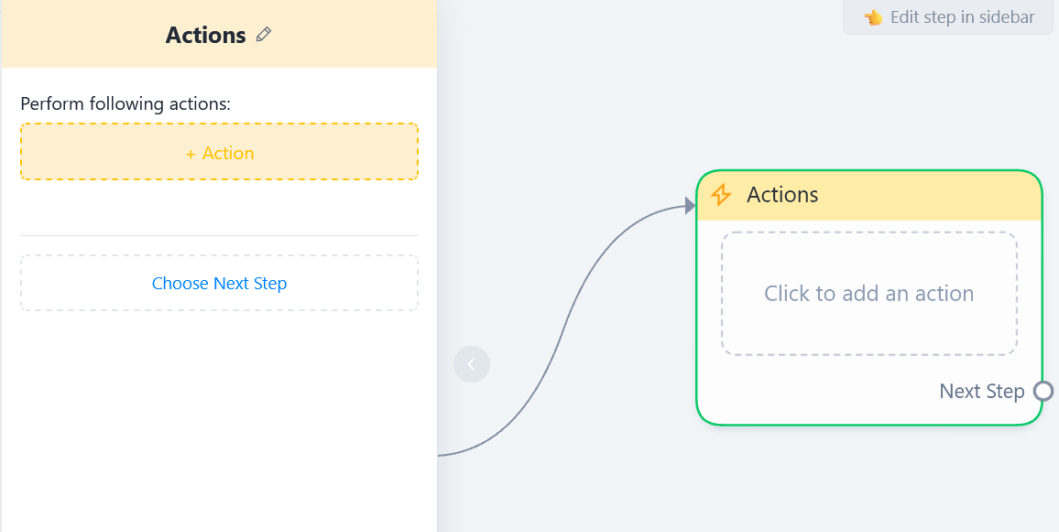
9. Add an 'Action' connected to this message and select 'Trigger Make'. Click 'Set Live'.
Step 3. Link Chatbase to Make
Now, you can link Chatbase to Make to ensure Chatbase can receive and understand the messages from Manychat.
1. Once that's done, add another module.
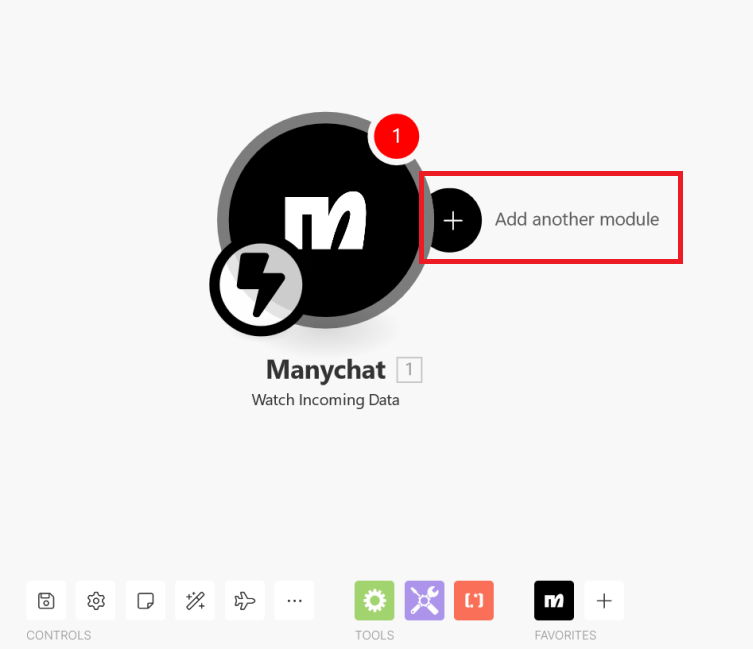
2. Type 'Chatbase' and select 'Send a Message'.
3. Select 'Create a Connection'.
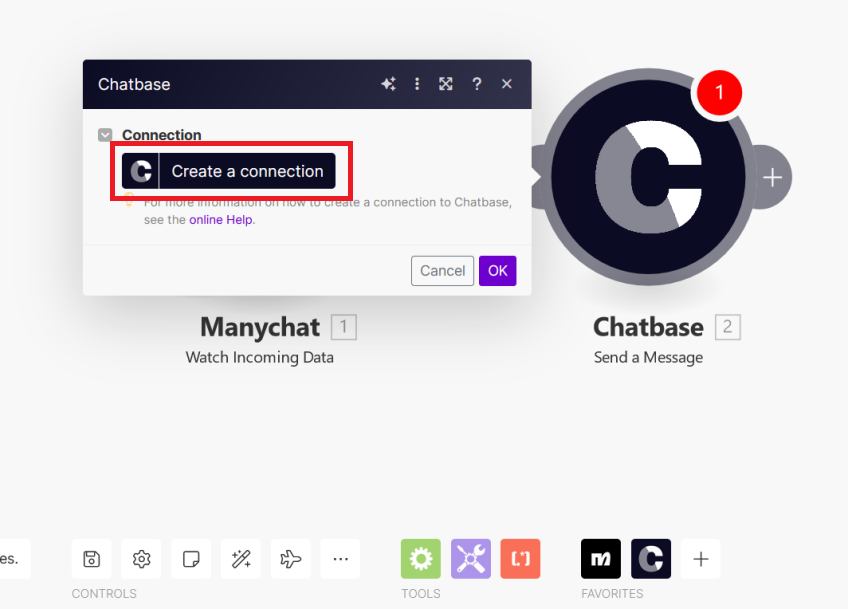
4. Add your Chatbase's API key to the required field. You can find it on 'Chatbase' in the 'Settings' tab.
5. Add your 'Chatbot ID'. You can find it in 'Settings' on Chatbase.
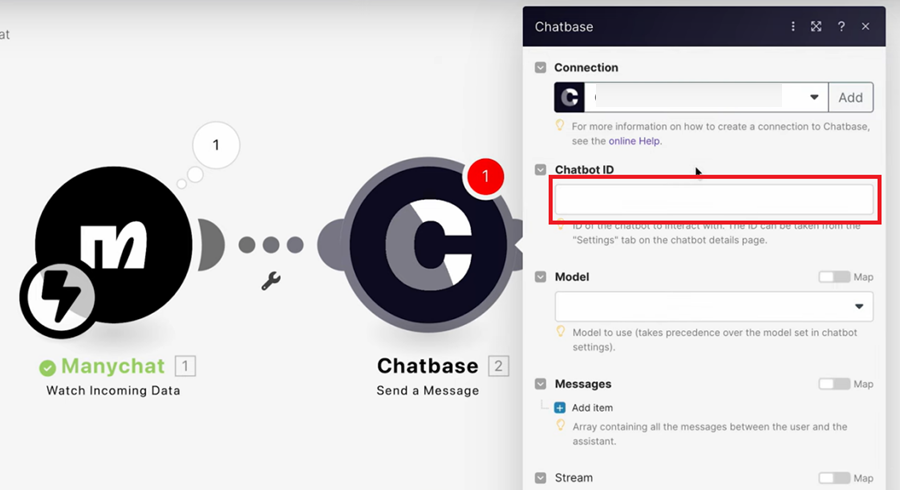
6. On the 'Messages' tab, select 'Add item' and under 'Content', select the 'Questions for Chatbase' field (which is what you created from Manychat in Step 2). Change the 'Role' to 'User'.
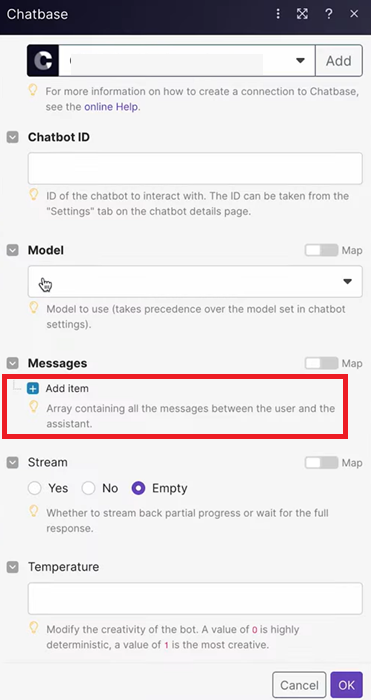
7. Click 'OK'.
Step 4. Create a new User Field on Manychat
Performing this step helps Manychat chatbot to receive answers from Chatbase.
1. On Manychat, go to 'Settings' and select 'Fields'.
2. Click 'Create New User Field'.
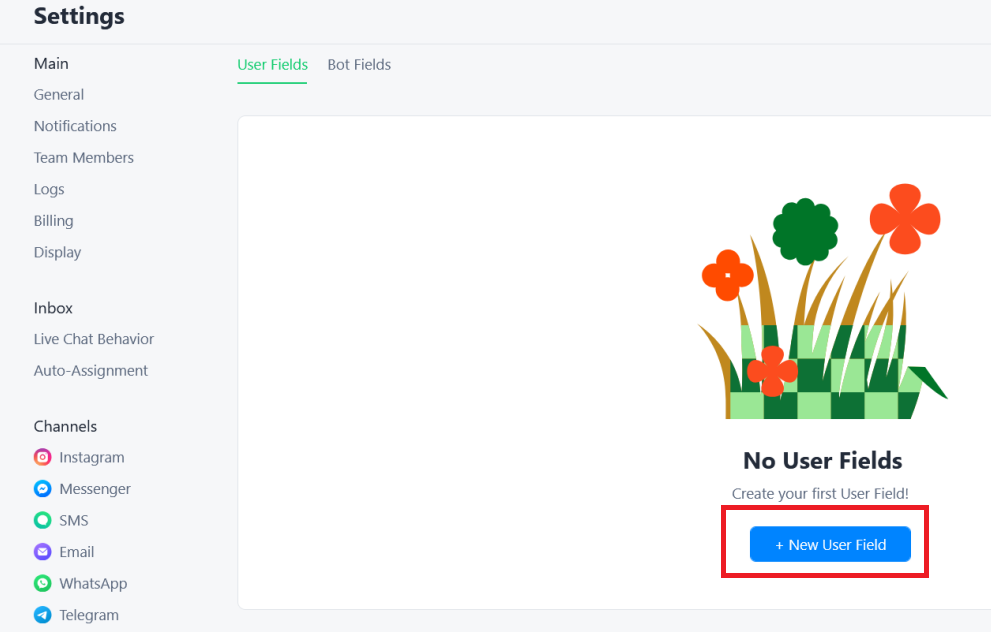
3. Name it 'Answers for Chatbase'. This is to allow your Manychat chatbot to receive the answer from Chatbase.
4. Go to the 'Make' page and add another module. Select 'Manychat' and then 'Set a Custom Field'.
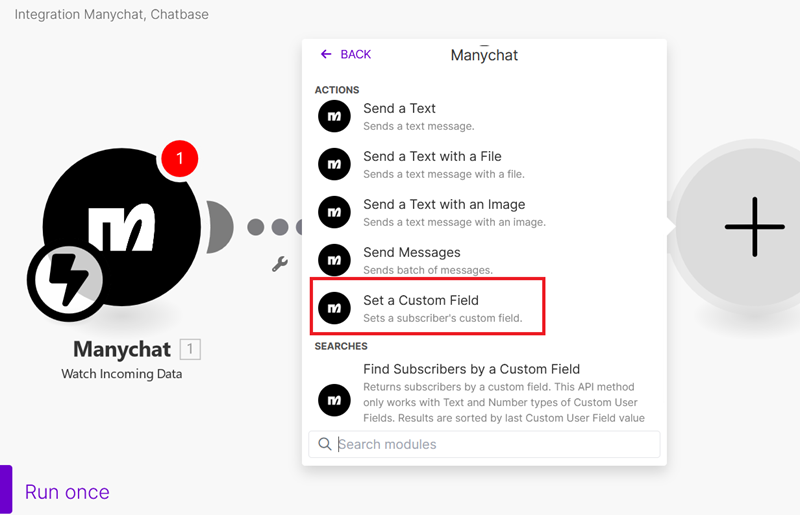
5. Select your Manychat Subscriber ID, select 'Answers for Chatbase' in the 'Field ID' and for 'Field Value', select the text response from Chatbase.
Step 5. Add a Manychat Flow to Make
Performing this step makes sure Manychat to deliver the answers generated by Chatbase to WhatsApp users.
1. Go back to Manychat and create a new automation.
2. Name it 'Answers for Chatbase' and select 'WhatsApp'.
3. In the 'Send Message' menu, use a '{' and select the Custom User Field 'Answers for Chatbase' created in Step 4.
4. Click 'Set Live'.
5. In your address bar, you'll see 'Flow ID' in the URL after 'content'. Copy it from after the 'files/' up to '/edit' in the address bar.
6. Go back to Make and add another module. Select 'Manychat' and then 'Send a Flow'.
7. Select your Subscriber ID and under 'Flow ID', paste the 'content' URL.
8. On Make, click 'Save' and then click 'On' to enable the integration.
By now, you have successfully connected your Manychat with Chatbase, and the AI chatbot can receive the questions from WhatsApp via Manychat, generate a response, and send the response to WhatsApp via Manychat.
Integrating AI with your WhatsApp chatbot takes some time and patience, but it can enhance your work productivity. If you have to deal with a large amount of user queries with different user intents, only a chatbot by Manychat is not a great option because you will have to manually set up lots of triggers, keywords, and answers. However, with a customized AI chatbot, it can deal with these triggers and generate automatic responses easily.
2.5 Test WhatsApp AI Chatbot
For the last step, it's the moment of truth.
Message your WhatsApp chatbot from another WhatsApp account to test it. Make sure it's replying as intended and follows the rules and behavior you've set on Chatbase and Manychat.
Test it thoroughly before publicizing it to your audience to ensure the best customer experience.
Part 3: How to Utilize WhatsApp Chatbot for Business
Here are the possible ways you can use WhatsApp Chatbot to help your business:
Customer Support
Your WhatsApp chatbot can handle the bulk of your customer's queries and FAQs. This allows you always to have someone to respond to customers, enhancing customer satisfaction.
Marketing and Sales
The chatbot can also blast out promotions and deals based. If you have a promotion, you can program the chatbot to reach out to customers, informing them of the discount to help generate passive sales.
Appointment Booking
You can set up an automation for the bot to schedule an appointment based on customer responses such as their preferred date and time, streamlining the appointment-making process.
Feedback Collection
After a sale or appointment, you can set your chatbot to gain feedback about your products or services. This helps you learn more about the overall customer experience which you can use to improve your operations.
Part 4: Successful Examples of WhatsApp Chatbots
We also find some successful WhatsApp chatbot examples:
Plum
Plum is an insurance provider, and with their chatbot, they were able to automate claims processing and provide their customers with detailed information on how to start the process, thus increasing transparency and trust in the insurance process.
Amazon
Amazon uses WhatsApp chatbot to assist customers in searching products, tracking orders, and customer support after purchase.
The WhatsApp chatbot can even recommend products for users based on their browsing history, and help with refund process.
Part 5: Final Words
And that's how to create a WhatsApp bot from scratch using a no-code chatbot builder like Manychat and Chatbase. It's not as complicated as 'coding' a new bot, but it can be confusing for first-time chatbot builders so it's a trial-and-error process.
Another thing to note is while all the three services we've mentioned: Manychat, Chatbase, and Make have free tiers, you'll need a paid subscription to access APIs to start integrating everything as well as use other exclusive chatbot features.
Make sure your business is ready to handle the additional costs of all these services before diving into the wondrous world of chatbots. If you're on the fence though, the real-world examples and success stories speak for themselves.
If implemented correctly, a chatbot can be a powerful ally to streamline your business's daily operations.





Leave a Reply.