How to Send Contact Card in iMessage (iPhone & Mac)
iMessage is deeply integrated with Apple's ecosystem, making it easy to access and share contact cards directly on iOS and macOS devices. This post shares the detailed steps to send the contact card in iMessage on both iPhone and Mac.
1. Send Contact Card in iMessage on iPhone
First up, we’ll show you how to share your contact card in iMessage using an iPhone. There are two methods to do this, using the built-in Contacts App or using the AutoFill feature in a chat.
The good news is you can use both methods regardless of the iOS version or the iPhone model you’re using since there are no strict requirements for either. Depending on your preference/need, use one of the methods below to share your contact card.
Send the Contact Card in iMessage via vCard Format
The first method to share your contact card on iMessage with your iPhone is by using the Contacts app, which allows you to send the contact card via the vCard format. In that case, the receiver will receive the contact card as a ‘card layout’ and directly save it to the contact list with just one tap.
Follow the steps below to share your contact card in iMessage on iPhone:
- Step 1.Open the Contacts App on your iPhone.
- Step 2.Scroll to the very top and tap on ‘My Card’ to find your contact details. Or choose the contact you want to share from the list.
- Step 3.Once done editing, scroll down and tap on ‘Share Contact’, select the fields/info you’d like to share, then tap 'Done'.
- Step 4.On the Share page, select ‘Messages’.
- Step 5.In the text field, enter the name or number of the person you’d like to share your contact details to. Then tap the Send button.
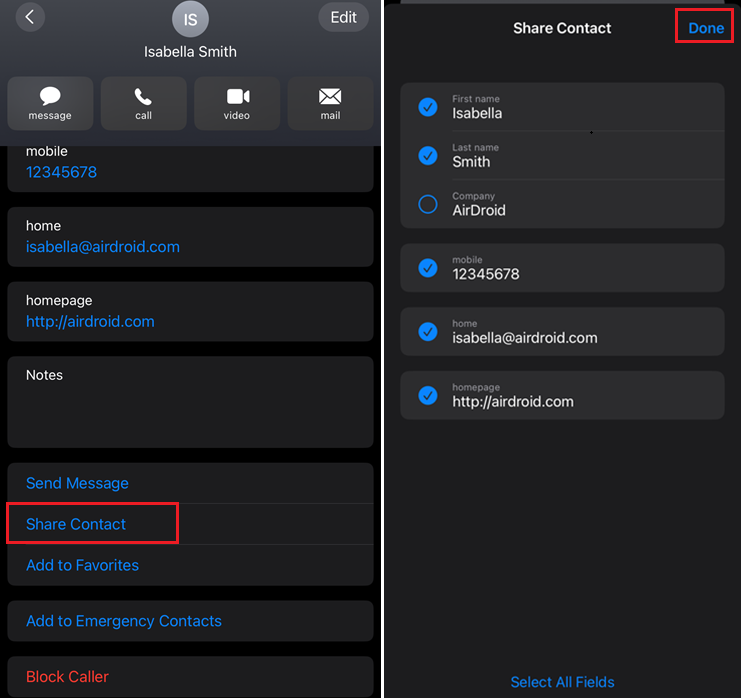
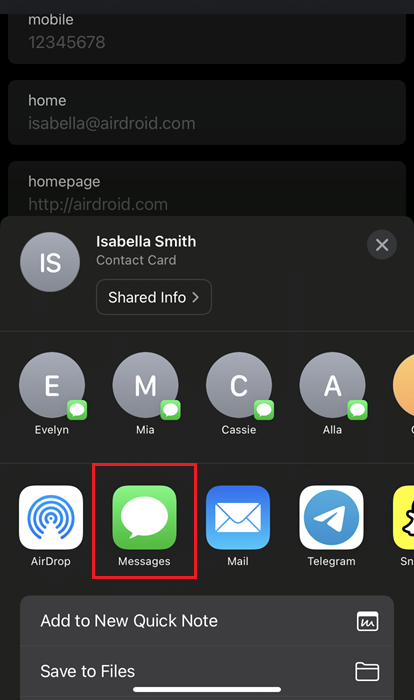
Thus, you can share contact cards in iMessage on iPhone easily, and the receiver will open the contact card as a vCard and he can directly save it with just one tap.
Send the Contact Card in iMessage via Text Format
Instead of going through your Contacts app and sending your contact card manually, you can also quickly send any contact info in an iMessage chat or text message using the ‘AutoFill’ feature.
Follow the steps below to use the AutoFill feature to send your contact card:
- Step 1.On your iPhone, open the Messages app. Open an existing iMessage chat or start a new one with the person you’d like to send your contact card to.
- Step 2.Double-tap on the text field to open a pop-up menu with additional options. Select AutoFill > Contact.
- Step 3.Once you’ve found your contact card, select it.
- Note: Using ‘AutoFill’, you won’t see the ‘My Card’ option at the top of the screen. Instead, search for your contact card according to how you’ve saved your contact info with your full name.
- Step 4.Now select which information you’d like to share (email address, phone number, name, etc.), and it will automatically paste the details on the Message app.
- Step 5.Repeat the steps to autofill and select the contact details until you finish.
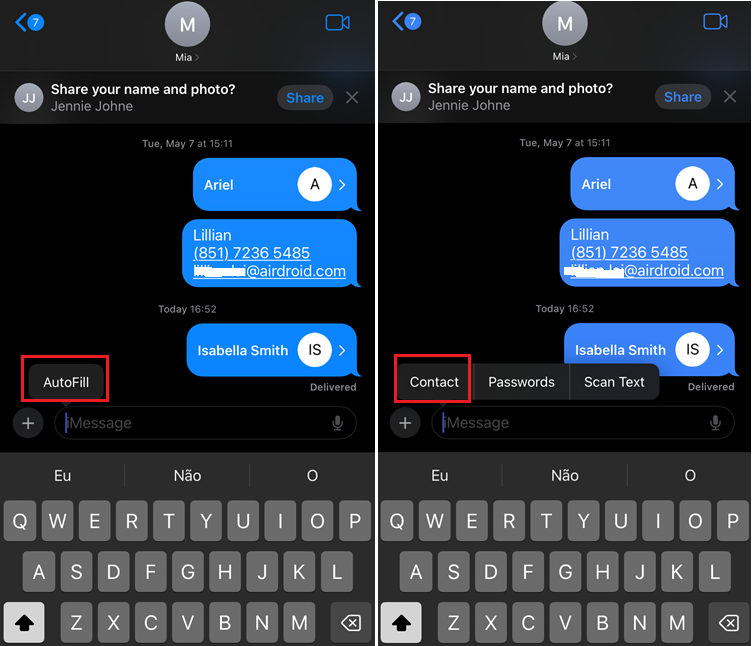
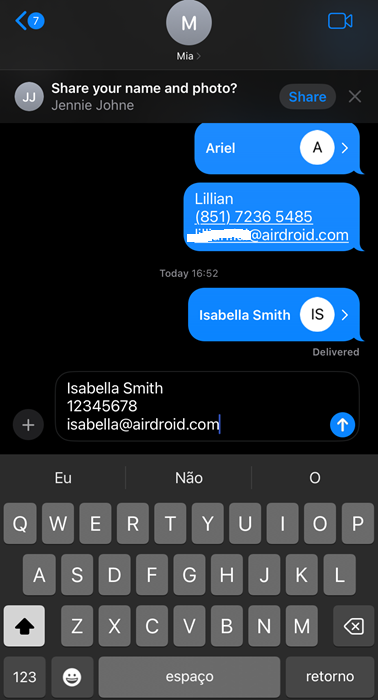
But here’s where you’ll see the most obvious downside of this method.
Selecting one of the contact card details will only copy and paste that specific field you selected into the chat. It doesn’t send the contact card in its entirety as a vCard like the above method.
This means if you have multiple fields you’d like to share, you have to repeat the AutoFill process to fill up the message before sending it. The receiver will also have to manually select and input the information to your contact card on their device.
2. Send Contact Card in iMessage on Mac
If you’re trying to send your contact card in iMessage via your MacBook laptop or iMac desktop, you can do so easily.
Follow the steps below to share your contact card in iMessage on your Mac computer:
- Step 1.Open the Contacts app on your Mac.
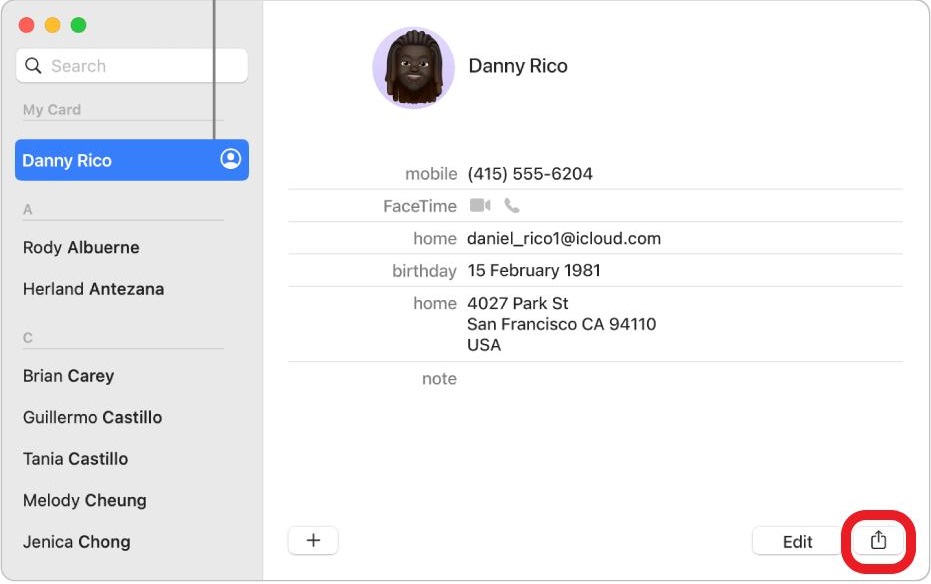
- Step 2.You’ll notice a My Card section at the very top of the list. Click on your name to edit or share the card.
- Step 3.If required, add any additional information you’d like to share.
- Step 4.When you’re ready to share, click on the ‘Share’ icon in the bottom right-hand corner of the window.
- Step 5.Select the ‘Messages’ app or select a contact directly in the Share menu.
3. Tips: Streamline Contact Management with AI Business Card
For professionals who need something with a little more pizzazz, sharing your contact information can be more than just sending a message on your phone. ChatInsight’s AI business cards, the perfect way to leverage the power of AI to improve your networking skills and streamline your contact management needs!
Key Features
- AI business cards can handle and respond to all new connections immediately any time, anywhere, in any language.
- It can streamline the network process and offer advanced analytics data for marketing strategy.
- It can be shared via URL, QR code, iframe, and widget.
If you are interested in creating and sharing your AI business card, follow these steps:
- Step 1.Sign in your ChatInsight account, and choose New Bot > AI Business Card.
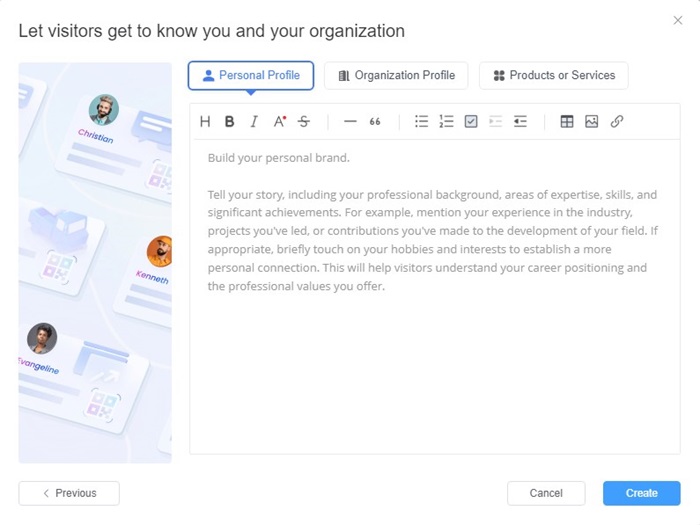
- Step 2.Enter the basic information - profile photo, profile name, company name, etc., and then provide the contact information about yourself, info about your company, product, or service.
- Step 3.Follow the on-screen instructions to finish the wizard, then your AI business card bot is created.
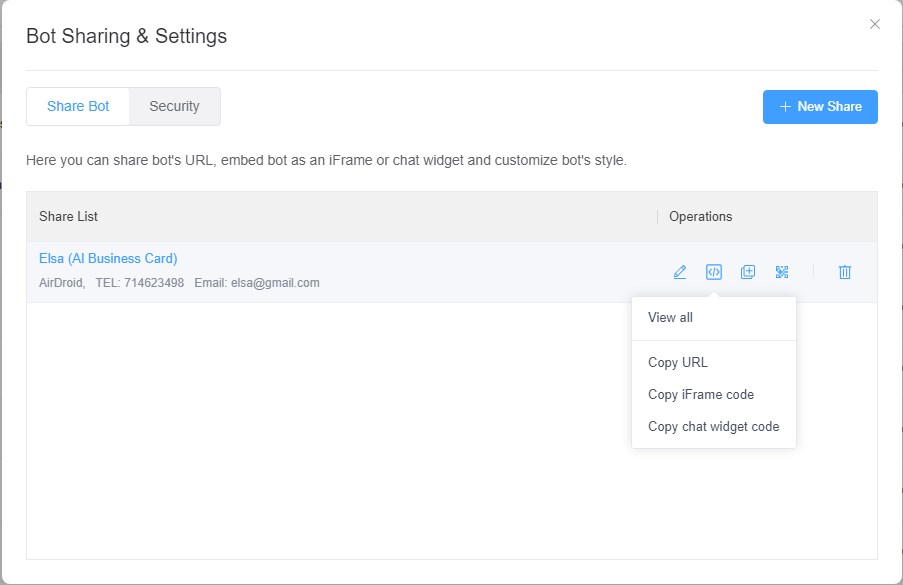
- Step 4.To share the AI business card, click Bots, then click the share button for your card.
- Step 5.Choose the layout design for your card, and then you can select the sharing method you prefer: URL, QR code, iframe, or widget code.
4. Final Words
Sharing your contact card in iMessage on your iPhone or Mac is simpler than ever and you can do it in a myriad of ways! You also have options like vCard or text message for online sharing, or if you’re looking for something to bolster your networking skills, ChatInsight’s AI business cards are the perfect solution!


Leave a Reply.