How to Set Auto Reply in Facebook Page Messenger (2024)
Facebook gives you multiple ways to connect with your customers - whether it’s through posts, comments, reviews, or videos. But in the end, everything ends up in your inbox for support.
To manage this influx and engage with your customers effectively, setting up Messenger auto-responses is the solution you need. This way, all your queries will be responded to automatically right away.
In this guide, we will share with you two effective methods to set up auto reply in Facebook Page Messenger. Plus, we’ve got some tips to make sure you’re doing it correctly.
- Part 1. Why Set Up Auto-replies on Facebook Messenger?
- Part 2. How to Set Up Auto Reply in Facebook Page Messenger?
- Part 3. How to Change Automated Message on Facebook Page?
- Part 4. Tips for Set Up Auto-replies on Facebook Messenger
- Part 5. Conclusion and Hot FAQs about Set Up Auto-replies on Facebook Messenger
Part 1. Why Set Up Auto-replies on Facebook Messenger
The main reason for setting up Messenger auto-replies is to provide instant support to customers even outside of business hours.
It's important to respond to customers quickly. If you don't, it can seem like you're not respecting their time. That's why 53% of customers are more likely to go with the business that gets back to them first.
With Facebook auto-reply, you don't need to manually respond to every single query or keep your customers waiting if the team is unavailable. Auto-replies on Facebook Messenger keep communication flowing by providing timely responses.
For example, you can set your quick reply to say, "Thanks for sending us a message! We appreciate your question and will get back to you soon." This way, users know that their question has been received and will be handled quickly without waiting around for a response.
Part 2. How to Set Up Auto Reply in Facebook Page Messenger?
When setting up your Facebook Messenger auto reply, you have two options: use Facebook's built-in tool or choose a third-party platform like ChatInsight for custom AI chatbota.
The main difference is how much you can automate and customize the responses. It really comes down to the type of replies you want to send and how much control you need.
We have shared the instructions for both Inbox Automation and Chatinsight below.
Method 1. Meta Business Suite
Meta Business Suite provides a bunch of tools to make managing your Facebook pages easier. One such useful tool is the Inbox Automations, which lets you set up automatic responses for all incoming messages.
Setting up your auto-replies with Meta Business Suite is pretty straightforward. Here’s what you need to do:
- Step 1. Open Meta Business Suite
- Go to business.facebook.com and log in with the same account you use for your Facebook Business Page. Also make sure you have selected the correct page from the left side menu.
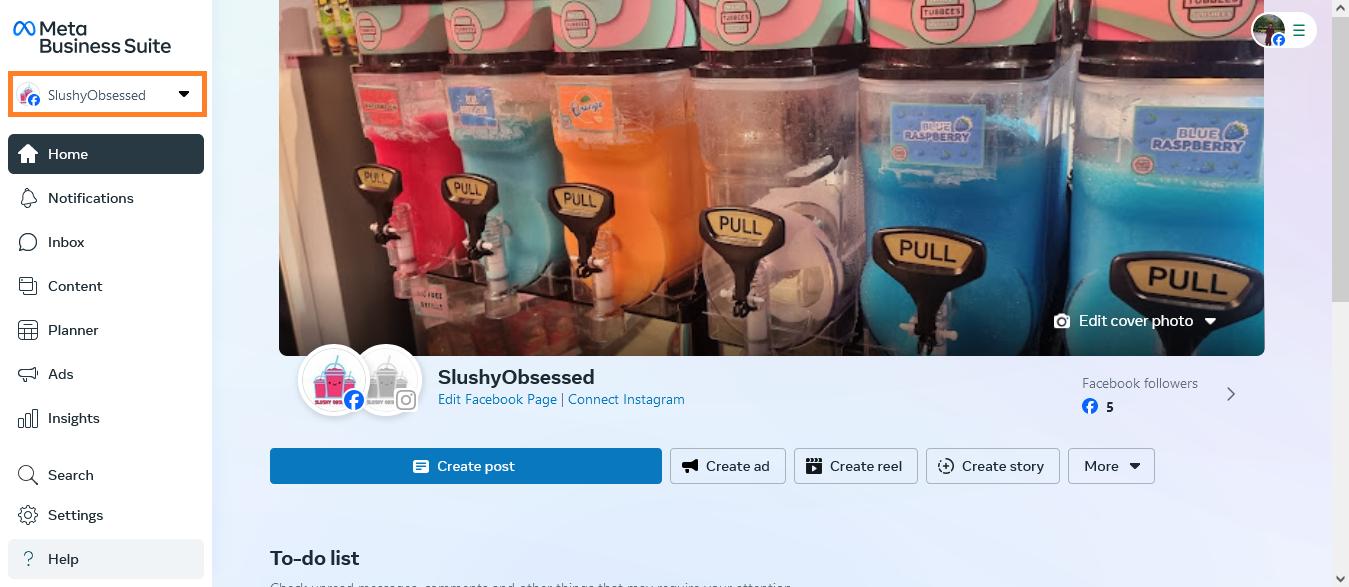
- Step 2. Go to Automation Tab
- From the left menu, click "Inbox" and then select "Automation" from the top. This will take you to a new page where you can see different options to automate your inbox, like Instant Reply and Away Message.
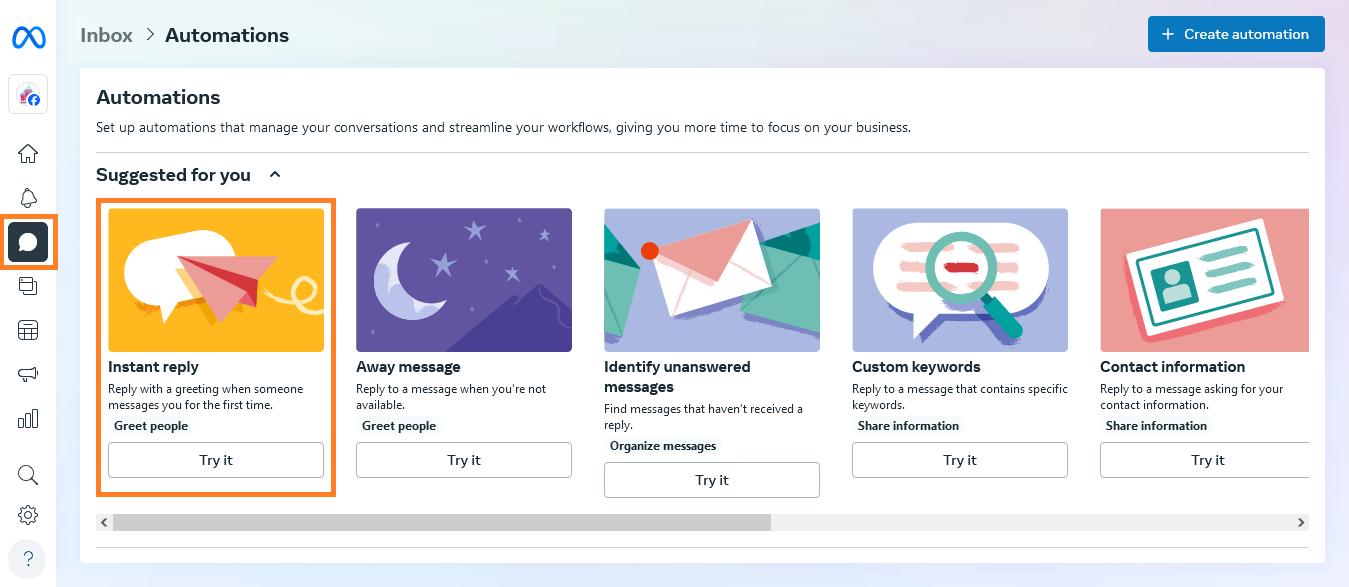
- Step 3. Set Up "Instant Reply"
- Select the “Instant Reply” option and enable it from the top. Tick mark "Messenger" as your preferred auto-response channel and type your message in the "Message" box.
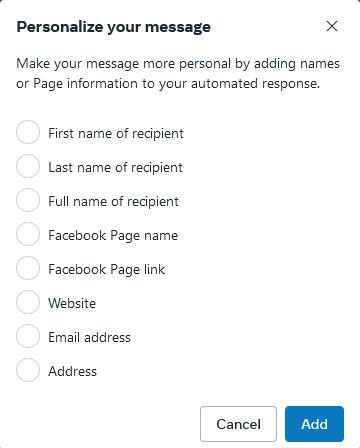
- You can also add emojis or personalize the message with the user's first name, last name, or full name. After making all the changes, click "Save Changes" to apply your quick response.
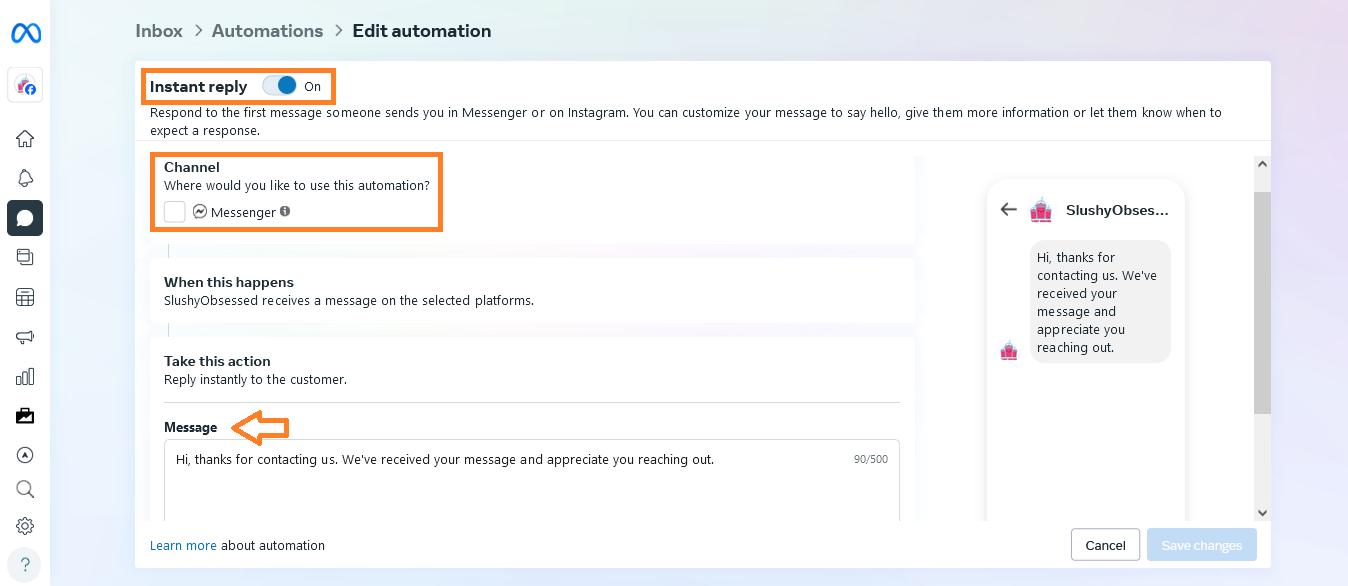
Method 2. ChatInsight
The Instant Reply option sends a single, predefined message to all incoming queries. Although it can be combined with "Custom Keywords" to create specific responses, it remains limited to the messages you have configured.
ChatInsight is a platform for creating custom AI chatbots powered by ChatGPT. It allows you to create a personalized, smart auto-reply system that works 24/7 for your Facebook Page Messenger.
The bot learns from its interactions with users and can be trained on your unique knowledge base. Moreover, ChatInsight offers intent recognition, making customer interactions feel more human-like.
Here's how to set auto-reply in Facebook Page Messenger using ChatInsight:
- Step 1. Create the First Bot
- Visit chatinsight.ai and sign up for a free account. On the main dashboard, you will find many options in the left menu. To create your first bot, go to the "Bots" tab and click on "New Bot."
- You can create two types of bot with ChatInsight:
- AI Business Card:AI-enhanced for better business communication.
- General Bot:Answers queries and resolves issues.
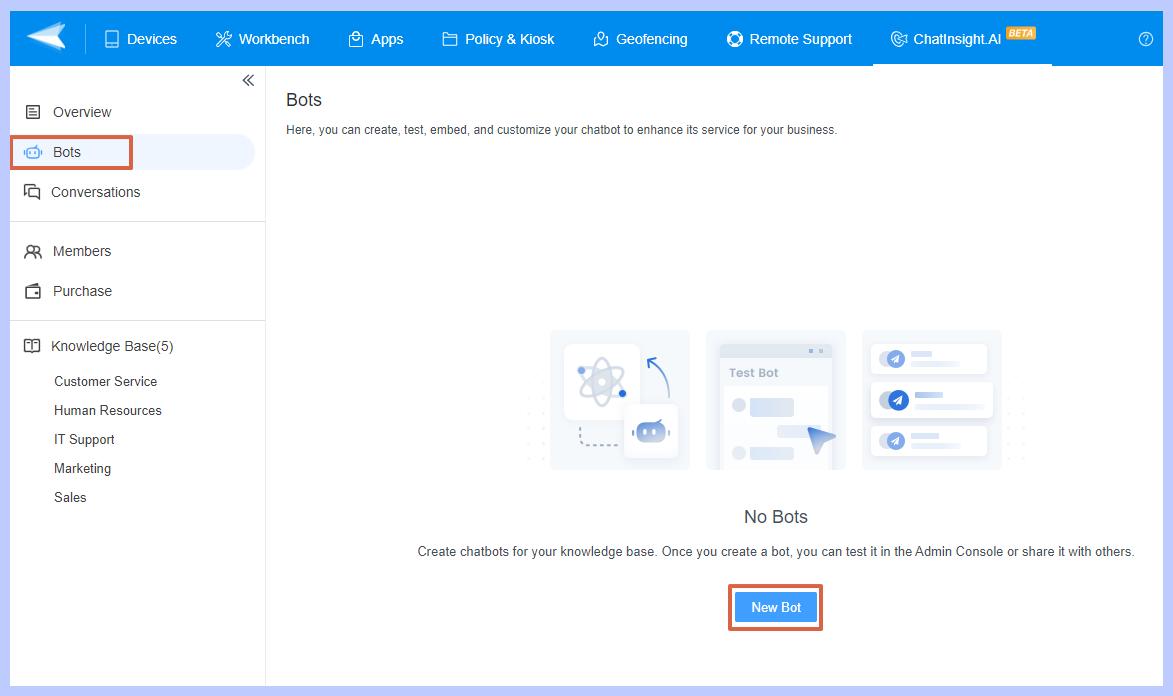
- Step 2. Set up Your Bot
- Pick the type of bot you want to create, then give it a name and a short description.
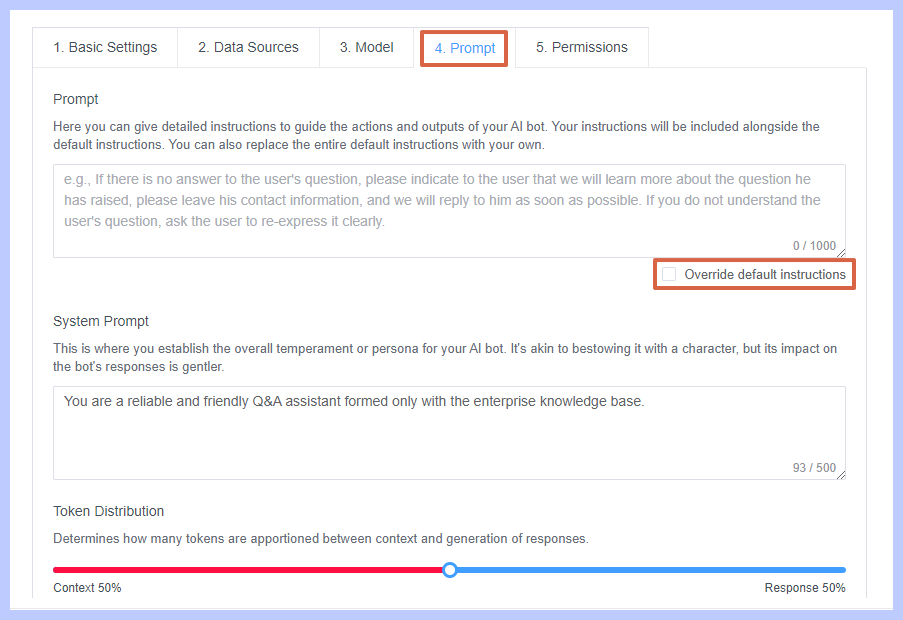
- After that, you'll have four sections to set up your bot:
- Basic Settings: Update avatar, write first message, and provide a few actions or queries for the user to choose from.
- Data Sources: Choose a data source for your bot to learn from. Click on "Knowledge Base" in the left menu to create a new category. You can paste content, upload a txt document, or import from a website.
- Model: In the Model section, you can choose between using the GPT-3.5 or GPT-4 versions. Additionally, you can adjust how strictly the bot should follow the knowledge base and relevance of references.
- Prompt: If you have specific instructions for your bot to follow when interacting with customers, enter them in the prompts section.

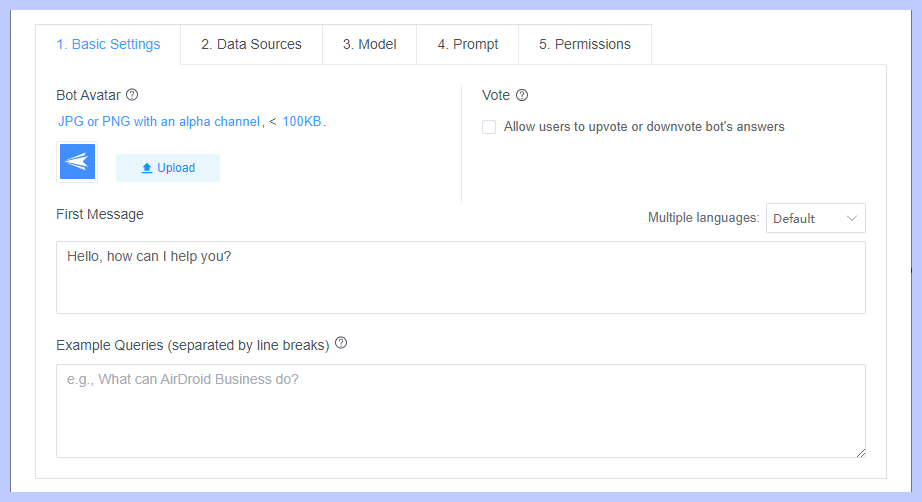
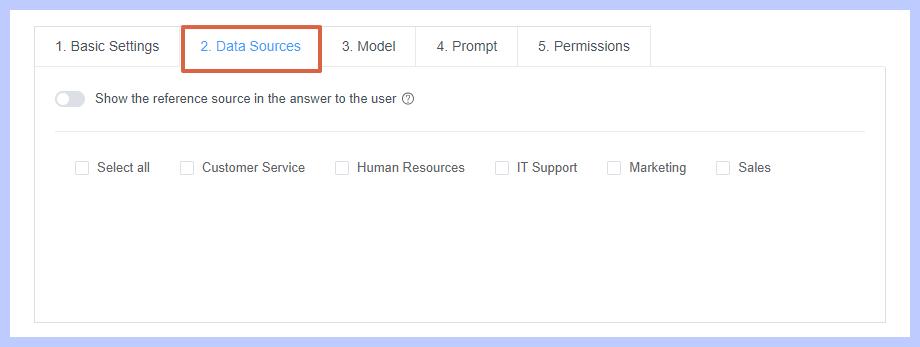
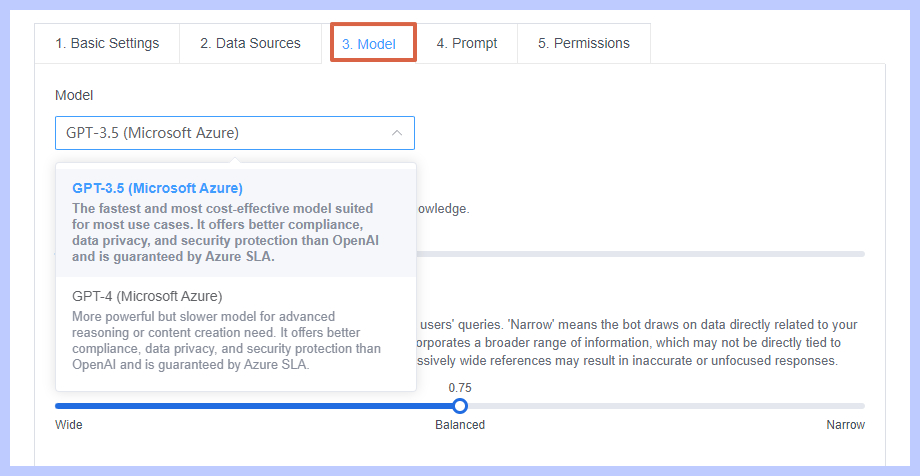
- Step 3. Connect the Bot with Messenger
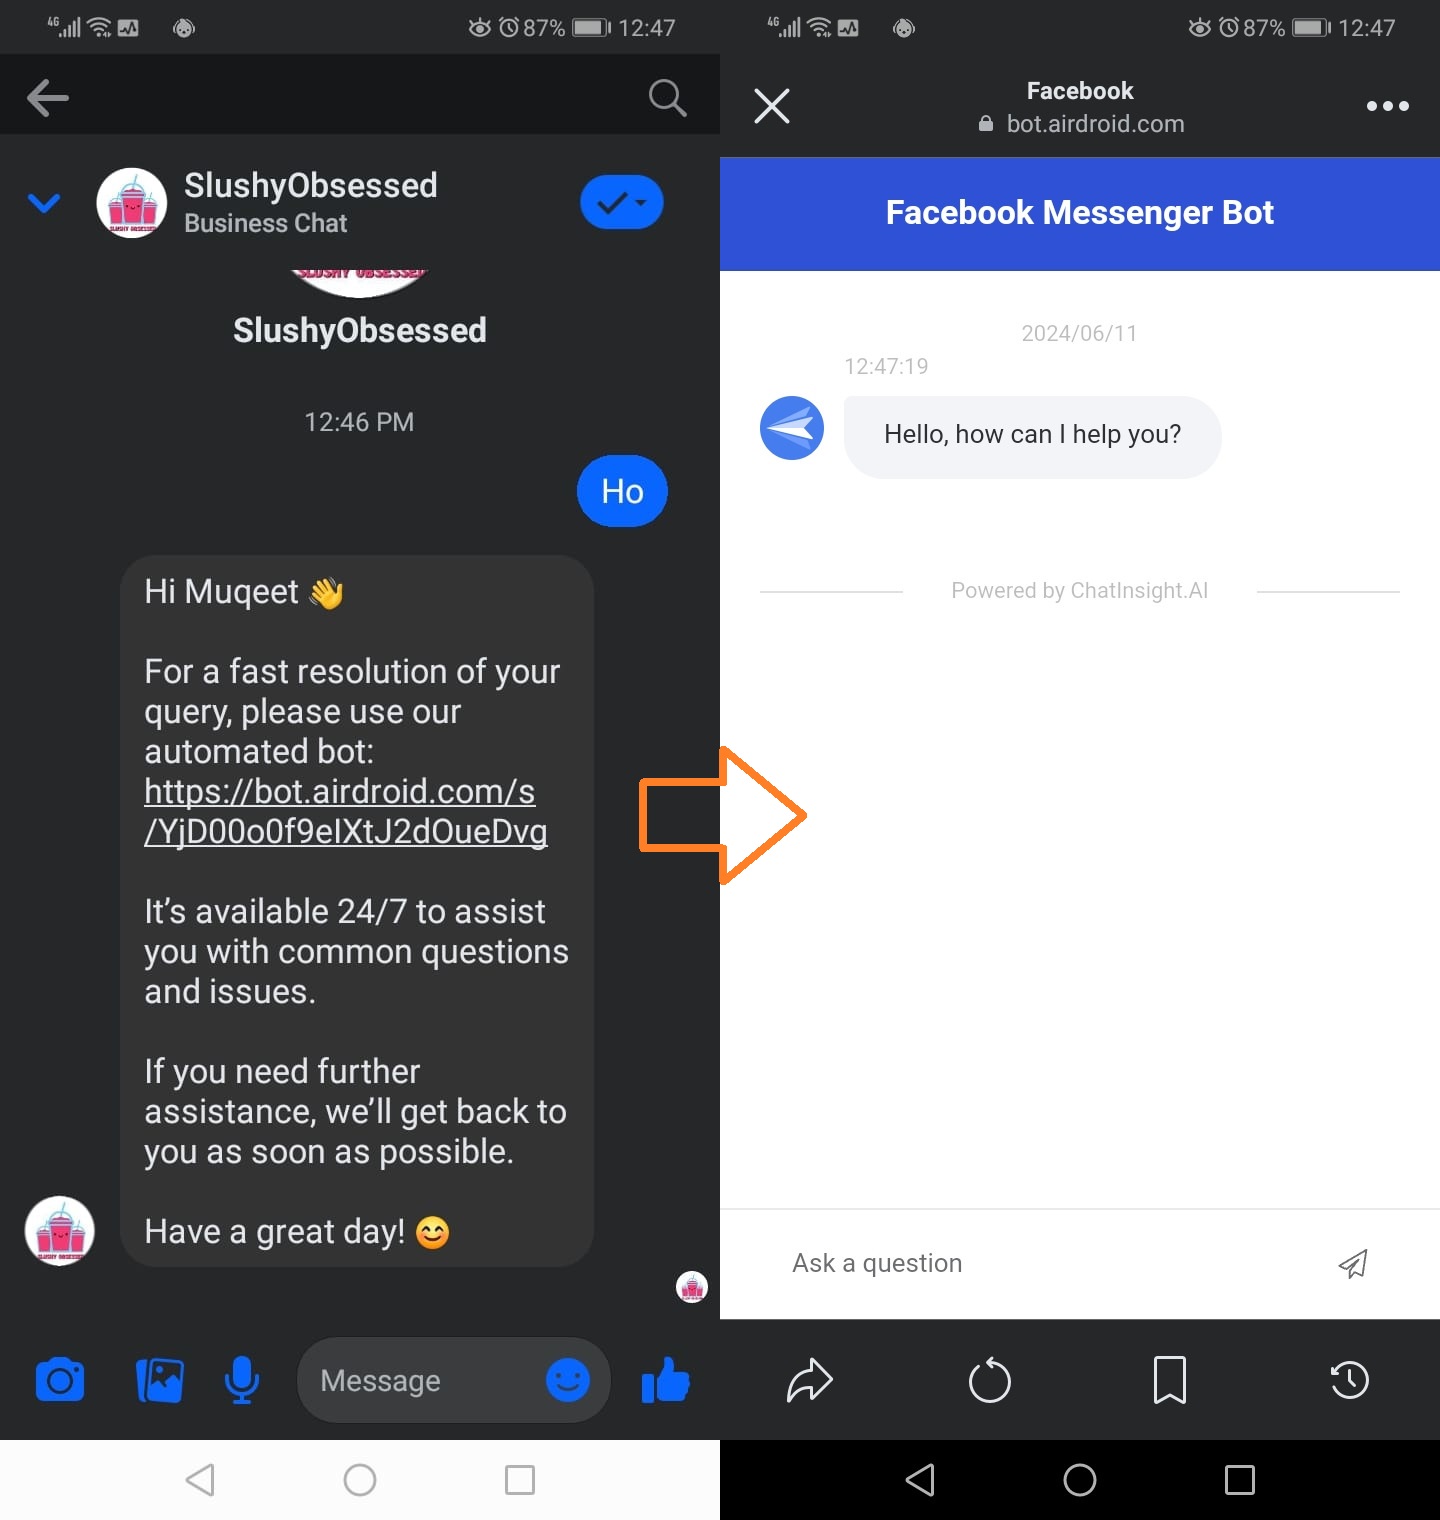
- Currently, the only way to integrate ChatInsight with Facebook Messenger is to share a link with users. Direct integration with Messenger will be available soon.
- Follow the steps in Part 3 to change the default automated message in Meta Business Suite with your ChatInsight bot link.
Part 3. How to Change Automated Message on Facebook Page?
When you turn on Instant Reply or Away Message on your Facebook Page, a standard message is automatically set by default. However, you can customize or change automated message at any time to keep your responses relevant and up-to-date.
- Step 1. In the "Automation" tab, scroll down to the bottom. Under "Your automations," you'll find all the active automated messages.
- Step 2. Find the automated message you want to change or modify and click "Edit" next to it.
- Step 3. Update the message to include the link to your bot. When a user clicks the link, the bot will start a conversation.


Part 4. Tips for Set Up Auto-replies on Facebook Messenger
Facebook has simplified customer interactions for businesses with tools like Auto Reply. Your team doesn't need to be online all the time to manually respond to customer queries.
You can also follow these additional tips to maintain effective communication with your Messenger auto-reply:
- Use Personalization: Include the user's name or other page information to your automated message to make it feel more personal and human.
- Keep it Simple: Make sure your message is clear and easy to understand. You have a 500 character limit on Meta Business Suite so use the words wisely.
- Mention When You'll Respond: If your team can't respond right away, let customers know when they can expect a response to reduce frustration.
- Include Helpful Resources: Share links to resources like a FAQs page, alternative contact info, or a knowledge base to help customers find answers on their own.
Conclusion
With Facebook pages now showing response rate and response time metrics, you can't ignore the importance of leveraging auto replies.
While automated replies don't directly improve your page response rate, they do help you respond quickly and let customers know when to expect a response.
We recommend using Chatinsight because it's powered by advanced ChatGPT, and its human-like interactions really help engage customers.
Hot FAQ about Set Up Auto-replies on Facebook Messenger


Leave a Reply.