Enabling an app to auto-start at boot reduces manual operations, ensuring uninterrupted workflows and increased productivity. This ability offers numerous benefits for different types of Android users.
Personal User
- Users would like to setup frequently used apps, like work communication software, to be immediately accessible upon device startup.
- Android interface customization app, when set to auto-start at boot, allowing users to see their customized device interface as soon as they power on.
Business
- The self-service kiosk requires regular restarts, and it is desirable for business applications to automatically launch afterward.
- The direct opening of slides on the screen when the device boots in a meeting room gives an impressive impact, unlike moving to multiple folders and opening the concerned application.
Let’s discuss the basic concept of auto-start and boot with various ways to configure it on your Android devices.
Part 1. How to Set Up Android Auto Launch App?
Setting up Android auto-launch is based on a basic principle :
- A signal called ‘BOOT_COMPLETED’ is sent to the app when a device is ready after boot.
- All the auto-launch Android apps on the Google Play Store contain a tool called ‘Broadcast Receiver’ within the app.
- This tool identifies the ‘BOOT_COMPLETED’ signal and works as an alarm to warm up the app instantly after the device restarts.
1.1[Answered] Any Built-in Methods for Auto-Starting Apps At Boot?
Most people have the misconception that auto-launch app at boot is the same as auto-start app in the background because they seem similar verbally. But conceptually, both have a great difference.
Auto-launch app at boot
- Definition: An application is configured to start automatically when the Android device boots up.
- An third-party tool is required for setting.
Auto-start app in the background
- Definition: An application continuously runs in the background to perform specific tasks even when it is closed.
- It can be set up in Android settings under the target app's info by selecting "Battery usage" and enabling "Allow auto-launch." Contrarily, Android OEMs do not offer built-in settings for auto-starting apps at boot, so third-party apps are required which we have discussed later.
1.2Configure Auto-start App At Boot
Method 1. MacroDroid
MacroDroid is a free Android application that is easy to download and use to configure the auto-launching of the app when a device reboots. Here are the steps you can perform on MacroDroid:
- Step 1:Download MacroDroid
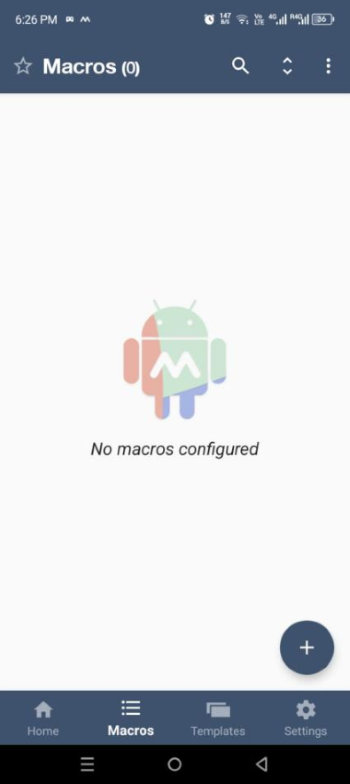
- Open the Google Play Store and download the MacroDroid app, which is free. After downloading, launch it on your Android phone. Choose the ‘Macros’ tab from the bottom and tap the ‘+’ icon to create a new Macro.
- Step 2:Set Triggers
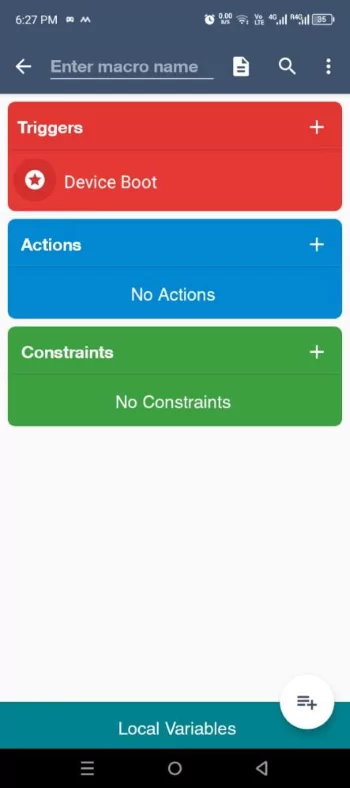
- Click on the ‘+’ icon after the Triggers option and type ‘Boot’ in the search bar at the top of the interface. Select ‘Device Boot’ option from the search results.
- Step 3:Manage Actions tab
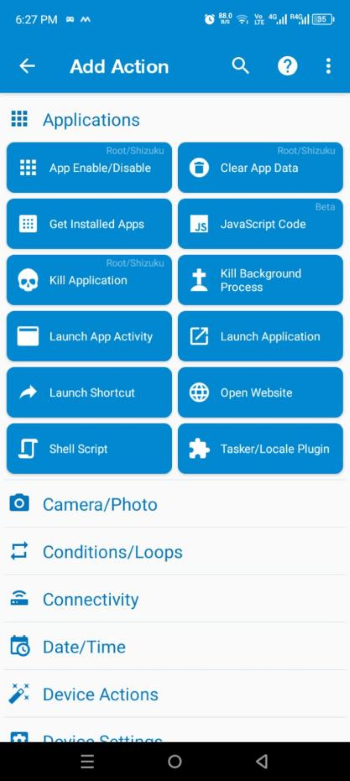
- Choose the action you want to perform on device boot up. Click the ‘+’ tab available after the Actions. Select ‘Applications’ tab so view app categories.
- Step 4:Select ‘Launch Application’ tab
- Choose ‘launch Application’ from the menu. A pop-up will appear when you tap on the Launch Application. Press ‘OK.’
- Step 5:Enable ‘MacroDroid’ tab
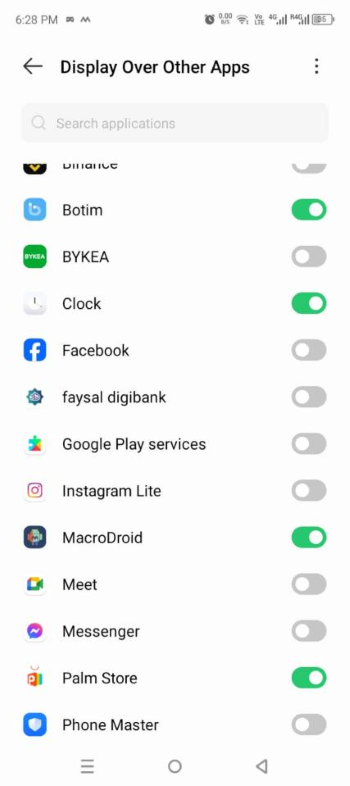
- A list of apps will appear. Scroll down to find ‘MacroDroid’ and toggle the slider to the right to enable it.
- Step 6:Choose Launch Application Option again
- Now, again choose the ‘Launch Application’ option and press ‘OK’ without changing the default option.
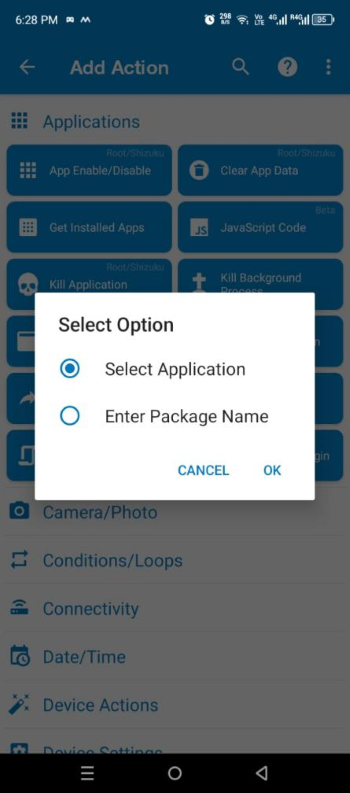
- Step 7:Select the App
- Now select an app from the installed apps list. For example, we choose Google Chrome to auto-launch when the device is booted up.
- Step 8:Name the Created Macro for Identification
- Name the Macro as you want from the top. For example, we choose ‘Bootup.’
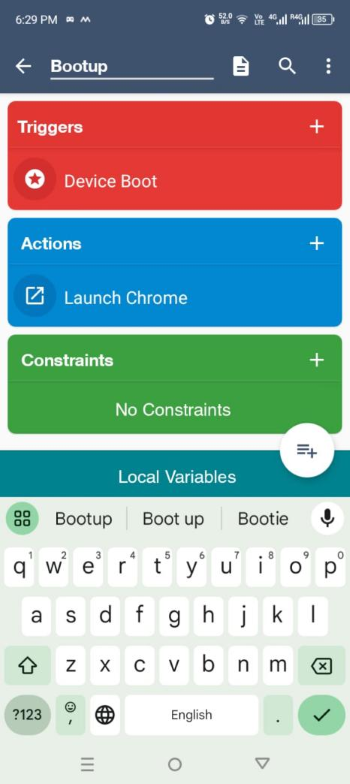
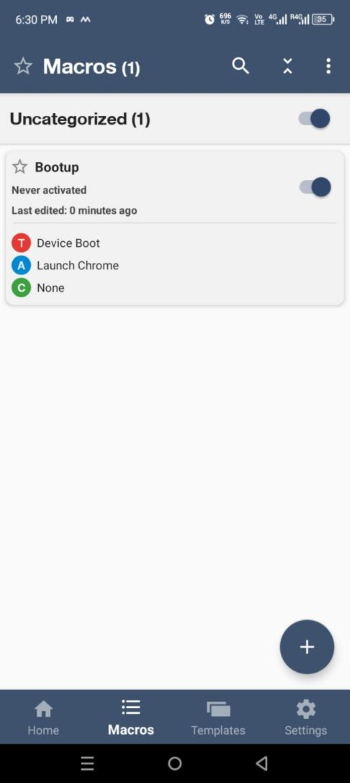
Now, you can see that your newly created Macro is enabled. You can disable it by moving the slider to the left. Once disabled, Google Chrome will not automatically launch when a device is boot up.
Pros
- It is intuitive and simple to use.
Cons
- It offers limited customization options for creating only 5 Macros for free.
Method 2. Tasker
Tasker is one of the most powerful apps on the Google Play Store, which allows comprehensive control for the automation of tasks on Android devices. General steps include adding ‘Tasks’ that you want to trigger automatically. The ‘Profile’ section includes conditions that need to be fulfilled to automatically trigger specific tasks mentioned in the ‘Task’ tab after the ‘Profile.’
Here are the steps to configure an auto-launch of the app on Android when a device boots:
- Step 1:Download Tasker app
- Open the Google Play Store and download the Tasker app after paying the amount asked.
- Step 2:Create a Profile
- Open the ‘Profiles’ section and press the ‘+’ icon. Then choose the ‘Event’ tab from the menu. Choose ‘System’ and them ‘Boot’ option to perform some action when a device boots.
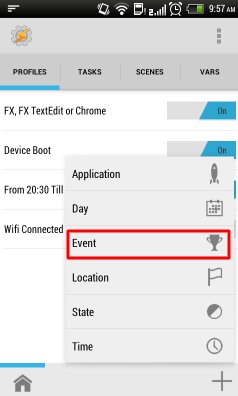
- Step 3:Manage Task Section
- After managing the profile, choose action to perform when a device reboots. For that, choose action category as ‘App’.
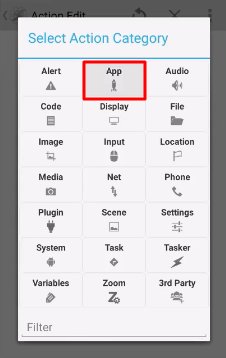
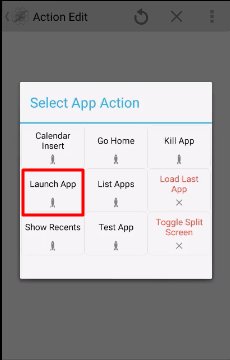
- Step 4:Select App Action
- As we want to launch an app, so choose ‘Launch App’ as app action.
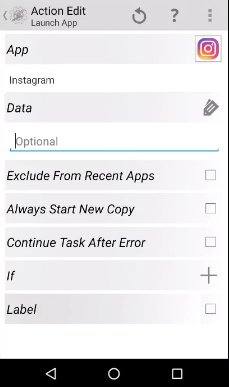
- Step 5:Choose the App from Device
- All the apps in your Android will appear. Choose the app you want to auto-launch. For example, we choose Instagram. Manage optional settings if you want and then proceed.
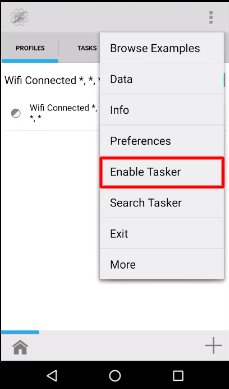
- Step 6:Enable Tasker
- Make sure to enable the Tasker to apply changes; otherwise, it won’t trigger them.
Click on the 3 dots at the top-right corner and choose the ‘Enable Tasker’ option. Once you are notified of ‘Applied,’ restart the phone and confirm Instagram auto-launches on the screen when powered on.
Pros
- It offers advanced customization options and settings for automation.
Cons
- It is not available for free and is a complex application.
Method 3. AutoStart App Manager
AutoStart App Manager is one of the simplest applications on Google Play Store to manage auto-launch of apps on device boot. Here are the steps:
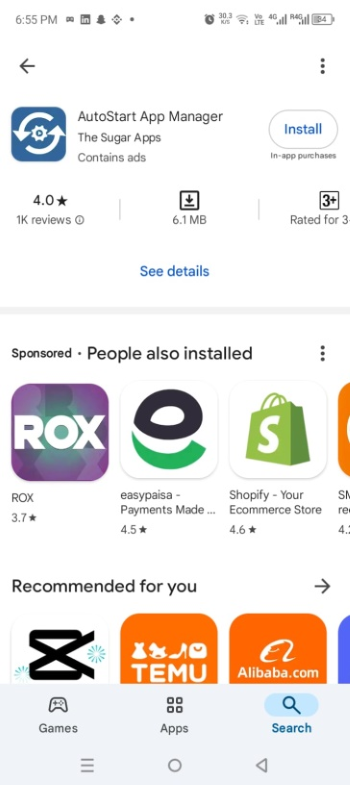
- Step 1:Download the App
- Open Google Play Store and type AutoStart App Manager in the search bar. Tap on ‘Install’ button to launch it.
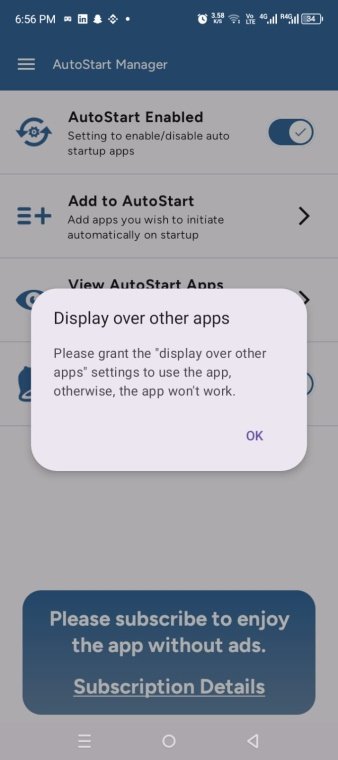
- Step 2:Enable the App
- When opened, a pop-up will appear on the screen. Tap ‘OK’ and then turn on the slider after ‘AutoStart App Manager.’
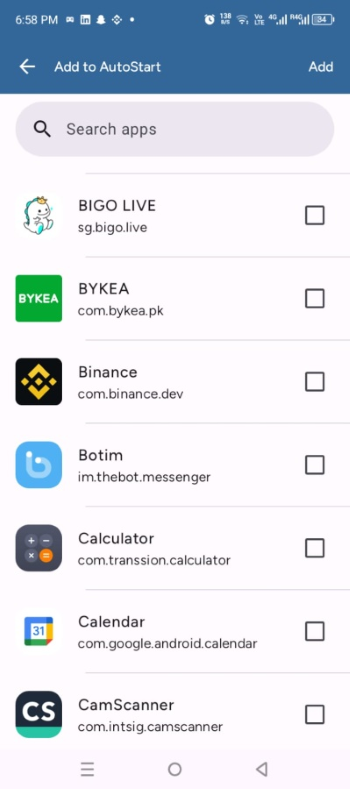
- Step 3:Add the App
- Tap the ‘Add to AutoStart’ option from the main menu and choose the app you want to auto-launch on boot-up. Choose multiple apps you want and press the ‘Add’ button displayed in the extreme top-right corner.
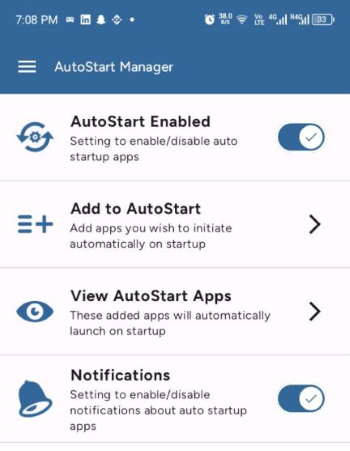
- Step 4:Disable the auto-launch
- Toggle the slider after ‘Auto-Start Enabled’ option to the left to disable it and vice versa.
Pros
- It is free to download and allows auto-launching of multiple apps also.
Cons
- It is ad-supported, and too many ads may frustrate users.
Part 2. Factors Affecting App to Auto Start
Some important factors for successfully auto-launching apps on Android include app permissions, battery optimization settings, and background process limits. It is crucial to understand and carefully manage settings for essential factors to ensure seamless auto-launch of apps.
- App Permissions
Specific app permissions are required to auto-launch the apps on boot up to receive system broadcasts like BOOT_COMPLETED and inform when the device is ready to open the configured app automatically after boot. Otherwise, the app won’t run after the device is booted up. Ensure you grant all the necessary permissions for uninterrupted and automatic configuring your desired app. - Battery Optimization
Android devices come with a battery optimization feature, which helps to extend the battery life by restricting or closing various background activities. This interferes with the app installed to configure auto-start on boot, disrupting the process. So, choose the ‘Don’t Optimize’ option from the Battery optimization section in your device Settings. - Background Process Limit
Android offers a developer mode that allows its users to set background-process limitations to ensure high security, optimize battery life, and improve efficiency.
However, these settings can prevent apps from auto-launching automatically upon boot-up. To maintain auto-start functionality, check the background process limits by navigating into your device's developer options.
Part 3. How to Enable An App to Auto Start on Android Fleet?
In the current business landscape, it is essential to ensure that the apps launch automatically after the device boost. It is due to several reasons such as:
- Productivity: The employees of the company can access all the needed and beneficial tools instantly, which minimizes downtime and maximizes efficiency overall.
- Immediate and seamless customer interactions: In the application of POS or inventory management, when the tools launch immediately, they get ready to use for transactions as well as inquiries.
- Data Collection: Apps that need to collect important information such as track progress, and auto-start after the device boots are helpful in the data integrity as well as the timely insights.
Below is the step-by-step guide on how to enable the auto-start application on Android using AirDroid Business.
- Step 1.LockDown Devices into Desired App:
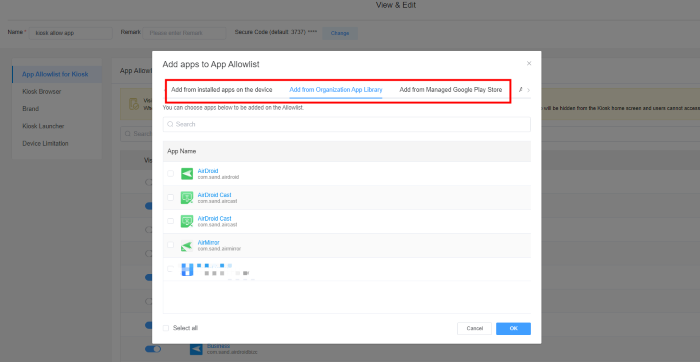
- IT admins can set up an App Allowlist that defines which apps can be accessed on corporate-owned Android devices:
- Create a Kiosk Config File on AirDroid Business admin console and select "App Allowlist for Kiosk".
- Choose a desired app from the list.

- Step 2.Set Up Single App Mode
- Now click "Kiosk Launcher" - "Single App Mode".
- This option allows you to restrict your devices to only running one app that you have configured.

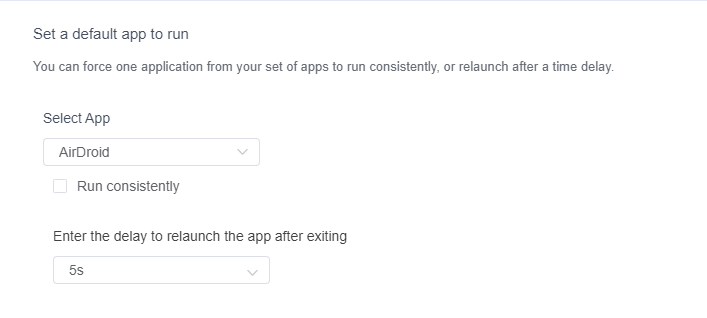
- Step 3.Enable the App to Run Consistently
- Here, you have to trick the “Run consistently” option. The managed devices are now locked into this app's interface, preventing any exit, and will automatically start upon device restart.
It is a way to ensure that the continuous operation runs on the application you have chosen on the device. Users won’t be able to shut down or close the application even if they go to the home button, they will return to the app again. If you do not want the app to run constantly, you can even put a delay time in order to relaunch the application. Users can switch to the other apps to perform other actions but only for a specific amount of time and then again the interface of the selected app will open.
Part 4. Best Practices of Running An App Automatically At Startup
Customization:
Personal Users: It all depends on you and the apps that are important to you. Identify apps you genuinely need at startup, like alarms, calendars, or communication tools. Prioritize battery-friendly options and avoid overloading your device, this will help in not draining your battery.
Businesses: Analyze workflows and identify crucial apps for your operations. Consider kiosk mode on dedicated devices for a single-app focus. This will help businesses for better productivity and work efficiency.
Security:
Businesses: Implement strict app allowlists, which allow you to select the needed app and implement the security protocols to prevent unauthorized auto-launch and potential data breaches. Consider enterprise-grade mobile device management (MDM) solutions such as AirDroid Business.
Prioritize User Experience:
Personal Users: Ensure auto-launching apps enhance your workflow, not disrupt it. Avoid unnecessary notifications or background processes that drain the battery or distract you.
Businesses: In single-purpose devices, auto-launching the primary app creates a seamless user experience, guiding users directly to their tasks without navigating additional interfaces.
Conclusion
To ensure uninterrupted workflow in both personal and industrial settings—such as healthcare, retail, hospitality, manufacturing, and corporate environments—it's essential to configure Android applications to launch automatically at startup. This can be easily achieved using third-party tools like MacroDroid, Tasker, and AutoStart App Manager, as Android OEMs typically do not provide built-in methods. For businesses, implementing an MDM solution is recommended for a complete lockdown and automatic environment setup.
However, some factors ensure seamless app functionality after boot-up, i.e., battery optimization, app permissions, and developer mode. By applying these strategies and carefully considering potential hurdles, businesses can boost productivity and enhance user experiences.
FAQs
- Enable Background Activity / Run in Background
- Disable Battery Optimization
- Add the app to the Auto Start whitelist
- On some OEMs, place it in Protected Apps or Unrestricted battery mode to prevent forced shutdown




Leave a Reply.