Android Keep Screen on for Certain Apps [Comprehensive Guide]
Are you an e-book lover, a gaming enthusiast, or a business person who needs to keep the screen on for specific apps to avoid distractions?
If yes, this article will prove very informative as we will discuss multiple methods for Android keep screen on for certain apps.
Each method has unique usage and compatibility requirements, features, and limitations from general users to IT experts.
How to Set Android Keep Screen On for Certain Apps?
1Way 1. Native API or In-App Code Configuration
💡Implementation process
FLAG_KEEP_SCREEN_ON
Keeping the screen turned on is automatically managed with APIs on some Android devices. For devices that lack such APIs, we need to implement manual setups using FLAG_KEEP_SCREEN_ON function to set keep screen on. Here are the detailed steps to implement it:
- Step 1:Launch Android Studio
- Launch it and open a project of the app that you want to set for screen always on.
- Step 2:Activity File
- Navigate to the activity where you want to keep it on. Find it in the ‘JAVA’ or ‘Kotlin’ directory beneath the app’s package name.
- Step 3:Enter the Code
- Set the ‘FLAG_KEEP_SCREEN_ON’ feature using the code:
For Java, enter:
getWindow().addFlags(WindowManager.LayoutParams.FLAG_KEEP_SCREEN_ON)
For Kotlint, enter:
window.addFlags(WindowManager.LayoutParams.FLAG_KEEP_SCREEN_ON)
- Step 4:Testing
- Try out the app on your device to ensure that the screen keeps on until the app is running in the background.
WakeLock
WakeLock offers more granular control over the device’s power state. This method can be temporarily useful to keep the device awake as it increases the power consumption. Here are the detailed steps to configure it:
- Step 1:Launch the Studio
- Launch the Android Studio and open a project of the app that you want to set for screen always on.
- Step 2:Manage Permissions
- A WAKE_LOCK permission is necessary to set up wake lock on Android. So check out if it is allowed, otherwise add the following code in the ‘AndroidManifest.xml’ file to set the permission as allowed:
- Step 3:Add the Code
- Navigate to the activity or service that you want to keep screen on, and add the add the following code:
For JAVA:
PowerManager powerManager = (PowerManager) getSystemService(POWER_SERVICE);
WakeLock wakeLock = powerManager.newWakeLock(PowerManager.PARTIAL_WAKE_LOCK,
"MyClassName::MyWakelockTag");
wakeLock.acquire();For Kotlin, type:
val wakeLock: PowerManager.WakeLock =
(getSystemService(Context.POWER_SERVICE) as PowerManager).run {
newWakeLock(PowerManager.PARTIAL_WAKE_LOCK, "MyClassName::MyWakelockTag").apply {
acquire()
}
}In this code, the PowerManager.newWakeLock() is added to create and configure the PowerManager.WakeLock object only. It does not keep the device awake. However, the ‘acquire()’ is added to keep the device aware.
- Step 4:Turn off Wake Lock (When Not Required)
Turning off will ultimately save for battery life.
For JAVA:
if (wakeLock != null && wakeLock.isHeld()) {
wakeLock.release();
}For Kotlin:
if (wakeLock?.isHeld == true) {
wakeLock.release()
}
Advantages:
- The ‘FLAG_KEEP_SCREEN_ON’ and ‘WakeLock’ are directly implemented within the app’s code to ensure seamless integration with app’s functionalities.
- They offer a comprehensive control over the screen status that varies with the app’s requirement.
Limitations:
- These methods are only suitable for developers and other users with coding skills because changes can be made by accessing the source code.
- They significantly drain the battery letting the device to shut down earlier. FULL_WAKE_LOCK comparatively consumes more battery if not properly optimized.
- Trying these steps without technical expertise can lead to system downtime or might hinder the app’s functionalities.
2Way 2. Setup with Third-Party Application
Recommended Third-Party Tools
Third-party automation tools include Tasker, MacroDroid and KinScreen. These tools offer automation, giving users a way to take control of screen settings and automate various tasks without root access. They allow customization of screen timeouts, brightness, and create automated workflows.
Demo: Configuring a Specific App Screen Always-On Using Kinscreen:
- Keep Screen On
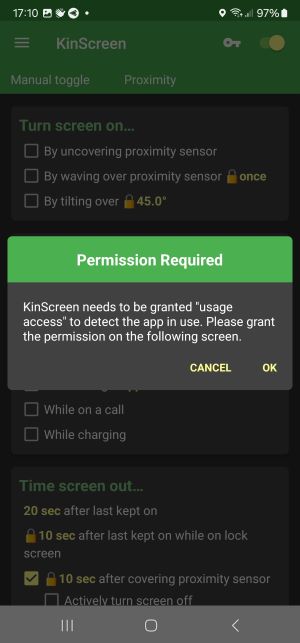
Navigate to the 'Keep Screen On' tab, where you'll find several options: keep the screen on while charging, during calls, or when using apps. Select 'While using apps.' To identify apps, Kinscreen requires permission to manage usage access.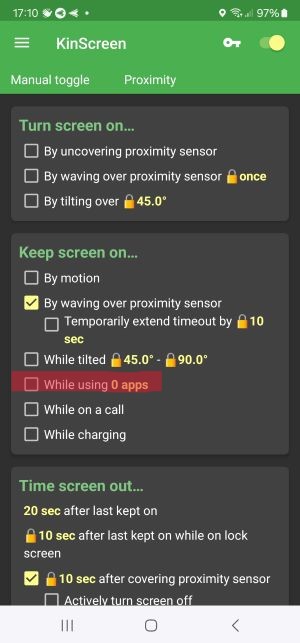

- Choose Apps
Choose your target apps from the list and click ok.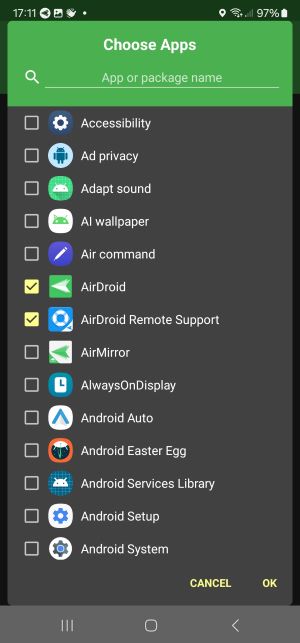
- Save and Activate
Save your settings and ensure Kinscreen is running in the background to apply these settings. You can now keep your Android screen on when using selected apps.
Advantages:
- These applications are easy to configure for even new users.
- They do not require root access to customize screen settings.
- This method is more flexible than the native settings required for app management.
Limitations:
- Latest Android versions contain additional whitelist settings and background permission restrictions. Checking the compatibility of specific device models is hence necessary.
- All these third-party apps may vary with each other in functionality and user interface.
- Some of these apps ask for paid subscription to access full features of these tools.
3Way 3. Xposed/LSPosed
💡Implementation Process
See the step-by-step instructions below to perform this method:
- Step 1:Reboot the Device
- Install Magisk to root your Android device and manage rotting permissions. The steps might vary based on your device model. So, apply the steps for rebooting accordingly.
- Step 2:Install Custom Recovery
- Find out and download a custom recovery like TWRP to flash the Xposed or LSPosed framework.
- Step 3:Install the Framework
- If you want to download Xposed framework, navigate to Xposed official repository. Otherwise navigate to GitHub repository to download LSPosed zip.
- Step 4:Flash It
- After downloading, boot into the custom recovery i.e. TWRP. Choose the ‘Install’ tab and navigate to download the ZIP file. Confirm installation and boot the device.
- Step 5:Install the Manager App
- Install the Xposed or LSPosed Manager app and other open the app to verify that the framework is properly operating.
- Step 6:Install a Module
- Download and install a module from the Manager app. Navigate to the modules tab and enable your installed module. Then reboot the device to apply changes.
- Step 7:Configure It
- Launch the module app from app drawer and enable screen-on functionality from settings in Xposed Edge. Save it and exit the app.
Advantages:
- These modules allow controlling specific aspects of individual apps without altering the source code using the Android Runtime hooking process. Screen management, app permissions, UI Customization, specific functions, and behavior modifications are the important control options available.
- The configuration of these modules can ensure customizable settings based on usage scenarios. For example enabling immersive mode for gaming apps, disabling screen timeout for DPF or e-books, and automatically enabling ‘Do Not Disturb’ mode during work hours.
- These methods are free from source code and APK files modification processes.
- These methods provide a centralized platform to manage all installed modules from a central position. The interface contains the module list, adjustable settings, and scope management.
- This method allows creating complex rules like multi-app integration and task automation for enhanced screen management.
Limitations:
- This method requires root access, which arises several security issues and void warranties by device manufacturers.
- This method only works from Android version 8.1 to 14. So, module compatibilities varies.
- Technical information is required for configuring the modules properly.
- Some of the module might lack updates.
①Users need to continuously check out GitHub and XDA forums to keep updated with latest information and updates about compatibility.
②Not all modules are compatible. Some modules are only compatible with specific Xposed / LSPosed versions.
③Confirmation of modules proper functionality is essential before relying on them.
④For latest Android versions, it is essential to verify module compatibility. This is because of the restrictions on some features applied by Google’s latest security models.
4Way 4. Brand-Specific System Settings
💡Supported Brands and Their Features:
1-Samsung Devices
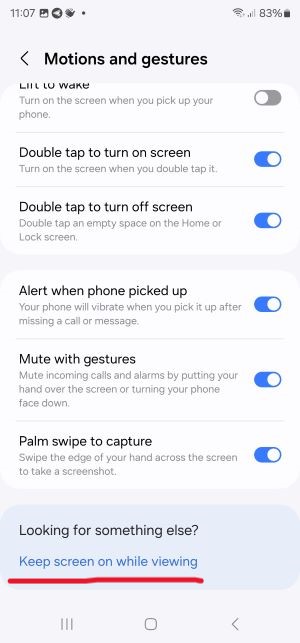
Smart Stay: This feature helps to keep the screen on by using the front cam while looking at it(Keep screen on while viewing).
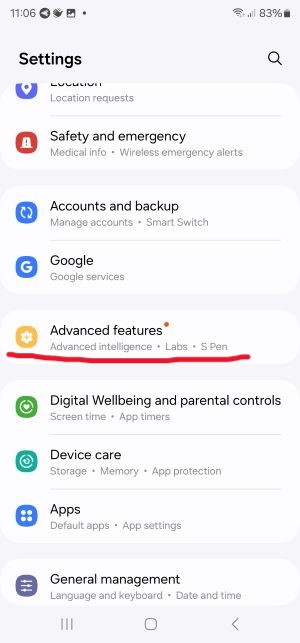
- Step 1.Unlock your Samsung device and tap the “Settings” icon.
- Step 2.Navigate to 'Advanced features' and select 'Motions and gestures'. Here, you can enable 'Keep screen on while viewing'.

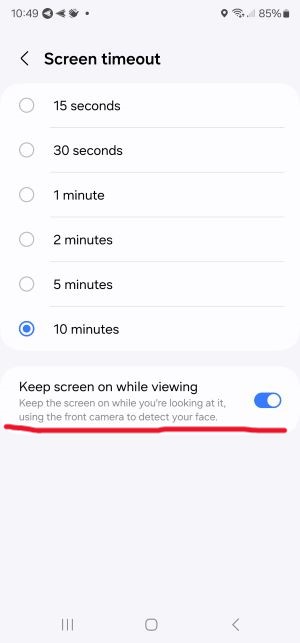
Global "Never Sleep": This feature is available on very limited device models. Navigate to the ‘Settings’ tab and tap on ‘Display’ option. Then choose ‘Screen Timeout’ option and enable ‘Never Sleep’ to disable screen timeout.
2-Xiaomi Devices (MIUI)
Global Wake Lock: This options allows keeping the screen on while the device is being charged. Open the device ‘Settings’ and navigate to ‘Additional Settings’. Tap ‘Developer Options’ and choose ‘Stay Awake’ to enable screen on.
Per-App Screen On: Some international MIUI Xiaomi devices contain this functionality. It requires technical knowledge. Check out XDA forums that are primarily operational for specific device model. Search for the custom ROMs or modules that enable this feature and follow the steps detailed on these forums to install it.
3-OnePlus Devices (OxygenOS)
Screen Timeout Settings: Open the device ‘Settings’ tab and click on ‘Display’ option. Then select ‘Screen Timeout’ and choose the maximum time it offers. This method is very general and only offers 30 minutes timeout duration.
Developer Options: OnePlus Devices have ‘Stay Awake’ functionality in developer options. Navigate to the ‘About Phone’ tab in device Settings. Tap ‘Build Number’ seven times to enable developer options. Open the Settings again and select ‘System’ to enable ‘Stay Awake’ feature. This feature is only suitable when the device charger is plugged in.
Pros
- No third-party tools or device rooting is required to enable these features.
- These methods have direct integration with the device’s native settings, eliminating the need for additional support.
Cons
- These are the global settings offered by various device models.
- The customization options are very limited as compared to other methods.
- Some features like ‘Stay Awake’ only works when the device charger is plugged in.
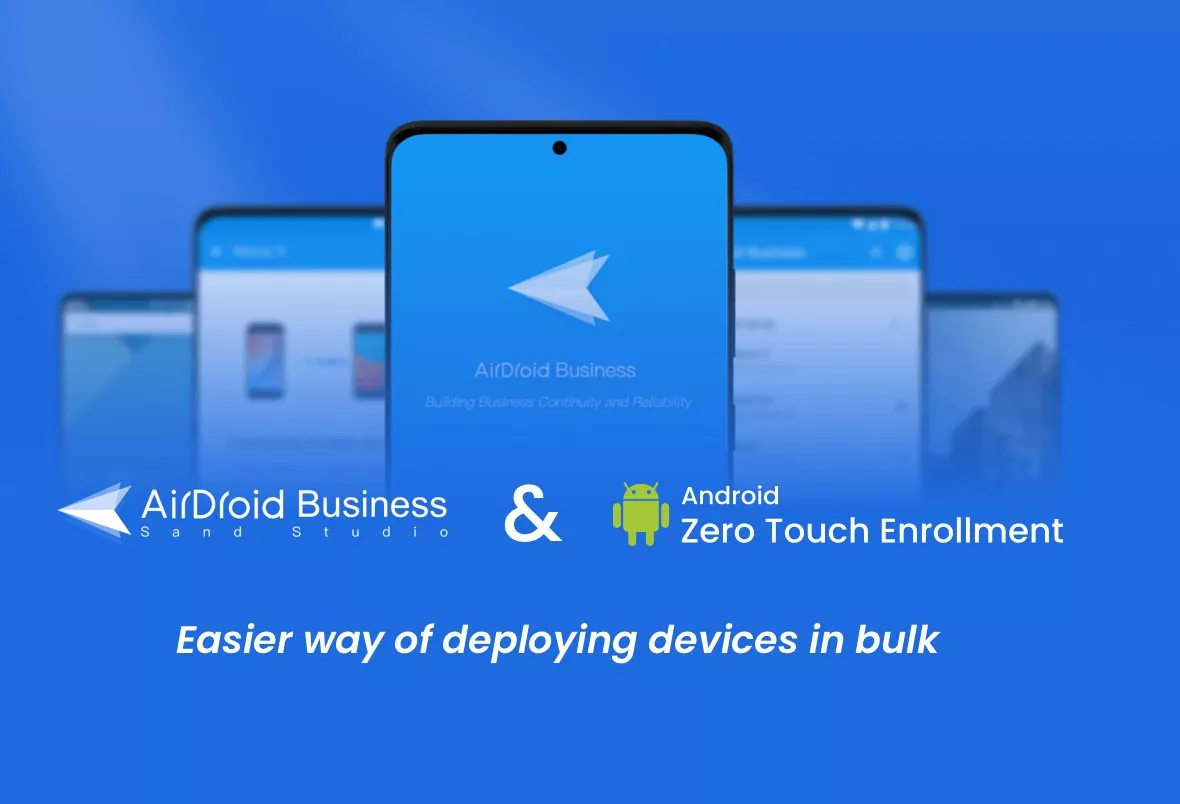
5Way 5. MDM Solution for Businesses
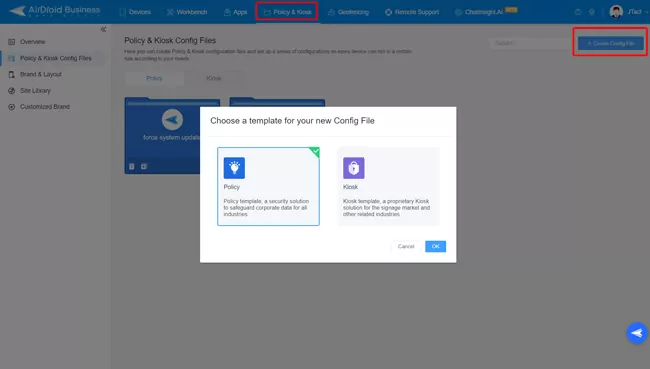
- Step 1:Open the 'Policy and kiosk config files' tab
- Sign up and log into AirDroid Business admin console. Select the 'Policy and kiosk' tab from the main menu at the top and then select 'Policy and kiosk config files' from the left side menu bar to create a new config file.
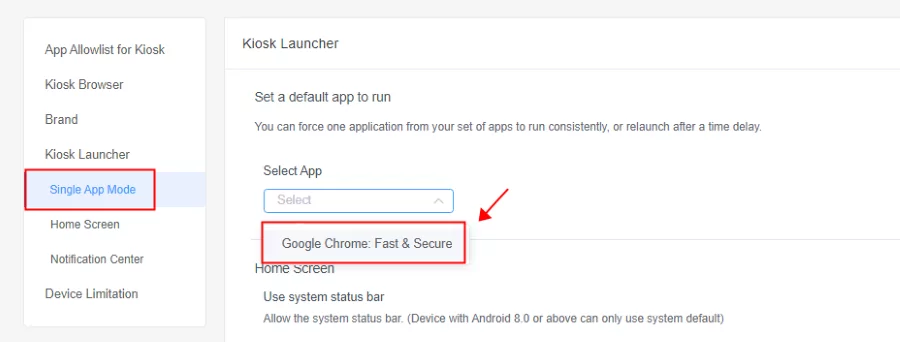
- Step 2:Select the app
- Select the single app mode option and choose your desired app to run in one app mode with continuous display.
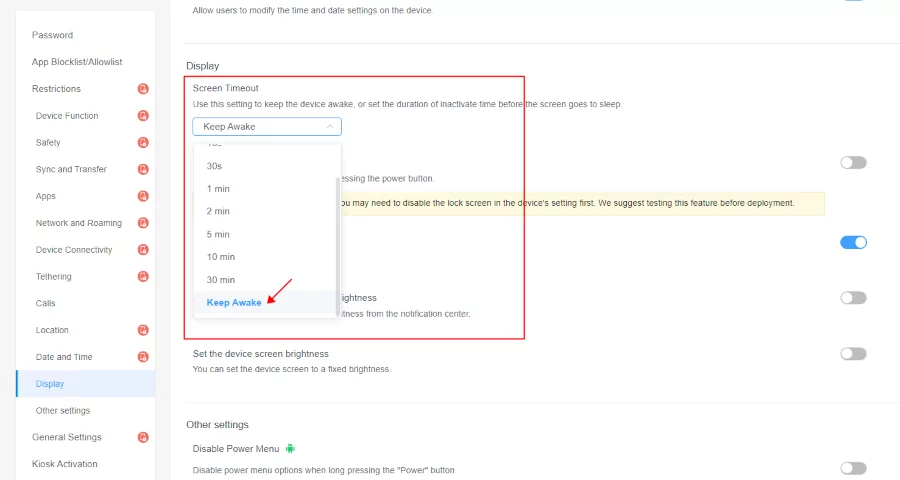
- Step 3:How to keep Android screen from timing out: set up screen always on
- Select the 'Display' tab from the menu appearing from top to bottom. Open the dropdown menu below the Screen timeout tab and select 'Keep Awake.' Also, turn the slider on after the 'keep the screen awake' option. Click the 'Next' button to enter a profile name and code.
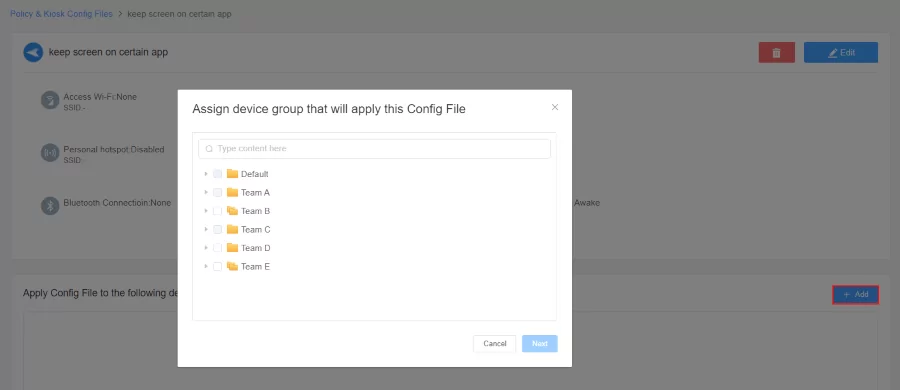
- Step 4:Save and Apply configuration on devices
- Then press the 'Save and Apply' button. Click on the 'Add' button after the 'Apply Config file to the following devices/groups' and select the devices to apply the configuration. Click 'OK,' and it will be applied to selected devices. After completing the setup, the screens of the devices in your management group will stay on and be locked to the app interface you've set.
Advantages:
- Centralized Management: MDM allows implementing same policies and rules across all devices from the dashboard to ensure consistency.
- Scalability: MDM solutions allow bulk enrollment of devices with ability to efficiently manage screen settings for thousands of devices without disruptions.
- Remote Troubleshooting: MDM solutions offer remote monitoring and access feature to diagnose issues and remotely troubleshoot them, saving costs and downtime of devices.
Limitations:
- MDM solutions mostly requires paid subscriptions. So, it’s better to first try out solutions that offer a free trial before paying amounts to a specific provider and find the most appropriate one.
Potential Issues and Considerations
Issue 1. Unusual battery consumption
Using tools to constantly keep the screen for hours can increase the power consumption rate and thus it would lead to draining of battery faster than usual.
To overcome this issue:
- Enable automatic brightness or reduce the screen brightness and ensure the device is regularly charged.
- Use dark mode on AMOLED screens as power consumption in this mode is low.
- Do not set keep screen on regularly. Optimize the screen timeout as required.
- Enable battery saver mode, as it limits the background processes and the battery time increases.
Issue 2. Device Over-heating
Continuous screen-on with heavy brightness while using high processing apps like location-based gaming apps can lead the device to overheat.
To overcome this issue:
- Close all unnecessary apps running in the background and keep the brightness lower.
- Use cooling pads or fans to keep the device cool even when using heavy apps.
- Include breaks in your device usage process and keep checking the temperature to use the Android device accordingly. Moreover, keep the devices away from heat or direct sunlight.
Issue 3. Screen Burn-in
AMOLED/OLED screens can become vulnerable to burn-in when left in static display mode for a long time.
To overcome this issue:
- Reduce the brightness of the device screen and enable features that slightly move the screen content. Some appropriate examples include Screen Shift and Pixel Shift.
- Using apps that contain dynamic content or by enabling screensavers, this issue can be minimized.
- Changing the color scheme or installing the apps that prevent burn-in also reduces this risk.
Final Words
We have explored a comprehensive range of methods to keep the Android screen on for specific apps, spanning from the simplest to the most complex solutions.
This functionality is highly beneficial for both individuals and businesses. For instance, officials require uninterrupted screen time during presentations, drivers need to constantly check directions on Maps to stay on course, and industries such as retail, hospitality, and healthcare rely on self-service kiosks, point-of-sale (POS) systems, and check-in terminals that maintain regular screen activity.
It is highly recommended that businesses opt for a central management system, such as AirDroid Business MDM solution, to achieve greater ease of use and enhanced customization options. This approach leads to better control and overall management.
FAQs


Leave a Reply.