Use MDM for Google Chrome Configuration (How-to Guide)
You can use mobile device management software to configure Google Chrome settings. This article will demonstrate how to do it step by step.
Before getting started, please make sure that you have:
- An Android phone/tablet running 7.0+
- An MDM software that supports Managed Google Play
Now, read the step-by-step guide below.
1 How to Configure Google Chrome Remotely?
Using mobile device management software makes the configuration process as simple as three steps.
As you log into the admin console of AirDroid Business, you will find the app management entry in the navigation bar. Then, proceed with the following steps.
Step 1 : Add Chrome App in Managed Google Play Store.
Find '+ Add App' in 'App' > ' App Library' > 'Managed Google Play Store.'
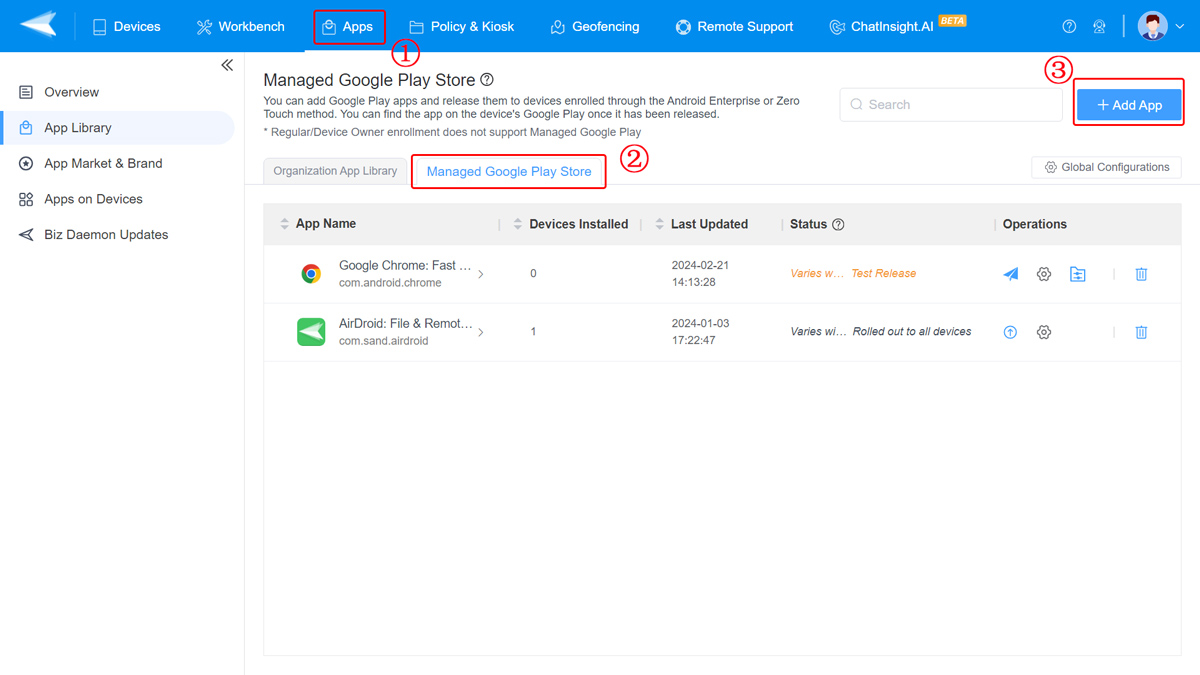
Click the button and then enter the Google Play window. Here you can find the Chrome browser app. Next, click the app and then select it.
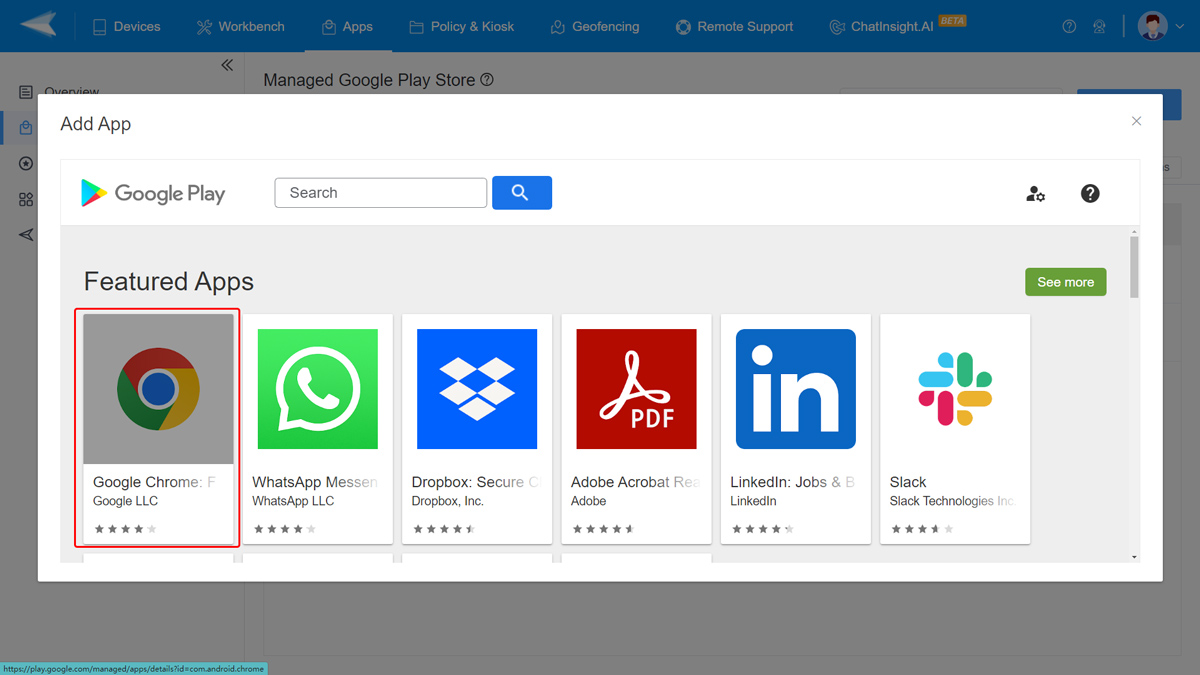
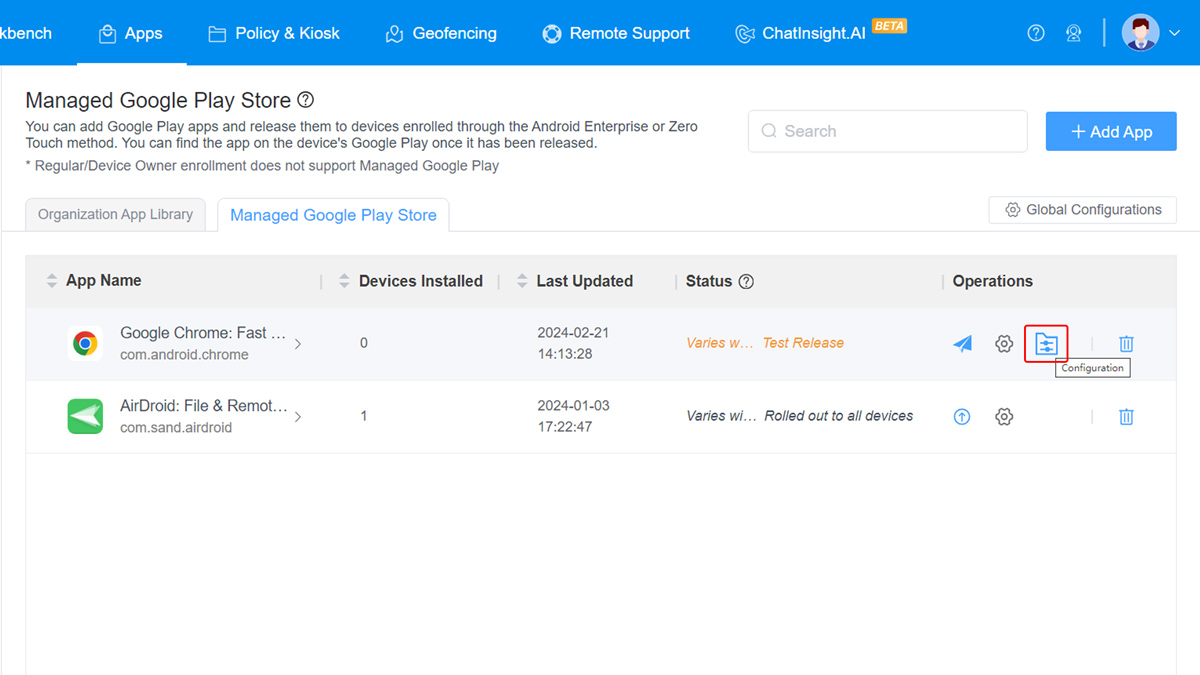
Step 2 : Configure Settings for Google Chrome.
Click 'Exit' first. Then, you will go to the configuration page. Clicking 'Configuration' to proceed.
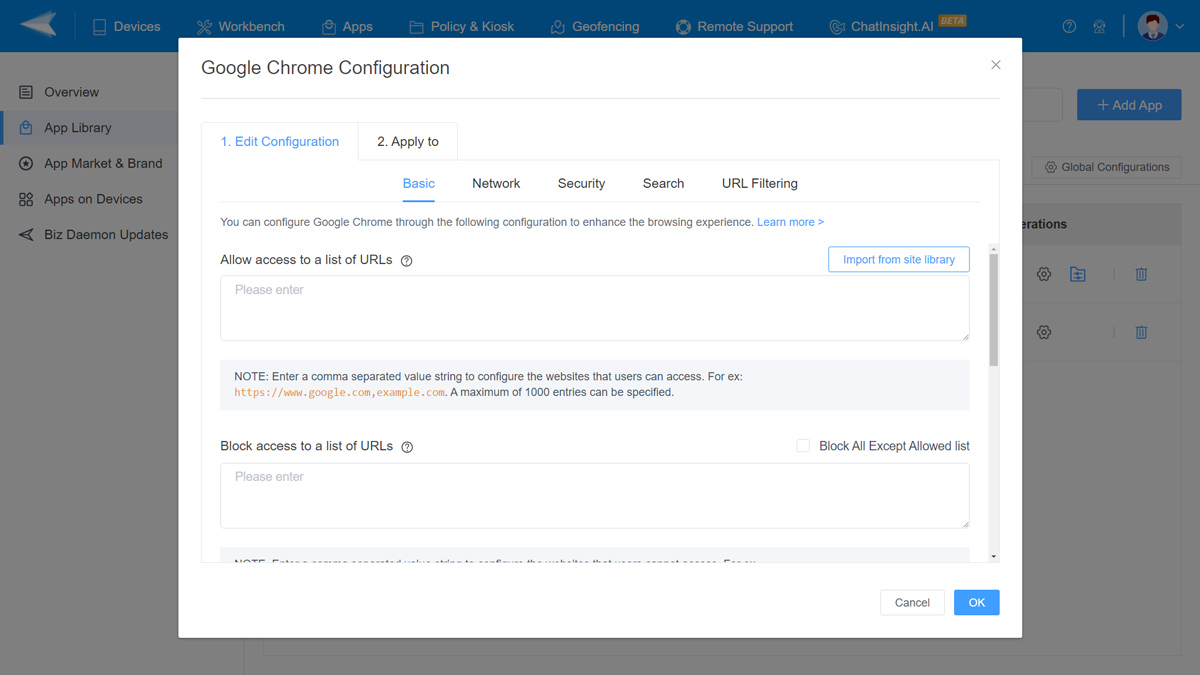
You're able to configure settings including URLs and filtering, network, security, and search preference.
- Basic - you can set common options for your Chrome, such as website allowlist or blocklist for Chrome.
- Network - you can set how Chrome connects to the internet, including the negotiation options, authentication options, etc.
- Security - this contains detailed options for network security, like DNS, SSL, cookies, etc.
- Search - allow to configure search-related functions, such as provider, method, suggestion, etc.
- URL Filtering - use to manage functions for URLs.
1) App Permissions Management: this includes location, phone, storage, camera, calendar, contacts, and microphone.
2) App Update Management: this is to configure auto-update rules for Google Chrome.
Step 3 : Apply Google Chrome Settings to Android Devices.
When you complete the configuration settings, it's time to apply them to the mobile devices.
Click 'Apply to' in the configuration window.
You have two options to choose target devices - by devices/groups; or by device models.
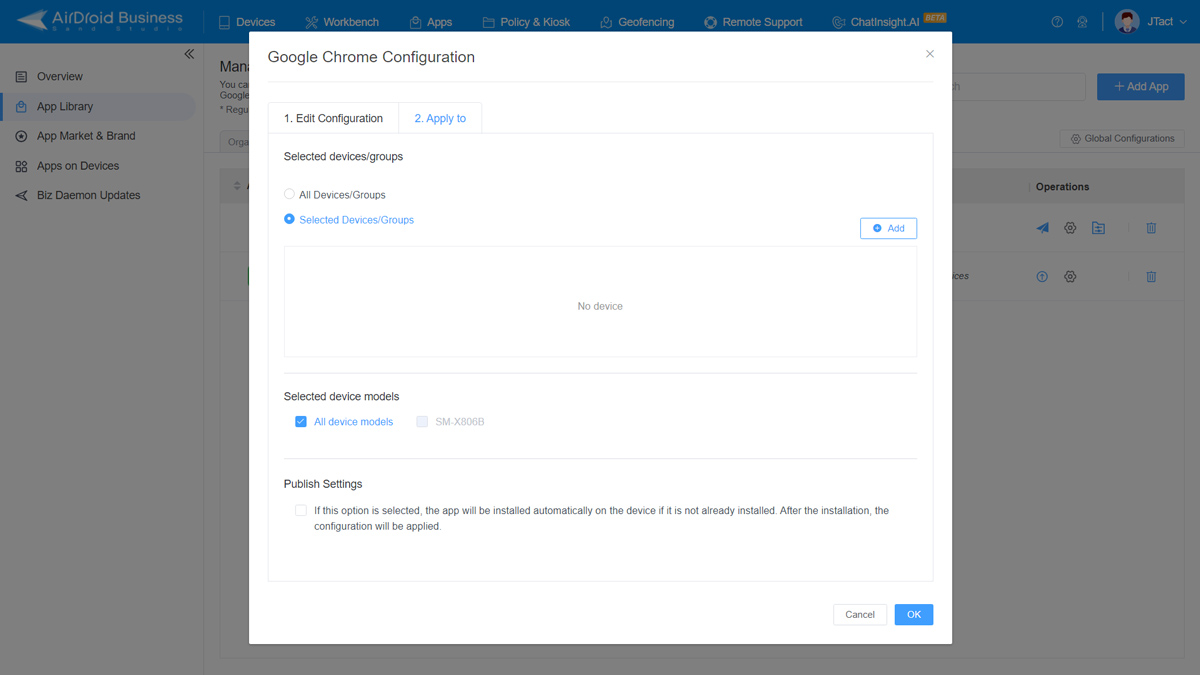
Publish Settings is given to streamline the installation. If you select it, the Google Chrome app will be automatically installed on devices.
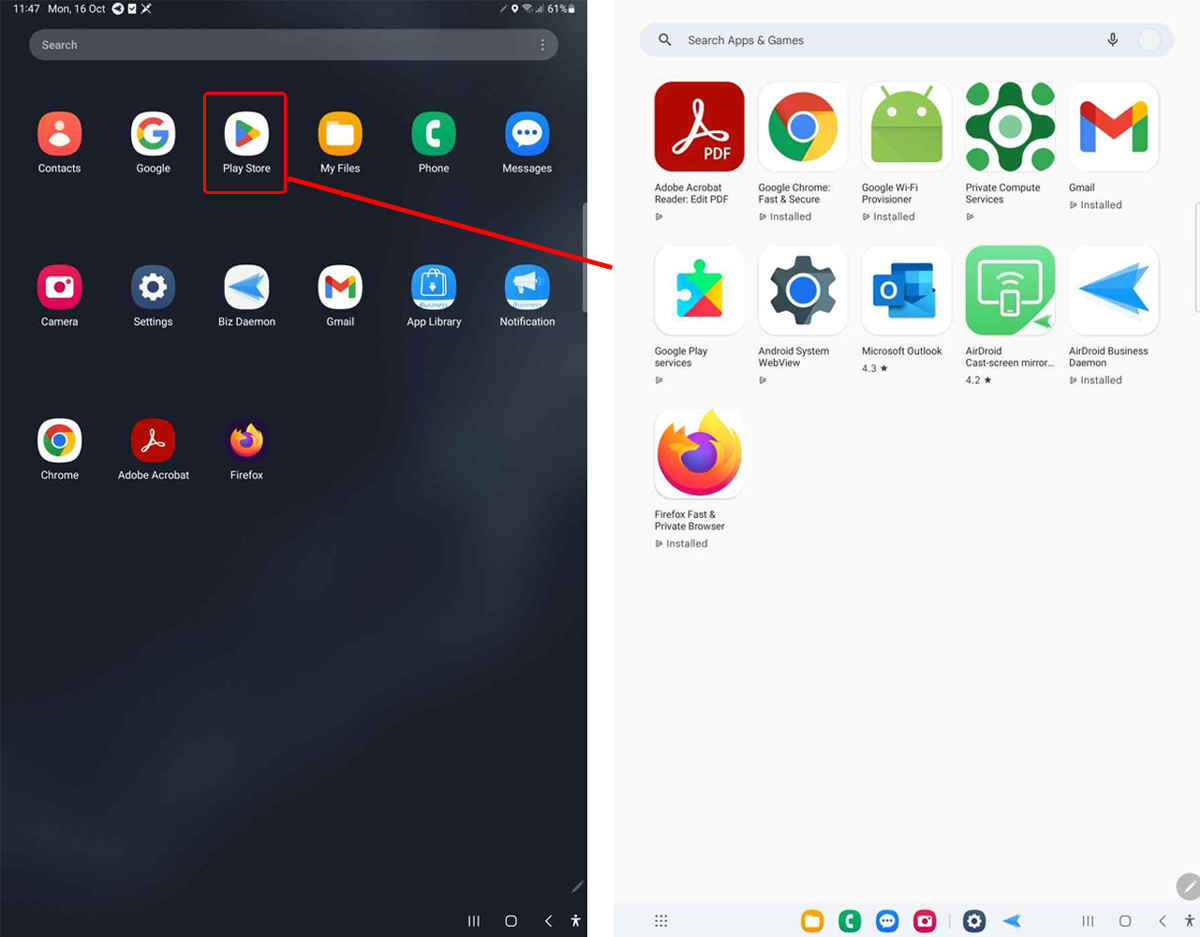
Finally, as Google Chrome distributes to the Android device, the configured browser will display as follows.
2 Checklist for Google Chrome Configuration Settings
Basic
| Allow access to a list of URLs | Device user can access these URLs on Chrome. Up to 1000 entries. |
| Block access to a list of URLs | Device user can not access these URLs on Chrome. Able to block all except allowed list. |
| Enable printing | Turn on/off the printing setting on Chrome. And user can't change it. |
| Incognito mode availability | Enable or disable Incognito mode. |
| Default pop-ups setting | Allow to display or deny popups on websites. |
| Default JavaScript setting | Allow or disallow websites to run JavaScript. |
| Default geolocation setting | Allow or disallow websites to track the users' physical location. |
| Default cookies setting | Allow or disallow all sites to set local data; or, keep cookies for the duration of the session. |
Network
| Account type for HTTP Negotiate authentication | Specify the account type provided by the Android authentication app. |
| Supported authentication schemes | Specify HTTP authentication schemes that Google Chrome supports. |
| Disable CNAME lookup when negotiating Kerberos authentication | Activate the skipping action of CNAME lookup. |
| Enable NTLMv2 authentication | Activate the running of NTLMv2. |
| Enable network prediction | Control network prediction in Google Chrome, such as DNS prefetching, TCP, and SSL preconnection and prerendering of webpages. |
Security - Login AirDroid to view all options
| The enrollment token of cloud policy | Retrieve an enrollment token from the Google Admin console. |
| Allow DNS queries for additional DNS record types | Control whether Google Chrome may query additional DNS record types when making insecure DNS requests. |
| List of origins allowing all HTTP authentication | Specify origin to allow all HTTP authentication schemes supported by Google Chrome. |
| Define domains allowed to access Google Workspace | Turn on Chrome's restricted sign-in feature in Google Workspace and prevent users from changing this setting. |
| Kerberos delegation server allowlist | Assign servers that Google Chrome may delegate to. |
| Authentication server allowlist | Specifies which servers should be allowed for integrated authentication. |
| Enable AutoFill for addresses, and credit cards | Allow or disallow user to control Autofill settings. |
| Control the BackForwardCache feature | Allow the use of the back-forward cache. |
| Block third party cookies | Prevent webpage elements from setting cookies. |
| Browser sign in settings | Enable/disable browser sign-in; or, Force users to sign in to use the Chrome browser. |
| Browsing Data Lifetime Settings | Allows IT admins to configure (per data-type) when data is deleted by Chrome. |
| Enable component updates in Google Chrome | Enable component updates for all components in Google Chrome |
| Control use of the Web Bluetooth API and WebUSB API | Allow or disallow websites to ask for access to nearby Bluetooth devices and connect USB devices. |
| External authentication app launch URLs | Specify configs for authentication URLs in Android WebView. |
| Explicitly allowed network ports | Allow to bypass the list of restricted ports built into Google Chrome. |
| Force Google SafeSearch | Mean SafeSearch in Google Search is always active, and users can't change this setting. |
| Force minimum YouTube Restricted Mode | Enforce a minimum Restricted mode on YouTube and prevent users from picking a less restricted mode. |
| Enable Site Isolation for specified origins on Android devices | Mean each of the named origins run in a dedicated process on Android. |
| Allow Google Lens camera assisted search | Allow users to search with their cameras using Google Lens. |
| Enable saving passwords to the password manager | Allow users to save Google Chrome remember passwords for signing in to a site. |
| Allow websites to query for available payment methods | Set whether websites are allowed to check if the user has payment methods saved. |
| Proxy settings | Configure the proxy settings for Chrome and ARC-apps, which ignore all proxy-related options specified from the command line. |
| Safe Browsing Protection Level | Allow to control whether Google Chrome's Safe Browsing feature is enabled and the mode it operates in. |
| Disable saving browser history | Mean browsing history is not saved, tab syncing is off and users can't change this setting. |
Search
| List of alternate URLs for the default search provider | Specify a list of alternate URLs for extracting search terms from the search engine. |
| Enable the default search provider | Mean a default search is performed when a user enters non-URL text in the address bar. |
| Default search provider encodings | Specify the character encodings supported by the search provider. |
| Parameters for image URL which uses POST | Specify the parameters during image search with POST. |
| Default search provider keyword | Specify the keyword or shortcut used in the address bar to trigger the search for this provider. |
| Default search provider suggest URL | Specify the URL of the search engine to provide search suggestions. |
| Enable search suggestions | Turn on search suggestions in Google Chrome's address bar. |
URL Filtering
| Allow cookies on these sites | Set a list of URLs that are allowed to set cookies. |
| Block cookies on these sites | Set a list of URLs that are not allowed to set cookies. |
| Limit cookies from matching URLs to the current session | Set a list of URLs to specify sites that can and can't set cookies for one session. |
| Allow JavaScript on these sites | Specify the sites that can run JavaScript. |
| Block JavaScript on these sites | Specify the sites that can not run JavaScript. |
| Managed Bookmarks | Users can't change the folders the bookmarks are placed in. Managed bookmarks are not synced to the user account and extensions can't modify them. |
| Allow pop-ups on these sites | Set a list of URLs to specify what sites can open pop-ups. |
| Block pop-ups on these sites | Set a list of URLs to specify what sites can not open pop-ups. |
3 How to Enroll Android Devices for Using Managed Google Play?
Managed Google Play is the enterprise version of Google Play Store and requires MDM solutions to work with. You can manage and configure all mobile app settings based on needs through it, including the Chrome browser.
As to enable the function on mobile devices, you need to complete the enrollment process. And Android Enterprise enrollment is what to support.
Now, follow these steps to enroll devices via Android Enterprise.
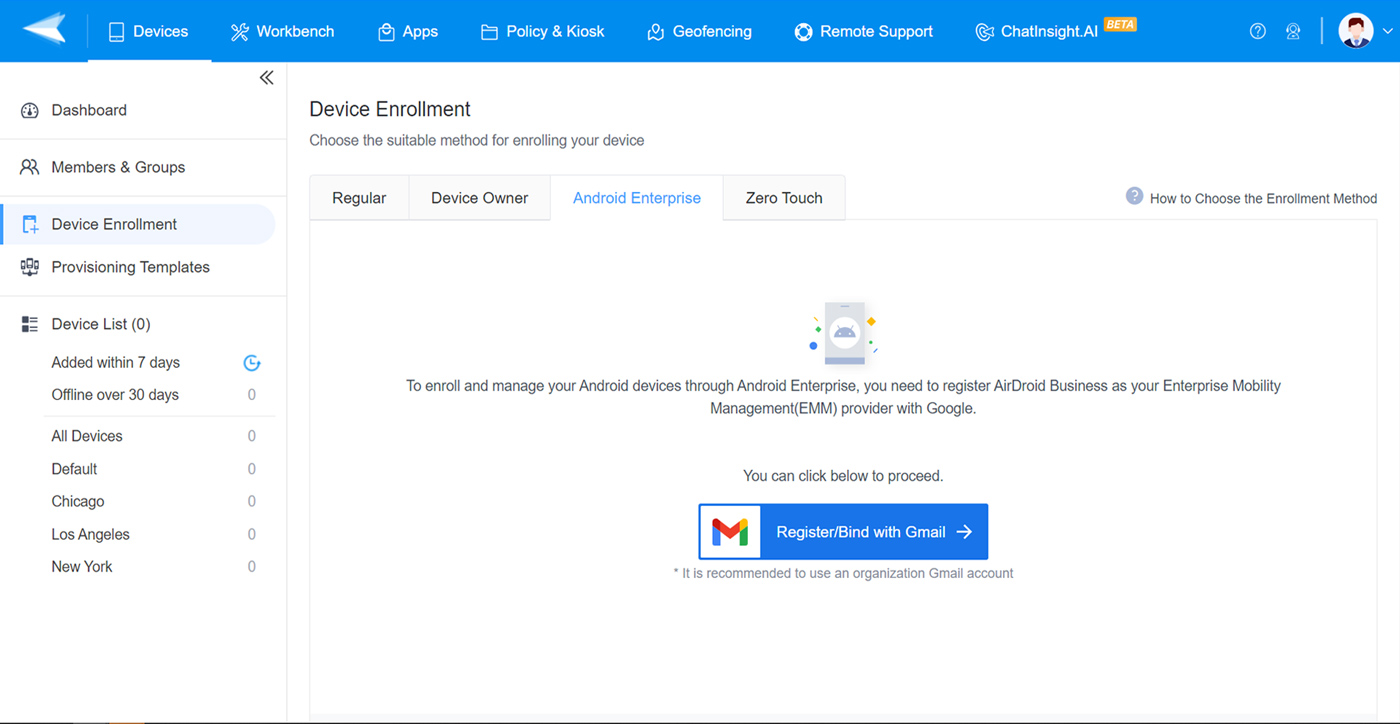
Step 1: Activate Android Enterprise in AirDroid Business.
Navigate to Devices > Device Enrollment > Android Enterprise Enrollment. Click 'Register/Bind with Gmail' to finish binding your account with AirDroid.
Step 2: Factory reset the Android device and connect it to the network.
Step 3: Enter 'afw#setup' in the popup Google sign-in page.
Step 4: Scan the QR code in the Admin console.
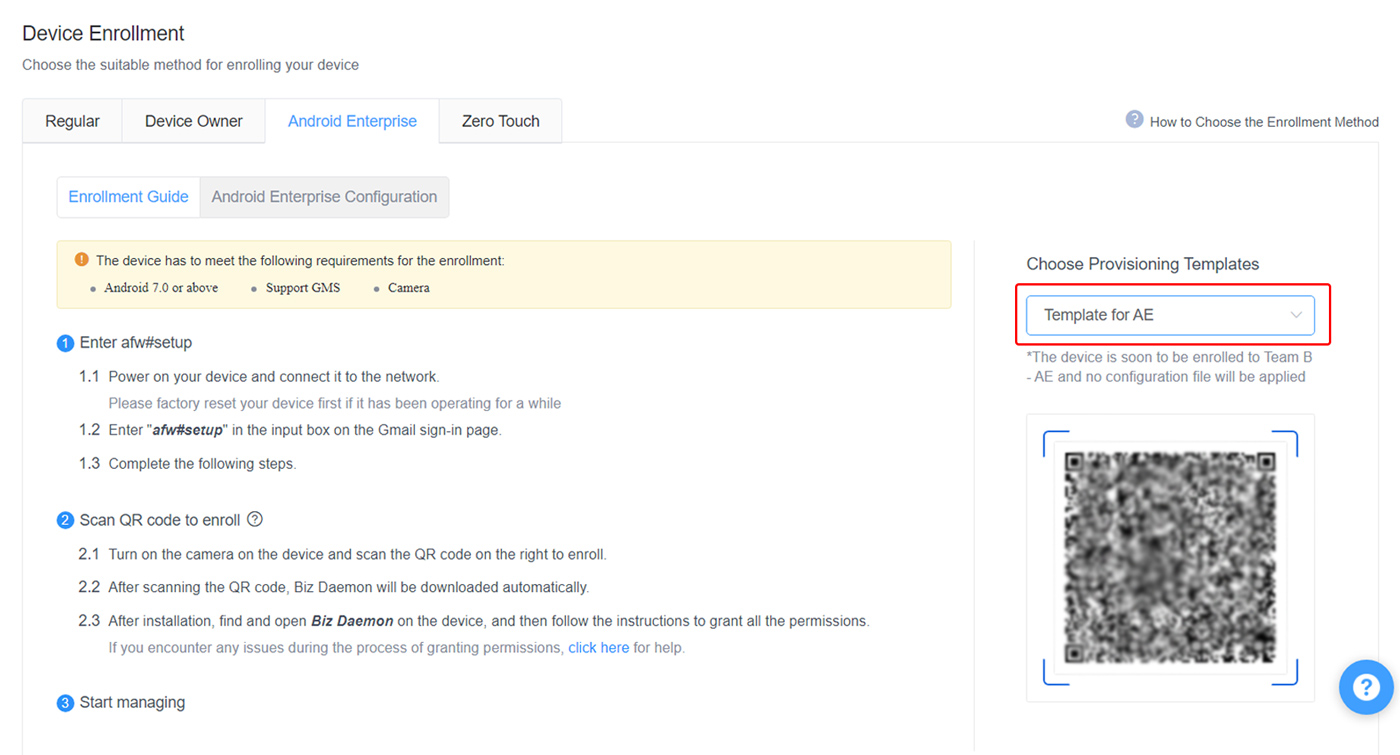
Step 5: The companion app for MDM will be installed automatically and the device is ready to be managed.
4 Common Questions of Configuring Chrome Browser
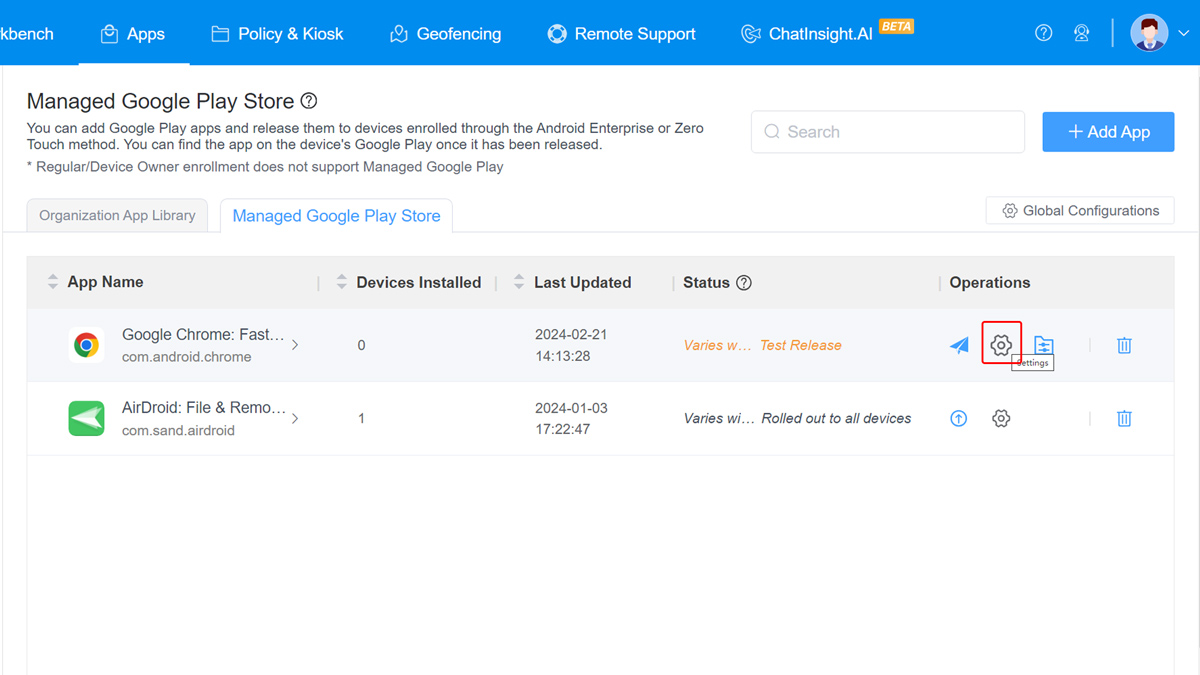
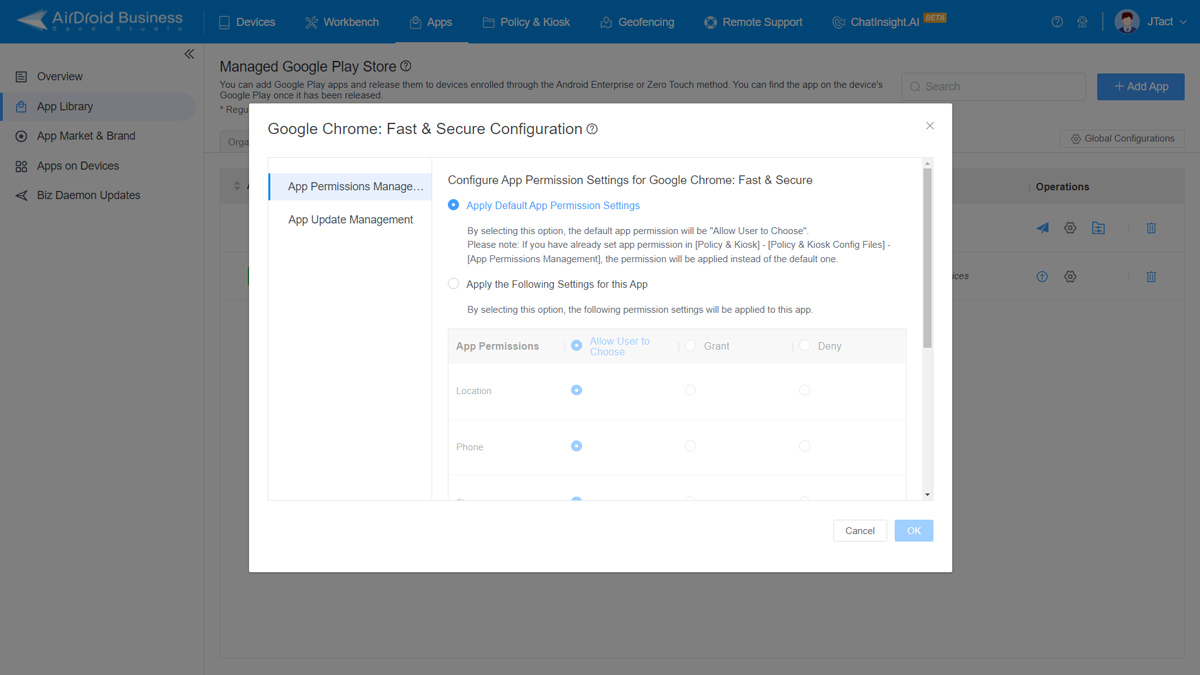
1. How to manage permission settings for the Google Chrome app on Android?
Step 1: Click 'Settings' in AirDroid Business console's App > App Library > Managed Google Play Store.
Step 2: Choose Apply Default App Permission Settings or Apply the Following Settings for this App.
Step 3: Permission settings include Allow user to choose, Grant, and Deny. You manage them flexibly.
2. Is it possible to set up auto-update policy for the Chrome app?
Yes. With AirDroid Business, you can manage update rules for Chrome. Click 'Settings' in App > App Library > Managed Google Play Store > App Update Management.

3. How to lock Chrome into kiosk mode on Android?
Step 1: Access the kiosk mode by navigating to Policy & Kiosk in AirDroid Business admin console and then create a kiosk config file.
Step 2: Go to App Allowlist for Kiosk to add Google Chrome to the list.
Step 3: Then you have to apply the Kiosk file to selected Android devices.
4. How to force install the configured Google Chrome on Android?
Step 1: Click 'Continue to rollout' to proceed with the deploy process.
Step 2: Click '+ Add' to choose Android devices. Force Installation is selected by default in Test Release.




Leave a Reply.