- Part 1 :Set up Android Enterprise on AirDroid Business
- Step 1: Register/Enroll your Gmail for AirDroid Business
- Step 2: Sign in your Gmail account
- Step 3: Enter your company information
- Step 4: Complete Registration
- Part 2 :Android Enterprise Enrollment
- Step 1: Factory reset your device and begin the initialization
- Step 2: Enter the Android Enterprise command to start the process
- Step 3: Scan the Android Enterprise QR code
- Step 4: Authorize Biz Daemon permissions
- Step 5: Further guidance of settings
- Step 6: Enrollment Complete


How to use Android Enterprise Enrollment?
- Part 1 :Set up Android Enterprise on AirDroid Business
- Step 1: Register/Enroll your Gmail for AirDroid Business
- Step 2: Sign in your Gmail account
- Step 3: Enter your company information
- Step 4: Complete Registration
- Part 2 :Android Enterprise Enrollment
- Step 1: Factory reset your device and begin the initialization
- Step 2: Enter the Android Enterprise command to start the process
- Step 3: Scan the Android Enterprise QR code
- Step 4: Authorize Biz Daemon permissions
- Step 5: Further guidance of settings
- Step 6: Enrollment Complete
We have created a YouTube video to help you understand this guide better and faster.
Video Tutorial: How to Use Android Enterprise Enrollment (MDM)
In this section, we will introduce Android Enterprise Enrollment and you will be able to use the Managed Google Play Store feature in AMS. You can use the "Add from Managed Google Play Store" feature in the Provisioning Template during device enrollment. This will enable you to easily add apps to your device during the setup process.
Before enrolling the device with Android Enterprise Enrollment, you will need to register/bind with your Gmail.
After the registering/binding process is completed, you will be redirected back to the Admin Console. And then you need to finish enrolling the device, and grant the permissions for Biz Daemon.
1Set up Android Enterprise on AirDroid Business
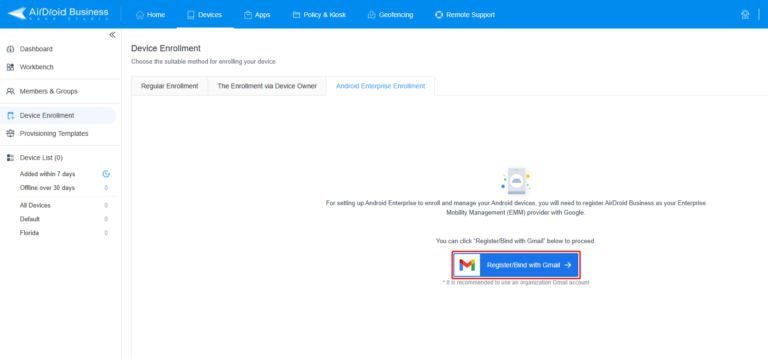
- Step 1Register/Enroll your Gmail for AirDroid Business
- Go to Devices > Device Enrollment > tap on Android Enterprise Enrollment > Click Register/Bind with Gmail.
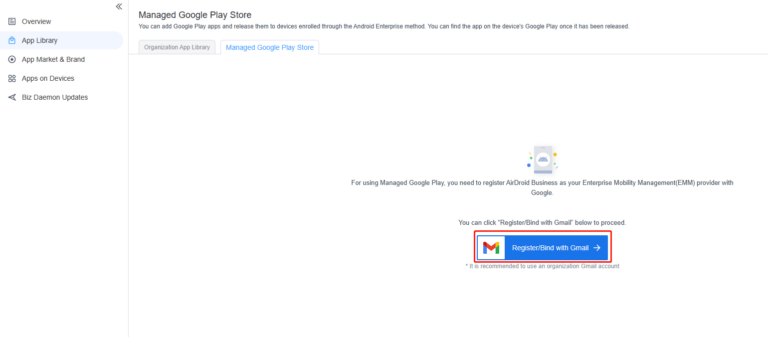
- Or click the Apps > App Library > Managed Google Play Store
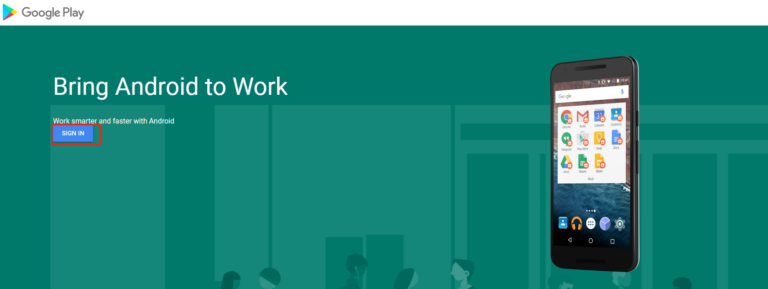
- Step 2Sign in your Gmail account
- Tap on Sign in to complete the login process of Android Enterprise.
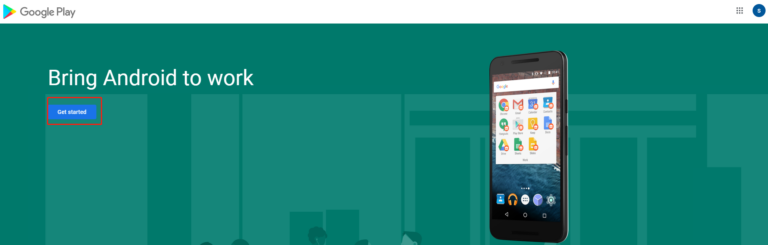
- Once you are logged in to the Gmail account, tap on Get Started to proceed.
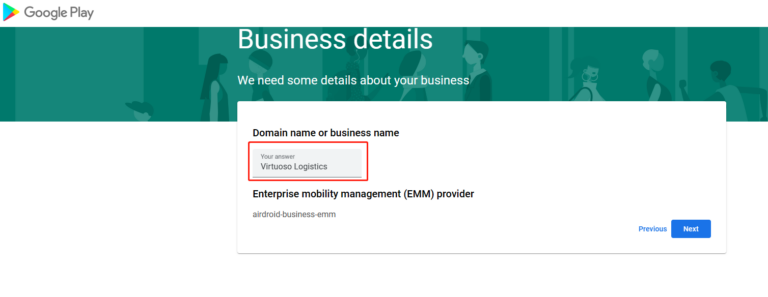
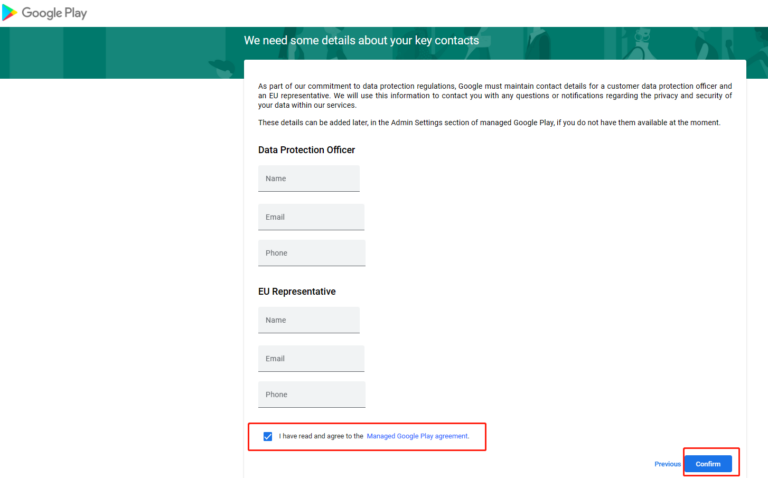
- Step 3Enter your company information
- Enter the business name and other details of your company.
- Once you are completed, please tap on I have read and agree to the Managed Google Play agreement and Confirm.
- Step 4Complete Registration
- Tap on Complete Registration and you can use the Android Enterprise Enrollment.

2Android Enterprise Enrollment
- Step 1Factory reset your device and begin the initialization
- Power on your device and connect it to the network, and finish the following procedure on the device.
- If your device is already in use, please go to the settings on the device to factory reset your device.
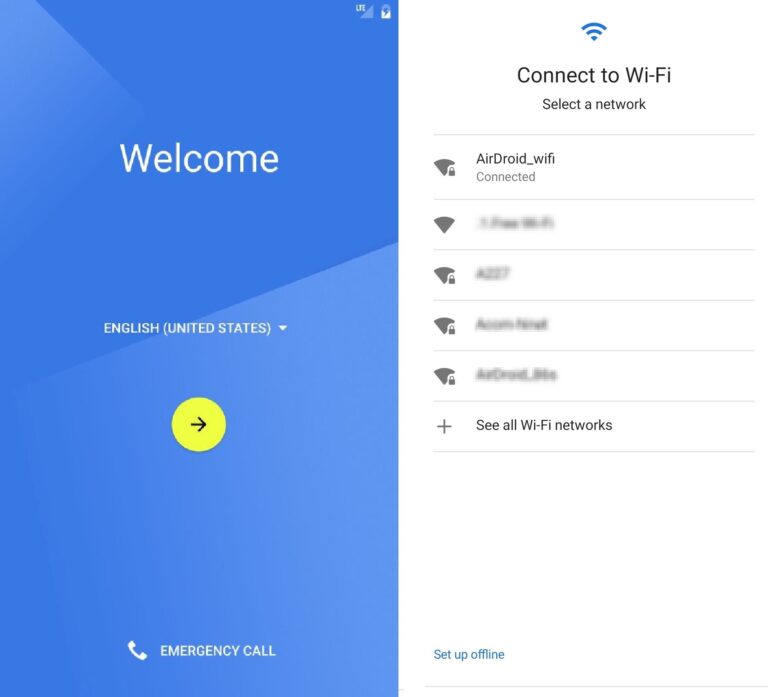
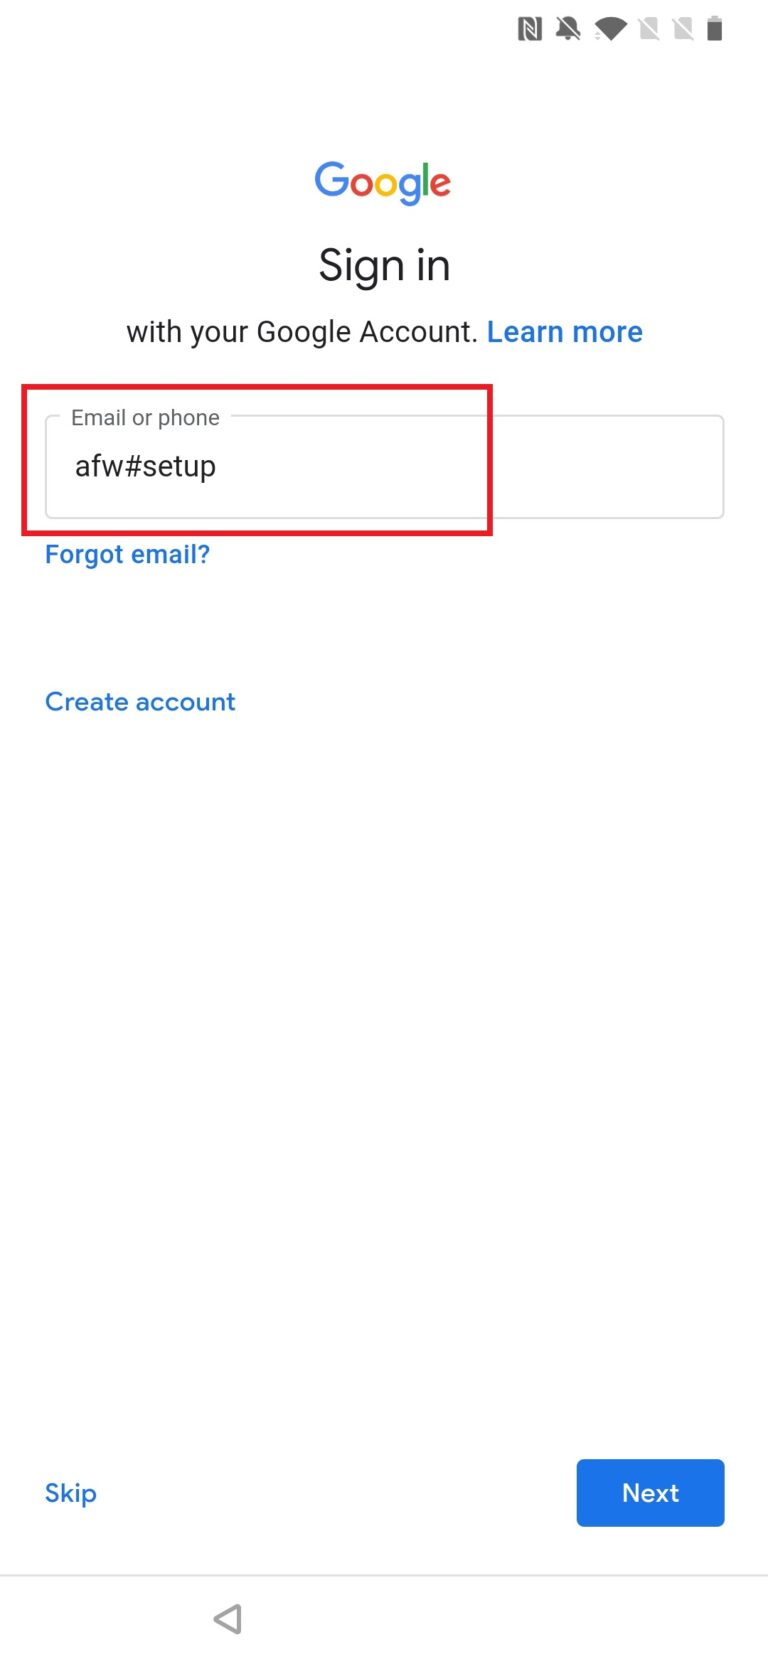
- Step 2Enter the Android Enterprise command to start the process
- When you see the device screen asking you to configure your Gmail account, enter "afw#setup" in the input box on the Gmail sign-in page. Then continue to complete the following steps on your device.
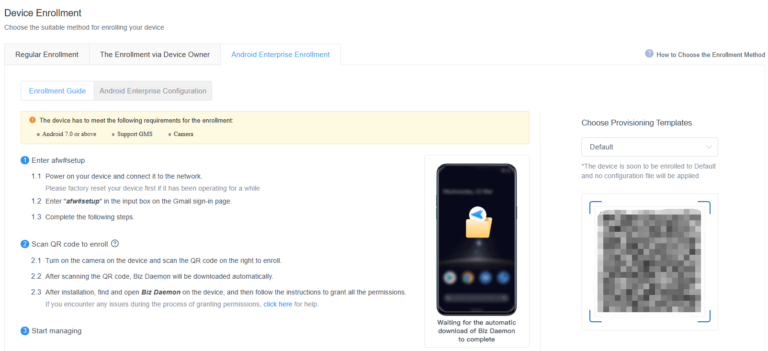
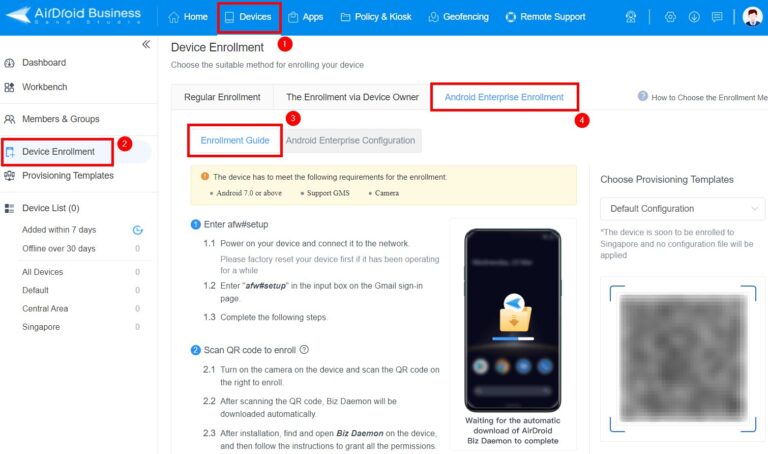
- Step 3Scan the Android Enterprise QR code
- After a few steps, you will be prompted to scan a QR code. Please authorize the permission required to scan the QR code, and scan the QR code on the right side of the page from Admin Console under Devices > Device Enrollment > Android Enterprise Enrollment > Enrollment Guide
- Please ensure that you have completed the setup of Provisioning Templates. If not, refer to this article to complete the Provisioning Templates settings.
After scanning the QR code, AirDroid Biz Daemon will be downloaded automatically.
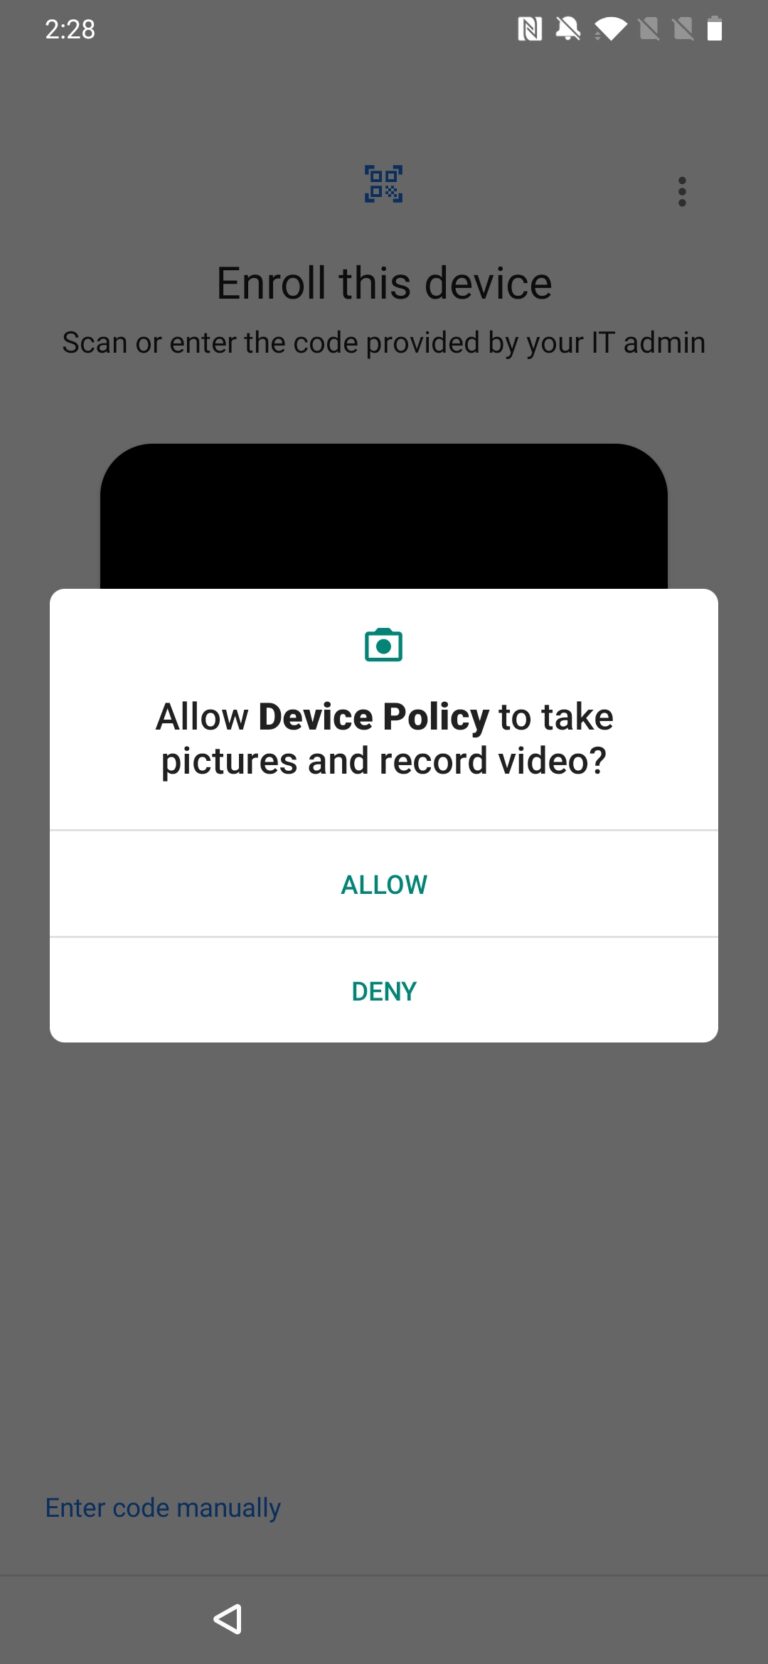
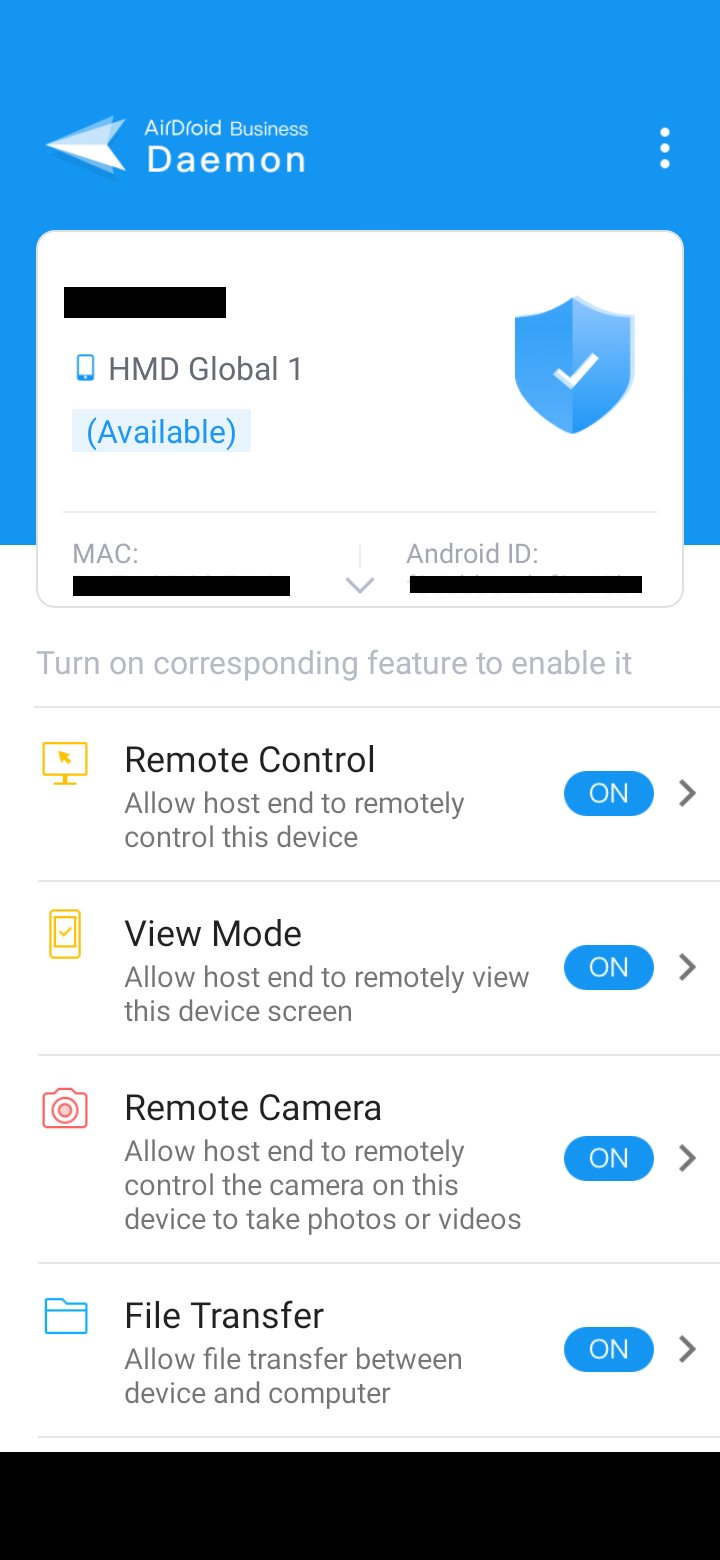
- Step 4Authorize Biz Daemon permissions
- After installation, open Biz Daemon on the device, you will need to authorize Biz Daemon permissions. We recommended you to grant all permissions to have better management experience.
- You can also check on this article and enable some of the permissions based on your needs.
Just a reminder, the Biz Daemon layout, and options might be different from the screenshot in the article, depending on the enrollment methods, Android System versions and device models.

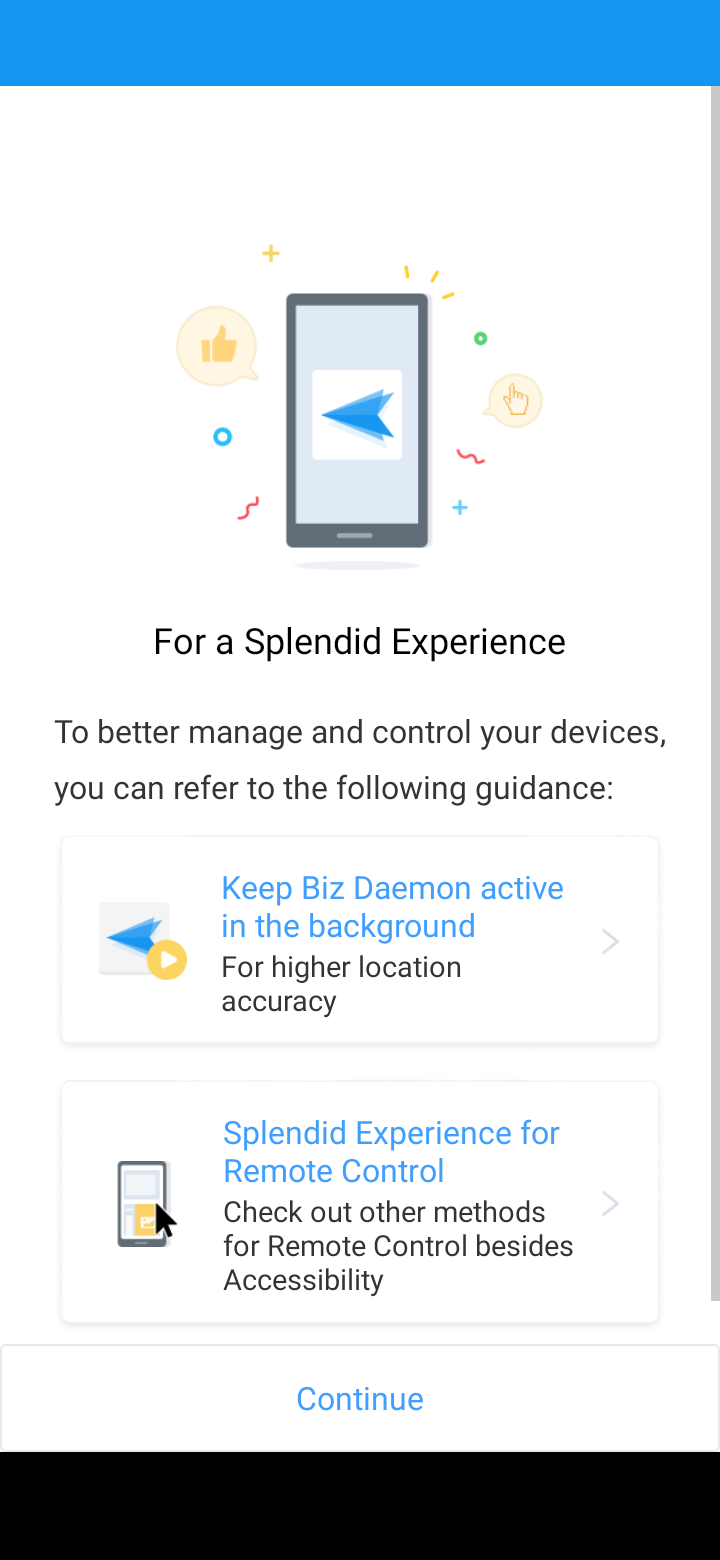
- Step 5Further guidance of settings
- After granting necessary permissions, please check the guidance that allows you to enhance your management experience and click continue and the process will be finished.
- Step 6Enrollment Complete
- If you need to change the permission after completing the deployment process, you can always change the accessibility accordingly by opening the Biz Daemon.
If you need to unenroll the Android Enterprise, you can refer this article.
Congratulations! You have deployed your device with the Android Enterprise Enrollment.
If you want to optimize the overall management experience, please check the next step.
Still need help? Submit a request >>
Related Articles
You May Also Like
- What features are available for Remote Access on AirDroid Business?
- How to remote access a device via Admin Console on AirDroid Business?
- How to Manage Devices on AirDroid Business Desktop Client?
- How do I use the View Mode on AirDroid Business?
- How to use Black Screen Mode to maintain the remote device during Remote Control?