[Updated 2024] How to Stop Google Photos Backup on Android and iPhone
Arguably the most popular cloud storage platform, Google Photos works just as fine on both Android and iPhone. Often, this app is set, by default, to automatically backup all the photos in your phone's gallery.
Not everyone wants to continue with these backup settings for several reasons. If you're one of them and wondering how to stop Google Photos backup, then cheer up.

1Why Should You Stop Google Photos Automatic Backup?
For many years, Google Photos offered unlimited storage to photos stored in "High Quality," The only photos that were backed up in 'Original Quality' consumed your Google account storage of 15 GB. But Google has walked back that feature.
Starting from June 1, 2021, every single photo that you back up on Google Photos will count towards your free 15GB Google account storage. With automatic backup turned on, the chances of your free 15 GB storage running out of space quicker than you think are quite high.
Thus, it's important to learn how to turn off Google Photos backup to get more control over what you want to back up and what not. The next section is going to teach you exactly how to do that.
2How to Stop Google Photos Backup on Android?
Are you using an Android and seeking how to stop auto backup in Google Photos? Luckily, the process is easier than you think it is. All you need to do is disable the "Backup and Sync" option on the Google Photos app.
Just follow the below instructions to find out how to stop backing up photos to Google on Android:
Step 1. Launch the updated Google Photos app and hit your profile picture at the top-right corner.
Step 2. Next, tap either Manage Storage or Photo Settings.
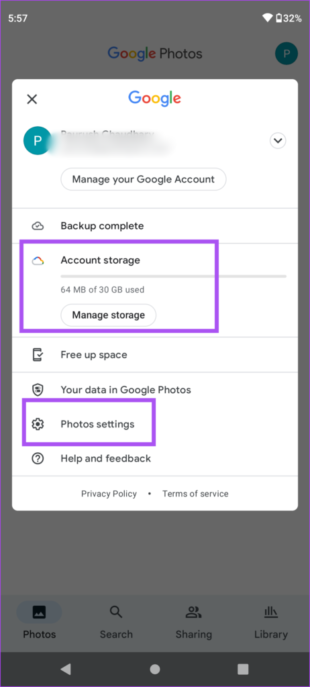
Step 3. Now, simply tap the "Back up and sync" option and turn its toggle off.
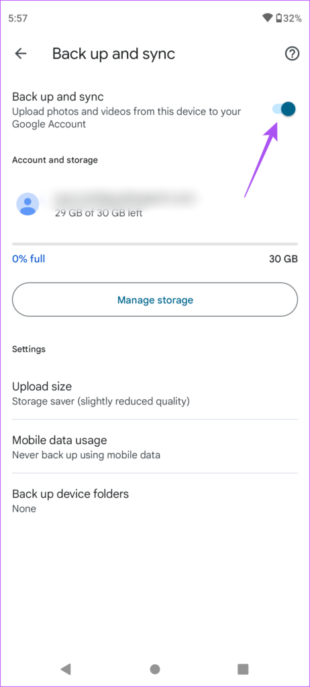
From this point on, Google Photos will no longer back up your photos. You'll still be able to view your new photos on the Google Photos app, but they will be saved on your Android phone only.
3How to Stop Google Photos Backup on iPhone?
Often, iCloud is the first priority of iPhone users to back up their photos. But iCloud offers 5GB of free storage compared to 15GB by Google Photos and it's no brainer why many iOS users still use Google Photos.
Still, it's important to learn to stop Google Photos from backing up to make sure you make the most of this free storage. Without any further ado, here's how to stop photos from uploading to Google Photos on your iPhone:
Step 1. Launch the Google Photos app on your phone.
Step 2. Tap your profile photo at the top-right corner and select the "Google Photos Settings" option.
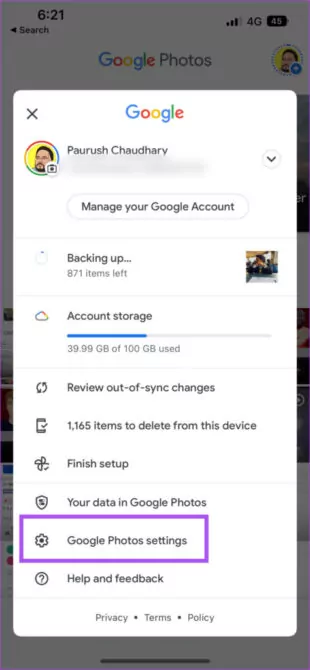
Step 3. On the next interface, tap "Backup and Sync" at the top.
Step 4. Next on how to stop Google photo upload, disable the toggle in front of Backup and Sync.
And voila, you have just stopped the automatic backing up of your photos. However, the photos that are already backed up will remain on your Google Photos account. You can always delete the selected items anytime you want.
Also Read: Google Photos Backup Stuck? Here's How to Fix It
4Bonus Tip: Use a Professional Backup Tool
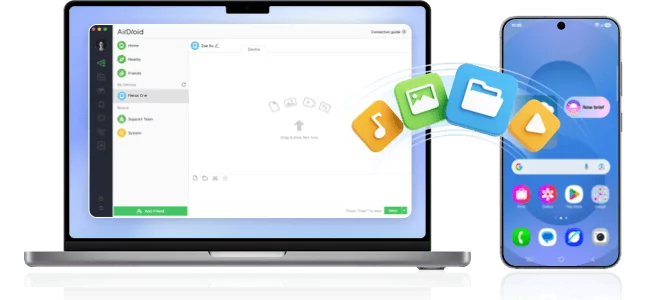
Want to get your hands on a program that offers more flexibility and friendliness than Google Photos? Look no further and get AirDroid Personal. This powerful program offers a simple procedure to back up all your photos and videos on a PC.
Moreover, you can easily trigger the automatic backup feature – and disable it with just a single click. It doesn't cause any quality loss as you get to back up and restore photos in the original quality. What makes it different from similar tools is its sleek interface and lightweight. It can work smoothly even on low-end PCs.
Key Features of AirDroid Personal
Here are the notable benefits of this remarkable program:
- It guarantees a super-quick way to back up your photos and videos.
- Offers both manual and automatic backup options.
- Doesn't cause any quality loss when backing up your data.
- It can transfer data between smartphone and PC at a remarkable speed.
Now that you know how useful AirDroid Personal, let's dive into the steps to backup your phone:
Step 1. Start by downloading AirDroid Personal on both your PC and phone and sign in with the same AirDroid account.
Step 2. Next, open the desktop app and click on the Transfer icon. Click on your phone's name under "My devices" to connect both.
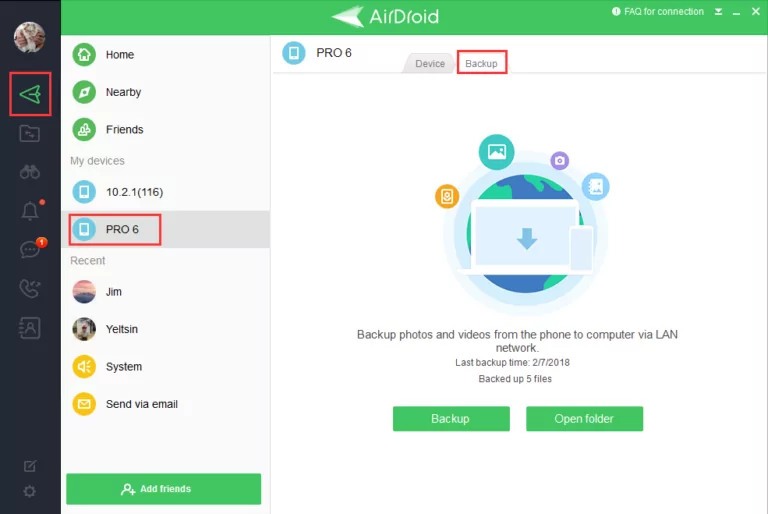
Step 3. In the next step, select the Backup tab and click on "Backup" to get started.
Step 4. On the next interface, select the backup folder and destination, and hit Done to start backing up your files. Here, you can also enable the automatic backup option if you want.
Step 5. Wait patiently until the process is finished. Use the "Open Folder" option to view the backed up files.
Final Remarks
And that's everything you need to know about how to stop Google Photos backup on your smartphone. It doesn't require you much effort to disable the automatic backup which helps you utilize the free 15GB storage effectively.
But if you want something more useful than Google Photos, then take assistance from AirDroid Personal. It is a one-stop solution to backup your data on PC, transfer files, and man between iPhone/Android/Windows/Mac, and manage your phone from your PC.
Get its premium version and explore what additional features it offers.
FAQs About How to Stop Google Photos Backup
Here are some common queries of users:
1. How to stop uploading photos in Google Photos?
- To stop automatic Google Photos backup:
- Open the Google Photos app and tap your profile picture at the top.
- Select "Photo settings" > Backup and Sync > and toggle it off.
2. How to unsync Google Photos on Android?
To do that:
- Launch the app.
- Click on your profile picture and select "Photo Settings."
- Select Backup and Sync and toggle it off.
3. Does deleting from Google Photos delete from the gallery?
No, deleting from Google Photos doesn't delete it from your phone's gallery as long as you haven't enabled the backup option. But if you back up photos and videos to Google Photos on a mobile device, they get deleted from the device when you delete them from the Google Photos app.





Leave a Reply.