The Best Ways to Transfer Files from iPhone to PC
Many users are looking for ways to transfer their files from iPhone to PC or vice versa, possibly as a solution to iPhone's limited storage capacity, or also as a failsafe to other potential emergencies. However, one can find an overwhelming number of options to do this, like Bluetooth, iTunes, USB flash drives, and an array of cloud storage to choose from.
So whether you want to backup your important files such as work-related documents and valuable media, or simply to free up storage space due to the growing size of digital formats, this article will walk you through the best among the best methods to transfer your valuable files to PC.
TOP 5. Via USB Cable
Nothing beats the classic, manual way of the file transfer.
Key features:
None.
Pros
- Simple. The process is straightforward, especially for those who have been using a PC for a while and have no problem navigating through their File Explorer.
- Storage. No other apps are needed to be installed, saving storage space.
Cons
- Unsafe. Sudden removal or disconnection from the cable or USB can corrupt certain files.
- Slow. Unlike the cloud which depends on the speed of your internet, this process depends on the processing speed of both your iPhone and PC, which can be very slow, especially when downloading a large number of files.
Requirements: USB Cable
Transfer Process:
- Step 1.
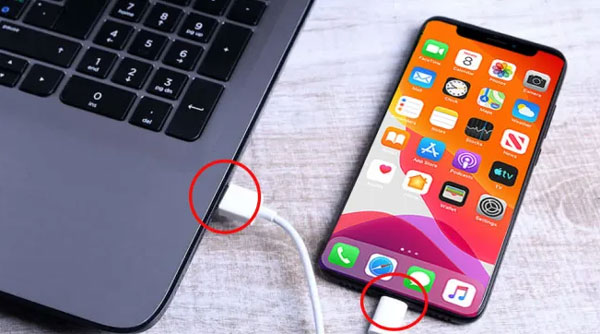
- Using a USB Cable, connect your iPhone into any of the USB ports in your computer.
- Step 2.
- Unlock your iPhone, as the PC won't be able to access it while it's locked.
- Step 3.
- In your computer, go to "This PC" (or your PC name) > "[your iPhone name]" then select whether the files you want are in the internal storage or the memory card.
- Step 4.
- Manually select and copy the files you wish to transfer from your iPhone to anywhere in your PC.
Price: Free
TOP 4. Via iTunes
iTunes is one of the most convenient and most used ways of file transfer from iPhone to PC, and it is for a reason.
Key Features:
More oriented on media and organization
Pros
- Cost. iTunes as an app is free
- Convenience. iTunes removes the clutter in transferring files by allowing you to access your media, documents, etc. directly.
- Cloud storage. iTunes is in sync with your iCloud storage
Cons
- Slow. iTunes has been known to lag, most users complain of it running slowly as it also eats up a lot of RAM.
- Storage. Due to its many functions, iTunes takes up more and more storage with each of its updates.
Requirements:
an iTunes account and a PC with an updated version of iTunes installed
Transfer Process:
- Step 1.
- Using a USB cable, connect your iPhone into any of the USB ports in your computer.
- Step 2.
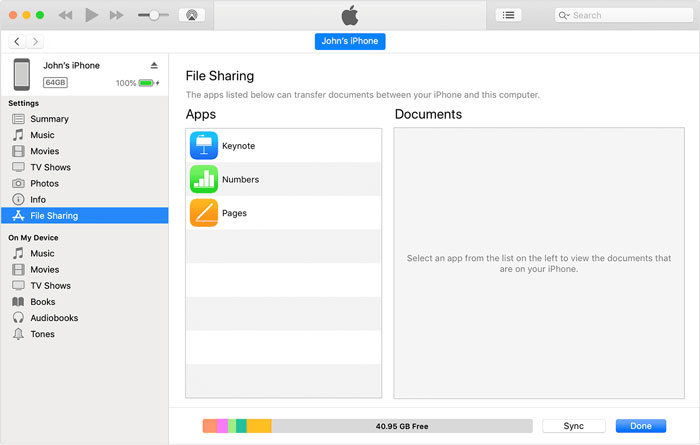
- Open your iTunes on your PC and click on the iPhone button on the top-left of the windows screen. Note: it looks like an image of a mobile device)

- Step 3.
- Select the "File Sharing" option in the left sidebar, and it will reveal a selection of file types to choose from, including documents, movies, etc.
- Step 4.
- Select the files you wish to transfer and click "Save to."
- Step 5.
- Choose your desired destination folder to save the selected files to start transferring them.
Extra note:
If you wish to sync your photos from iPhone, follow these steps starting from
Step 2.
- Select "Photos" instead of clicking the "File Sharing" button
- Click "Sync" in the bottom right corner of the window.
- Select the folder to save all your photos.
Price: Free, with in-app purchases
TOP 3. Via Google Drive
Google Drive has been prominent due to its easy accessibility, wide range of tools, and of course its connections to the entire array of Google services. It's not much of a surprise to see it on this list.
Key Features:
Microsoft Office Compatibility, Storage, Team Collaboration
Pros
- Storage. Both of Google Drive's free and paid storage outclasses most, including Dropbox.
- Cost. Cheaper than most for better.
- Convenience. Google Drive is one of the software that is the easiest to interact with.
Cons
- Privacy. Google analyzes your content.
- Security. Google Drive has a feature wherein you have no control over who has access to your file, as long as they have the link to it. Files you privately shared to one can be passed into another if one is not careful.
Requirements: A Google account logged in both iPhone and PC.
Transfer Process:
- Step 1.
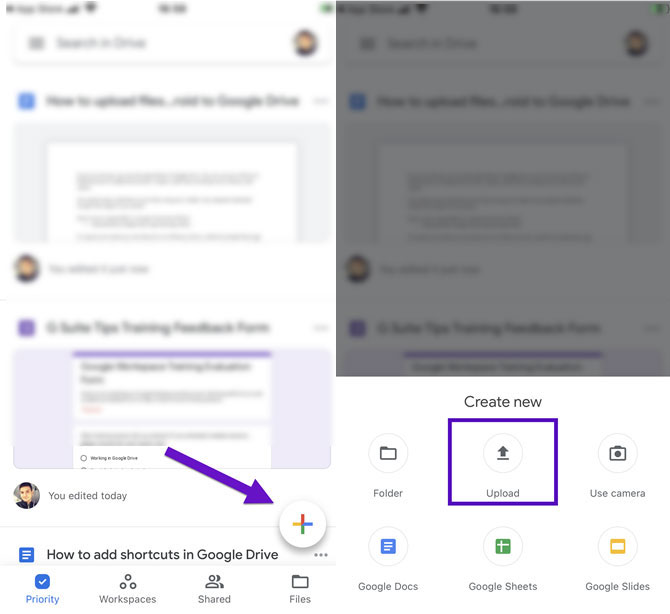
- Open your Google Drive on your iPhone. Click the "Add +" button and tap "Upload"
- Step 2.
- Select the files you want to transfer, and it will automatically be uploaded in your drive folder.
- Step 3.
- If you wish immediate access to the files, open Google Drive on your PC, right click on the files and select "Download"
Price: Free for the first 15GB of storage, with paid storage ranging from $19.99 to $99.99 annually.
TOP 2. Via Dropbox
Dropbox had been widely used since its original appearance, and over the years its developers have been continuously giving it love and attention. What puts Dropbox above iTunes is in fact, its capability to integrate into any device, may it be iPhone or PC, or Android, Mac or Linux.
Key Features:
Encryption Security, File Sharing, Productivity Tools, Cloud Storage, Content Collaboration
Pros
- Secure backup. Dropbox has file recovery and version history. Never lose your files by mistake.
- Synchronization. From passwords to storage across multiple devices.
- Synergy. Well-integrated with other tools like Zoom, Canva, and more.
Cons
- Storage. Dropbox offers very limited storage for free users.
- Cost. Most of Dropbox' advantages are locked under a high price.
Requirements:
A Dropbox account, and Dropbox installed both on the iPhone and the PC. Login into both with the same account.
Transfer Process:
- Step 1.
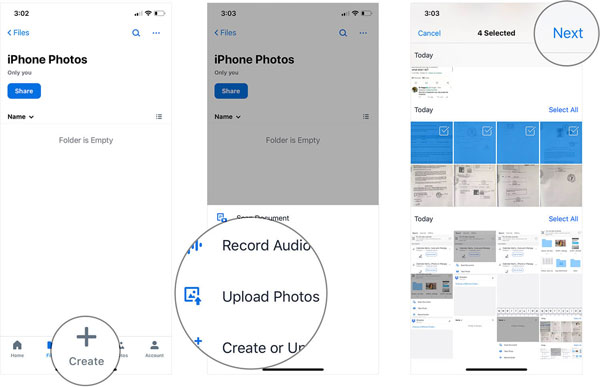
- Open Dropbox in your iPhone and click on the + icon to create a new folder where we could upload files. After giving it a name, just choose the type of file you'd like to transfer.
- Step 2.
- Choose your upload destination, and all your files will automatically be uploaded to your computer's Dropbox folder.
Price: Free for the first 2GB of storage, with paid storage ranging from $19.99 to $119.88 annually.
TOP 1. Via AirDroid
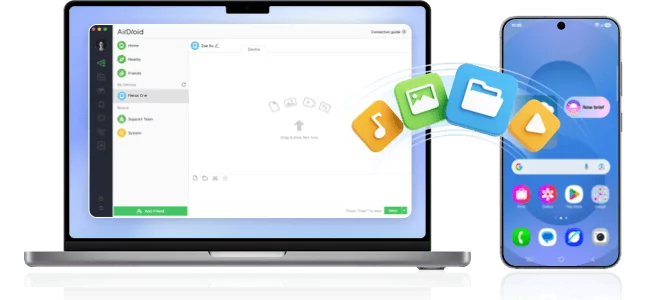
AirDroid is an app that is specifically tailored for iPhone and Android use, its functionality extends to giving its users access and control to their mobile devices directly from their PC. This includes transferring files, viewing messages, receiving notifications, email, contacts, and so much more.
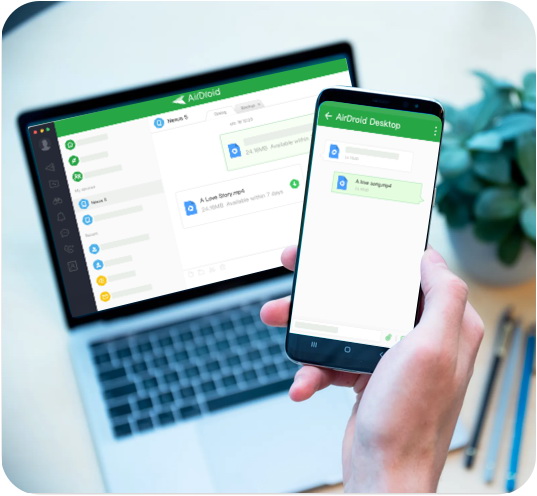
Key Features:
- Files and Media Management. Send your files, images, audios, and videos faster from your iPhone to PC and vice versa without the need for USB Cable.
- The "Nearby" Feature. A feature that lets you immediately transfer your media to nearby devices, all without the need for an account or internet connection.
- Control phone from PC. From taking a picture, a screenshot, to managing your apps, making phone calls, messaging, contacts, and remote monitoring, all can be done from the comfort of your computer where you can type faster and view everything on a larger screen.
Pros
- Interface. AirDroid's capabilities and range is less overwhelming and less prone to convolution compared to its counterparts
- Convenience. AirDroid's interface is the easiest to interact with.
- Control. You have more control over the extent of who can receive your files.
- Cost. AirDroid's Premium service is earnable through points. Earn enough points and you can access its many perks and features.
Cons
- Limits. It's free version can be limiting, but otherwise enough for normal file-sharing needs.
Requirements:
An AirDroid account, logged in and installed in both iPhone and PC.
Transfer Process
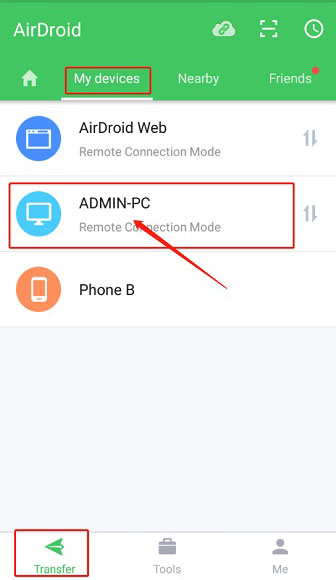
- Step 1.
- Open AirDroid on your iPhone and click on the device you want to transfer your files to.
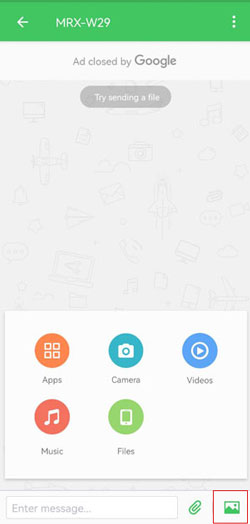
- Step 2.
- On the bottom right corner of the screen, tap the "camera" button to send an image, or tap the "paperclip" button to select any other kind of file.
- Step 3.
- Select the files you wish to transfer and click on the "send" button on the bottom right corner of the screen. The files will automatically be sent to AirDroid's folder in your chosen computer.

Price: Free, with a Premium version that can be redeemed with points simply by watching ads, and a $29.99 annual plan.
The Bottom Line
Sometimes the simplest questions of "what kind of phone to choose" to "how to transfer files from iPhone to PC" have the most complicated answers, and sometimes all you need is a comprehensive list of all the best choices to choose from. And if one does not work for you, it is also good to know the alternative that works best. Choose the solution that best meets your requirements.
As an iPhone user, being familiar with these apps will be a great help in managing your files, documents, and data, especially since most of these are widely used in terms of file-sharing. These choices also apply to iPhone to Mac transfers, or Mac to PC, or Android to PC, or Android to Mac, and vice versa. So, in cases where you or your friends, colleagues, or families need to transfer files between different devices, you know the best apps to choose from.
FAQs





Leave a Reply.