Android Certificate Management App: How to Choose & Apply
Android certificate management apps are an absolute necessity for both individuals and enterprises when it comes to the appropriate handling of digital certificates. These apps help in the seamless management of digital certificates to ensure a secure environment and reduce the chances of data interception. Manually managing the certificates is complex and error-prone, especially for an enterprise. These apps help streamline and automate the importing, exporting, and updating of the certificates, thereby enhancing efficiency and security.

- 1. What is a Certificate Management App for Android Device?
- 2. Top Best Android Certificate Management Apps
- 3. How to Choose the Right Certificate Management App for Android Devices
- 4. How to Use AirDroid Business to Manage the Certificate of Your Android Device
- 5. How Do I Manage Certificates on Android Devices Manually? (Samsung as an example)
1 What is a Certificate Management App for Android Devices?
Definition
A certificate management app for Android is a software tool used to save, handle, export, import, renew, and manage digital certificates. These certificates are needed to secure communication and data. Without automation through a certificate management app, it can be rather complicated to manage these certificates, especially in an enterprise setting. Here is what they do:
- These apps keep the certificates saved securely in an Android device’s keystore.
- They help renew the certificates in time or notify before they expire.
- Help integration of devices with the enterprise’s network and VPNs, and much more.
Importance
- Certificate management apps for Android are important because they help avoid data tampering.
- In an enterprise setting, it is often mandatory for the users to use digital certificates, hence organizations need a management app to handle them.
- Efficient management of certificates is a compulsory requirement to get certifications like GDPR and HIPAA.
- It is important to avoid interruptions caused by revoked certifications.
2 Top Best Android Certificate Management Apps
Given below is a list of some of the most popular Certificate Management Apps both for individuals and businesses.
1 For Personal Use
SSL Certificate Monitor
It is a handy tool for monitoring the validity of SSL certificates.
Key Features | Pricing | Download Link |
|---|---|---|
| ● Beginner-friendly app that offers easy setup of all the certificates and certificate folders. ● Monitors web certificates, not the FTP and email certificates. ● Features push notifications and customizable widget. | You can install it for free and it offers free one folder with one certificate host. In-app purchases are needed for some premium features. | SSL Certificate Monitor - Apps on Google Play |
SSL Toolkit
SSL Toolkit is another powerful certificate management app for seamless to help you save time and automate the handling of certificates.
Key Features | Pricing | Download Link |
|---|---|---|
| ● Supports the majority of RFC standards regarding X509, CSR, PKCS7, and PKCS12. ● Simplifies the handling and management of certificates and spares the users the need for any command line tool. ● It is a multiplatform tool, supporting all features across all platforms. | Free download but contains some in-app purchases. | SSL Toolkit - Apps on Google Play |
My Certificates APK
It is a useful app that provides free inspection of security certificates used for VPNs and apps.
Key Features | Pricing | Download Link |
|---|---|---|
| ● Provides a quick and easy way of verifying the validity of certificates. ● Check a number of certificate attributes with this app, including alias, subject name, issuer's subject name, key algorithm, key size, validity period, and more. | Free | My Certificates APK for Android - Free download and software reviews - CNET Download |
2 For Business
For enterprises, managing certificates for entire IT assets including each and every device is near to impossible, especially when some devices are also used remotely. Businesses hence use MDM service providers that offer centralized management of certificates. Let us have a look at what they offer, taking the example of the AirDroid Business.
AirDroid Business (Recommended)
It offers a comprehensive Credential Management Tool that enables IT admins to remotely manage security certificates.
Key Features | Pricing | Download Link |
|---|---|---|
| ● Through a centralized console, it allows you to create a credential management policy and apply it uniformly and remotely across all Android devices. ● Keep track of the expiration of all the certifications and hence never suffer downtime. ● In case of lost or stolen devices, remotely revoke certificates to avoid unauthorized access. | 14-day free trial (21 days free trial when you register with a business ID). | Get a free trial here |
3 How to Choose the Right Certificate Management App for Android Devices
Free vs Paid Solutions
Both the free and paid certification management apps have their own set of advantages and disadvantages, and the choice should be made depending on what depth of security you are looking for and what is your budget.
Free Solutions | Paid Solutions | |
|---|---|---|
| Pros |
|
|
| Cons |
|
|
Factors to Consider
- Features Required: For personal use, the basic set of features like import, export, and installation from the storage is all you need most of the time. Hence, investing in advanced features would be overspending. On the other hand, an enterprise needs advanced features to cater to a fleet of devices. At the level of an enterprise, automation is needed as it isn’t possible to access and manage certificates for each device manually. So, a certificate management app that is feature-rich should be considered for better management.
- Types of Devices Supported: In a workplace environment where different types of devices, e.g., BOYD devices, are used and it upholds a hybrid environment, make sure your certificate management solution supports your work model.
- Level of Expertise Needed: Before settling for a certificate management tool, ask yourself if the admins and users have the level of expertise it asks for. Is it easy to install and easy to use?
- Level of Security: Your selected app should be able to store the certificates in a keystore or other safe and secure locations. Moreover, it should have the capability to provide hardware-based security if needed. If there are any suspicious certificates on the device, the app should be able to revoke them automatically, or at least notify the user.
4 How to Use AirDroid Business to Manage the Certificate of Your Android Device
AirDroid Business has a comprehensive Credential Management Tool to help enterprises automate certificate management and get centralized control for deploying their credential management policy. Below is a step-by-step guide on how you can get the best out of this tool.
1 Types of Certificates AirDroid Business Supports
AirDroid supports the following two types of certificates for Android:
- Identity Certificates: These are used by browsers/apps to authenticate a user’s identity for Certificate-Based Authentication (CBA). They mostly come in formats like .pl2 and .pfx.
- CA Certificates: These are needed to establish the trustworthiness of the provided certificates and can be in formats like .cem, .pem, and .der.
2 Steps to Use AirDroid Business to Manage the Certificate of Your Android Device
Upload Certificates
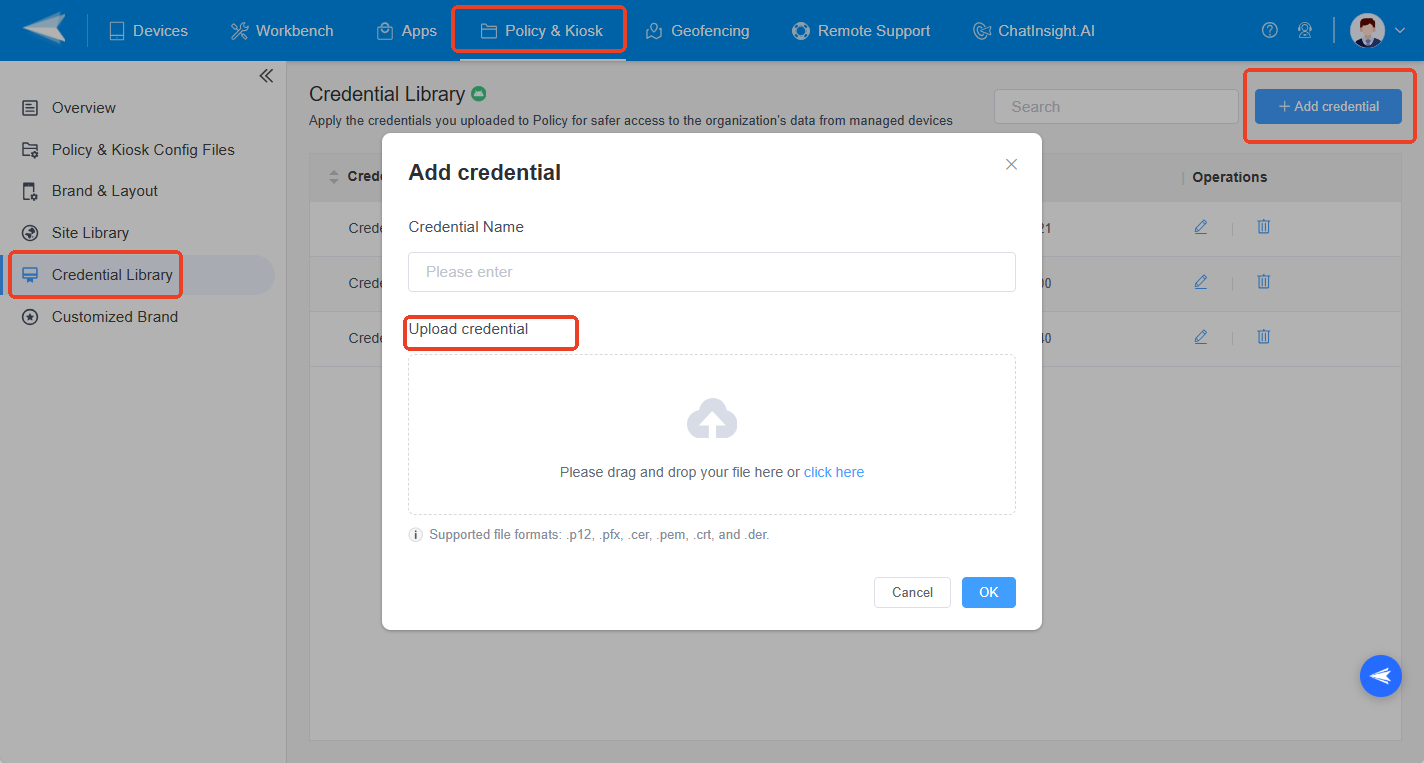
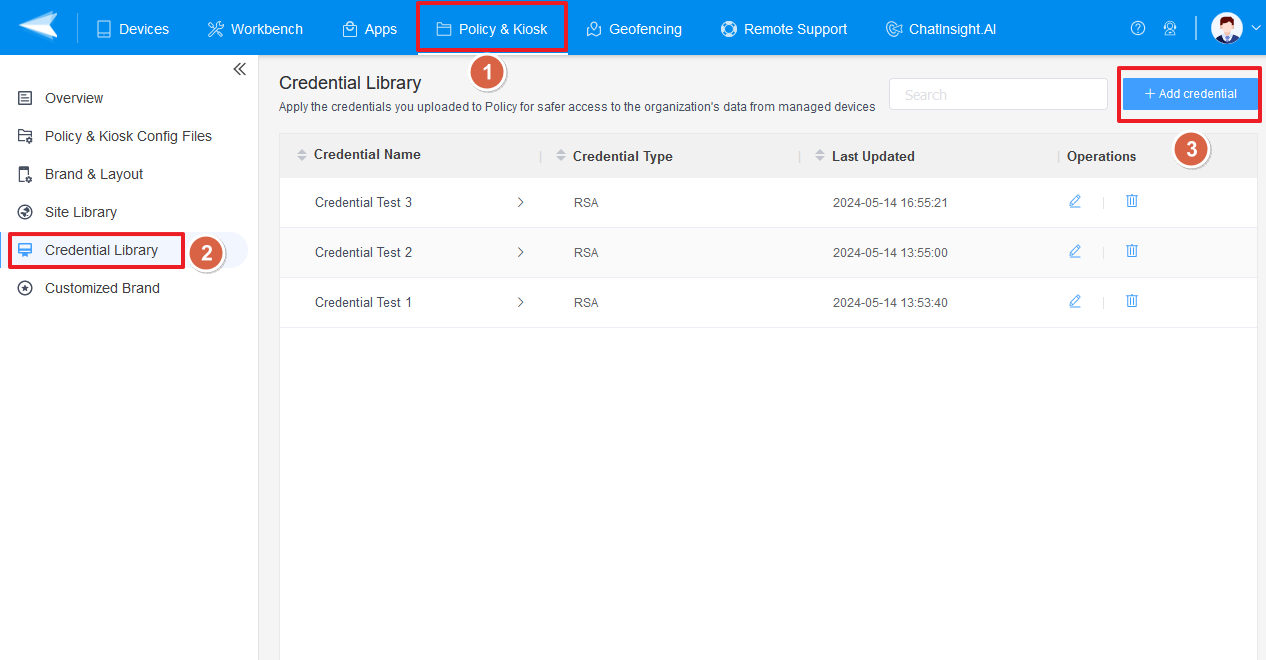
- Step 1: Login to your AirDroid Business Dashboard, and enter the ‘policy and Kiosk’ section.
- Step 2: In the left pane, click ‘credential Library’.
- Step 3: Click ‘+Add Credentials’ near the top right of the screen.
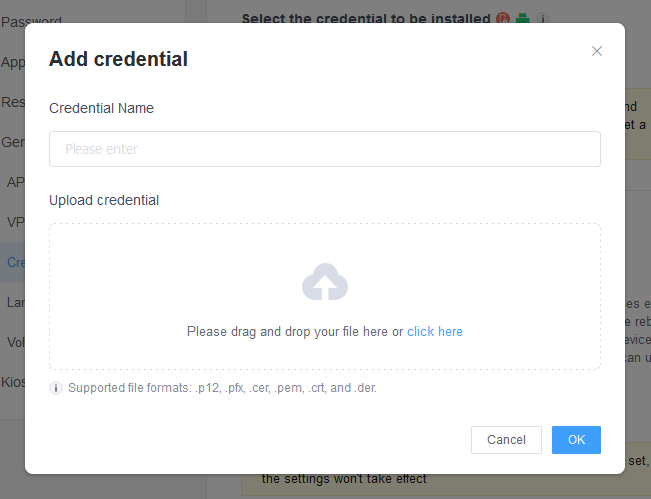
- Step 4: In the window that opens, press ‘upload credentials’ and provide the credential file.
- Step 5: Fill in the required information and press ok.

Delete Certificates
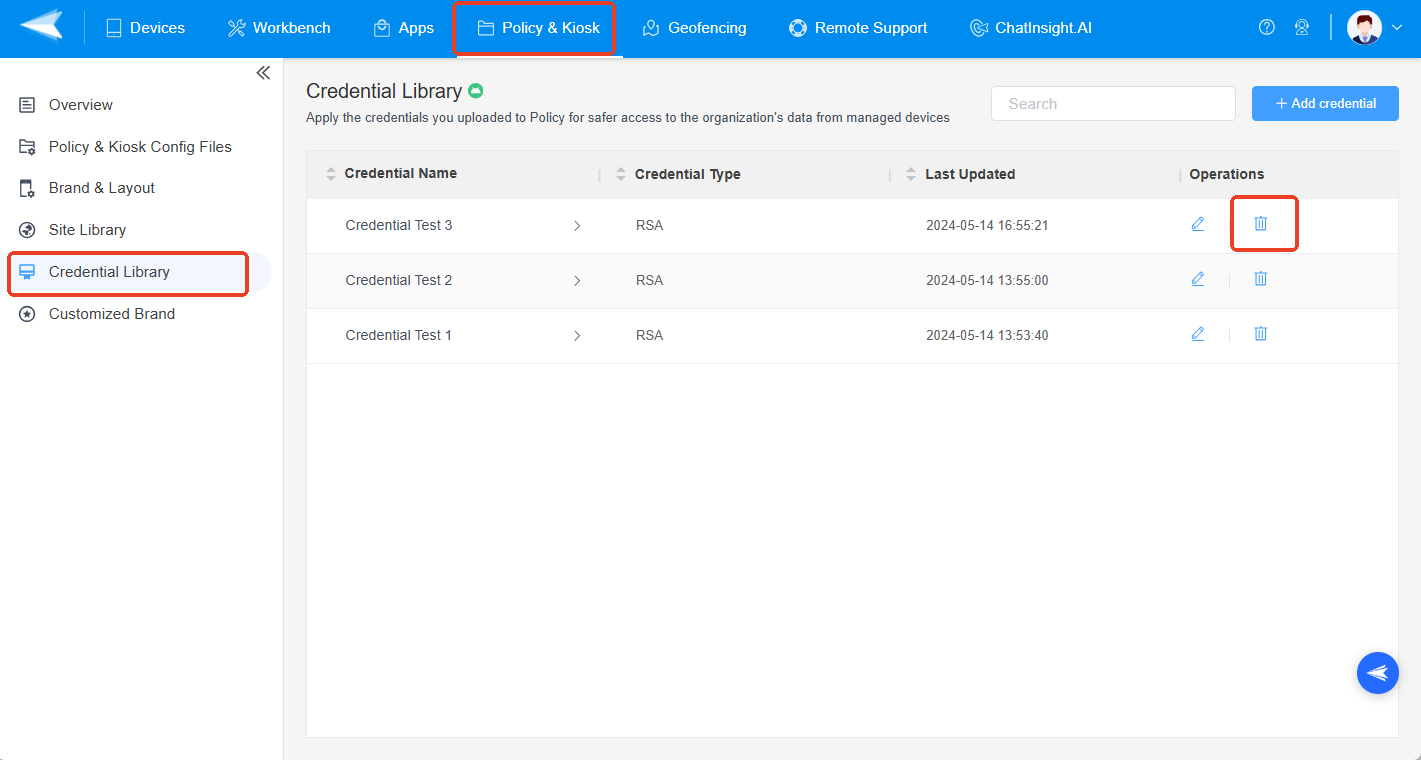
- Step 1: Login to your AirDroid Business Dashboard and enter the ‘Policy and kiosk’ section from the top bar.
- Step 2: Hit the ‘credential library’ option in the left pane.
- Step 3: In the list of credentials that appear, press the bin icon in front of the credential you want to delete.

Apply Certificates on the Devices
To apply the certificates on the devices, start with setting up a credential setting policy. Here are the steps to the entire process:
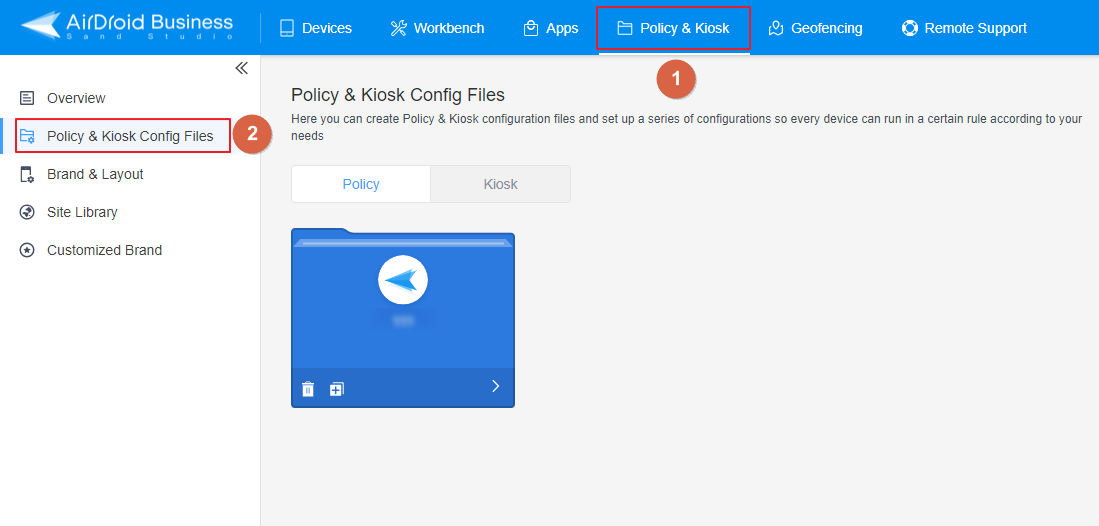
- Step 1: Login to your AirDroid Business Dashboard, and enter the ‘Policy and Kiosk’ from the bar on the top.
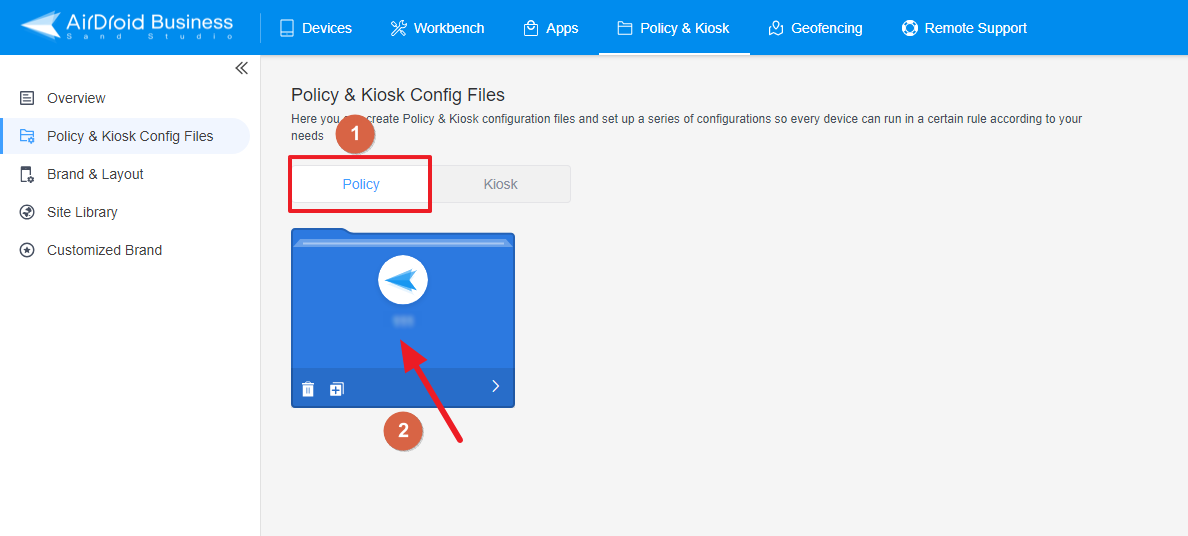
- Step 2: Click ‘Policy and Kiosk Config Files’ in the left pane.

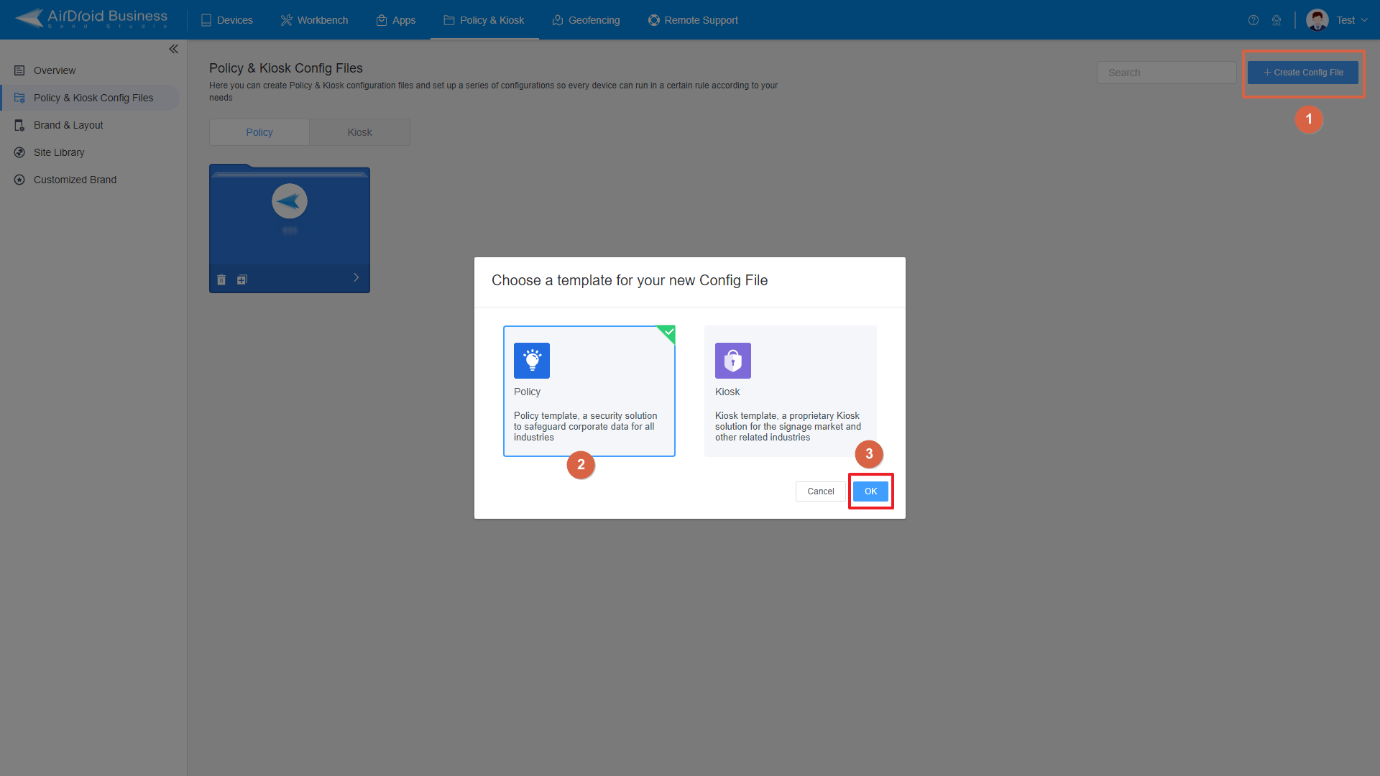
- Step 3: Now you can either create a new policy or edit an existing one. To create a new policy, click the ‘+create config file’ button on the top right corner. Select ‘policy’ and click ‘ok’.

- Step 4: Or edit an existing policy by clicking the ‘policy’ tab and selecting the policy file to edit.

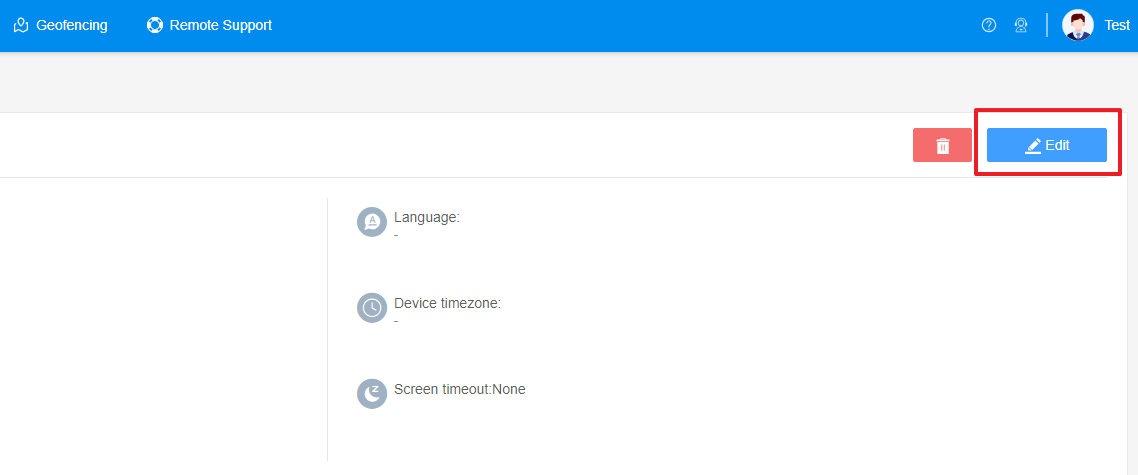
- Step 5: On the page that appears, click ‘edit’ on the top right and you can adjust all settings of your file as you want.

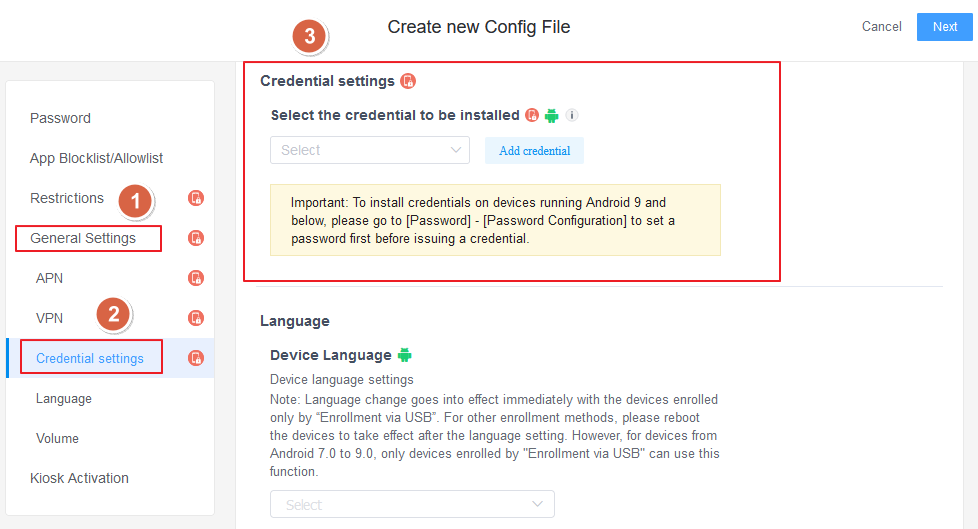
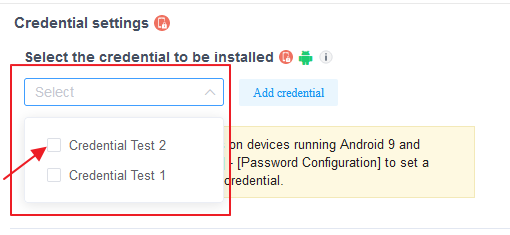
- Step 6: Click the ‘general settings’ in the left pane and navigate to the ‘credential settings’. Now you can configure the ‘credential settings policy’.

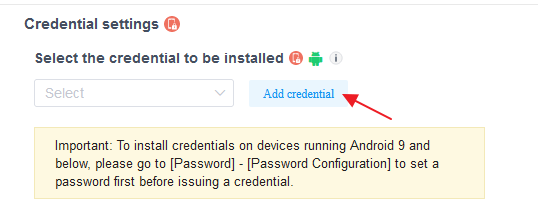
- Step 7: Now it's time to add the credentials. You can do it in two ways. Click the option ‘add credentials’ and you can upload the credentials in the pop-up window.


- Step 8: Or else, you can add credentials by following this path, Policy & Kiosk > Credential Library > Click the button ‘Add Credential’ > Upload the Credential file and complete other information.

- Step 9: Once you’re done adding credentials, hit the drop-down box and select the credential to be applied.

- Step 10: Once the policy has been set, credentials added, hit the ‘save’ button on the top right.
- Step 11: Now go back to ‘policy management section’ and select the policy you created or edited. Navigate to ‘Apply Config File to the following devices/groups’. Click ‘+Ad’ and select the devices or the groups to which you want to apply certificates.
- Step 12: When you see the status ‘applied successfully’ it means the policy and certificates have been applied.
- Step 13: Once done with the above process, check the results on your device.
5 How Do I Manage Certificates on Android Devices Manually? (Samsung as an example)
You can manually manage digital certificates on your Android device. You can check already installed certificates, install a new one, or delete an installed certificate. Let’s have a look at how to perform these functions.
How to View Installed Certificates on Android Device?
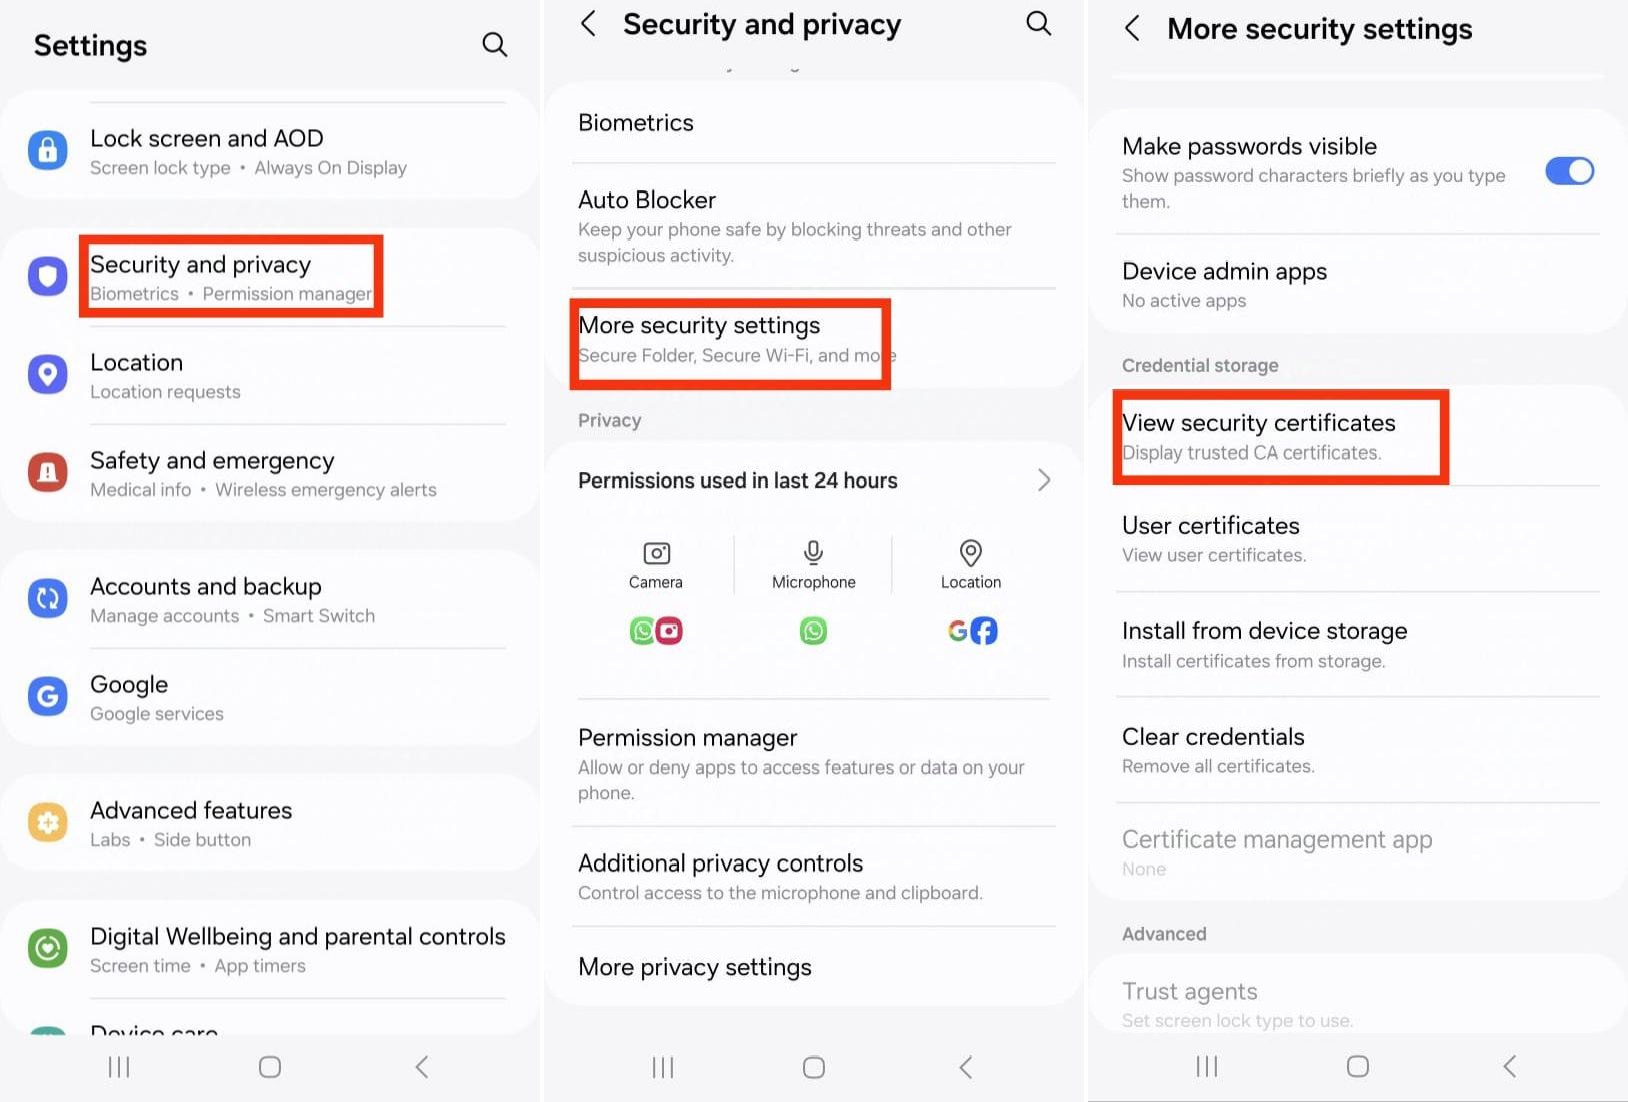
For the beginner, the certificates you install manually on your phone, or those installed automatically by the apps you’ve installed on your phone are mostly found under the ‘user certificates’ tab. Here is how you can view them.
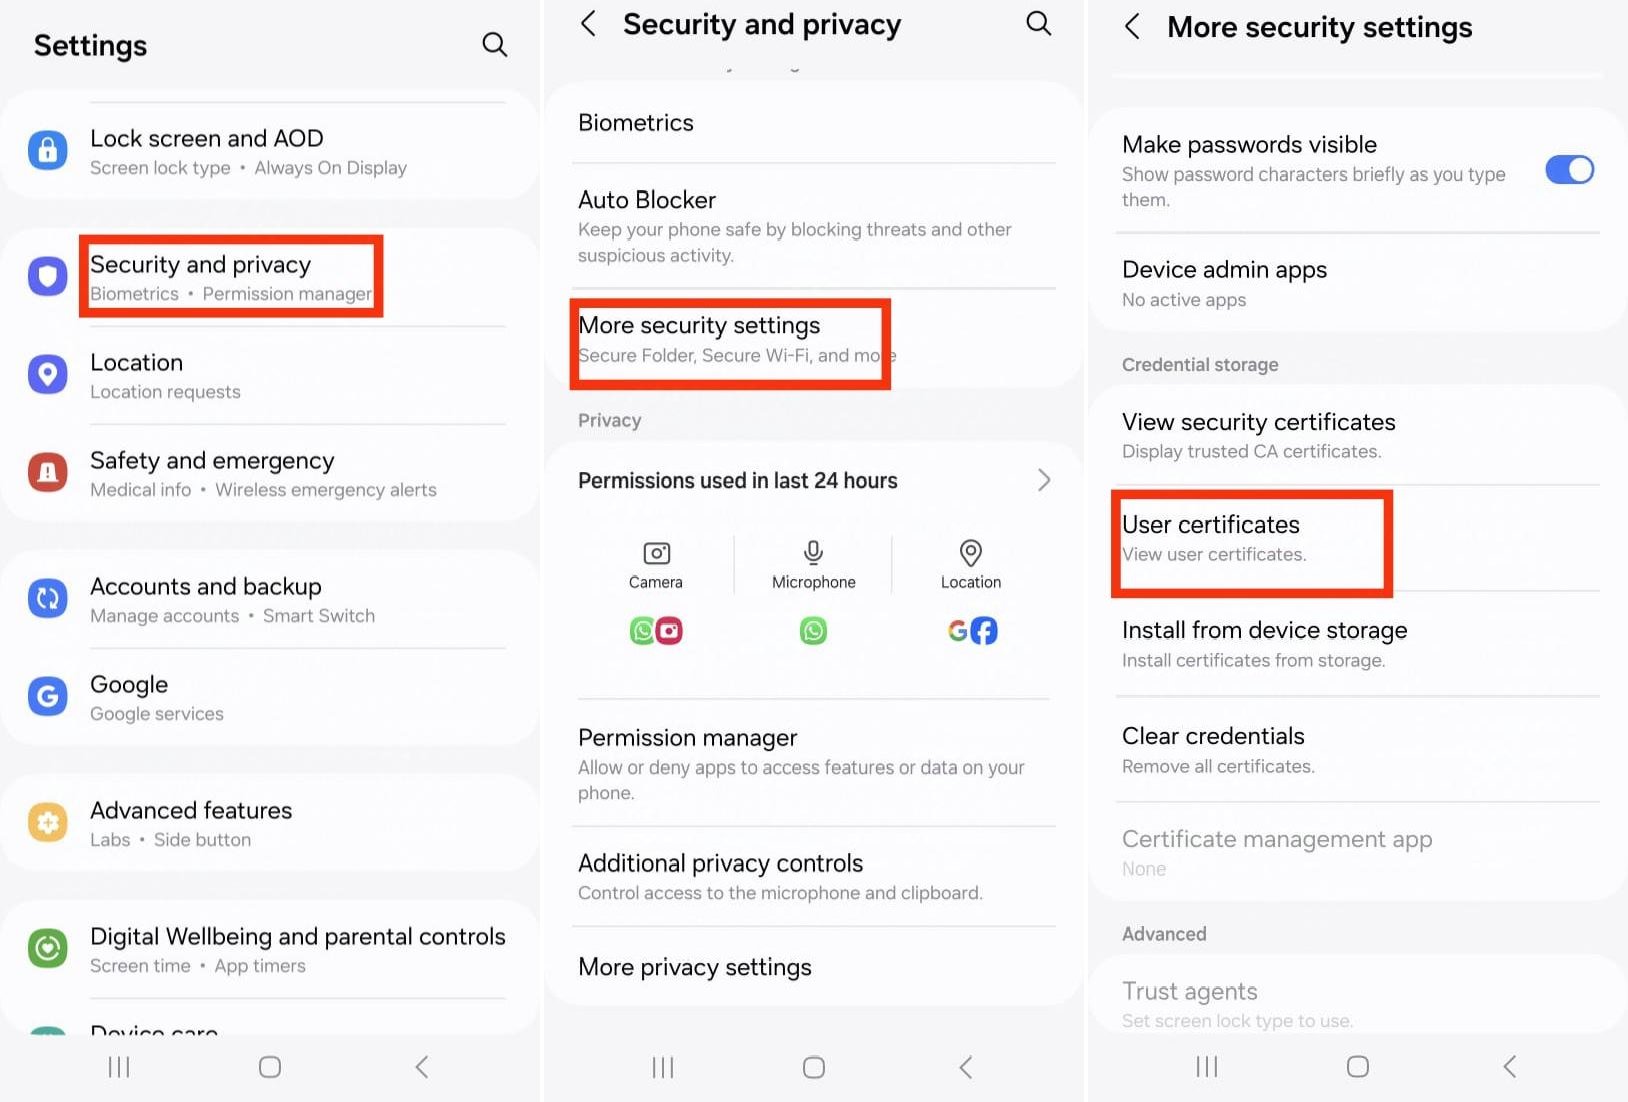
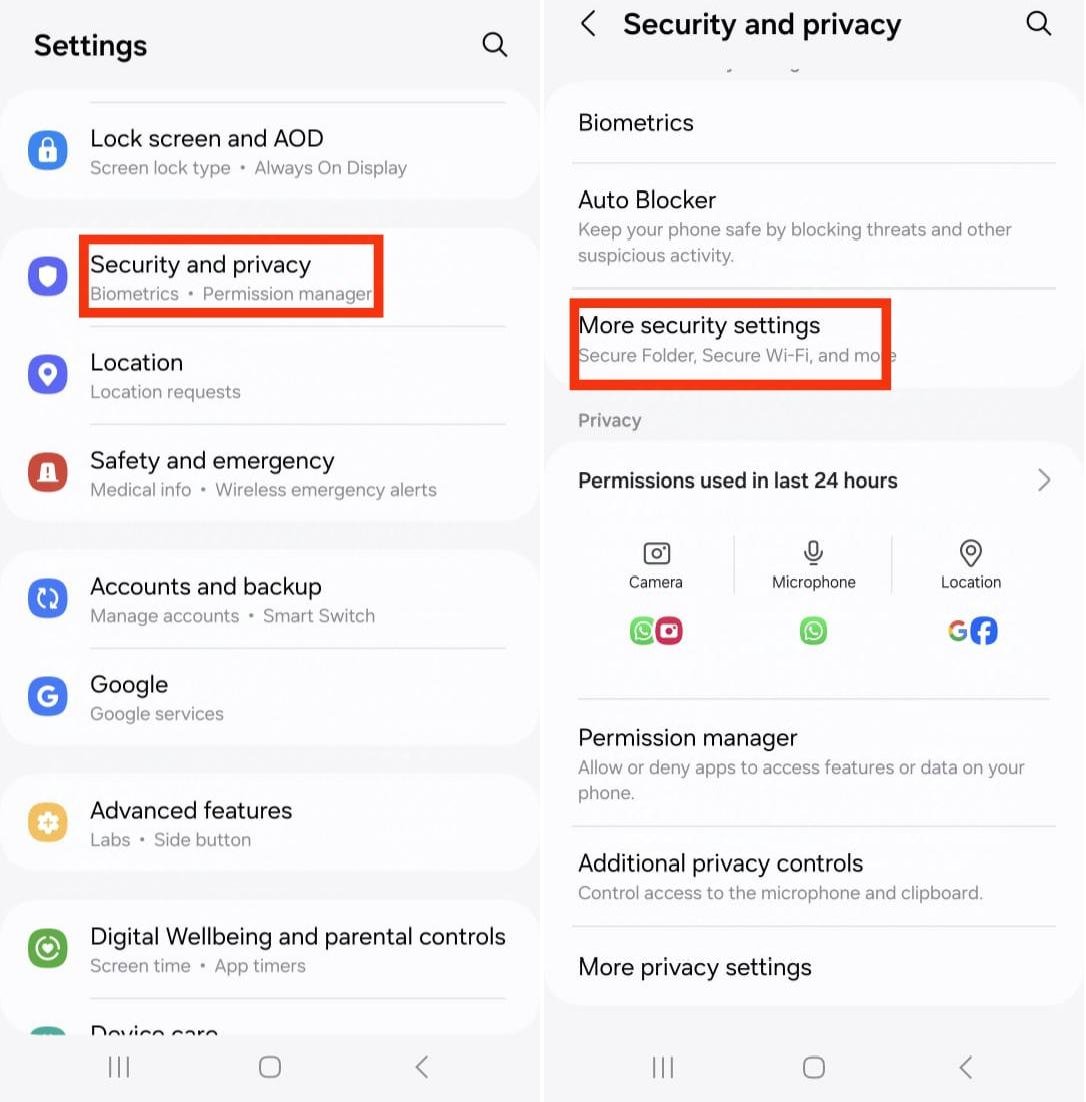
- Step 1: Click the ‘settings’ app on your phone.
- Step 2: Hit ‘security’ or ‘security and privacy’.
- Step 3: Navigate and click ‘more security settings’.
- Step 4: Now you will see two options in the list, ‘user credentials’ and ‘view security certificates’. The former has a list of installed credentials i.e. the ones installed by you or by the apps installed by you. And the latter has the pre-installed trusted certificates.
- Step 5: Click on the ‘user certificates’ and you will see the details of installed certificates.

Where Are the Trusted Certificates on My Android Device?
Trusted certificates are those that are trusted by your device. These are the pre-installed CA (Certificate Authority) certificates often found in your settings by the name of ‘security certificates’. Here is how you can view them:
- Step 1: Click the ‘settings’ app on your phone.
- Step 2: Hit ‘security’ or ‘security and privacy’.
- Step 3: Navigate and click ‘more security settings’.
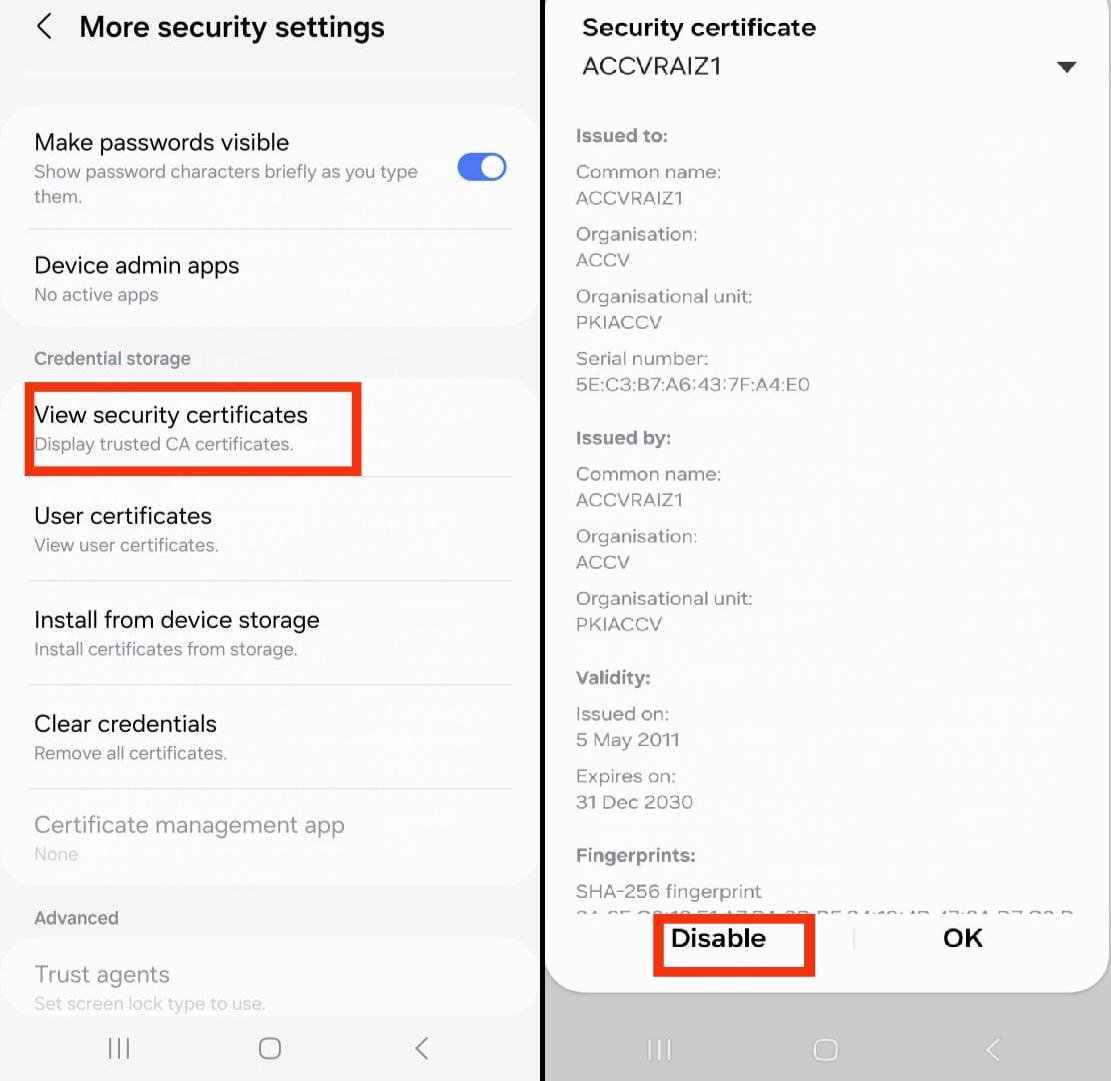
- Step 4: Now you will see two options in the list, ‘user credentials’ and ‘view security certificates’. The former has a list of installed credentials i.e. the ones installed by you or by the apps installed by you. And the latter has the pre-installed trusted CA certificates.
- Step 5: Click on the option ‘view security certificates’ and you will see the details of trusted certificates.

How Do I Delete Certificates on Android Devices?
Follow these steps to remove any certificate from your device:
- Step 1: Click the ‘settings’ app on your phone.
- Step 2: Hit ‘security’ or ‘security and privacy’.
- Step 3: Navigate and click ‘more security settings’.

- Step 4: Now you will see two options in the list, ‘user credentials’ and ‘view security certificates’. The former has a list of installed credentials i.e. the ones installed by you or by the apps installed by you. The latter has the pre-installed trusted CA certificates.
- Step 5: Click on the option ‘view security certificates’ and you will see the details of trusted certificates.
- Step 6: From the list that appears, press and hold the certificate you want to view or delete and select ‘disable’. Or you can simply toggle off the switch in front of the certificate.

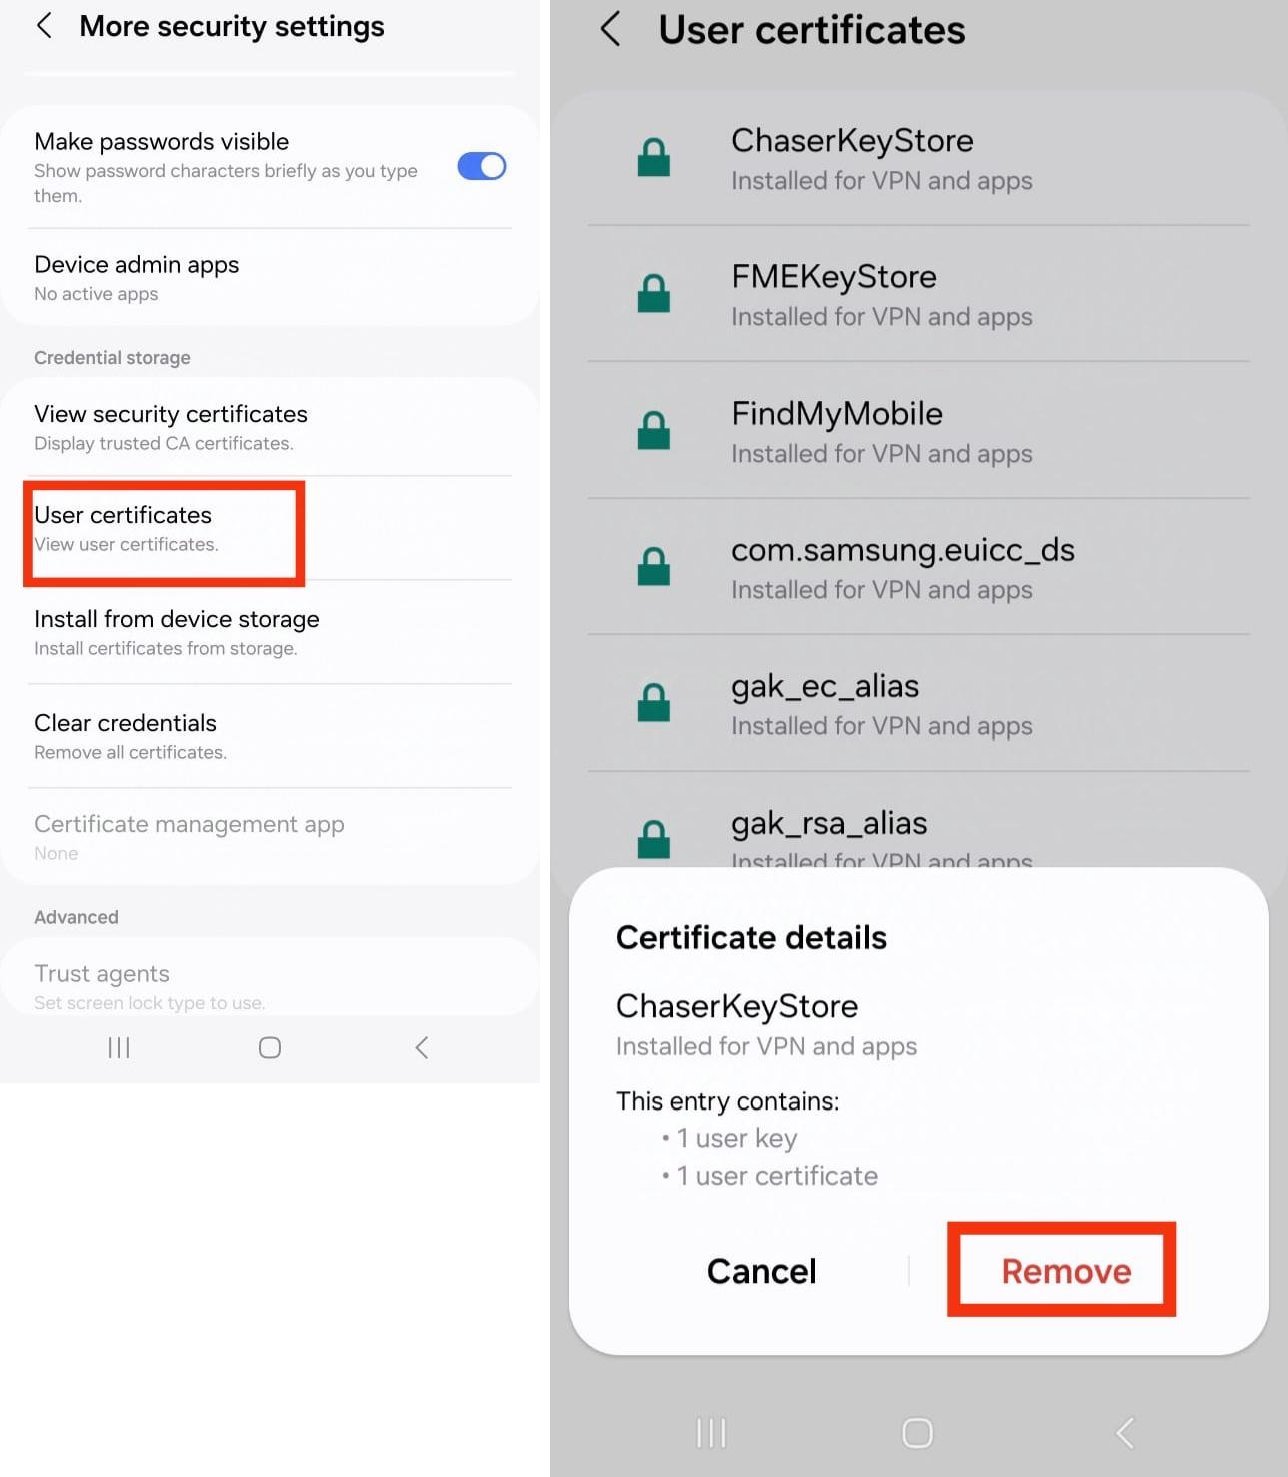
- Step 7: To delete any user certificate, select the option ‘user certificates’ under the ‘more security settings’ tab.
- Step 8: Now, from the list of certificates, select the one you want to delete by pressing down on it for a few seconds and select the option ‘remove’ at the bottom.

Keep in mind that all the information regarding the apps will be deleted if you remove the related certificate.



Leave a Reply.