How to Configure Proxy Settings on Android Devices
Android proxy settings are essential to improve personal and business security in Android devices. Do you want to know how? This article is for you. Usually, users can configure the proxy to reroute their online traffic using a different server. This is possible with the effective masking of the IP address, which adds an extra layer of security. It is helpful for both individuals and enterprises who want to protect their internal communications and data transfers.
Some of the excellent advantages that are possible with the proxy Android proxy settings are:
- bypassing geo-restrictions
- preventing online tracking
- protecting sensitive information, etc.
Moreover, this article will take you to the depths of essential setup and management of the Android proxy settings on your Android gadgets. We will cover the beneficial aspects from both personal and business perspectives. Therefore, whether you are a single user or a business that wants to improve its privacy, this article will help you to protect your information.
1How to Set Up Proxy on Android Device
1Setting up your Proxy for a Wi-Fi network
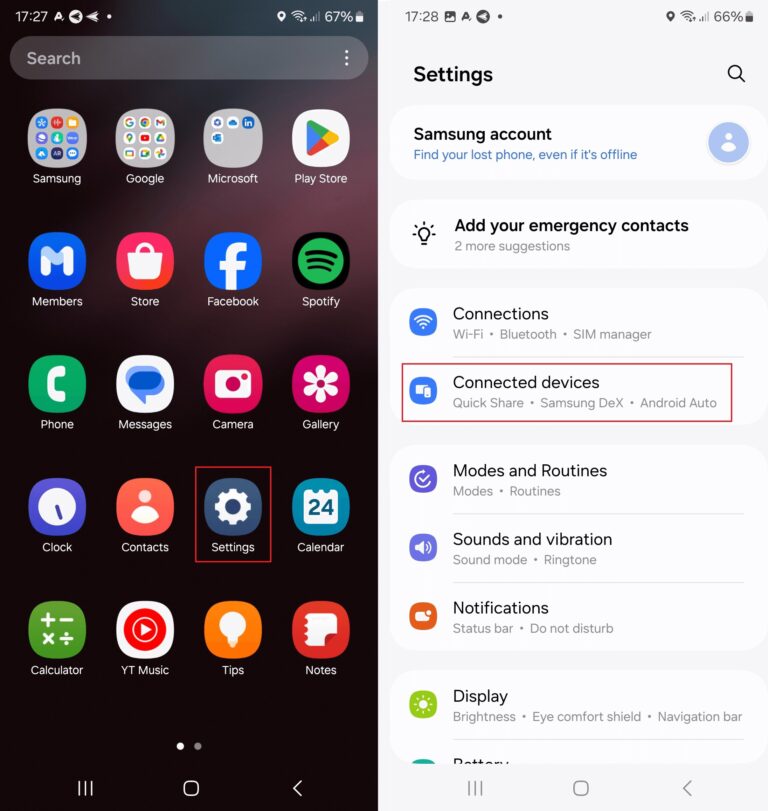
- Step 1Open Android’s Settings
- The first step to follow is to open the Settings on your Android device. Click the gear icon on the screen.

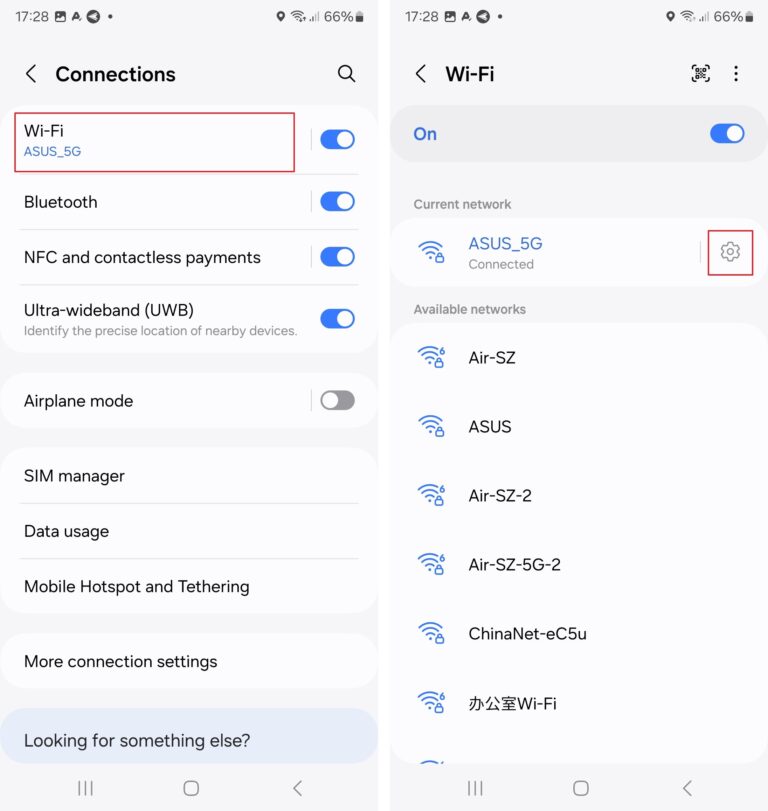
- Step 2Connect To Wi-Fi
- Next, tap the Wi-Fi. Now, look for the gear icon from all your Wi-Fi networks. It will be next to the Wi-Fi you are connected with.

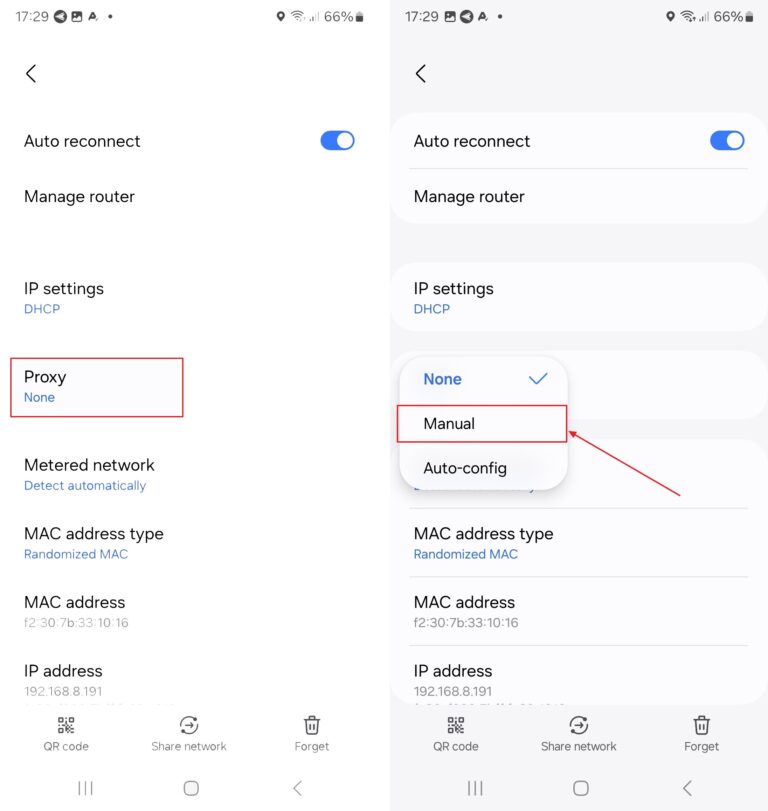
- Step 3Advanced Settings
- Now, click on the Proxy to see all the available advanced options on your screen.
- Step 4Change Proxy Settings
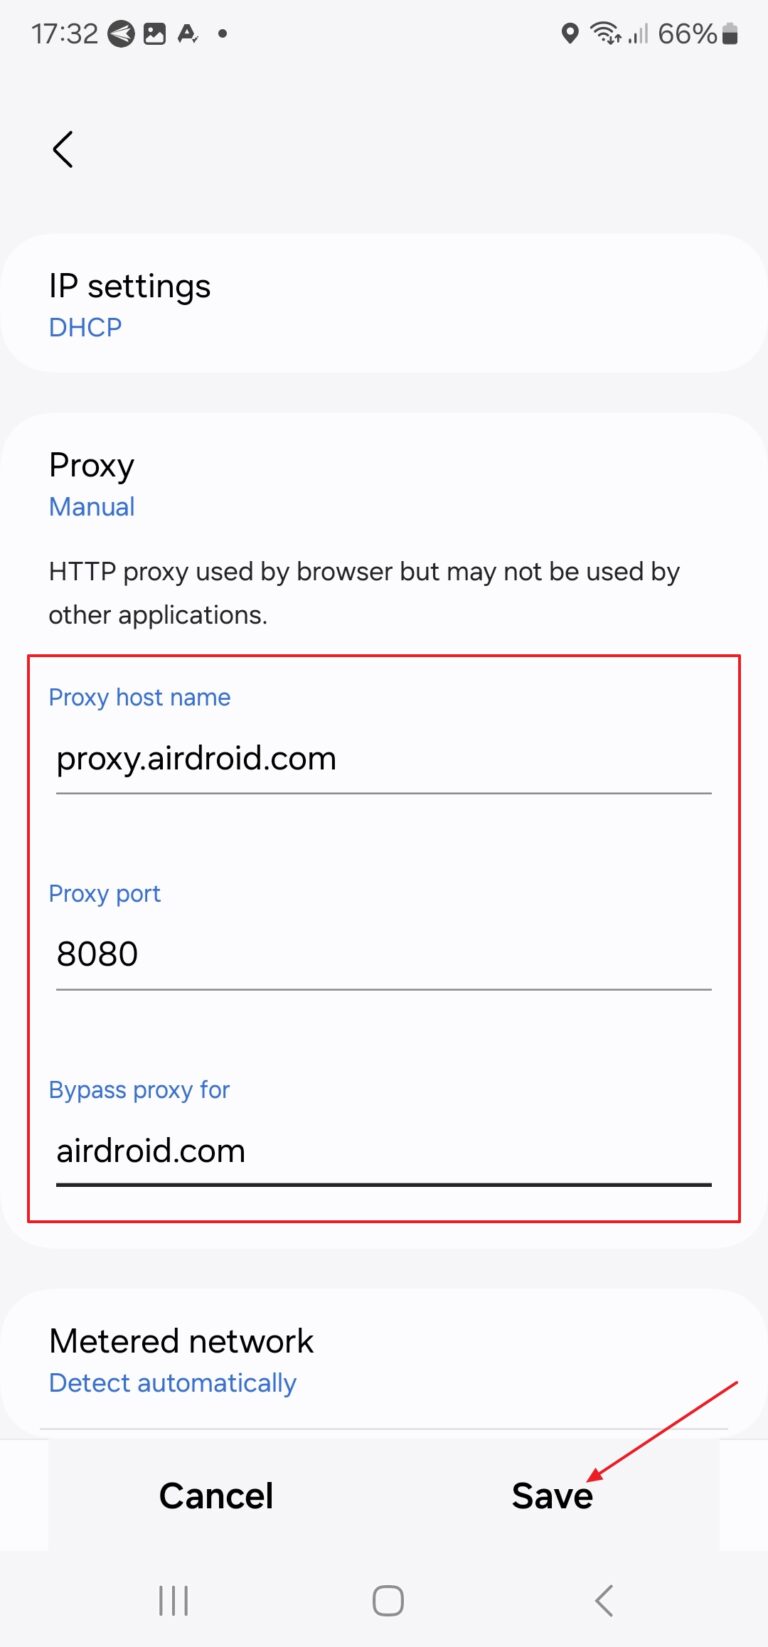
- In this step, you can change your Android proxy settings. You need to select Manual.

- Step 5Enter the Host Name and Proxy Port
- Now, proceed with entering the Host Name and Proxy Port. An example is hostname.eng.example.com:8080. The same goes for the residential and data center proxies. If you want to be aware, only the endpoint:port will be different.

- Step 6Check the IP Address
- Finally, check for the IP address. It should now be a proxy IP address rather than your address.
2Configuring a Proxy for a Mobile Network
You can set the mobile network settings when using the mobile data. The following steps can help:
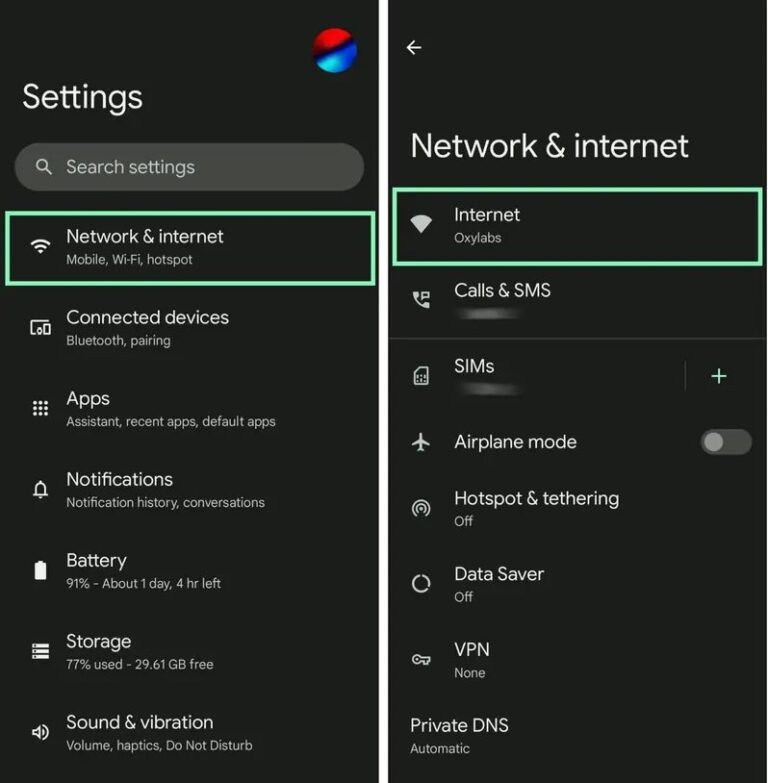
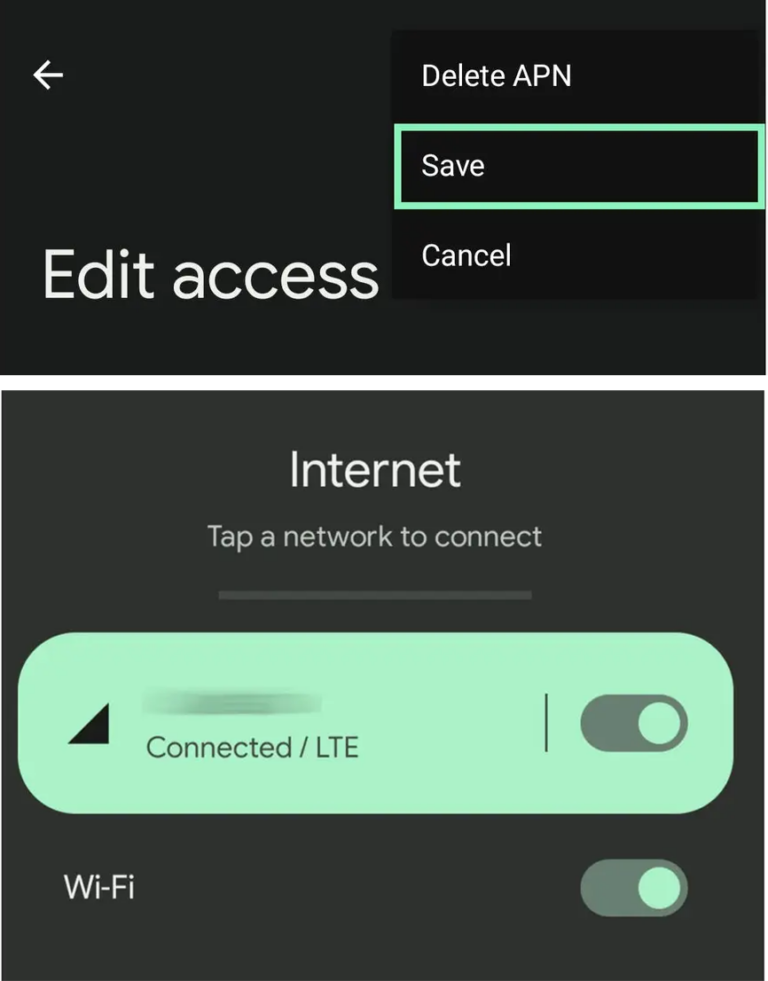
- Step 1Go to "Internet"
- Go to Settings > Network & internet > Internet.

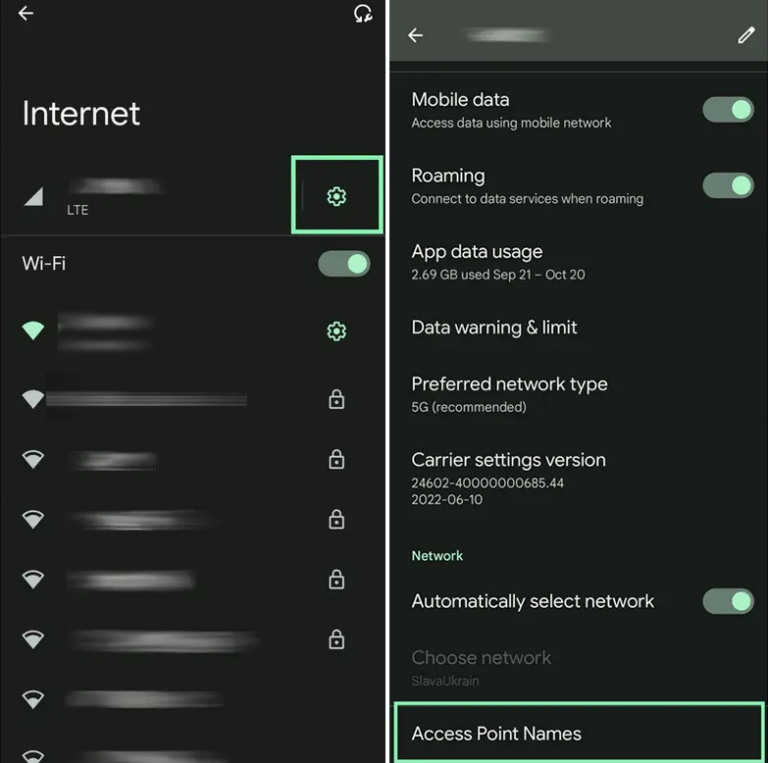
- Step 2Choose the APNs
- Hit the setting of your mobile network provider. Then, scroll to the bottom and choose the Access Point Names (APNs).

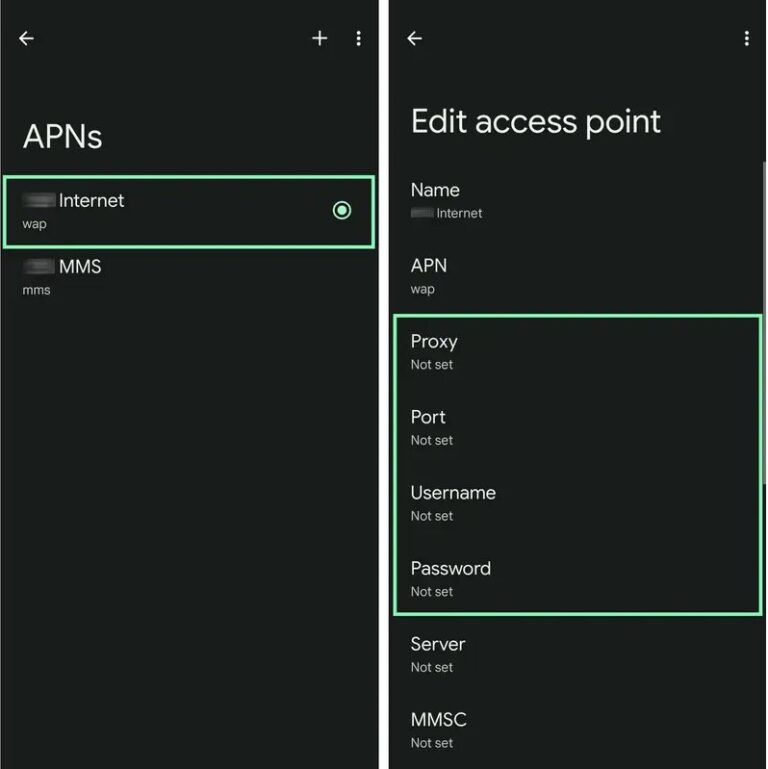
- Step 3Select the APN
- Select the APN that you are presently using to manage the Android proxy settings.
- Step 4Enter the information of Proxy
- Enter your proxy details and credentials like Proxy, Post, Username, and Password.

- Step 5Save the Configuration
- Touch the three vertical dots at the top corner on the right and select Save.
- Step 6Restart the Network
- Now, restart your network and apply the changes by switching the connection OFF and ON again.

- Step 7Sign In the Web
- At last, open your web browser. Now, enter your previously mentioned credentials and press Sign In.
3How do I turn off the Proxy on Android?
Turning off the Android proxy settings is simple. In Android devices, you can select Proxy> None instead of Proxy> Manual in Step 4 under the above heading, “Setting up your proxy for a Wi-Fi network.”
23 Best Free Proxy Apps and Services for Android
1NordVPN – fastest and secure online experience
NordVPN is an excellent tool for Android proxy settings. It can provide you with top-level security features while you browse. Besides, the subscription for using the tool starts at a budget-friendly price of $3.09 per month. Its RAm-only servers, AES-256-CBC, and ChaCha20, guarantee secure connections.
Moreover, NordVPN software comes with a 7-day Free trial, which allows you to try it and check if it works well for your requirements. It is compatible with Android 7.0 and newer versions for smartphones, tablets, and smart TVs.
Pros
- The tool has high speed.
- It works great with the streaming platforms.
- NordVPN also allows torrenting.
- It offers a 30-day money-back guarantee.
Cons
- No Free plan is available for NordVPN
2Surf Shark – connect to over 3200 servers
Surfshark is an incredible solution for Android proxy settings on your devices. It is present on the Google Play and Apple App stores, which is also an opportunity for iPhone users to utilize the tool. Its exceptional features include AES-256 encryption, GPS spoofing, and more.
Surfshark's lowest prices start from just $2.19 per month. Besides, Surfshark provides a free trial of 7 days. It supports Android 5.0 and new operating systems.
Pros
- It offers exceptional server performance.
- With Surfshark, you will get the streaming and torrenting availability.
- It has RAM-only servers.
- Surfshark operated on unlimited devices.
- You have a 30-day money-back guarantee if you don't find the tool helpful.
Cons
- There is non-availability of any Free plan.
3Norton VPN – use bank-grade encryption
Norton VPN is also a secure and trusted VPN provider for Android devices. It enhances the protection significantly. You will get the AES-256 encryption with this solution and secure tunneling protocols. Its price starts at $2.49/month.
Besides, this tool also offers a trial period of 7 days for the users. The trial is available on any device and in combination with a subscription plan. It doesn't even require the third-party app stores.
Pros
- You will get a stable speed with Norton VPN.
- It has robust security features.
- The users will also get the no-log policy.
- Ten connections are available with this tool.
- The money-back guarantee is 60 days.
Cons
- The users can not get the Free version of this tool.
- It will not unlock the common Netflix libraries.
3MDM Solution: Efficiently Managing Proxy Settings of Android Device for Business
MDM solutions are effective in streamlining the proxy settings management over different devices. One fine example of such a solution is AirDroid Business, which offers centralized control. The administrators can use this tool to remotely configure and implement the proxy settings. It guarantees uniformity and compliance with organizational policies.
Moreover, AirDroid Business allows configurations to be automated. As a result, it minimized the manual effort and unwanted errors. Therefore, you will get improved connectivity for all the devices.
Steps to Configure Proxy for Android Device with AirDroid Business
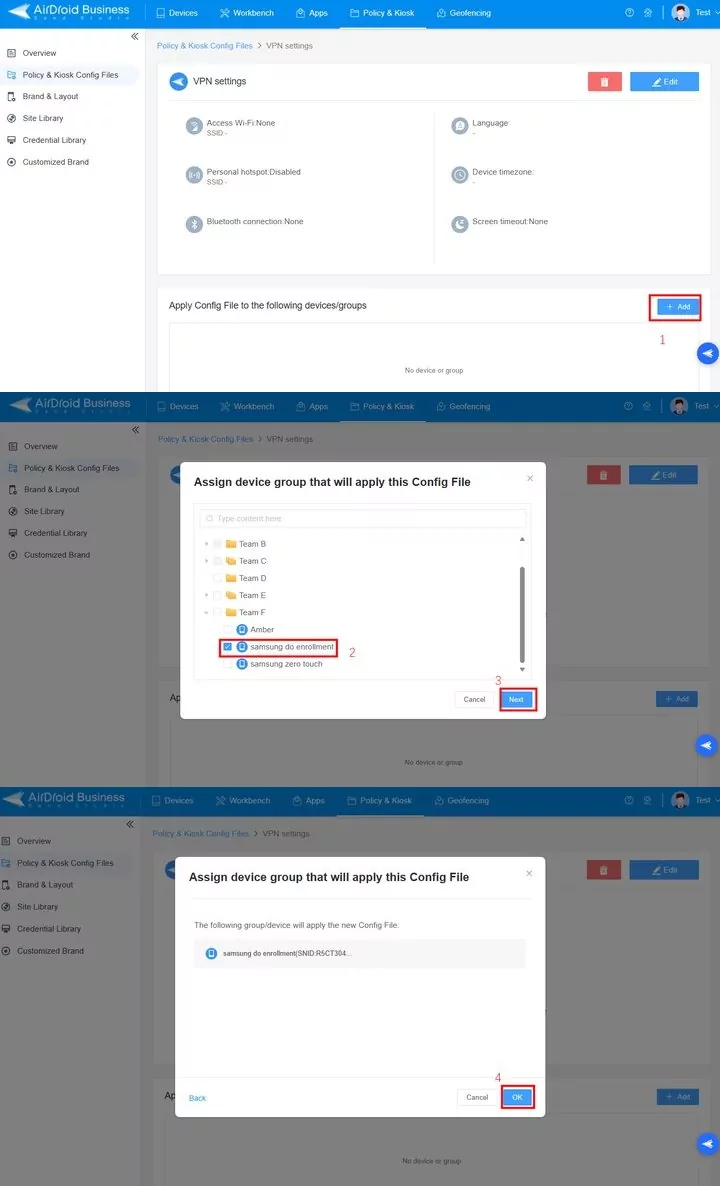
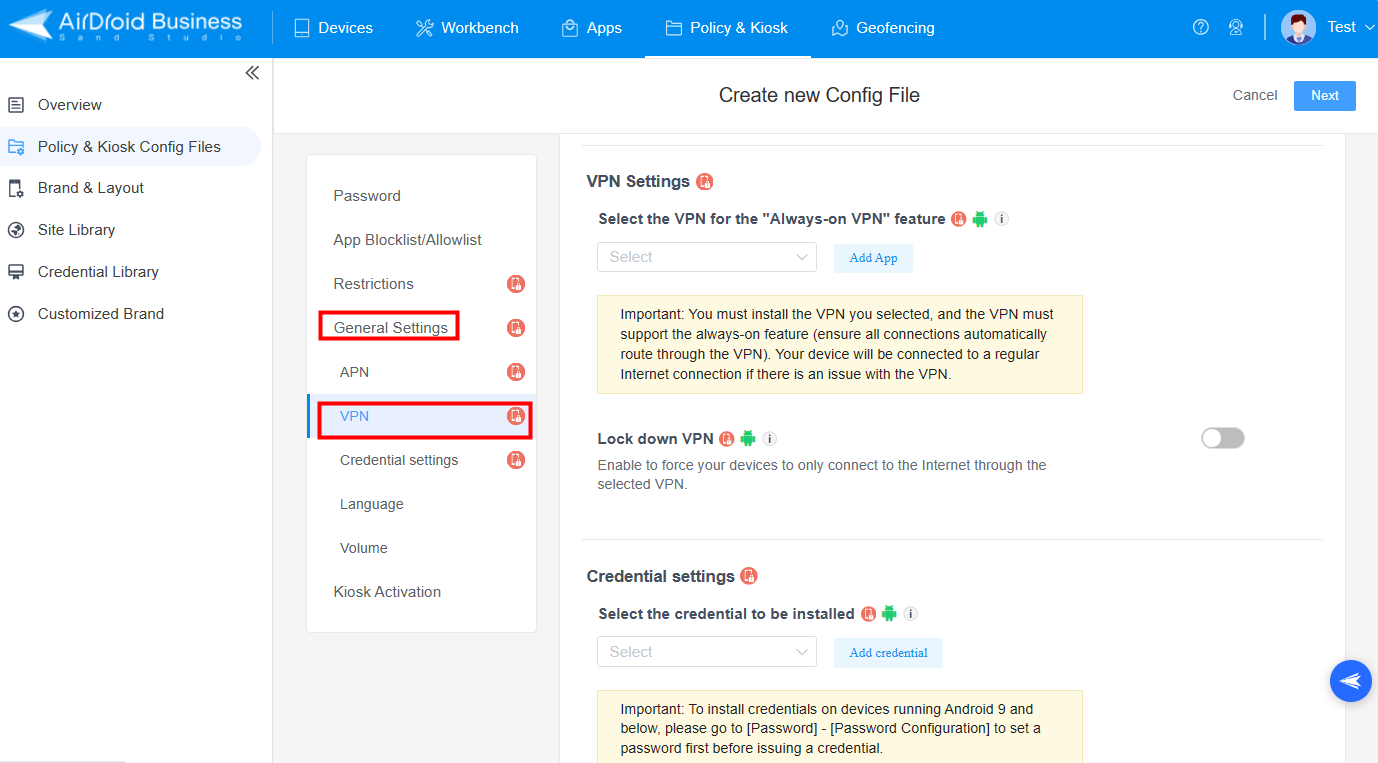
The VPN Setting Policy of AirDroid Business has some excellent features like “Always-on VPN" and “Lock Down VPN.” It guarantees the protection of your VPN. The Always-on VPN feature allows your VPN to always be turned ON when users start their devices. On the other hand, a Lock Down VPN enables your devices to get connected to the Internet through a particularly chosen VPN.
Quick Steps To Use VPN Settings Policy on AirDroid Business
- Step 1: Go to the Policy & Kiosk Config files section and create or edit the policy.


- Step 2: Locate to “VPN Settings”

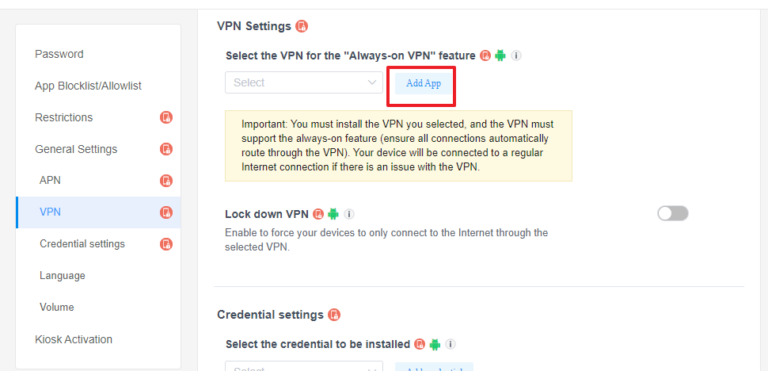
- Step 3: Choose a VPN application you want on the Always-on VPN feature.

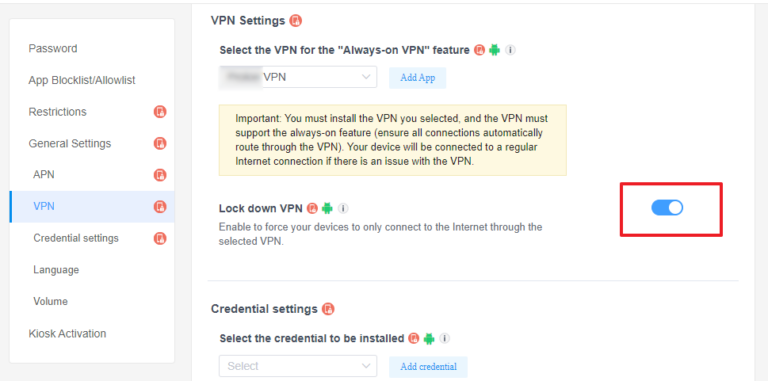
- Step 4: Enable the “Lock down VPN” feature to use a specific trusted VPN only on the devices

- Step 5: Save and apply the policy.
2Troubleshooting
Firefox shows "Proxy Server Refused Connection" when using VPN
Many people have faced this issue. It upsets the users, and they try to find various online solutions to fix this issue. Some of the effective methods that you can attempt are:
- Check your Proxy Settings in the browser
- Try to turn OFF the Proxy server for the LAN
- Check the VPN
- Disable your manual Proxy setup from Settings
- Check the system for malware
Is there a way to set a proxy ONLY for specific apps on Android?
Yes. You can set a proxy only for the specific apps on your Android devices. The first method that you can try is using the Split Tunneling option available on your VPN software. Another option that can be tried is opening your VPN software through an external open-source app called OpenVPN for Android.
FAQs





Leave a Reply.