[Solved] How to Setup Chromium Kiosk Mode in Raspberry Pi?
With the increasing ratio of cybercrimes, every individual and enterprise is vigilant about their privacy on the internet. They look for security features to safeguard their privacy and avoid malicious attacks.
One security measure is to create and configure a browser in kiosk mode. Many businesses prefer using Google Chrome for this purpose.
However, Raspberry Pi does not support Chrome. As an alternative, the Chromium web browser can be set to kiosk mode on Raspberry Pi. Chromium shares many features with Google Chrome and is open-source.
1Chromium - An Open-source Web Browser
Chromium has a wide range of users worldwide due to its unique characteristics than other web browsers. It is an open-source browser that allows other browsers to use its source codes.

Developers use the Chromium browser to add new functionalities based on the source code. It is compatible with Google services and closely resembles the Chrome browser, supporting all Chrome extensions.
The primary purpose of Google creating Chromium is to gather external input and generate new ideas for an advanced browser.
2 Chromium Kiosk Mode: Setup Guide and Instructions
Chromium kiosk mode on Raspberry Pi devices effectively turns devices into dedicated web kiosks with specific URLs added in the script to allow access.
Effects of Chromium Kiosk Mode
- Restricted Access: When switched into this view mode, the Chromium browser takes over the entirety of your screen, blocking access to status bar, browser controls, and the operating system interface.
- Full-Screen Display: When switched into this view mode, the Chromium browser takes over the entirety of your screen, blocking access to status bar, browser controls, and the operating system interface.
How to Set Up Chromium Kiosk Mode on A Raspberry Pi?
Setting the Chromium browser into kiosk mode enables developers and other users to continue smooth browsing. Enterprises can ensure device data security and allow staff to use only the Chromium browser for web research and use source code while blocking all other functions on the devices.
Requirements
Raspberry pi B+ model with installed OS (Raspios Buster Lite) Version 202-12-02. This Version is formally known as Raspbian and does not include a graphic operating interface.
Manage basic settings on raspi-config and update the apt-get to proceed efficiently.
Install a basic dependent program (Xserver) to run the chromium on Raspberry Pi. Here is the script to install it: sudo apt-get install --no-install-recommends xserver-xorg x11-xserver-utils xinit openbox
💡Setup Steps of Raspberry Pi Kiosk Mode
- Step 1.Install the Chromium browser
- Type the following script to install Chromium: sudo apt-get install --no-install-recommends chromium-browser
- Step 2.Open and Edit the file
Open [/etc/xdg/openbox/autostart] file and add the following script to it:
# (PT1) Disable any form of screen saver / screen blanking / power management
xset s off
xset s noblank
xset -dpms
# (PT2) Allow quitting the X server with CTRL-ATL-Backspace
setxkbmap -option terminate:ctrl_alt_bksp# (PT3) Start Chromium in kiosk mode
sed -i 's/"exited_cleanly":false/"exited_cleanly":true/' ~/.config/chromium/'Local State'
sed -i 's/"exited_cleanly":false/"exited_cleanly" :true/; s/"exit_type":"[^"]\+"/"exit_type":"Normal"/' ~/.config/chromium/Default/Preferences
chromium-browser --disable-infobars --kiosk ' http://your-url-here'
- Step 3.Execute Xserver automatically on Boot
Use the following command to edit.profile
Cut and paste this text to the end of the file: sudo nano .profile
[[ -z $DISPLAY && $XDG_VTNR -eq 1 ]] && startx -- -nocursor
Press Ctrl + x and then y to save file.
The above settings will enable Chromium kiosk mode on Raspberry Pi after login. If you want to skip the login process, you need to add the account in the script, which will allow automatic login to the device with kiosk mode.
Chromium Kiosk Settings Options
Using ‘--noerrdialogs’ command, you can suppress error notifications to display on the interface, which can set a negative impact on user experience.
'-disable-infobars’ flag hides the information bar avaialbel at the top of the browser.
Add multiple URLs in the script with a space between them. It will allow Chromium kiosk to open all these URLs in different tabs. However, switching between tabs might require additional scripting.
Combine ‘--kiosk’ flag with other scripts like ‘—disable-extensions’ or ‘--incognito’ for limiting browser access to limited content.
3 The Alternative Method
Some users may seek alternative methods due to limitations in Chromium's kiosk mode.
Difficult maintenance and troubleshooting: Chromium kiosk requires manual updates and it is challenging to troubleshoot issues on bulk devices.
Scalability and security concerns: It lacks native and additional security measures, making it vulnerable to cyber-attacks and loss. It lacks centralized management tool to manage multiple kiosks placed at different locations.
Limited customization options: It only supports basic functionalities and options which are not enough to meet specific business needs.
Alternative Method: Install Your Required OS & MDM Solution
To efficiently lock down a large number of corporate devices into a browser, it is recommended to use Google Chrome instead of Chromium due to its superior stability and security. Chrome also provides extensive support and integration with other Google services.
The question is how to install Google Chrome on a Raspberry Pi? It start by setting up a new operating system on the device.
Then, use a Mobile Device Management (MDM) solution to enable lockdown, management and automate tasks across multiple devices.
- Step 1. Install new OS on it using Raspberry Pi Imager
💡Demo: Let’s discuss how we can install Android OS on it using Raspberry Pi Imager:
1. Download the Raspberry Pi Imager from the official website. Take an SD card of at least 32 GB and put it in the card reader. Connect the card reader to the device port and open the imager. Allow all necessary permissions to run the application.
2. Choose the ‘No Filtering’ option from the list of Raspberry Pi Devices. The Imager will display a list of OSs. Choose ‘Freemium and paid-for OS.'
3. Choose Android for Emteria and Android 14.
4. Click on the ‘Choose SD Card’ option and select your card. Select ‘Write’ and double-check your SD card to confirm it. Android emteria will write in the SD card, which might consume some time. So, please be patient and wait until it is completed.
5. Eject the SC card safely and insert the SD card into the Raspberry Pi. Make sure the device is powered off before inserting the card. Power on the Raspberry Pi, and it will boot from the SC card with the new OS selected.
Note : Now, you can make further changes for better device performance as per needs.
- Step 2. Choose an MDM solution
Option 1. Open-source MDM
Once you've installed the Android operating system on your Raspberry Pi, you can use open-source MDM software with kiosk features, like Flyve MDM to install Chrome browser and lockdown Chrome kiosk mode.
Option 2. Commercial MDM Solution
For bulk kiosk management, requiring custom features and security level cares, we recommend to use commercial MDM solution.
Pros of AirDroid Business MDM Solution
- Seamless kiosk setup and lockdown
- Centralized management console, remote monitor and control
- Unified configuration
- Compliance monitoring
- Data encryption
- Trusted customer support
- Step 3. Finish configurations
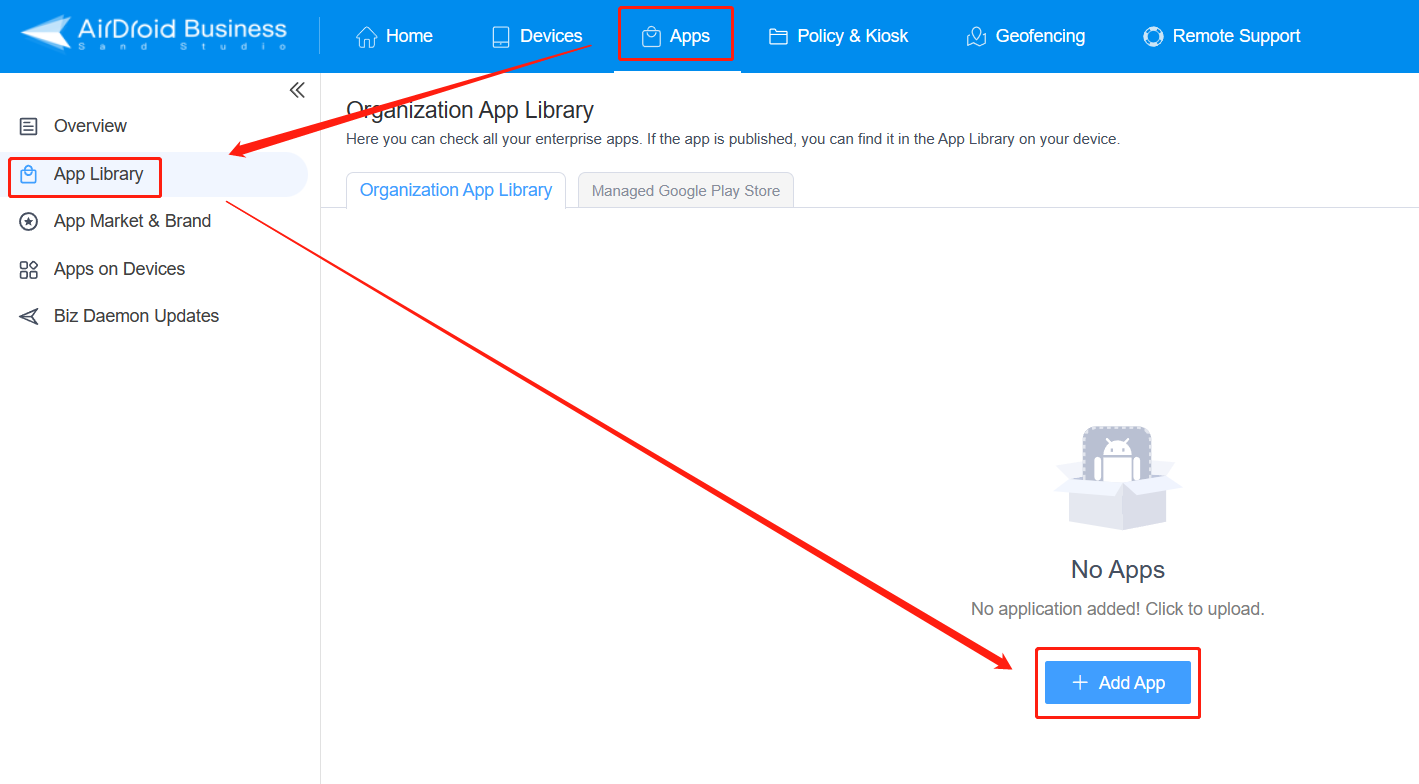
- Open the AirDroid Business admin console and find "Apps" - "Organization App Library".
- Upload the apk of the Google Chrome to your organization app library or directly download Chrome from Google Play Store. And then distribute it to your target devices/device groups.
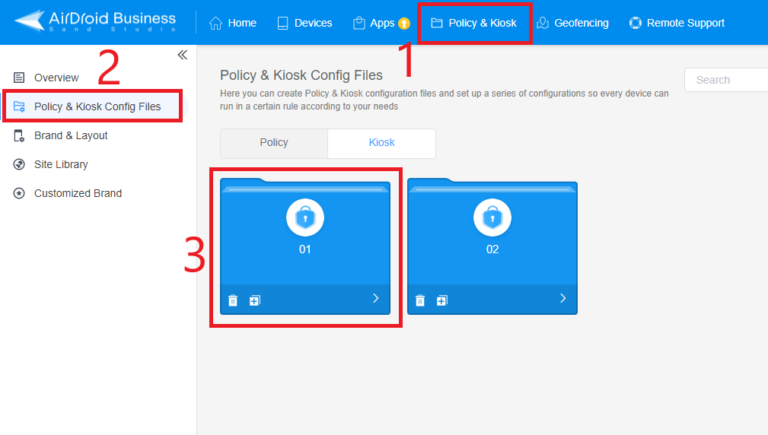
- After distribution, add "Chrome" to your App Allowlist(specify a list of approved apps that are allowed to run on your managed devices).
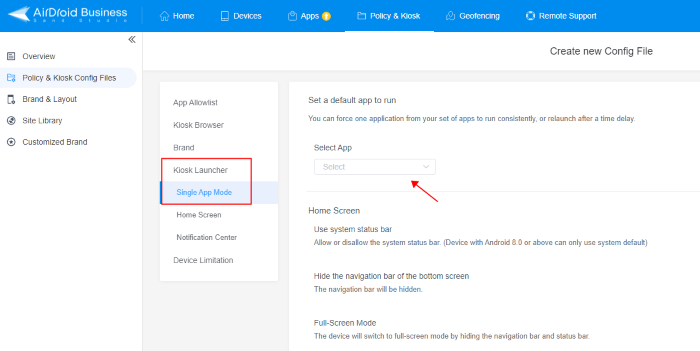
- Now you can choose whether to configure your devices into single/multi-app kiosk mode. Single-app kiosk mode - only running Chrome browser in your devices. Multi-app kiosk mode - you can set up more specific applications to make them available on your devices.
- You can also customize various settings of the devices using AirDroid Business MDM remotely. Including device interface, device functions and more.


4Versatile Digital Kiosk Display for Various Applications
Digital kiosk displays have significant importance in almost all industries. A kiosk helps enterprises to make enterprise devices purpose-built with limited functions.
They can set a single app kiosk mode to play only the company app on devices. Some companies require more than one application to perform various tasks. They can whitelist multiple apps to run on the devices. Here are its benefits in the three most important sectors:
Retails
- Self-Checkouts
- Sales and Promotions
- Product Catalogs
Most of the popular retail shops are crowdy. To manage numerous people simultaneously without delay, they utilize digital display kiosks. After shopping, customers reach these check-out kiosks to scan their bills and pay bills.
Retailers facilitate customers with different loyalty programs using these digital displays to add them to various rewards and promotions.
Digital displays are crucial to display product details and prices. They serve as interactive product catalogues sharing the images of products with complete information and creating a price comparison.
Advertisement
- Marketing Tool
- Interactive Ads
- Videos and Animation
Digital displays are utilized as a perfect marketing tool by adding additional cameras and sensors to analyze customer preferences and display ads accordingly.
Digital displays with kiosk mode are best practices to win customers' hearts. Interactive ways display new arrivals, promotions and sales to attract more customers.
Businesses can also play specific videos repeatedly to grab customer attention and improve sales. They can utilize them best for event promotions in various locations.
Self-service/self-ordering kiosk
- Hotels and Restaurants
- Information
- Ticketing
Self-ordering kiosks help restaurants and hotels to browse menus with digital images and prices. Customers can order the food and pay the bill without delay.
Self-service kiosks are valuable for displaying detailed information about any event, product or service, and users can easily purchase them.
It helps to easily buy tickets at airports, railway stations and cinemas for instant bookings with flexible offerings.
FAQs of Chromium Kiosk Mode


Leave a Reply.