How to Enroll and Deploy Company-owned Devices for Android
Using Android mobile devices for work purposes can be a challenge for enterprise management and security.
Malware and data theft could happen to employees' Android devices and lead to a data breach. Also, a lost device brings risks to the company's important information.
That's not surprising that enterprises require Android Mobile Device Management as a solution to relieve concerns.
Along with the solution, there is also the COBO (corporate-owned, business-only) or COPE (company-owned, personally-enabled) policy which acts as an agreement between the company and employees regarding deeper mobile management and avoiding privacy infringement.
At this point, company-owned Android device management become an essential part of enterprise operation.
This article is here to guide you. Read on and learn how to bring company-owned devices management into practice.
- Part 1 : Tools for Company-owned Android Device Management
- Part 2 : Best Practices to Enroll Company-owned Devices (Android) and Manage
- Method 1 : Enroll via Google Workspace
- Method 2 : Enroll via Android MDM Tool

- Part 3 : Deployable Content for Company-owned Android Device Management
- Part 4 : FAQs
Part 1 : Tools for Company-owned Android Device Management
Enterprises with COBO/COPE policy will need software (or a web-based portal) to help with administration and security. It can use mobile device management (MDM), enterprise mobility management (EMM), or unified endpoint management (UEM) to help. Both are tools to provide a centralized platform for device enrollment, deployment, configuration, app management, monitoring, and other remote control and troubleshooting capabilities.

To be more specific, for example, with an MDM for Android corporate-owned devices you can:
- Create device inventory lists via various enrollment methods, such as Android Enterprise enrollment (using afw#setup) and zero-touch enrollment (for large-scale company-owned devices).
- Set up security policies to enable or disable certain system settings, such as password policy and file transfer.
- Manage and configure apps in Managed Google Play for GMS mobile devices, such as app update rules.
- Single app/multi-app kiosk mode, kiosk browser with incognito mode and auto-clear cache ability.
- Location tracking and receiving alert notifications.
- Remote access, remote wipe, remote screen lock, and other control operations.
- Report and user management.
Part 2 : Best Practices to Enroll Company-owned Devices (Android) and Manage
In this section, we will explore best practices for company-owned Android device management according to the enterpise policy over device usage.
- For COBO policy - AirDroid Business Android MDM Tool: allow to enroll dedicated devices or fully managed devices with AE and zero-touch enrollment
- For COPE policy - Google Workspace: allow to manage corporate-owned devices with work profile
1Method 1: Enroll Corporate-owned Devices via AirDroid Business
Using a third-party Android MDM tool is an ideal practice for company-owned Android device management. You can enjoy comprehensive features and view detailed device status and log reports.
Take AirDroid Business for example and see how to use it for Android corporate device management.
- Step 1. Log into AirDroid Business and choose enrollment methods.
- In "Device" > "Device Enrollment", you can see four enterpise enrollment methods - Regular, Device Owner, Android Enterprise, and Zero Touch.
- Company-owned devices can use Device Owner, Android Enterprise, and Zero Touch enrollment for advanced control access.
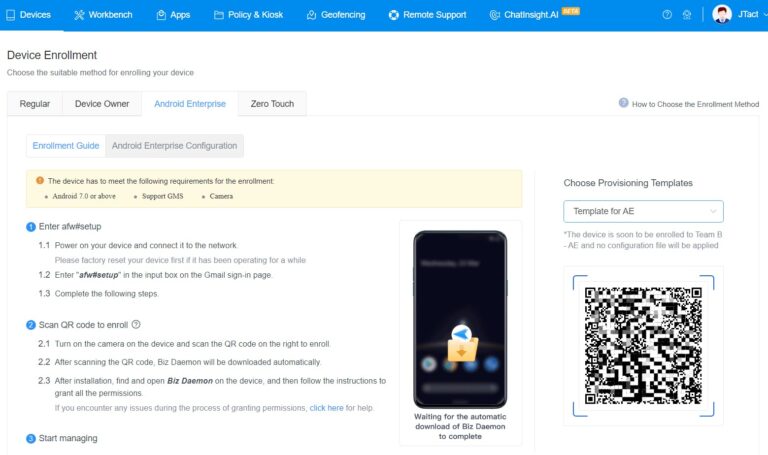
- Step 2. Enroll corporate-owned devices.
- Here, we will demonstrate Android Enterprise enrollment which is suitable for GMS devices and Zero-Touch Enrollment which is for bulk deployment.
- Firstly, you need to create Provisioning Templates. It's the place to finish device setting and app configuration before formal deployment. After creating, it will generate a QR code to use in the later enrollment process. Please read how to set up Provisioning Templates here.
- 1) Power on the device and connect to Wi-Fi.
- 2) Enter "afw#setup" in the prompt.
- 3) Turn on the device camera and scan the QR code. The code is in "Device Enrollment" > "Android Enterprise" > "Enrollment Guide."
- 4) After scanning, Biz Daemon will be downloaded automatically and the device will be added to the device inventory of the organization.
- 1) Log into
Zero Touch portal. The account and password should have been obtained from the resellers of your enterprise-owned devices. All your devices will be uploaded to the portal automatically and you can view them in "Devices." - 2) Find "Configurations" and create a new one.
- 3) Choose "Android Device Policy" when you drop down "EMM DPC".
- 4) Find "DPC extras" in the window, and paste the code of Provisioning Templates. You can find the code in "Device Enrollment" > "Zero Touch."
- 5) To apply the configuration, go to "Devices" in the zero touch portal and add.
- 6) Now, apps and settings will be configured automatically when the device connects the network.
Android Enterprise Enrollment
Zero-Touch Enrollment
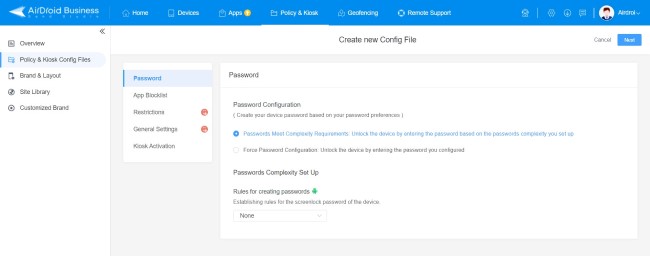
- Step 3. (Optional) Create config file with policy.
- This will determine password configuration, app blocklist, feature restrictions, and general settings on the device. Quick views for Policy config file:
- Password - create rules to set up a passcode; enforce password to device entry.
- App Blocklist - choose what apps cannot be used.
- Restrictions - enable or disable camera, system update, factory reset, safe mode, USB file transfer, wireless network, Bluetooth, screen time out, etc.
- General settings - set up APN, language, and volume.
- Step 4. (Optional) Set up kiosk mode to lockdown device.
- If desired, kiosk mode can be enabled to lock down company-owned Android devices. This will prevent users from accessing certain applications and websites.
- It benefits devices used in school, logistic, retails, and businesses that offer self-service.
Learn more if you’re interested: What is Android Kiosk Mode & How to Set it up on Devices
- Step 5. (Optional) Set up geofencing to track location.
- Geofencing is a feature to track on-site vehicles and personnel. You can set up alters and workflow when a company-owned device enters the delineated geographical scope.
- In AirDroid Business, you can go to Geofence Mgmt and click New Geofence to set up the longitude, latitude, and radius for the corporate device.
- Step 6. Invite members and assign roles.
- You can invite and manage members to the MDM console in Devices > Members & Groups. An email with an invitation link will be sent to the user.
- Several roles are offered: Super Admin, Admin, Team Member, and Viewer. Each enjoys different levels of management authority.
- Step 7. Monitor device and remote control if needed.
- In AirDroid Console, you can monitor all enrolled device screens in real-time. Besides, details including device network, CPU usage, and location can be checked. This helps find abnormal equipment immediately and avoid company property loss.
- If a company-owned Android device is lost, you can implement remote lock and factory reset to prevent data leaks.
- If you need to offer remote support for employees or your clients, AirDroid provides remote camera, Voice Call, Chat with Voice Message and Text, and others.
- Moreover, a Black Screen Mode for maintaining an unattended facility under a non-visual screen.

2Method 2: Enroll Corporate-owned Devices via Google Workspace
Google Workspace, sharing the same original author with Android, is one of the best company-owned Android device management solutions. You will need a Google Workspace account and devices running Android 9.0+ to get started. Now, follow these steps to enroll Android devices on Google MDM.
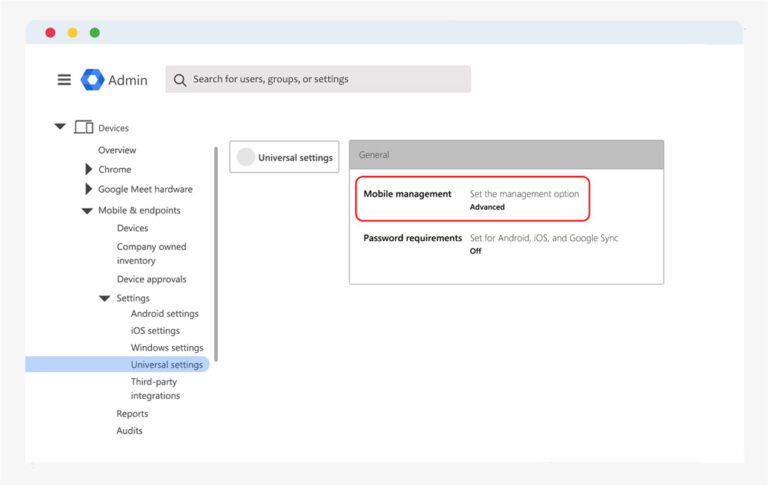
- Step 1. Log into Google Workspace Admin Console and turn on Advanced Mobile Management.
- As you come to the home page, follow this path: Devices > Mobile & endpoints > Settings > Universal settings > General > Mobile management. And then choose "Advanced."
- Step 2. Enroll company-owned devices into the inventory.
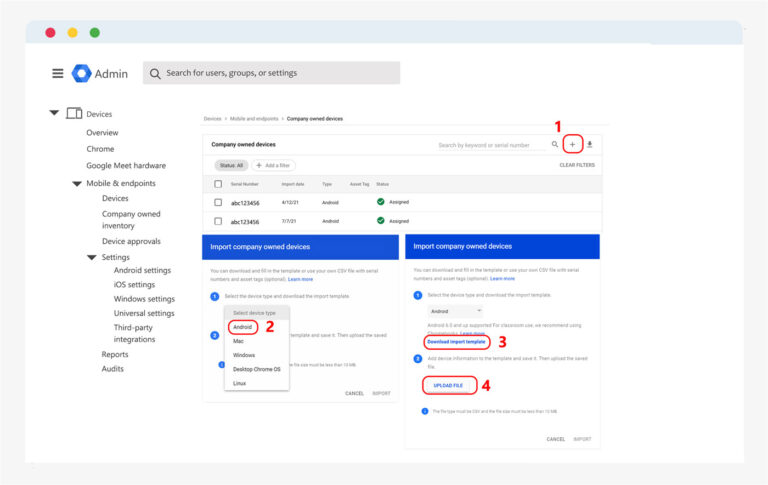
- You need to complete the process in: Devices > Mobile & endpoints > Company-owned inventory.
- Click '+' and then download the import template. Fill in the required info and upload the file.
- Step 3. Set up work profile for company-owned devices.
- The device needs to be factory reset first. Next, sign in to the Google Workspace email address that is given by the organization on the device.
- Install or update Android Device Policy app, an app that allows the admin to manage and control the device.
- Set up a work profile to separate person-use apps and work apps in the device. Data stored on the mobile phone will also be distinguished. You can find the work profile in: Settings > Passwords and accounts; or in the notification bar (swipe down the screen) "Work."
- Step 4. Configure device policy.
- Go to: Devices > Mobile & endpoints > Settings > Android.
- Here you can configure settings for networks, work profile, lock screen, Smart Lock, and device features (e.g. microphone, speaker, administrator restriction PIN, factory reset protection, etc).
- Step 5. Configure app policy.
- To manage third-party apps for company-owned devices, first go to: Apps > Web and mobile apps > Add app > Search for apps to add apps to the list.
- Next, configure app settings in "Managed Configurations > Add Managed Configuration". What you can do: install method, #auto-update app, and others.
It's worth noting that Google MDM can control the usage duration for Google Cloud services. In this way, device users can only use work tools, such as Gmail, during a certain period. It's helpful to protect company resources.
Part 3 : Deployable Content for Company-owned Android Device Management
Let’s take a close look at the specific managing content.
1. Device Inventory
Add or remove company-owned Android devices in your organization.
In the MDM console, you can view all enrolled device information, including device OEMs, binding time, battery capacity, available storage, network status, Wi-Fi mac address, etc.
2. User & Group
Set up user profiles or groups, granting them specific permissions and access to specific devices.
3. Security
Protecting devices and data is the most essential part of company-owned Android device management and is highly related to Android device deployment.
The following MDM features help with security:
- Policy - it is used to block usage permission and set alarm conditions for abnormal devices.
- Remote Access - it includes remote lock screen, remote reset password or wipe, real-time screen sharing, etc.
- Kiosk Mode - it is a lockdown mode for apps, browsers, and networks.
- Geofencing - it offers device location tracking and workflow alert.
- 2-step Verification - it is used to double authenticate users and re-bind lost devices.
4. Device Application
An IT admin can create an app whitelist and blacklist to limit application usage on the corporate device. Besides, releasing, updating and uninstalling apps are also available.
5. Workflow
You can create a workflow fleet to automatically execute operations.
6. Notification
Customize business messages and send them to device users. Or, block unnecessary notifications on devices.
7. Files
Customize business messages and send them to device users. Or, block unnecessary notifications on devices.
8. Report
Set up display content of reports, such as device status, user activity, triggered alert details, etc.
Part 4: FAQs
Devices of the three can be smartphones, tablets, laptops, computers, e-readers, smartwatches, etc.
Specifically, BYOD is "Bring Your Own Device". It means that the employee owns the device and has certain access to company resource and use it at work. Generally, BYOD with Android OS enjoys a built-in feature - work profile to separate data and apps into personal use and work use.
COPE is short for "Corporate-owned Personally Enabled". It is the device distributed by the company and allows an employee to use it personally.
Fully managed device is a concept brought by Android Enterprise. It refers to a device that completely belongs to the company and is administratively controlled by an IT department. Fully managed device contains devices for self-services, such as digital signage and kiosk.
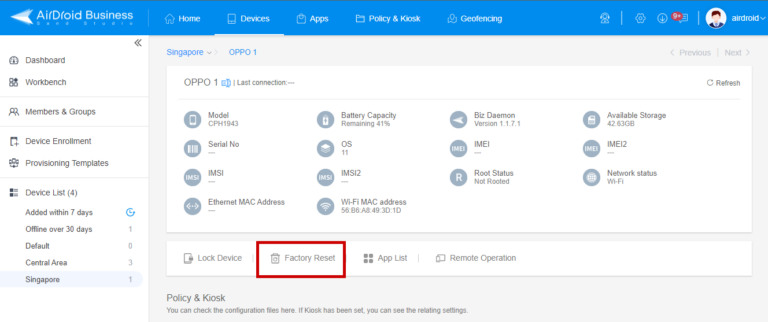
In AirDroid Business, you can first find the device you want to erase in Devices-Device List.
Click it and find Factory Reset in the panel. Then, enter the login password and confirm. Now, the wipe is completed.
- The ability to manage devices through a centralized console
- The ability to remotely control devices
- The ability to disable devices application
- The ability to detect and diagnose device problems


Leave a Reply.