How to Manage or Disable Autofill in Chrome for Android
When registering new customers on Android, the Chrome autofill and password-saving features can cause confusion. In the worst-case scenario, these features can raise serious privacy concerns. They can give the impression that you’re storing customers’ sensitive data, which isn’t the case.
That’s why you want to disable autofill on Chrome. Doing so will smoothen the registration and make customers feel that the process is safe and transparent. You can manually or automatically manage autofill and passwords on Google Chrome via MDM.
Study the two methods below and discover the better option.
1How to Disable Autofill in Chrome
1.1 Steps to Disable Autofill on Chrome
You want to prevent Chrome from automatically saving payment methods. Or even phone numbers and other critical personal data. Here’s how to stop autofill on Chrome:
Step 1 Open the Chrome app on your Android device. Tap the three dots at the top right corner of the screen, then select Settings from the drop-down menu.
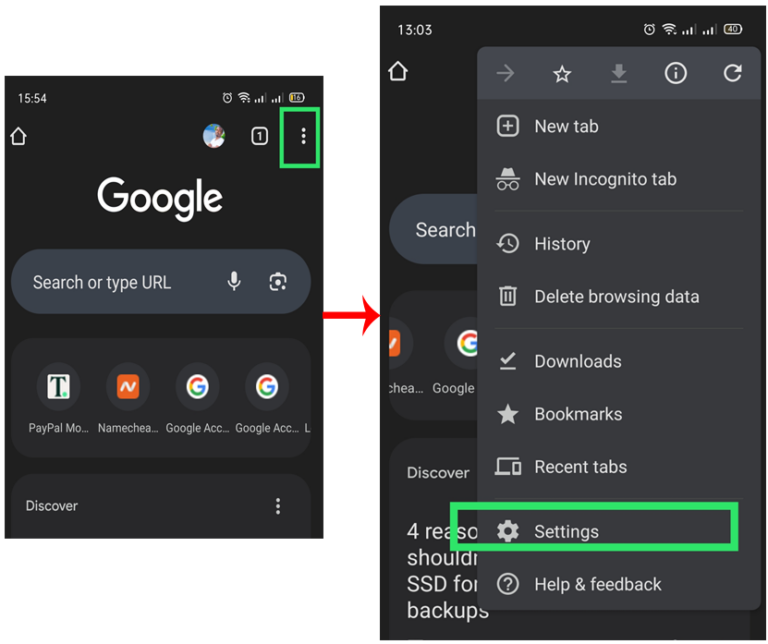
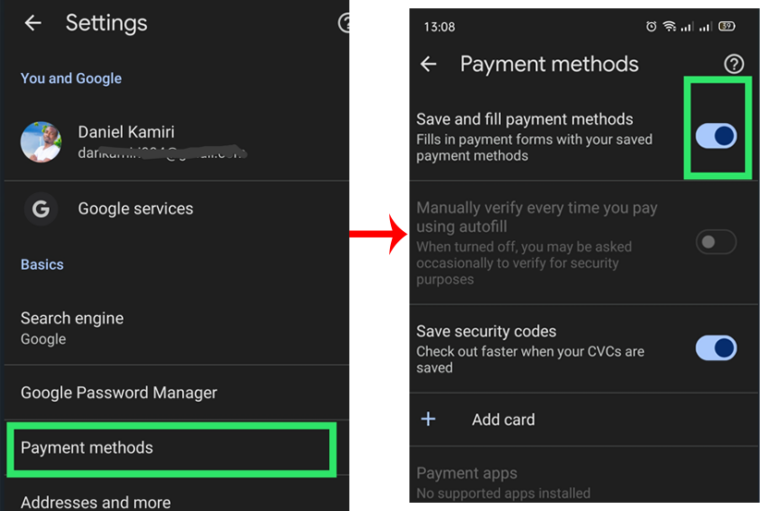
Step 2 Tap Payment methods, then toggle the button next to "Save and fill payment methods to off."
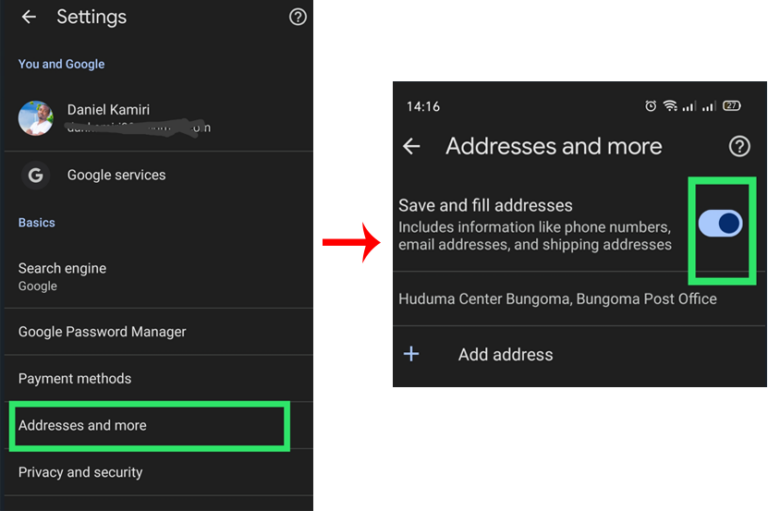
Step 3 Tap Addresses and more in Settings, then toggle the "Save and fill addresses" button to off.
Now that you know how to turn off the Chrome autofill function, you might also want to delete saved autofill data and passwords. If so, check below.
1.2 Steps to Delete Autofill and Saved Passwords
Follow these easy steps to clear saved autofill form data and passwords on Chrome:
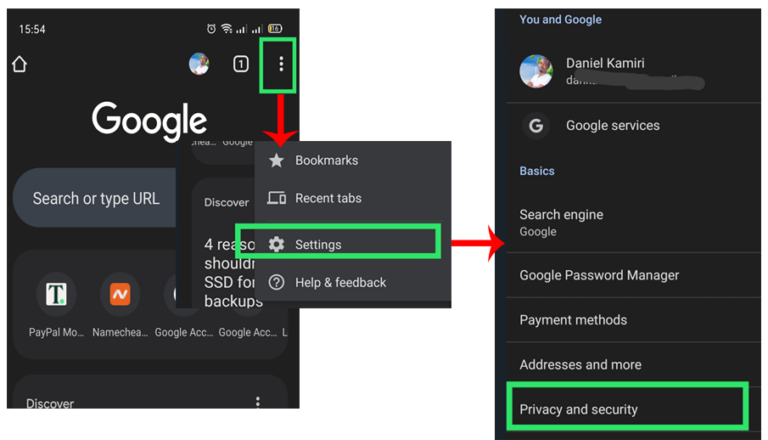
Step 1 Open Chrome on your target Android device and tap the three dots on the top right corner of the screen. Choose Settings, then select Privacy and security.
Step 2 Tap Delete browsing data.

Step 3 Choose Advanced, then check the boxes next to Saved passwords and Autofill form data.
Autofill form data and passwords are under "Advanced" settings.
Choose the Advanced option to clear autofill form data and passwords.You can also click the drop-down menu under Advanced to select a time range.
Then tap the Delete data button erase autofill on Chrome - and, of course, the saved passwords.
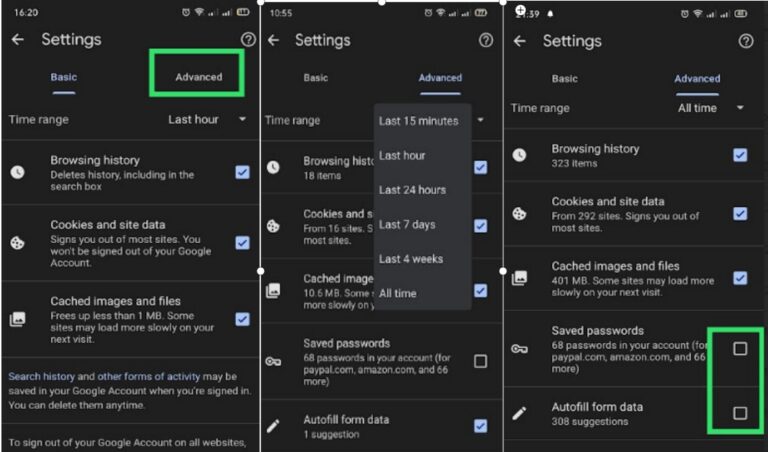
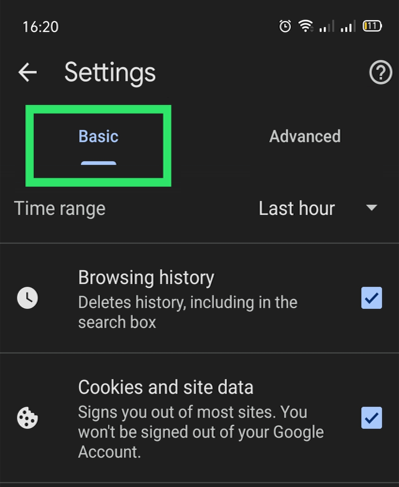
Remark:The "Basic" settings only include browsing history, cookies and site data, and cached images and files.
1.3 Steps to Manage Autofill Data (Google Password Manager)
If you want to prevent Chrome from automatically saving passwords, follow these simple steps to stop autofill in Chrome via the Google password manager:
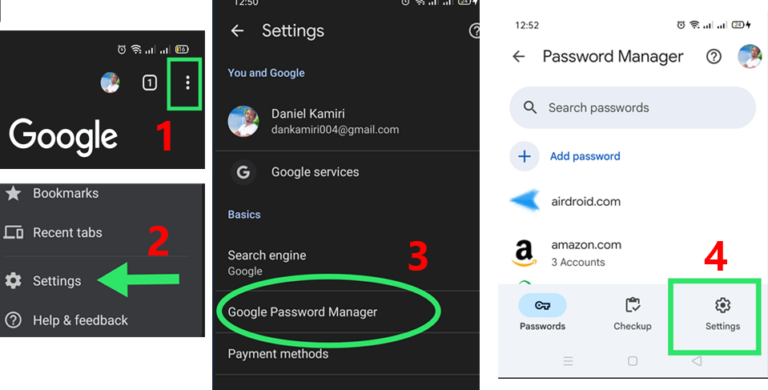
Step 1 Open Chrome on your Android device, then go to More > Settings. Click on Google Password Manager, then tap Settings at the bottom-right corner.
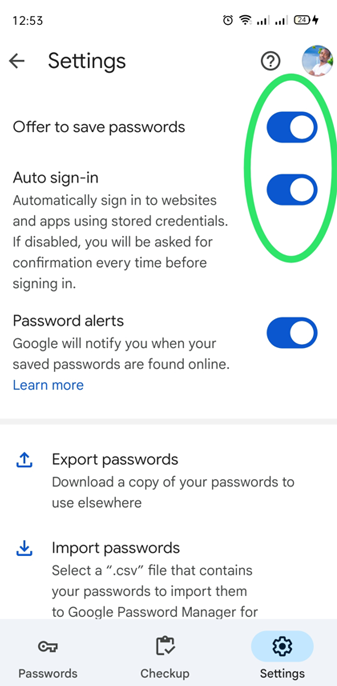
Step 2 Turn the buttons next to "Offer to save passwords" and “Auto sign-in” to Off. Switching off these two functionalities will prevent Chrome from automatically saving passwords and your sign-in data on different sites.
1.4 How to Turn off Autocomplete in the Chrome Search URL Bar
The autocomplete function on Chrome search URLs can also be quite annoying. If you don’t want to see personalized searches and auto-complete suggestions, do the following:
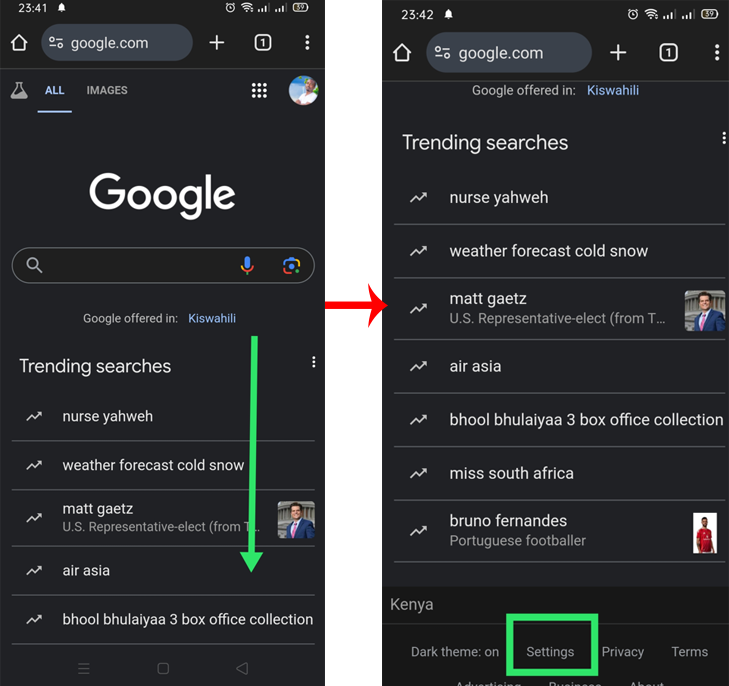
Step 1 Go to google.com, then scroll down the page and tap Settings.
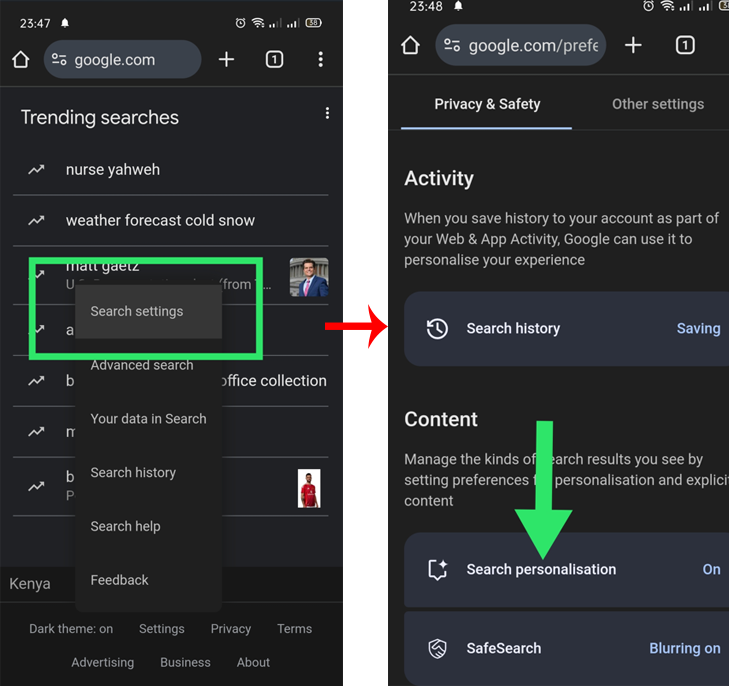
Step 2 Choose Search settings from the pop-up menu. Then tap Search personalization under Content.
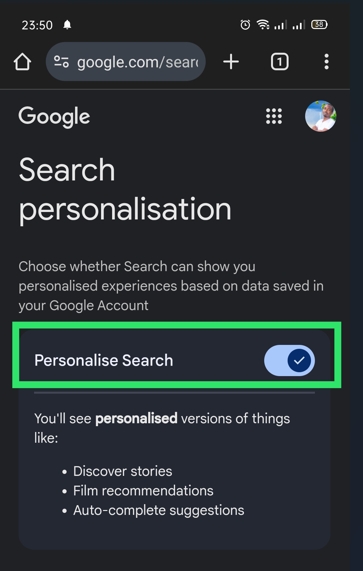
Step 3 Toggle the button next to Personalize Search to turn it off.
Similarly, follow these steps if you don’t want to see auto-complete and trending searches:
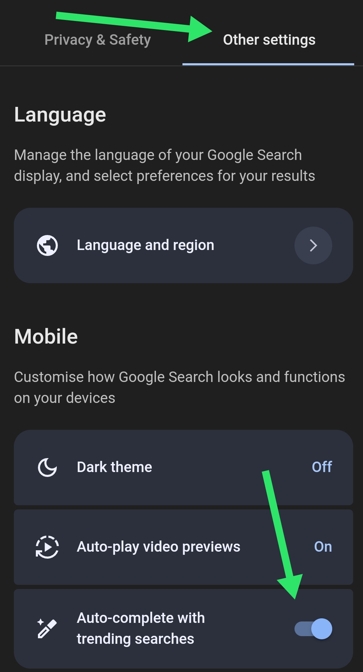
Step 1 Go to google.com > Settings > Search Settings.
Step 2 Select Other settings, then toggle the switch next to “Auto-complete with trending searches” to off.
The above are the standard settings for turning off autocomplete on Google Chrome, which many claim do not work in some cases. This has something to do with the browser's built-in features. Chrome is designed to prioritize convenience and sync, making it quite challenging to turn off autocomplete permanently in all contexts using the typical settings. You can read more on turning off Chrome autofill.
Concerns to Consider with Manual Method
Above method seems easy and quick. However, this is only so if you’re dealing with a single device. With many devices to manage in a corporate environment, above method presents several shortcomings.
- Inefficient. You can only manage the devices individually, which can be too much work when multiple devices are involved.
- It is time-consuming. By managing one device at a time, your IT admins will have no time to focus on other important matters.
- Prone to Errors. Using this method will likely result in uneven settings across all the devices, raising serious security concerns.
So, is there another more effective way to disable autofill on Chrome? Check out Method 2 below.
2Pro Method: Disable Autofill in Chrome Using MDM
Why We Recommend This Method
Managing autofill and passwords in Chrome via MDM provides critical advantages for corporate-owned devices. These range from security to efficiency, consistency, and many more. Here are some of these benefits in detail:
- Efficiency. Your IT admins don’t need to set up each device individually. With an MDM tool, they can apply settings to all devices at once, saving much time.
- Uniformity across devices. MDM allows IT admins to centrally manage Chrome autofill and passwords on all managed devices, ensuring uniform and consistent changes across all devices.
- Configuration and compliance. Your admin can configure Chrome to open with autofill disabled from the start. They can also remotely adjust autofill and passwords, even after the devices have been deployed to end users. That ensures that the devices remain compliant with business policies regardless of location.
- Enhanced Security. Since IT admins manage Chrome from a central location, the risk of unauthorized access to sensitive data is reduced.
MDM is indeed the better way of managing Chrome autofill and passwords.
Disable Chrome Autofill Using MDM
AirDroid Business is one of the best MDM tools for business. It has a very intuitive interface. You can turn off autofill Chrome Android in a few simple steps. To start, ensure you have done the following:
● Enabled and configured Managed Google Play Store on your AirDroid Business profile.
● Enrolled the target Android device(s) using Android Enterprise or Zero Touch Method.
After that, follow these three simple steps:
Step 1 Add the Chrome app to your Managed Google Play Store.
Sign in to your AirDroid Business profile. Next, go to Apps > App Library > Managed Google Play Store > Add App. Select the Chrome app to add it, and it will appear on your app list. Open the Google Chrome Configuration page by clicking the file icon next to the Chrome app.

Step 2 Find and Turn off the Autofill Settings
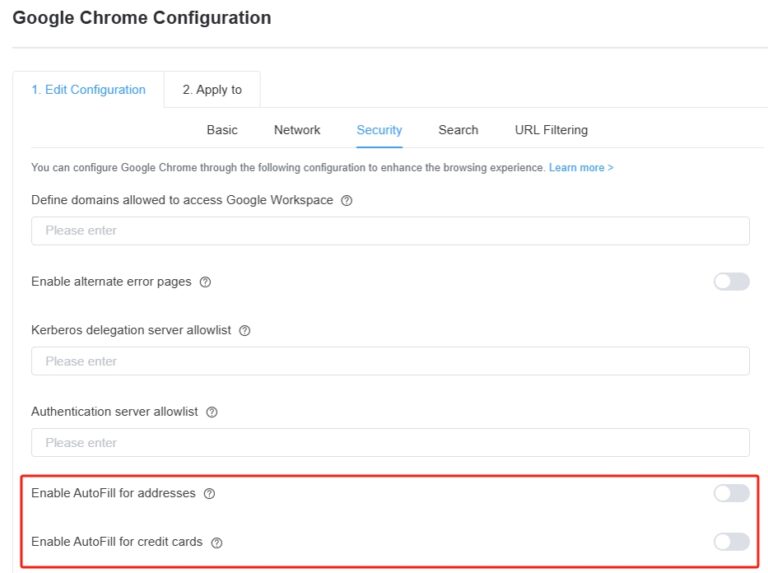
Choose the Security option under Edit Configuration. Scroll down the page and toggle the switch next to “Enable autofill for addresses” to off. Repeat this for the switch next to “Enable autofill for credit cards.”
Pro Tip
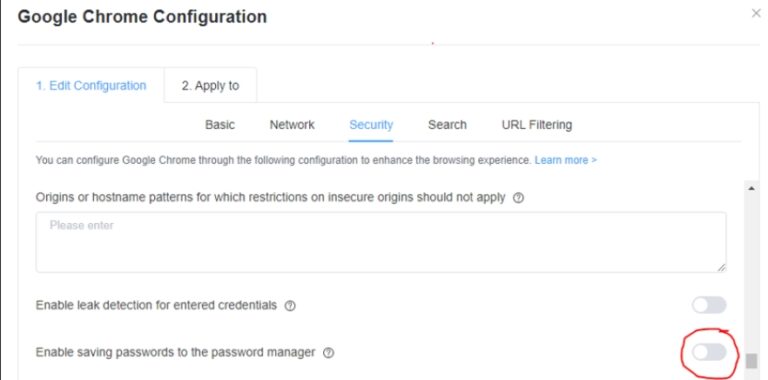
- You can also disable automatic password saving on this page. Scroll down and turn the switch next to “Enable saving of passwords to the password manager” off.
Step 3 Click the OK button to save the changes.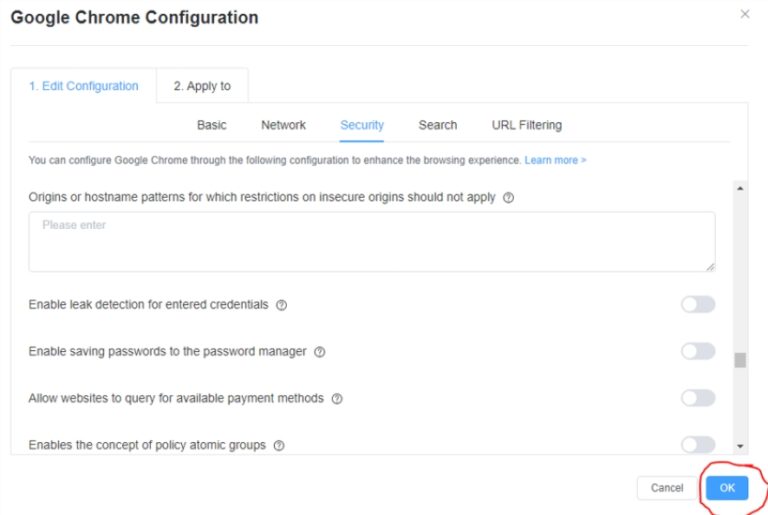
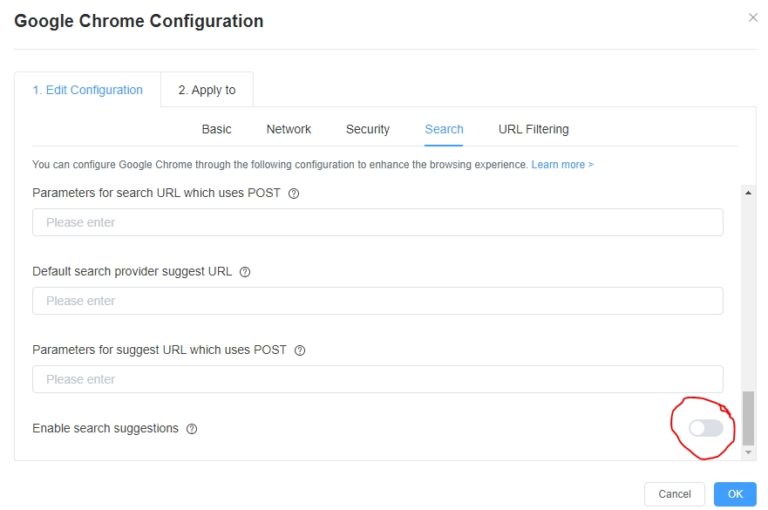
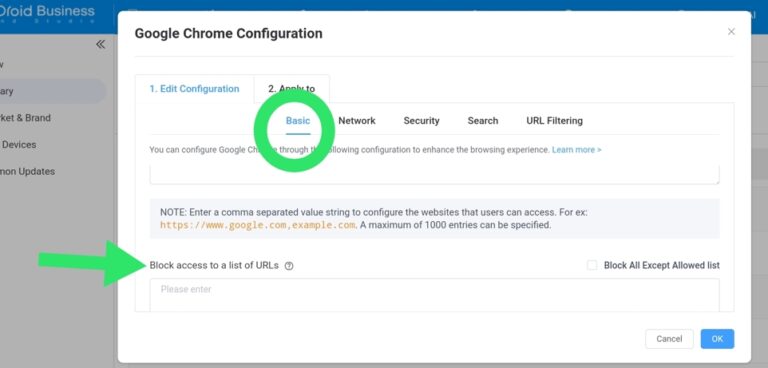
While at it, you can also turn off the search suggestions on Chrome’s search bar. However, this configuration doesn’t affect suggestions based on history and bookmarks.
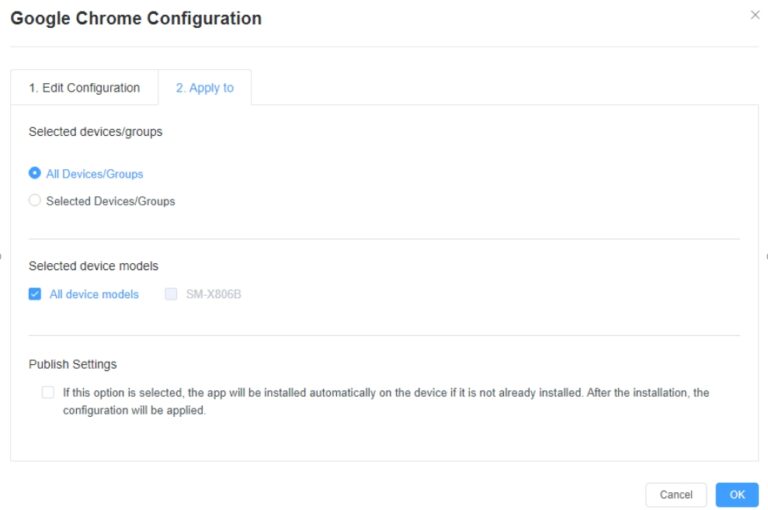
Step 4 Apply the changes to your target devices.
Tap Apply to, then select to apply the changes to All or Selected devices.
Conclusion
After reading this guide, managing Chrome autofill and passwords on Android devices is easy. You’ve learned two ways to do it: manually and using MDM.
The former is ideal for handling a single device, while the latter is perfect for many corporate-managed devices. An MDM tool like AirDroid Business allows organizations to manage various Chrome settings, even on multiple enterprise devices at once. These changes can be made on your business premises.
So, which one of these methods do you choose?


Leave a Reply.