Geofencing vs Geolocation: Key Differences and Applications
Although some use these two terms interchangeably, geofencing and geolocation differ discretely in many ways. They have their own sets of benefits and shortcomings and they differ in their application scenario as well as the use of technology. Let us have a detailed account of their definition, applications, benefits, challenges, and usage of technology.
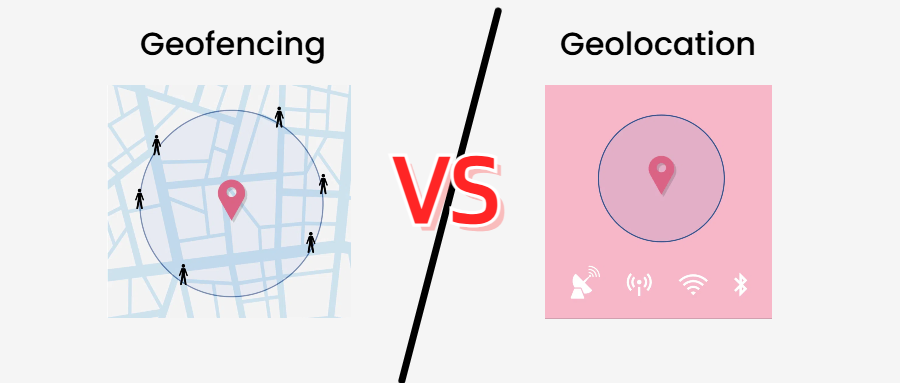
1 What is Geolocation
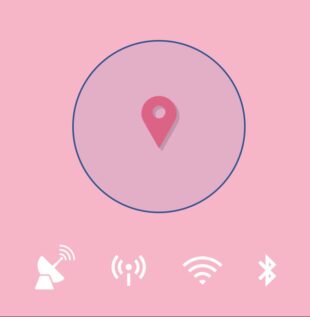
1 Definition of Geolocation
Geolocation means pinpointing the location of a device (and hence of its user) with the help of GPS, Wi-Fi, cellular networks, IP address, or Bluetooth.
2 Characteristics of Geolocation
- Geolocation gives the exact location of a device based on real-time tracking.
- It uses Wi-Fi, cellular networks, GPS, and IP addresses for location tracking.
3 Use Cases of Geolocation
- Marketing and customer behaviors, e.g., where do the target audience shop more often?
- Navigation software.
- Locating devices.
2 What is Geofencing?
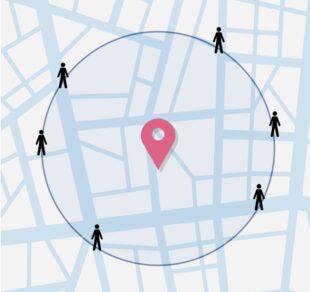
1 Definition of Geofencing
Geofencing means creating an intangible, virtual boundary around a physical location so that when a device enters, exits, or stays in that area, specific actions can be taken.
2 Characteristics of Geofencing
- It marks an area with a virtual boundary pointed out by GPS coordinates or radius around a point.
- Geofencing helps generate triggers, notifications, and pre-set actions when a device enters or leaves the ‘fenced’ area.
3 Use Cases of Geofencing
- Notifying when a device enters or leaves a geofenced premises.
- Tracking the arrival and departure times of vehicles.
- Monitoring the staff to ensure they don’t leave a designated work area during specified times.
- Sending discount offers, coupons, and notifications about products to the customers as they enter a retail store or shop around in its neighborhood.
3 Key Differences between Geofencing and Geolocation
Let us explore in detail how geofencing and geolocation differ notably in different manners:
1 Technology Implementation
Geolocation uses GPS, cellular networks, Wi-Fi, Bluetooth, and IP address mapping to pinpoint the real-time location of a device. Geofencing uses all of these technologies to set perimeters along with the logic software to generate triggers, notifications, and pre-set actions.
2 Purpose of Use
Geolocation is used to get the real-time location of a device and its user. It helps pinpoint the precise location of the device. Geofencing is used to mark virtual boundaries around an area and trigger a response when a device enters or leaves those boundaries.
3 Application Scenarios
- Use cases and applications of geolocation include navigation apps, finding out the location of a lost or stolen device, rescue services targeted at finding affected people, and targeted marketing e.g. finding out where the customers shop.
- Geofencing on the other hand focuses on when someone leaves or enters a premises. For example, noting the arrival and departure of vehicles, offering discount coupons as the customers get into the store or around it, and making sure remote workers are at the specified areas during specified work hours.
4 Pros and Cons
Geolocation
Pros and Cons of Geolocation
- Pros:
- Geolocation has a wide scope and can be used in retail, food delivery services, rescue, mapping, and much more.
- Real-time tracking is the real strength of geolocation whether it is for logistics, navigation, or safety.
- By using GPS service, geolocation provides very precise location data.
- Cons:
- Real-time monitoring and tracking can raise privacy concerns, especially when done without consent.
- Using GPS for prolonged tracking drains the battery pretty quickly.
Geofencing
Pros and Cons of Geofencing
- Pros:
- By enabling to send triggers based on location, geofencing helps a lot in targeted marketing.
- Geofencing provides a layer of security, especially in restricted zones.
- Helps a lot in home automation activities through integration with IoT.
- Cons:
- Setting up virtual boundaries with accuracy is a complex task and requires stringent, continuous adjustments along with precise configurations.
- It drains the battery as geofencing requires continuous monitoring of the area.
Characteristics | Geolocation | Geofencing |
|---|---|---|
| Technology Implementation | Uses GPS, IP mapping, cellular networks, Wi-Fi, and Bluetooth. | Along with geolocation technologies, it uses logic software for triggers. |
| Purpose of Use | Used to find and track where a device is. | Used to track when someone enters or leaves a place and trigger a response. |
| Application Scenarios | Tracking food delivery riders’ location, logistics, rescue services and emergencies, navigation software. | Security, employee monitoring, home automation, targeted marketing. |
| Pros and Cons | Pros: Accurate and real-time data, diverse applications. Cons: Privacy concerns, battery drainage. | Pros: A layer of security, allows customer engagement through highly targeted marketing. Cons: Power drainage, complex virtual boundaries setup. |
4 How to Use Geolocation and Geofencing with AirDroid Business?
Let us have a look at how an MDM provider like AirDroid Business ensures seamless geofencing and geolocation services from a centralized dashboard.
1 How to Use Geofencing with AirDroid Business
An MDM provider like AirDroid Business can go a long way in helping organizations protect their sensitive data and devices against unauthorized access. For example, industries like finance and healthcare use MDM services to make sure their devices cannot be used and data remains inaccessible outside the compliant areas.
With AirDroid Business, you can quickly and easily set virtual boundaries around any geographical area to monitor your company’s Android devices. Here is a step-by-step process of doing that:
- Step 1Get Started with the Geofence Tab
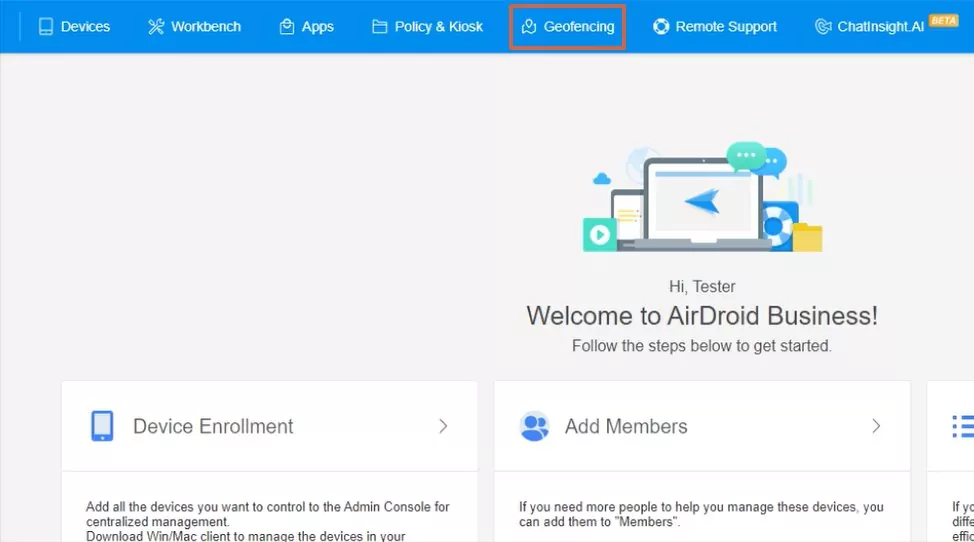
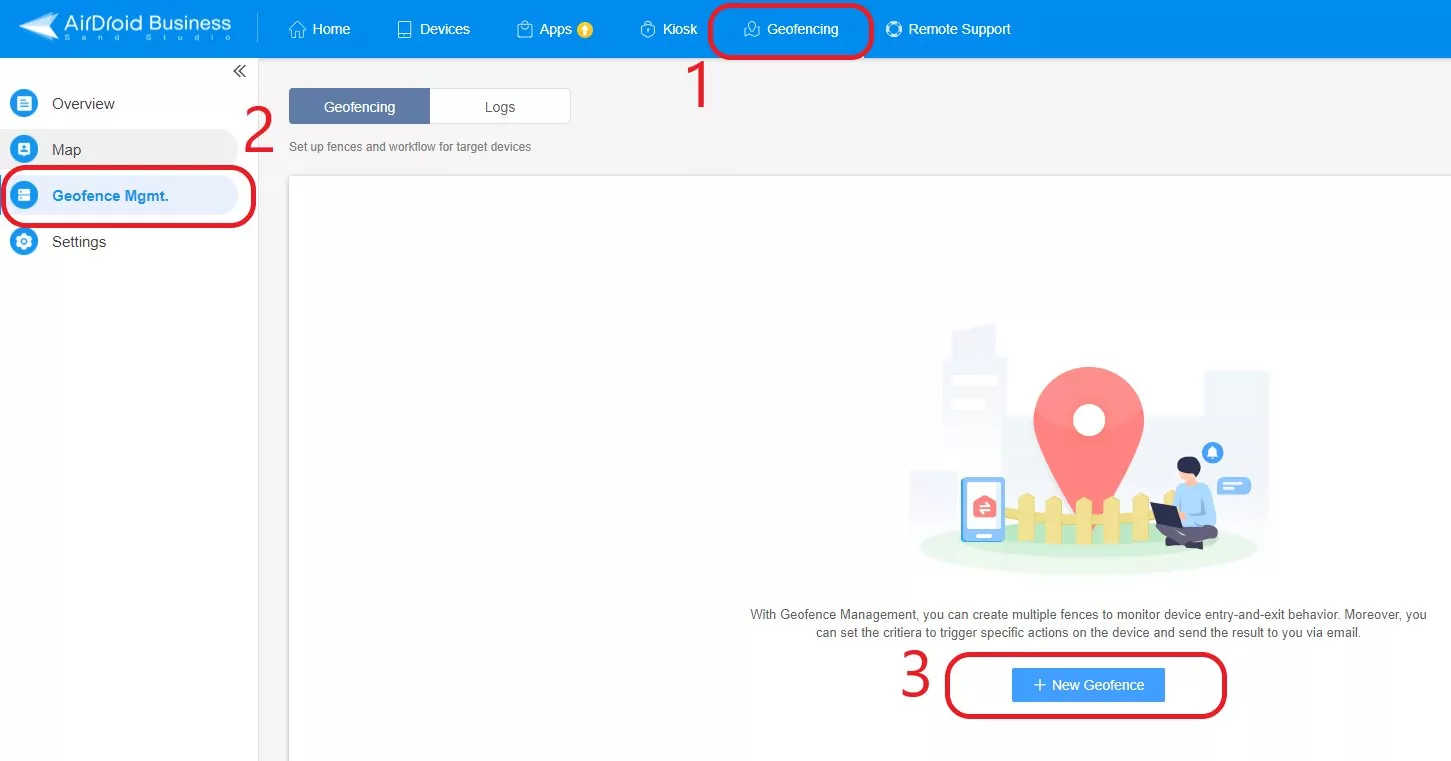
- Login to your AirDroid Business console. In the top bar, find and click the tab ‘Geofencing’.

- Step 2Creating a Geofence
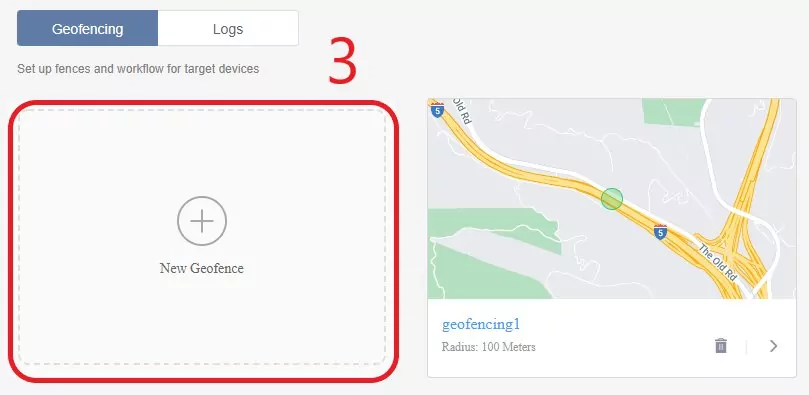
- In the left pane, click the option ‘Geofence Mgmt’ and at the bottom, click ‘+New Geofence’.

- When there are already other Geofences, you can also click the block which says ‘+New Geofence’.

- Step 3Configuring the New Geofence
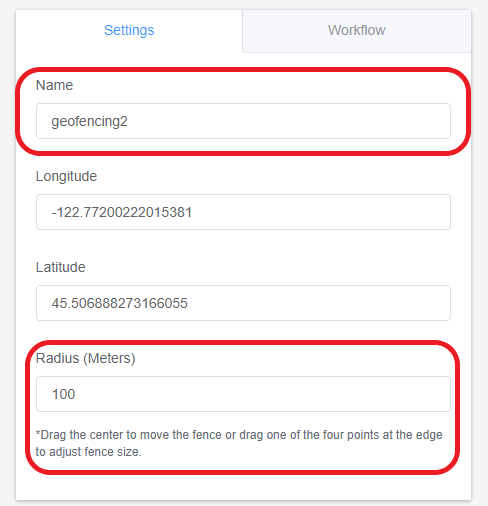
- Configure the geofence by entering the exact latitude and longitude values and the radius of your desired geofence.

- Step 4Applying the Geofence to Devices
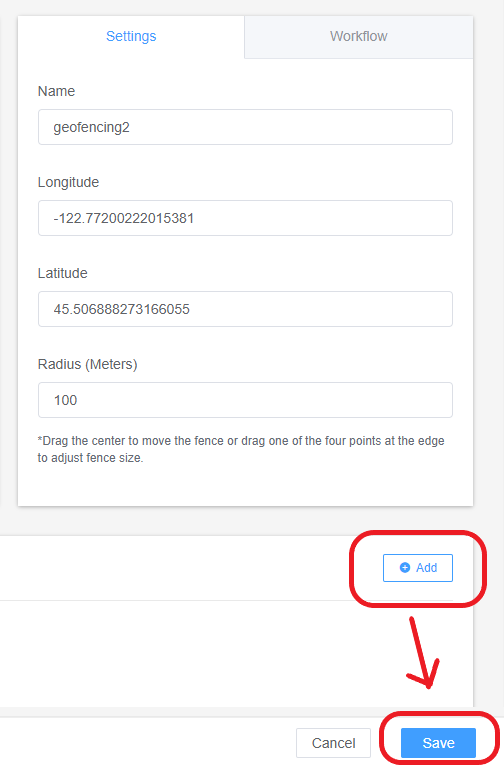
- At the bottom right, select the ‘+Add’ option and select the devices or groups on which you want to apply the geofence. Now hit save and you are done.

2 How to Use Geolocation with AirDroid Business
Enterprises in virtually every industry need geolocation services in case their devices get stolen or lost. With MDM services, the entire IT assets can be managed effortlessly and the staff can be monitored to ensure they are at designated places during the stipulated time period.
Geofencing Map Feature by AirDroid Business
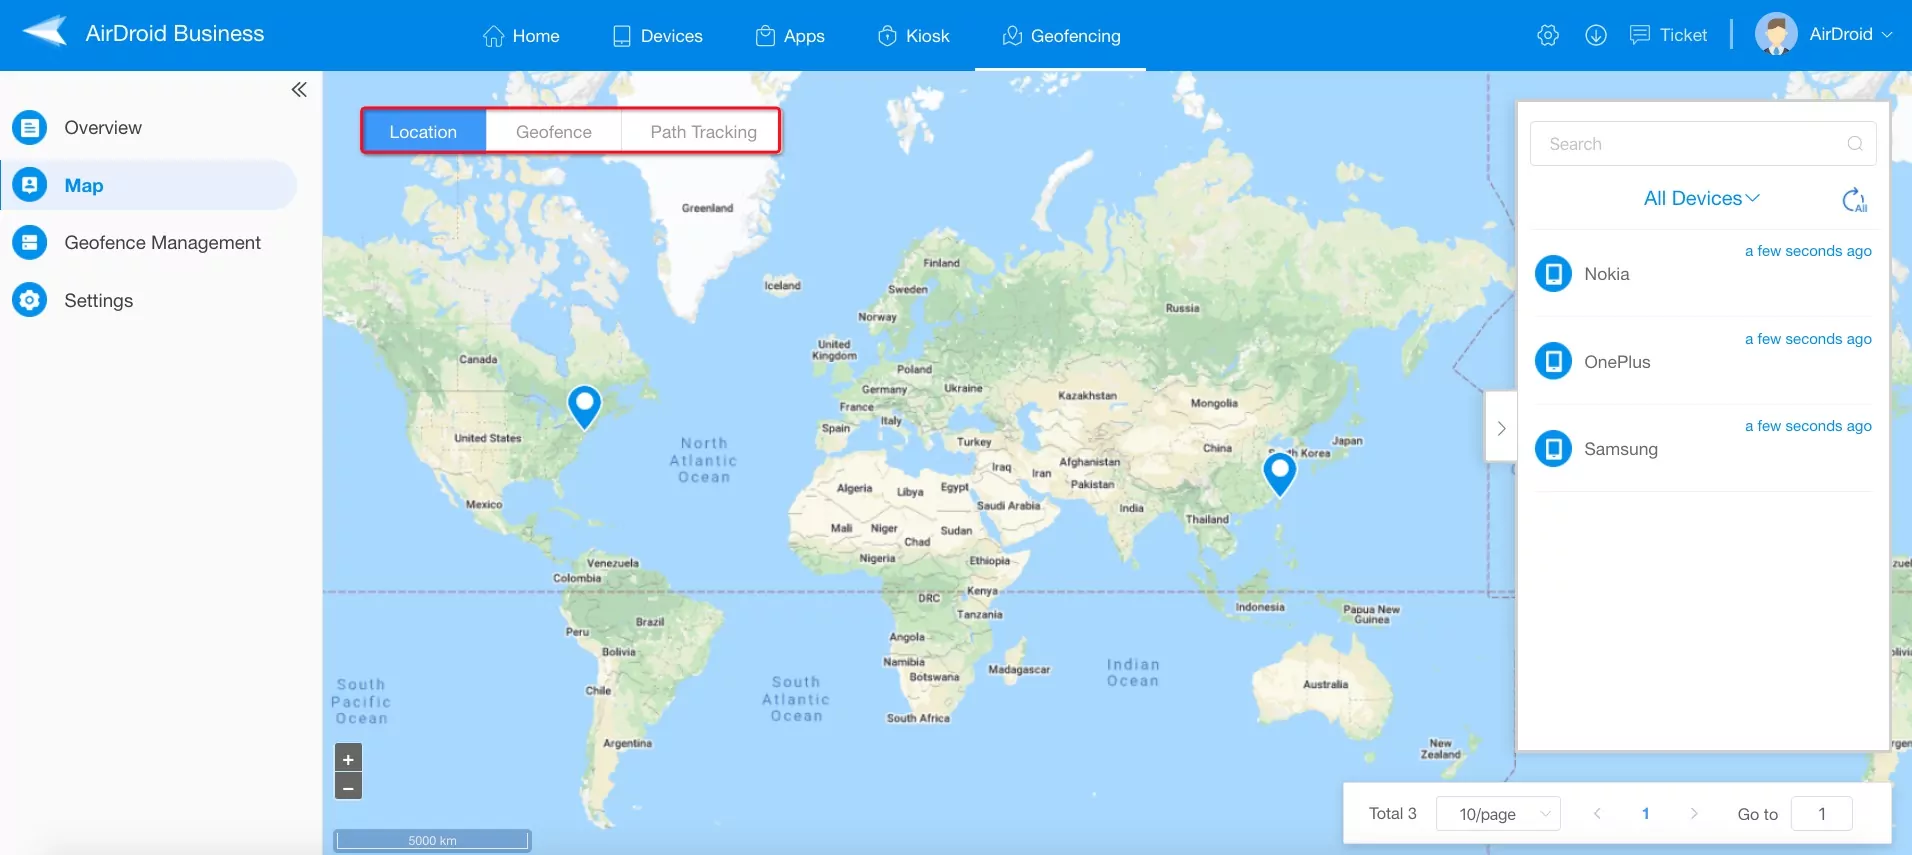
Using AirDroid Business for geolocation can help admins efficiently manage all Android devices from one dashboard, which would otherwise be very tedious if done manually. AirDroid Business allows geolocation with the help of its ‘Geofencing Map Feature’. This all-in-one feature allows you to locate in real-time any Android device that has GPS enabled on it. Moreover, it helps you set up geofences as well. So, you can not only track the devices, but also get notified once these devices enter or exit a specified geofenced area. Below is a step-by-step process on how you can use its various features.
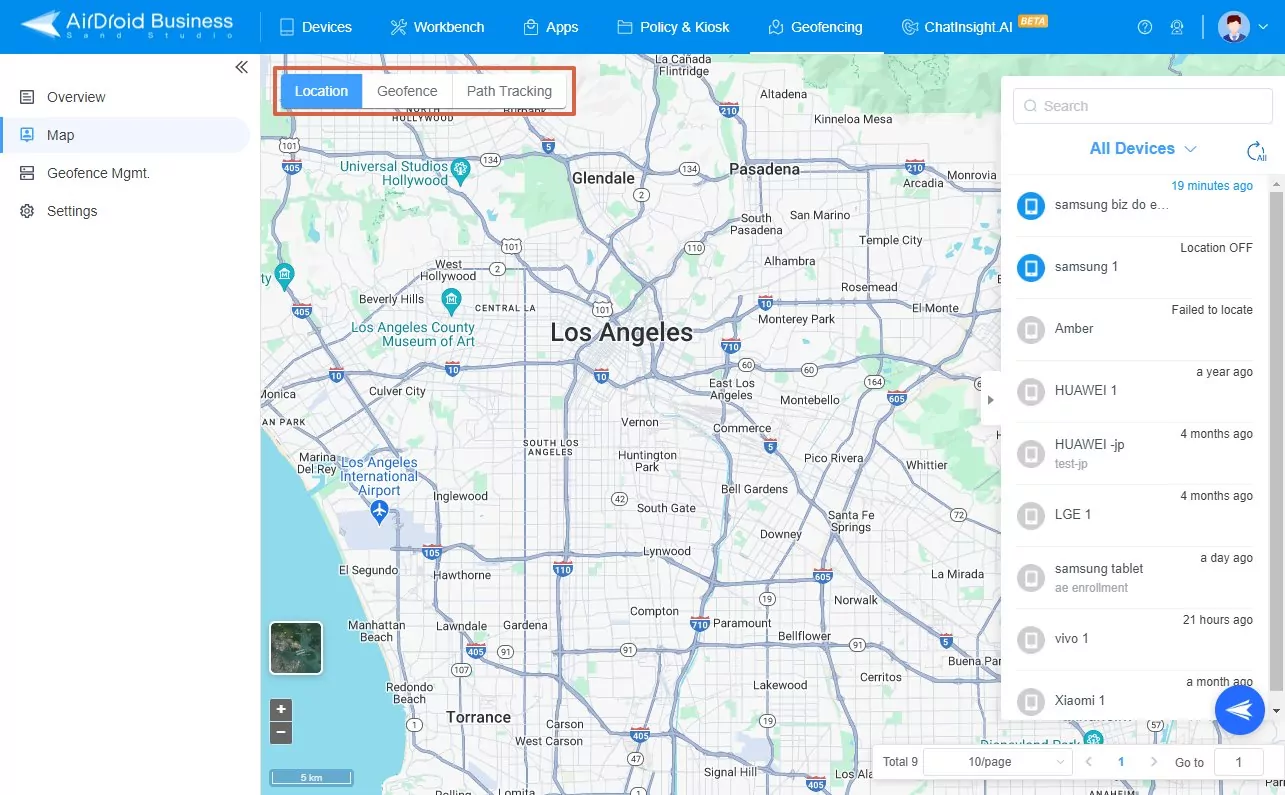
- Step 1Setting Geofences and Location Recording Frequency

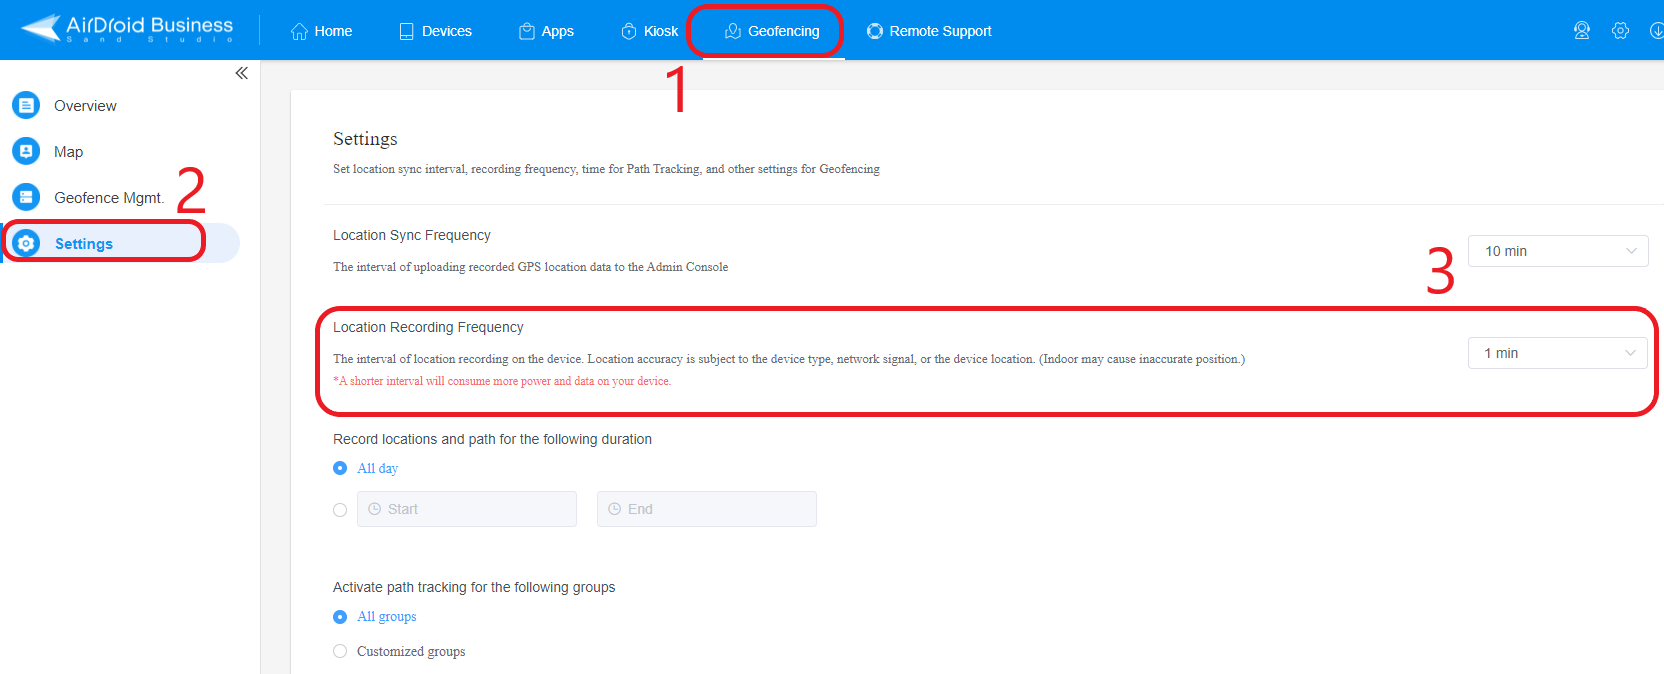
- Start with setting geofences if you haven’t already done so. For a complete guide on the steps involved, visit this section. Open the ‘Geofencing’ tab from the top bar in your AirDroid Business dashboard and click ‘settings’ and set a duration for Location Recording Frequency.
- Step 2Open the Map
- Once you are done with configurations, click the Map.

- Step 3Tracking Device Location
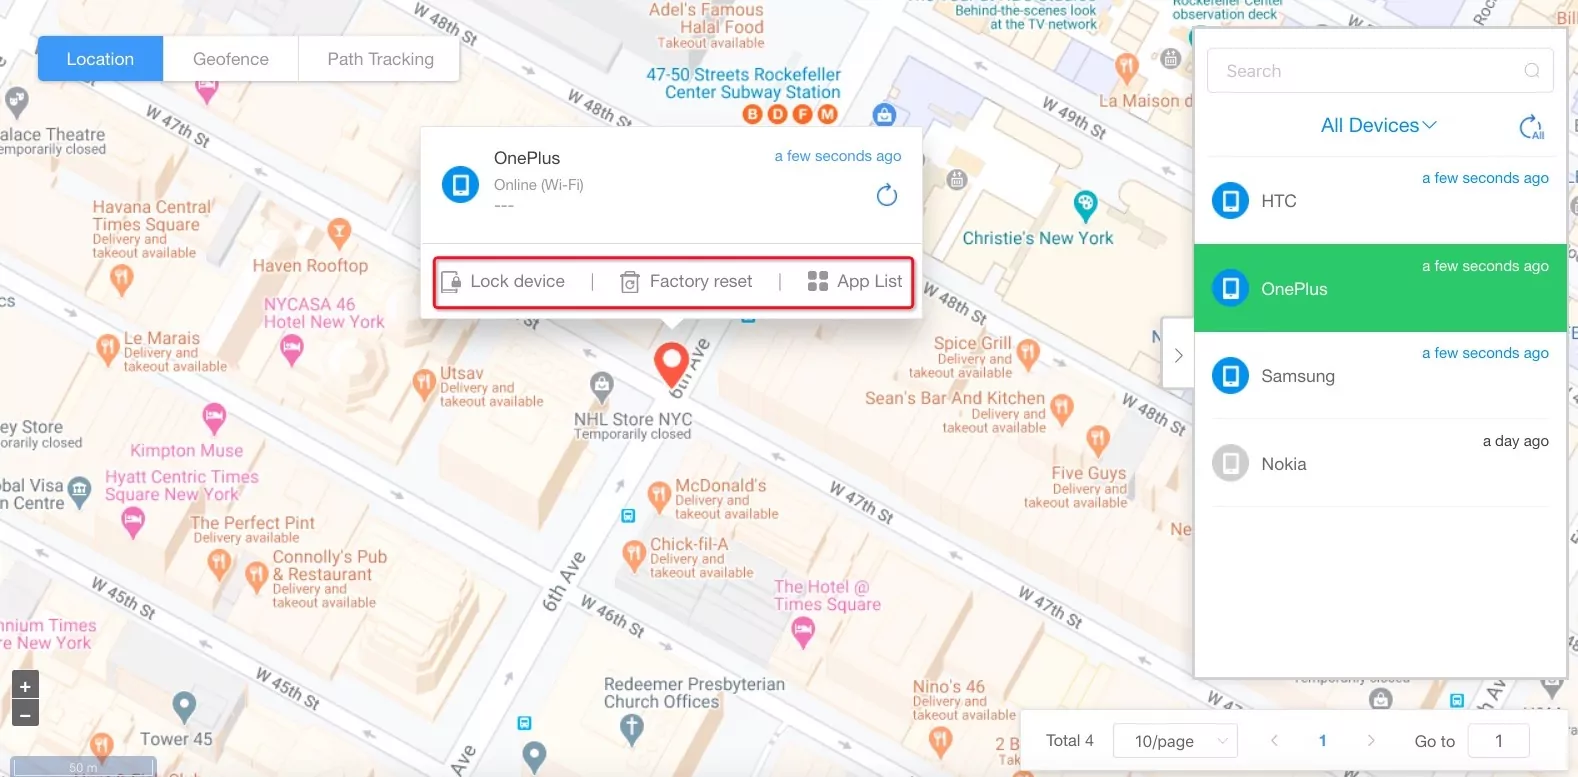
- Click the ‘Location’ tab, select the device, and perform the desired action.

- You can perform the following features:
- Device Lock: You can remotely lock a device and it would not be unlocked unless its lock screen password is entered.
- Factory Reset: You can wipe off all data from a device by resetting it to its factory settings. This also means that the device will no longer be manageable through the AirDroid Business dashboard.
- App List: It allows you to wipe application data and cache from the device and uninstall apps.
- Step 4Access Geofence History
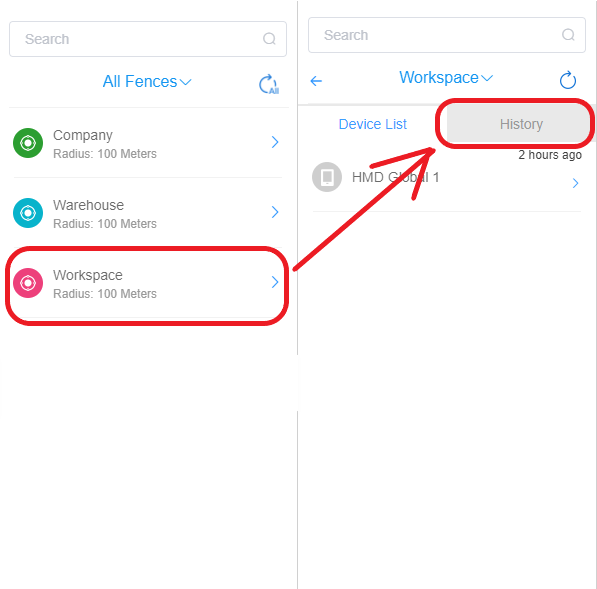
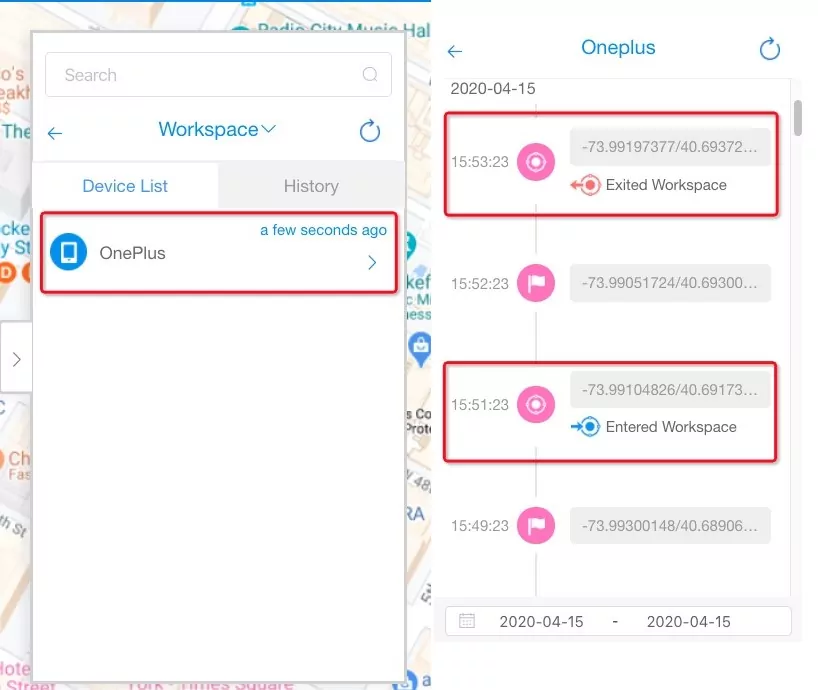
- Click the ‘Geofence’ tab and select any geofence. Click the ‘history’ tab in front of a device and you will see the entering and exiting history for that device in the selected geofence.

- Step 5Perform Actions or Check Device History
- By clicking on a device, you can perform any actions as mentioned above or check the device history by clicking the arrow next to the device.

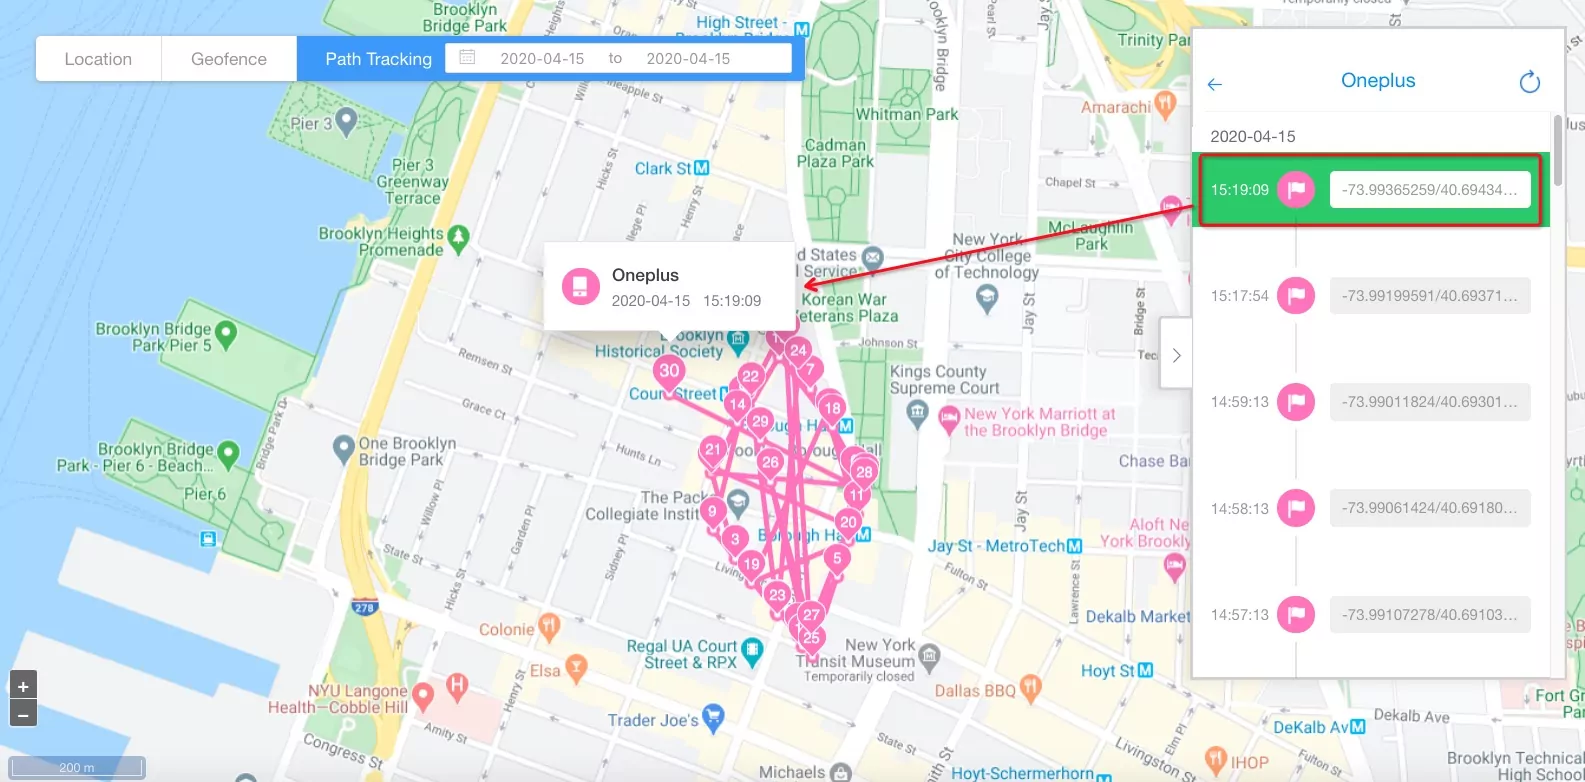
- Step 6Use Path Tracking
- Click ‘path tracking’ and select a device. Insert the time and data if asked and you can access the digital footprints of the managed device.

- You can display the name of the device on the map by clicking the device name option.

- Moreover, you can customize the track refresh method and frequency by selecting the suitable option from the drop-down menu.

- Step 7Access Detailed Information for a Path
- Click on any point on the path and you will see the detailed information about it.

5 Benefits and Challenges of Using Geofencing and Geolocation
Where geofencing and geolocation offer innumerable benefits in every industry, they have their sets of risks as well. Let us discuss both in detail:
1 Benefits
- Personalized Location-Based Services: The geolocation services help users get personalized services like weather, navigation, nearby locations recommendations, etc.
- Targeted Marketing: Retail businesses can use result-driven marketing tactics with the help of geolocation and geofencing. For example, they can send promotional messages, deals, and discounts based on a specific location or as the customers enter a specific area.
- Improved Security: With geofencing, you can restrict device usage outside a designated zone and lock some apps and features. Geolocation helps find out a lost or stolen device’s location and remotely manage data access for such devices.
2 Challenges
- Privacy Issues: Continuously tracking movements of individuals can raise privacy-related issues, especially when done without consent.
- Power Resource Consumption: Non-stop GPS usage can be resource-intensive and can drain the battery very quickly.
- Inaccurate Data: In dense urban locations, GPS might not deliver very accurate results all the time. Moreover, some devices have their limitations as well. This can lead to false triggers or inaccurate or delayed results.
6 Other Relative Concepts and Comparisons
1 Geotargeting Vs. Geofencing
![]()
- Geofencing: Involves setting virtual boundaries for a specific location using GPS, cellular networks, Wi-Fi, etc.
- Geotargeting: Deals in sending personalized, location-based content, like promotional messages, notifications, ads, etc., tailored to the customers’ location.
2 Geocoding Vs Geofencing
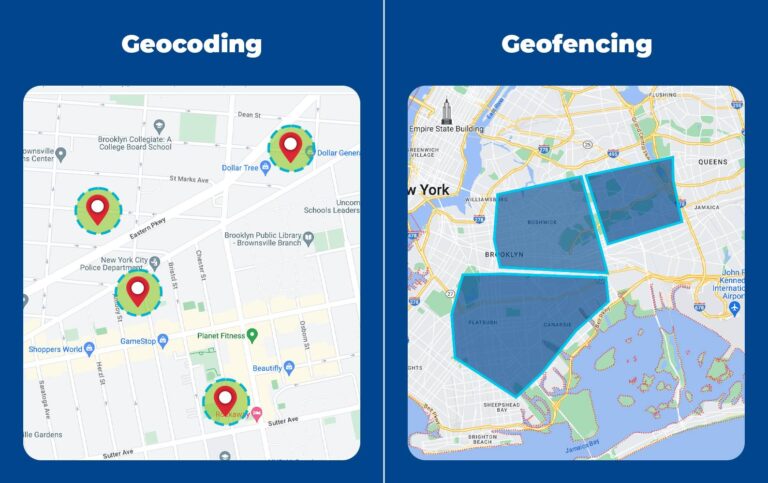
- Geocoding: Differs from geofencing as it is merely related to coding a specific address into latitude and altitude, whereas geofencing deals with setting virtual boundaries around a location with the help of cellular networks, Wi-Fi, GPS, etc. Geocoding relies on mapping services to convert address texts into coordinates or points on maps and hence helps pinpoint a specific location.
3 Geotagging vs Geolocation
- Geotagging: Is a process where a device attaches geographical information to the content. For example, tagging pictures with place names or latitude and longitude, etc. The device records the geographical data when the content is created and embeds it in the file.
- Geolocation: On the other hand, gives real-time location information for a device using GPS, Bluetooth, Wi-Fi, etc.
FAQs



Leave a Reply.