Step-by-Step: Gmail Exchange Configuration for Android
Configuring Gmail with Microsoft Exchange on Android devices offers many benefits for organizations. For example, it allows employees to access work emails even on the go, ensuring productivity remains at peak levels.
Gmail exchange configuration also dramatically improves teamwork. Colleagues can easily access shared distribution lists, calendars, and other collaborative features. The enhanced security also goes without saying. You can generally count on an all-inclusive and efficient corporate email managing experience.
There are two configuration methods: using an MDM (mobile mobility management) tool and doing it manually on the Gmail app. Compare them below and choose your ideal option.
1What Do You Need for Gmail Exchange Setup?
Before starting, you need certain things for a smooth Gmail Exchange setup. The requirements vary, depending on the method you choose.
For configuring via an MDM tool:
- You must have enabled and configured the Managed Google Play Store on your MDM site.
- Have a device enrolled via Android Fully Managed mode or Android Work profile.
- Email configuration settings, including hostname, username, device identifier, login certificate alias, and default email signature. Find out what all these settings imply in the section below.
For manual Configuration:
- An email address and password
- Gmail Exchange server settings, including Domain/Username, Server address, Port, and Security type.
- Note: You can sign in to your Outlook on the web to find your Gmail exchange server address.
2How to Configure Gmail Exchange Settings for Android?
Method 1: Configure Automatically for All Devices at Once
You can automatically configure Gmail exchange settings for Android on all devices at once using an MDM tool. MDM is a convenient software that enables companies to track, manage, and secure their mobile devices.
But first, as mentioned, you need Managed Google Play set up on your MDM profile. Managed Google Play is an account that IT administrators will use to deploy and manage the Gmail app on all the company-owned Android devices, ensuring end-users can access the latest app version.
Benefits of Using an MDM Tool for Exchange Configuration
Steps to Configure an Exchange Account via MDM
AirDroid Business is one of the most reputable MDM tools for businesses. With it, you can configure your Exchange account in three simple steps as outlined here:
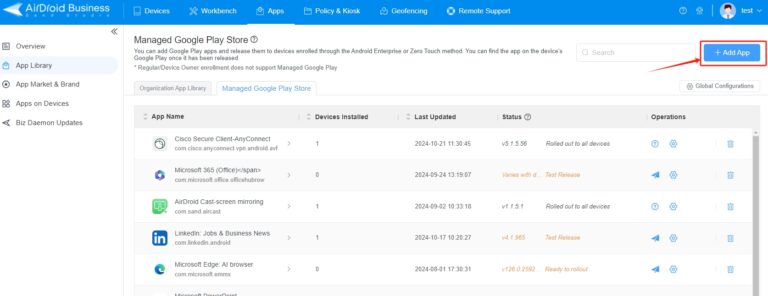
Step 1: Add the Gmail App to the Managed Google Play Store.
Sign in to your Android Business profile and go to Apps > App Library > Managed Google Play Store > Add App.
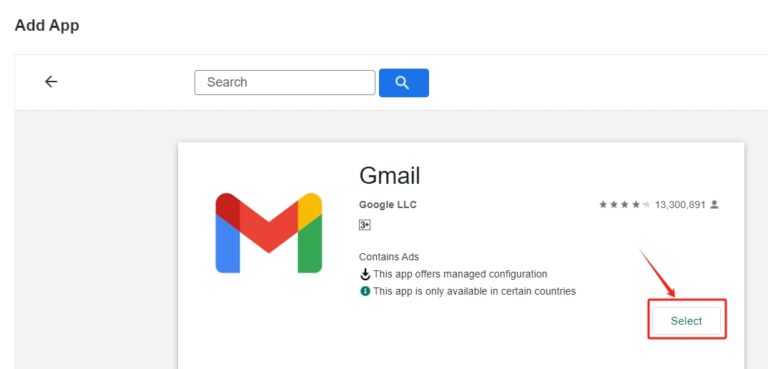
Next, choose Gmail, then click Select.
Step 2: Configure the Gmail Settings.
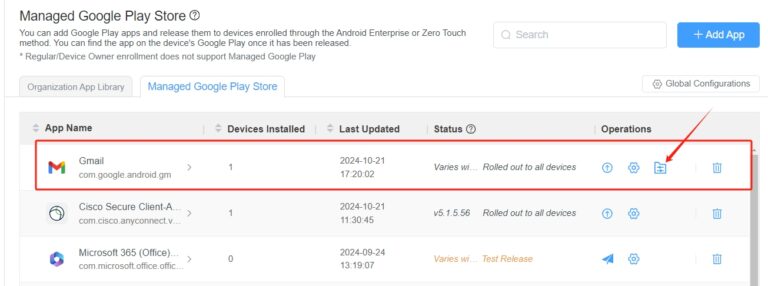
Click the file-like button, as shown in the image below. That will take you to the Gmail app’s configuration page.
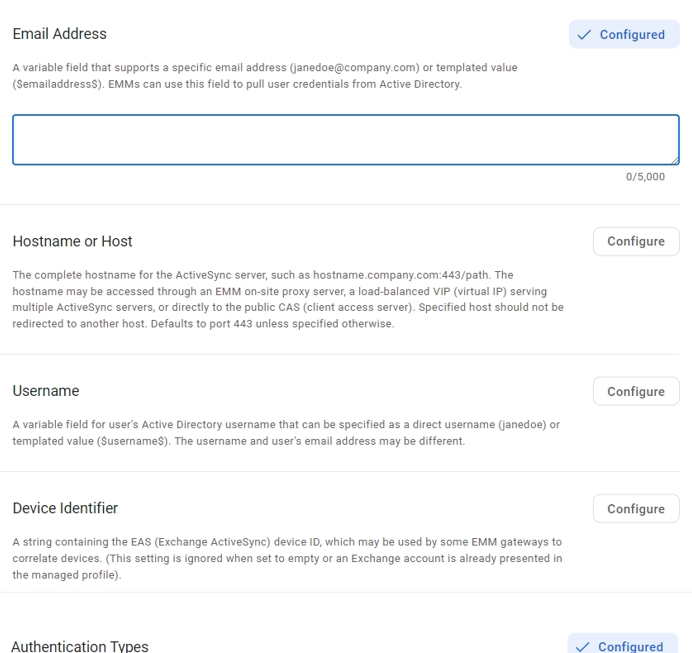
Here, take care of the following configuration settings:
- Email address: Enter the user’s email address. You can also enter a string like $emailaddress$ to enable Android Business to pull the email address from Microsoft Active Directory.
- Hostname or Host: Hostname of your Exchange server, for instance, “outlook.office.com” for Office 365.
- Username: The device owner’s username.
- Device identifier: A string containing an Exchange device identifier. It helps an Exchange server recognize and register an email client receiving emails via the EAS (Exchange ActiveSync) protocol.
- Authentication Types:
Types of authentication used for verifying a user’s email details with Microsoft Active Directory. - SSL Required: SSL means Secure Sockets Layer, communication to the server port specified in the Host setting.
- Trust all certificates: Validation checks on SSL certificates used on EAS servers, gateways, or proxies in front of email servers. It’s set to false by default to perform checks.
- Login Certificate Alias: Enter a string representing a certificate that contains a private key in the work profile keystore files. The certificate is usually a user certificate that helps authenticate to the EAS servers.
- Allow unmanaged accounts: This option allows users to add or remove an Exchange account except the one specified in the managed configuration.
- Default Email Signature: A signature you wish to be automatically included at the bottom of sent emails.
- Default sync window: Enter a number from 1 to 5 for the default period during which Exchange servers sync emails to Gmail.
After configuring these keys, hit the Save button.
Step 3: Apply the Settings to the Target Device(s).
Go to the “Apply to” tab. Here, select the specific device you want to apply the settings to. You can also choose to apply the configurations to all devices simultaneously by choosing All Devices/Groups. After that, click Add.
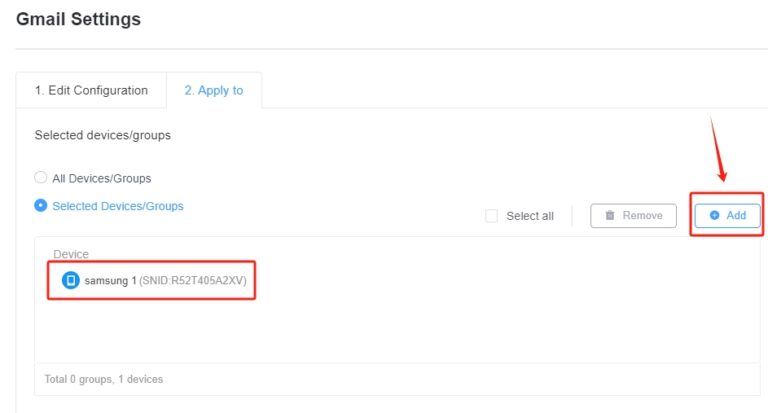
The device user(s) will now receive the app ready for use.
Target Users:
- IT admins and organizations with multiple devices
- Businesses that are using MDM solutions to ease app deployment and ensure the security of all managed devices.
- Larger enterprises that require typical email configurations
Method 2: Setup Exchange Email Directly on the Gmail App
Follow the simple steps below to manually set up Exchange Email on Gmail app on your preferred Android device:
Step 1. Open the Gmail app from your device’s home screen.

Step 2. Click Add an email address, then choose Exchange and Office 365 on the next screen.
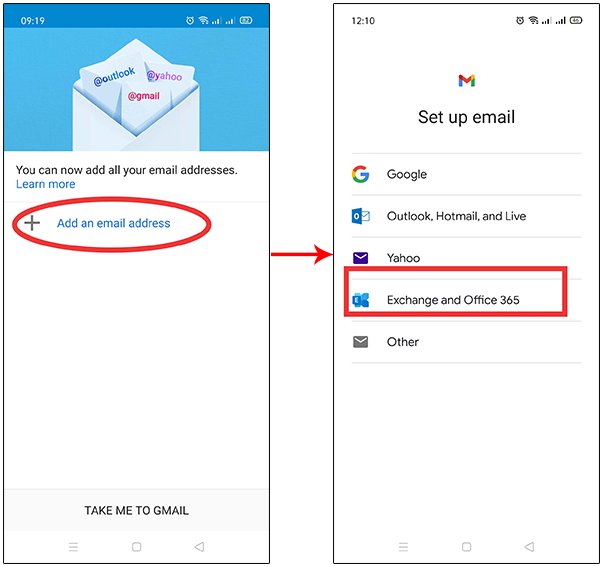
Note: If a gmail account has already been set up, first tap on the profile picture at the top-right corner. Then go to Add account > Exchange and Office 365.
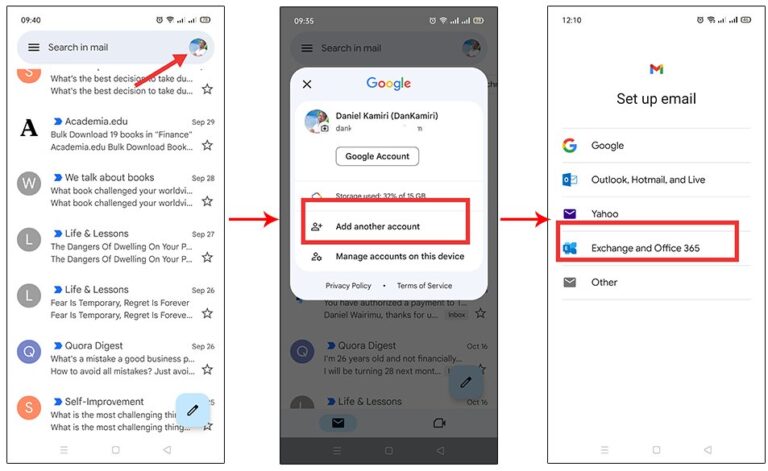
Step 3. Enter the email address you wish to set up and tap Next.

Step 4. Type your password on the subsequent page, then tap Next.

Step 5. Complete the “Email setup” page.
ex.mail.myorganization.com as an example in this guide)
Step 6. Click Next. “Your account is ready to go!” will pop up on the next screen. Tap Done to complete setting up your account.

You can now use your email account to send and receive messages directly from the Gmail app.
Target Users:
- Individuals and small businesses that have yet to have dedicated IT support.
- Those looking for a straightforward process to manage work or personal devices
- Tech-savvy users who prefer setting up their accounts independently.
Conclusion
After reading the above step-by-step guide, configuring Gmail with Microsoft Exchange on Android devices is easy. You have learned two methods: using an MDM tool and doing it manually on the Gmail app. Both are simple and will take you a few minutes to apply. We leave you to choose your ideal method based on your situation or needs.
AirDroid Business - Configure Gmail Exchange for Android.
AirDroid Business allows you to easily configure your Gmail Exchange, simplifying your email management. It also offers remote control and management tools for both Android and Windows devices.


Leave a Reply.