[Solved] How to Give/Grant An App Permission?
Have you ever been asked to allow access to different device features like camera, microphone, gallery, contacts, and file manager through pop-ups on installing new apps on your mobile devices? These are the app permissions you need to manage smartly to prevent identity theft, location tracking, malware, and data breaches. App permission has more security concerns for business devices as they contain corporate data that can damage the company’s reputation and financial status.
Quick Guide:
To give an app permission, you need to go into your device's settings, find the specific app or the general permission manager, and then enable the permission you want to grant, such as Camera, Microphone, or Location. The steps vary slightly between Android and iOS.
On Android: Open the Settings app on your phone - Tap on Apps or Apps & notifications - Select the app you want to change permissions for - Tap on Permissions - Select the permission you want to grant (e.g., Camera, Location) and choose Allow.
On iOS (iPhone): Open the Settings app - Scroll down the main settings list and tap on the specific app - You will see a list of permissions the app can request (e.g., Photos, Microphone, Camera) - Toggle the switch next to the permission to the On (green) position.
Continue reading for detailed guides and additional information on Android app permissions for fleets and other devices:
Part 1. Give an App Permission on Android
You can allow or deny access to device folders on Android using the Settings tab. Here are two different ways to manage it:
1Method 1. Based on Specific App
- Step 1:
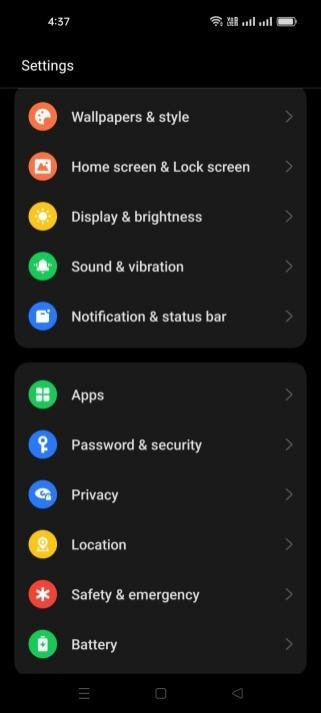
- Unlock your Android phone and open the Settings tab from the menu. Then click on the ‘Apps’ tab to view a list of apps.
- Step 2:Select the app
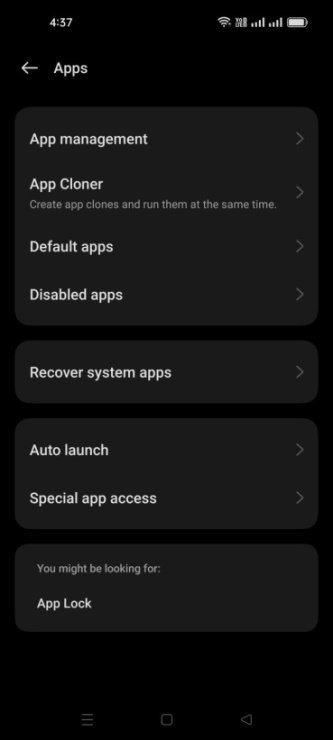
- Now click on the ‘App management’ tab to view and select any app to make changes.
- Step 3:Select the Permissions tab
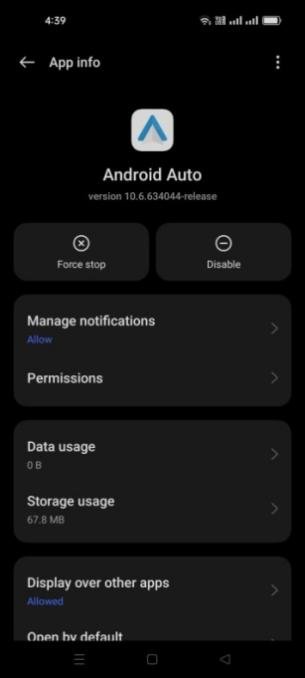
- After selecting the app, click ‘Permissions’.
- Step 4:Select Permission
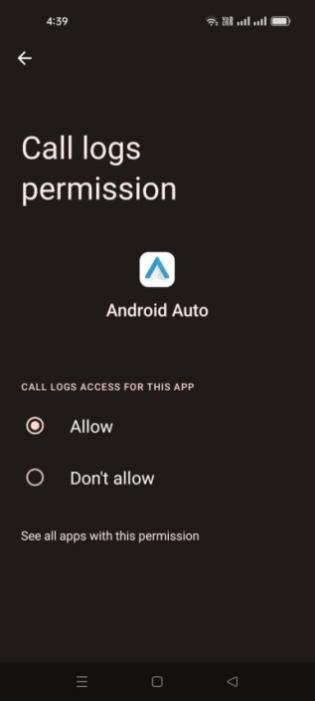
- Select any of the options from contacts, call logs, camera, location, microphone, and calendar. Then press ‘Allow’ or ‘Don’t Allow’ option.
2Method 2. Based on permission types
Enabling a specific permission type allows all apps with this permission type to access the data in that file type.
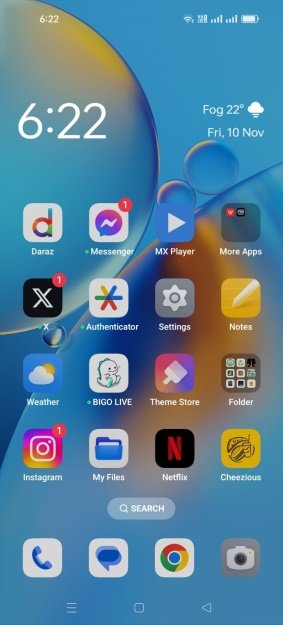
- Step 1:Open the Settings Privacy
- Open the Android Phone Settings tab and scroll down to choose the Privacy option.
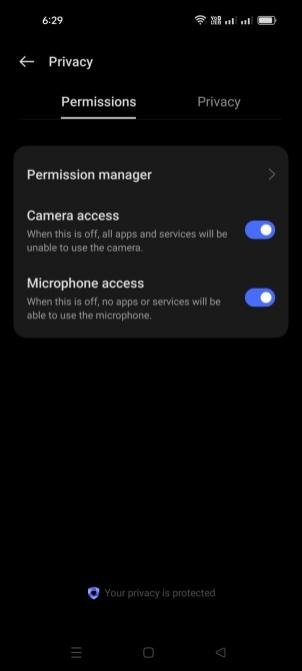
- Step 2:Select Permission Manager
- In the privacy tab, select ‘Permission Manager’ to view the list of permission types.
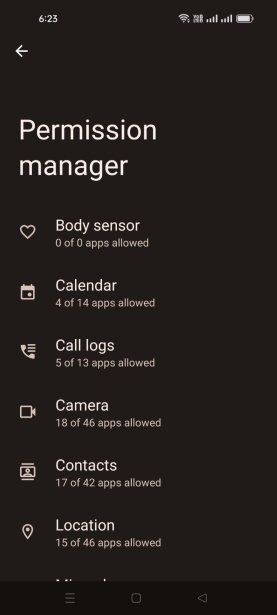
- Step 3:Click permission type
- Select any permission type from the list, like body sensor, calendar, camera, contacts, and location.
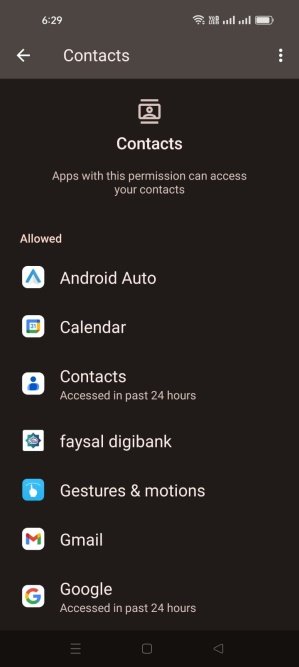
- Step 4:Select Allow access
- Now enable it to allow every app access your contacts, camera, or any file. You can also see the apps that can access your selected permission type.
Part 2. Manage an App Permission on Android Fleets
Managing app permissions on Enterprise devices is a serious issue because employees may install malicious apps and allow them access to system data, giving rise to potential risks for companies. To overcome this issue, admins can use the AirDroid Business management solution to monitor and control app usage on enterprise devices remotely and manage app permissions.
2.1AirDroid Business - App Manager
App managers help administrators to remotely manage the installation of apps, ensuring only official apps run on enterprise devices. Admins can also restrict employees from installing or uninstalling any app with permission. It also allows test releases to ensure the configuration of only device-friendly apps.
2.2Manage App Permission with AirDroid Business
You can manage app permission for individual apps using Google Play Store on AirDroid Business.
- Step 1:Open AirDroid’s admin console
- From the admin console, select Apps. Then, choose App Library and click on Managed Google Play Store.
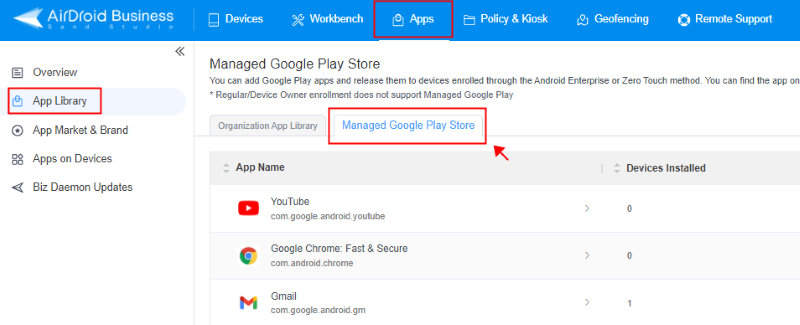
- Step 2:Select any app
- Select any app from the list that you will get on the Managed Google Play Store tab. Click on the Gear icon after the app name to make changes.

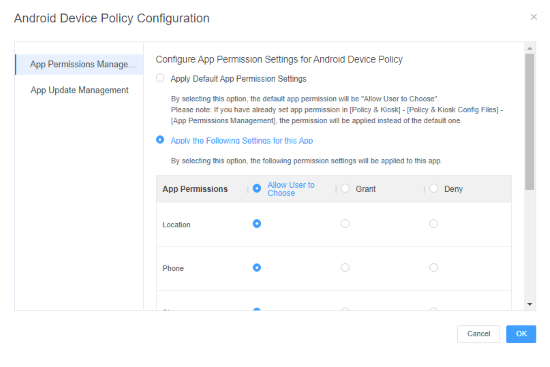
- Step 3:App permission management tab
- Click on the app permission management tab and customize settings for each permission type. There you will get location, phone, storage, camera, calendar, contacts, and microphone options. Choose any option from ‘Grant,’ ‘Deny,’ or ‘Allow user to choose’ to manage permissions for each type. Don't forget to apply this configuration to your target devices/device groups, then the setting will take effect.
Part 3. Give an App Permission on iPhone
Managing app permissions on iPhone is pretty simple, using Privacy and Security Settings. Here are simple steps to answer how to give app permission on iPhone:
- Step 1:Open Device Settings
- Open the Settings tab of your iPhone from the Home Screen and select ‘Privacy and Security.’ You can also access it from the App Library.
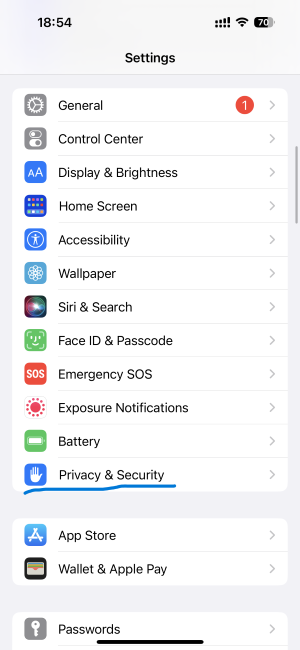
- Step 2:Open the Tracking tab
- In the Privacy and Security tab, select tracking and then turn on the ‘Allow Apps to Request to Track’ switch. Return to the back screen.
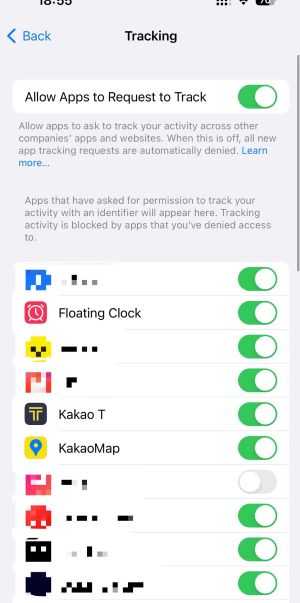
- Step 3:Tap Permission type
- Select any permission type from the following list:
- Contacts
- Calendars
- Reminders
- Photos
- Bluetooth
- Local Network
- Microphone
- Speech Recognition
- Camera
- Health
- Research Sensor & Usage Data
- HomeKit
- Media & Apple Music
- Motion & Fitness
- Step 4:Turn the switch ‘On’
- Turn on the switch after the app that has requested to access the data.
Part 4. Set Up App Permission on A Windows PC
It is important to know which apps on your PC are accessing your device data so you can safeguard your privacy. Here are the steps to make changes to permission settings on Windows 10 and 11.
Windows 10
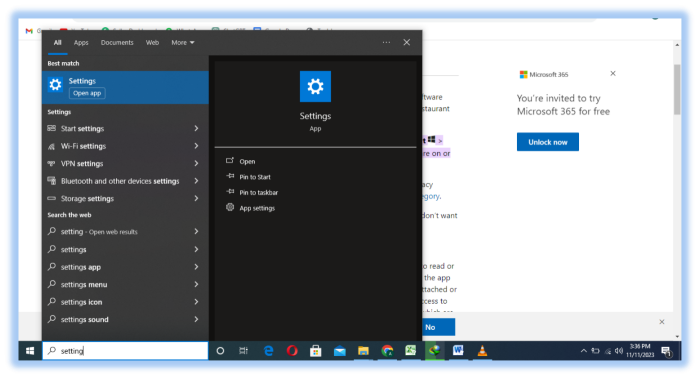
- Step 1:Open the Settings tab
- Turn on your PC and type ‘Settings’ in the Windows search bar. After getting results, click on the ‘Settings tab,’ and a new Window will pop up.
- Step 2:Select the Privacy tab
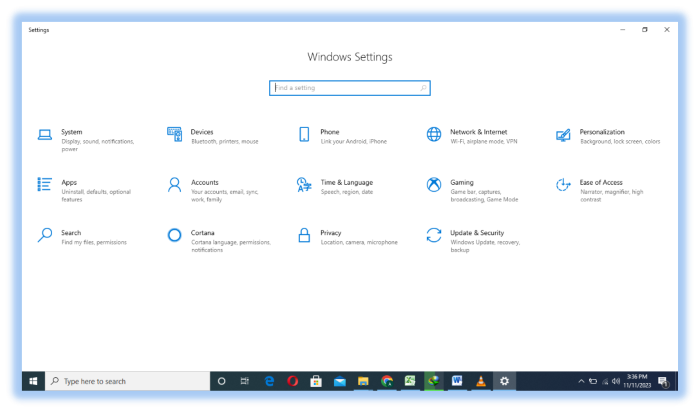
- In the Settings tab, you will see different device settings options. Select the ‘Privacy’ tab to initiate app permission settings.
- Step 3:Manage Different App Permissions
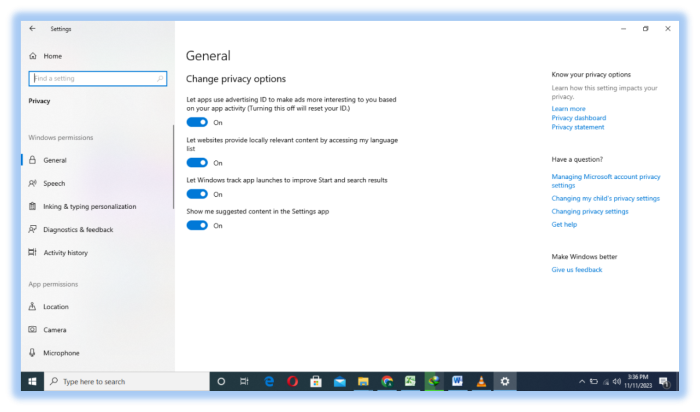
- In the privacy tab, you will get the Windows permissions tab and the App permissions tab. Scroll down to view the list of device features that installed apps can access.
- Step 4:Select any app permission type
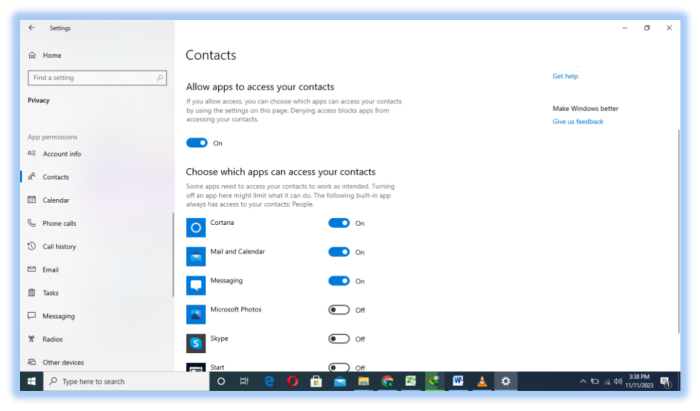
- Click on any of the app permission types. For example, select Contacts. Turn the slider on, and below, you will see the list of apps. Turn on the sliders of each app you want to allow access to your device contacts. Similarly, you can also manage other permissions.
Windows 11
- Step 1:Open the Search Bar
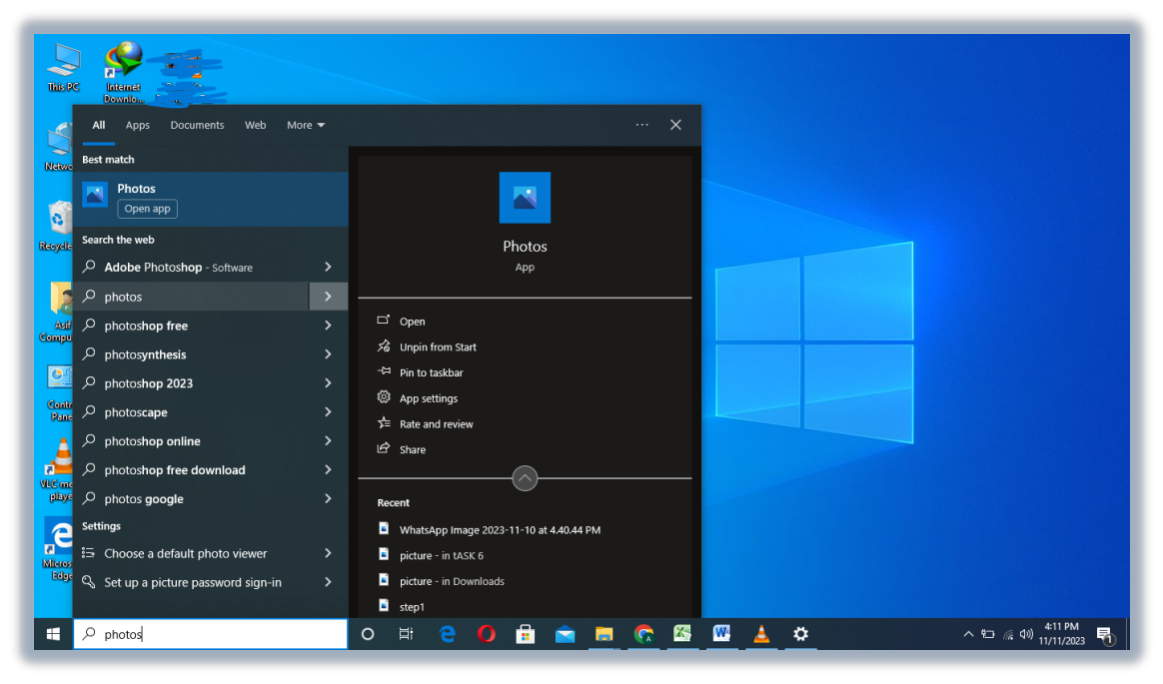
- Search the specific app in the Windows start menu to allow permissions. For example, you need to manage permission for the Photos app.
- Step 2:Select the App
- Type photos and right-click on the app name in the list to select App Settings.
- Step 3:Toggle On or off
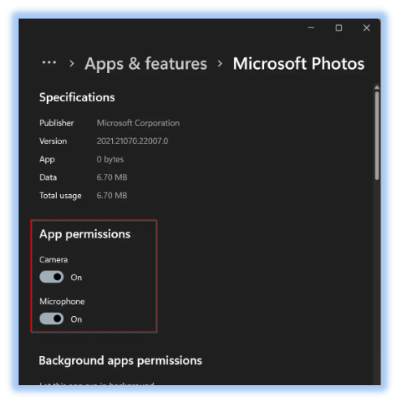
- Photos app settings will open. Check the permission options. You will see a camera and microphone. Toggle them on to allow photo app access to your device camera and microphone.
Part 5. Grant an App Permission on Mac
- Step 1: Click on the Apple icon at the top-left corner of the Mac display and select ‘System Preferences.’
- Step 2: In System Preferences, search for ‘Security and Privacy’ with house shaped icon. Then, select the privacy tab.
- Step 3: Now select any service from the left side. After selecting, you will see apps with permissions to access this device functionality. Make changes as per your needs by using the tick mark option.

Part 6. Different Types of App Permissions Explained
- Call History: Access to call history feature enables apps to view your incoming and outgoing call information on various telephonic apps like Skype.
- Contacts: Apps can view your contact list if allowed permission.
- Camera: Apps can access your device camera to view pictures and see around.
- Fingerprint Reader: Providing access to your fingerprint reader can enable apps to use your fingerprint on different platforms.
- Bluetootn: Apps can activate the Bluetooth of your device and connect to other devices for file sharing.
- Account info: Enabling this permission type allows apps to access any of your accounts and use it.
- Location: Allowing access to your device location can let apps use your device location and track it.
Part 7. How Do I Give Root Permission to An App?
You need to download a third-party app to give root permission to any app.
- Download the Superuser app on your Android device along with a busy box app.
- After successfully installing, you will view a list of apps on the home screen that have requested root access.
- Swipe right to the activity logs of rooted apps. Also, download the Titanium app to make a backup of all apps on your phone.
- Now allow rooted access to the apps that have forward requests. You can also deny the permission to prevent any specific app access on your device.
Conclusion
We have provided straightforward answers to your question about how to give app permissions on different devices. You can easily check and alter app permission access on your Android, iPhone, Mac, and Windows devices from your device settings. However, it is not so simple for enterprises where managing app permissions is more crucial - You need an MDM solution to control and manage application settings on enterprise devices. It is a very sensitive process because a single click can lead to data breaches and identity theft. Everyone needs to avoid granting access to unknown apps, especially to their contacts, videos, photos, and files. You should only allow access to permission types that are relevant to the app functionalities.


Leave a Reply.