Mastering MDM Logs with AirDroid Business: A Step-by-Step Guide
MDM logs play a pivotal role in ensuring security and compliance, and troubleshooting managed devices. They help IT teams track device activity, enforce policies, detect security threats, and ensure regulatory compliance. MDM logs also help in monitoring app usage, and auditing remote actions, ensuring smooth and secure operations across managed devices.
1Understanding MDM Logs
Let us first have a clear understanding of what MDM is and what the MDM logs are.
1 What Does MDM Stand for
By MDM, we mean Mobile Device Management. It is a comprehensive remote management system that helps enterprises manage, monitor, troubleshoot, and secure mobile devices within the organization. Its aim is to provide remote visibility and the ability to monitor and manage each and every device to ensure security, compliance, and smooth functioning.
2 What Do MDM Logs Track?
MDM logs are the records generated by MDM systems that let the IT teams track the management, use, and security of the enrolled devices. These records are valuable in monitoring device activity, pinpointing security issues, enforcing security policies, and troubleshooting the devices. For instance, they can track:
- Device’s enrolment and ownership status (whether it is company-owned or personal, and when was it enrolled)
- Security status (e.g. jailbroken or rooted)
- Encryption status
- Remote lock and remote wipe activity
- Attempts made for unauthorized access
- Installed apps and their version and updates status
- Geolocation data
- WIFI connection and VPN usage
- Patch status
- Device activity
- Battery health status
- Performance logs and much more
3 Why are MDM Logs So Important?
MDM logs are a means of tracking enrolled devices’ overall performance, ensuring their security, compliance, and troubleshooting any issues. They play a crucial role in the following scenarios:
- Detecting a device with jailbreak trying to access an enterprise’s sensitive data
- Pointing out and troubleshooting issues with devices, e.g., figuring out why a device is not syncing emails remotely
- Starting verification on whether an important patch was successfully deployed on all devices
- Detecting over usage of data on a company-owned device
- Tracking unauthorized data transfer from a lost device
2 How to Collect MDM Logs for Windows Devices by Using AirDroid Business?
Now that you know what MDM logs are and why they are of significant importance, let us explore how you can collect these logs using AirDroid Business. Here is a step-by-step guide on how you can access these logs, view the logs you are looking for by using search filters, and download the logs data.
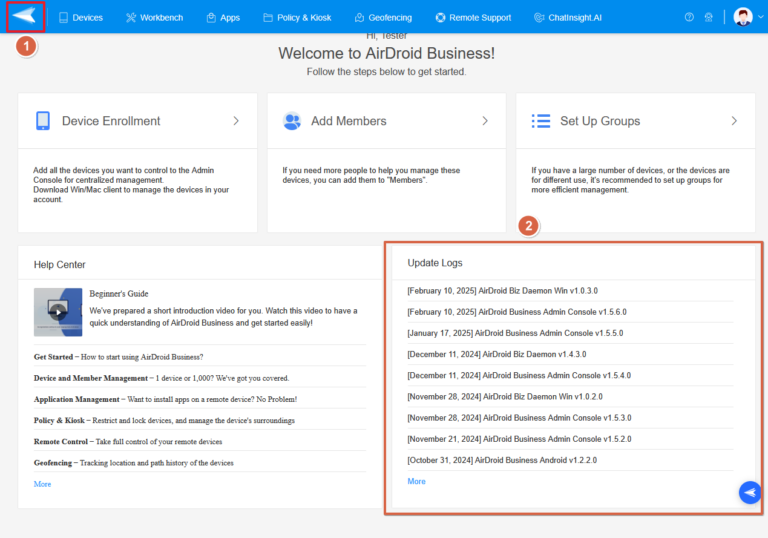
1 Update Logs
You can view your update logs to find out about the latest updates. This also gives you the information about which date a specific update was installed and also the version history of each update. Filter and sort according to what you are looking for and you can also export a list of update logs.
2 Task and Action Logs
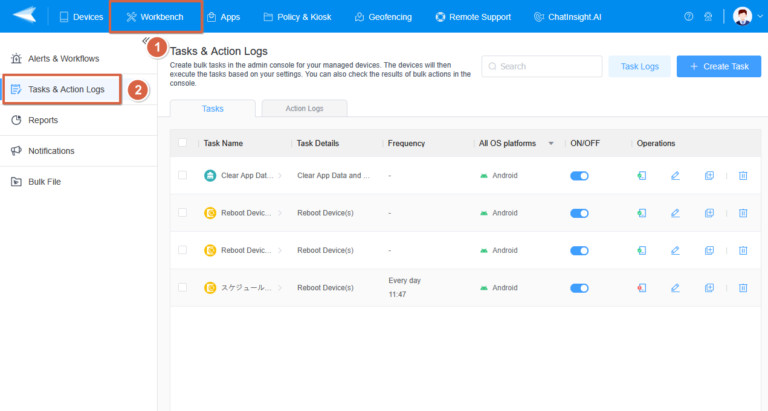
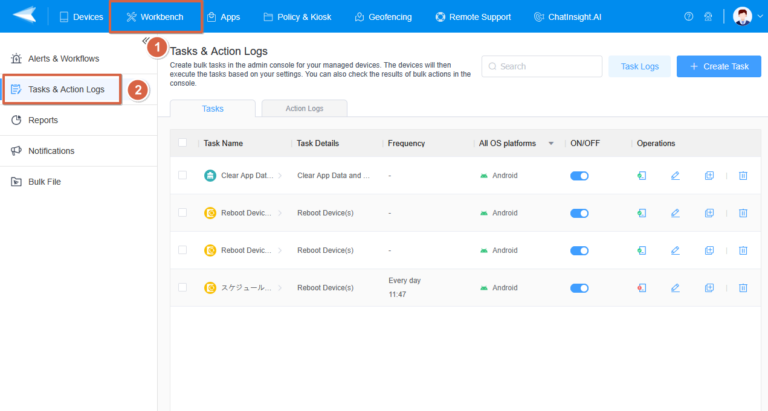
In your AirDroid Business dashboard, once you click ‘workbench’ on the top menu, you will see the ‘Task and Action Logs’ option in the left panel. Click it to access all the related logs and sort them according to what you are looking for. This section gives you detailed data on the tasks and actions performed on your enrolled devices.
Accessing Logs on Windows Devices
- Step 1: In your AirDroid Business dashboard, click the ‘workbench’ from the top menu and you will be shown a list of your ‘Alerts and Workflows’.
- Step 2: To access all the logs, you can click on the tab that says ‘All Logs’ in the top right corner.
Filtering MDM Logs
- Step 1: Once you click on ‘all logs’ you will see an entire list of logs which can be overwhelming and you might find it cumbersome to get to the logs you want to view.
- Step 2: To sort out the logs and filter the ones you are looking for, you can use the filters on this page. For example, you can sort the logs by time duration, a specific alert name, alert type, by groups, and even by devices.
Downloading MDM Logs
- Step 1: Once you have filtered out the logs you need, you can download/export these logs.
- Step 2: To download the logs, click the ‘Export’ tab in the upper right corner.
This will provide you with an Excel sheet of the logs you need.
3 Reports
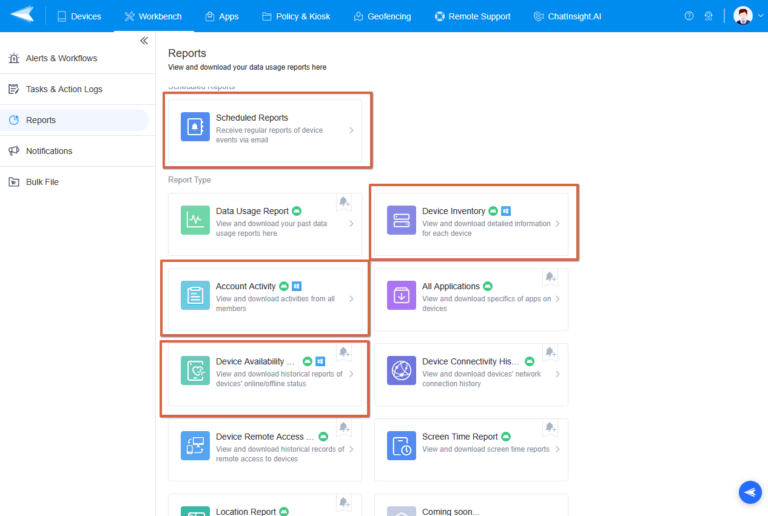
You can access the report logs for an in-depth view of different report types. For example:
Scheduled Reports
This section lets you receive regular reports of device events through email. You can add report types to be scheduled for log sharing through email. For example, you can add Data Usage reports to the Scheduled Reports and then you’ll be able to see the data usage patterns across the devices. This will help you point out excessive data on an enrolled device.
- Step 1: Hit the ‘Reports’ section in the left pane on your dashboard
- Step 2: Select ‘Scheduled Reports’
- Step 3: Now hit the tab on the top that says ‘Create Report’
- Step 4: Select the report type from the dropdown menu and set up the delivery settings, once done, hit OK and you will start receiving emails for the selected report type.
Device Inventory
Here you can view and export the detailed data regarding each of the enrolled devices. Device inventory reports give you detailed data on all important device indicators for enrolled devices. For example, for your selected devices it shows their model, device manager, Android ID, last online time, last connection, and a lot more. You can obviously sort the data according to device groups and also by the type of indicators you want to check.
- Step 1: In the ‘Reports’ section, select the ‘Device Inventory’
- Step 2: Filter out the logs that you want to export and hit ‘Export’
Account Activity
This section gives you the information from the user's perspective. It lets you view activities from all the members. For example, for the selected users you can get data about their app usage, geofencing, tasks, policy and kiosk settings, remote access, and much more.
- Step 1: In the ‘Reports’ section, select ‘Accounts Activity’
- Step 2: Apply the filters, e.g., specify the time for which you want to view the logs, and the users for whom you are trying to export the logs along with the activity types you are interested in.
- Step 3: Finally, hit ‘Export’ to download the logs.
Device Availability Report
Get an in-depth view of the history of the online and offline status of a device or group of devices. You can look into this data according to the devices’ serial number, model, IMSI, or other indicators. In your ‘Reports’ section, select ‘Device Availability’ and configure your report according to your needs. Hit ‘Export’ and the data will be downloaded.
3 How to Collect MDM Logs for Android Devices by Using AirDroid Business?
Here’s a brief overview of how you can access various logs on Android devices using AirDroid Business, sort them according to your need, and export them in the form of an Excel sheet.
1 Task & Action Logs:
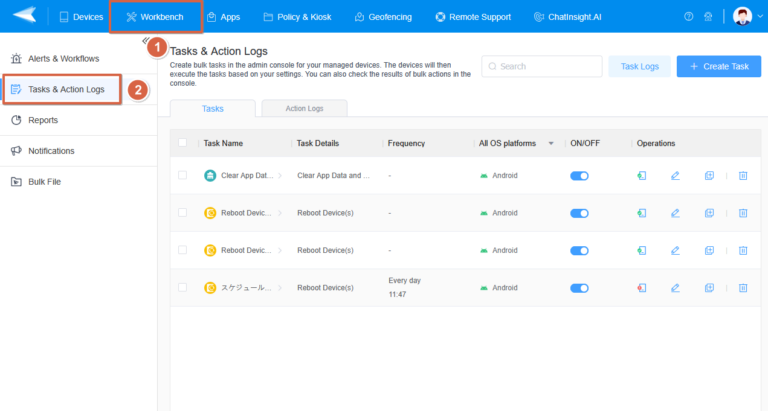
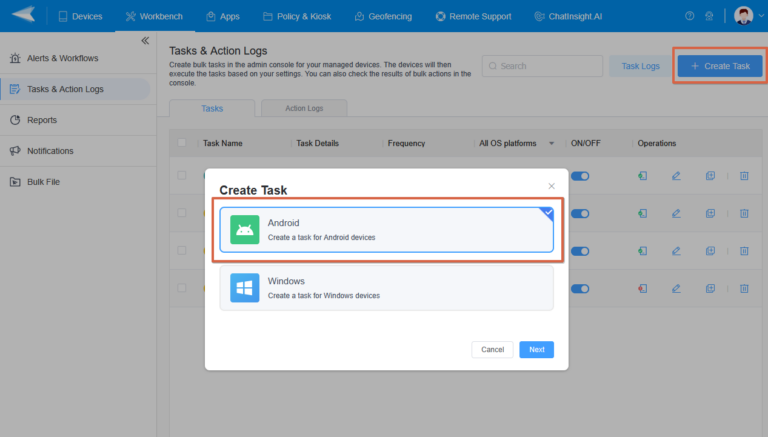
Accessing MDM Logs on Android Devices
- Step 1: Click the ‘Workbench’ tab from the menu.
- Step 2: You’ll be shown the ‘Alerts and Workflows’ page. Hit the ‘All Logs’ tab on the top right and you will see all the logs for the enrolled devices in one place.
Sorting/Filtering MDM Logs for Android Devices
- Step 1: Once you’ve clicked the ‘All Logs’ tab, you will see all the logs from every enrolled device but this can be confusing when you are looking for specific data.
- Step 2: To get to the logs you actually need, you can sort and filter them using the filters given above the logs.
Exporting/Downloading the MDM Logs for Android Devices
Once you’ve filtered out the logs that you need, click the ‘Export’ Tab on the top right and it will download all your required logs data.
2 Update Logs
View and export the logs related to the updates. You can filter them by time and will be shown the versions as well. Check the updates history and also the failed updates and export the data for easy evaluation of the update status of enrolled devices.
3 Reports
Using AirDroid Business, you can access the data for all sorts of reports, check their history, and export the data that you need. E.g:
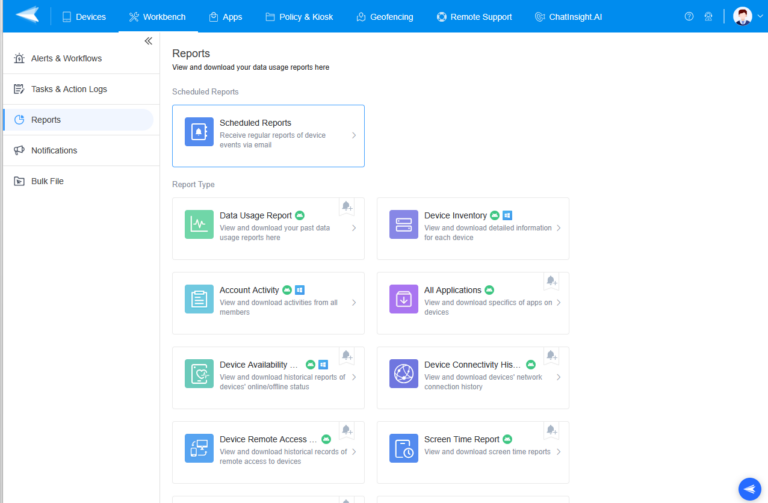
Scheduled Reports
This section allows you to automatically receive data about specific report types through email. For instance, you can add data usage reports for specific users or devices to the scheduled reports and you will get regular data about the data usage patterns right in your email. You can add the types of reports you want to receive regularly in your email by following a few simple steps:
- Step 1: Click the ‘Reports’ Tab in the left pane.
- Step 2: Select the ‘Scheduled Reports’ Section.
- Step 3: Now hit the button ‘Create Report’ on the top.
- Step 4: Select the report type and the delivery settings and hit OK and you’re done adding a scheduled report. Now you’ll start receiving the reports right in your inbox at set intervals.
Data Usage Report
Here you can view the reports about the history of data usage and download them if needed. Data Usage reports show you the data used over the previous day, today, past week, or previous 30 days. You can also sort out data usage reports for a custom time period. It shows the data usage trends with the help of graphs and even by the individual apps.
- Step 1: To view data usage reports, click the ‘Reports’ tab in the left pane of your dashboard.
- Step 2: Select ‘Data Usage Reports’.
- Step 3: Hit the ‘Export’ button on the top right and the logs will be downloaded.
Device Inventory
Access the detailed information about any device or groups of devices and export the logs for them. This report type presents data about the key attributes of all enrolled devices, e.g., their model, Android ID, last online status, and more. Here is how to access and export these logs:
- Step 1: After clicking the ‘Reports’ tab, select ‘Device Inventory’.
- Step 2: Apply the filters to get to the reports you want to export.
- Step 3: Hit the ‘Export’ button.
Account Activity
View the activity of the users and download the related logs. You can filter the users for whom you want to see the data. It shows their app usage reports, remote access status, geofencing, and other variables.
- Step 1: From the reports section, select ‘Accounts Activity’.
- Step 2: Apply the filters according to what you want to export, e.g., specific time duration and other given filters.
- Step 3: Hit the ‘Export’ button.
All Applications
Get valuable data about individual apps and their history. You can filter by app and download the data that you need for assessing app activity and status.
- Step 1: Select the ‘All Applications’ tab from the ‘Reports’ section.
- Step 2: You will be shown a list of all apps. Hit the ‘Export’ Button on the top and select the apps or devices for which you want to export the app logs.
- Step 3: After you are done applying the filters, hit ‘OK’.
Device Availability Reports
This section gives you the logs related to the device’s availability history. It shows their online and offline status. You can check the status for any specified time and devices and download the data by hitting ‘Export’ after applying filters.
Device Connectivity History
It lets you view the network connectivity history of the devices and the ability to download the related data for any device during any specified time. It shows such variables as the connectivity duration of devices, % of wifi and % of cellular, etc.
Device Remote Access Report
You can view and export the historical data about remote access to any device or devices. Select the time duration and devices and hit ‘Export’ after you’ve configured your required report.
Screen Time Report
View historical data about the screen time for devices and download it after configuring. This section tells you about the average screen time of a device over a period of time, e.g., for the previous day, for the last 7 days, or for the last 30 days.
Location Report
View the location of devices and also access and download the historical data about their location changes.
4 Geofence Logs
Another important type of logs that you might be interested in is the geofence log. It shows the geofence for the selected devices or groups of devices, their workflows, and a range of actions like enabling lost mode, clearing cache, failed attempts to clear cache, and more.
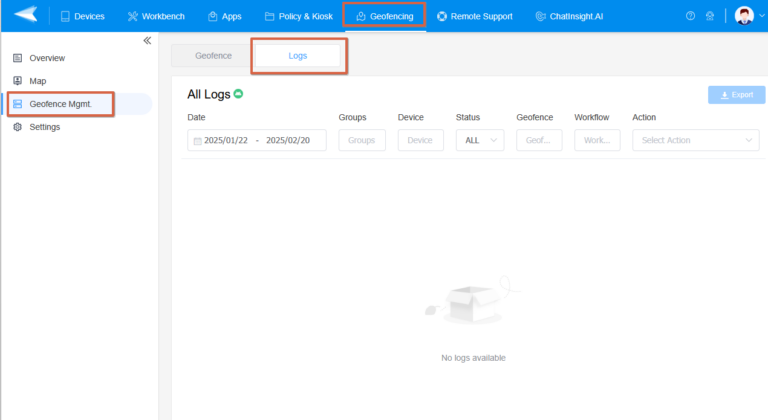
You can access them by following these steps:
- Step 1: Click the ‘Geofencing’ tab in the top menu.
- Step 2: Then click ‘Geofence Mgmt’ from the left pane.
- Step 3: Here you’ll find the ‘Logs’ tab on the top. Click this tab.
Here you’ll be able to filter the logs and export them.
4 Best Practices for Managing MDM Logs
Now that you know how you can use an MDM service like AirDroid Business to retrieve all the data that matters, let's have a look at how you can take the maximum benefit out of this function by following the best practices.
1 Regular Monitoring and Maintenance
This practice guarantees smooth functioning and avoiding problems instead of treating them when they get worse:
- Set up alerts for the events that are important so you get regular updates
- Make sure you conduct regular, scheduled audits of the logs for timely detection of anomalies
2 Ensuring Data Security and Compliance
It is of prime importance to ensure security and compliance with the existing standards. Here is how you can do it:
- It is recommended that you apply encryption to the logs to avoid unwanted access to sensitive data
- Follow the standards set by established codes like HIPAA
3 Optimizing Log Storage and Retention Policies
- Devise a log storage policy according to your needs
- Archive the older logs and compress them to save storage space
- Consider using cloud-based storage if possible
4 Troubleshooting Common Log Issues
- It is highly recommended to keep backups of your important logs
- Look for the missing and incomplete logs and fix the issues
Following these practices, you can always keep your MDM logs up to date and functioning to their best.


Leave a Reply.