How to Check Google Location History
Google Maps was launched in 2005 as a mapping platform. Since then, it has become the most important invention among several other location technologies. It has influenced the growth of GPS and other digital mapping services on all devices. In 2020, the total user of Google Maps had risen to over 1 billion. Undoubtedly, several features set this invention apart.
Popular examples are turn-by-turn navigation, real-time traffic conditions, location history, dedicated parking, and route planning by foot, car, bike, etc. In this article, we will show you how to use the location history feature of the app. Furthermore, we shall explore how to check and delete location history using mobile and web apps.

Key Takeaways
- Google Maps has influenced the growth of GPS and other digital mapping services on all devices.
- Location history shows places you have been and routes you have taken.
- Google does not filter travel history for separate devices; a location tracker app will be helpful in these cases.
- If a user's location is made public, it can pose a very serious security risk. Google provides its users with privacy. You can also delete your location history manually or automatically.
Part 1: Privacy of Google Location History
User information gathered by Google Location History is very sensitive. For example, if a user's location is made public, it can pose a very serious security risk. Hence, Google provides its users with privacy. This privacy agreement between Google and its users was, at first, only the none disclosure of location details. However, improvements have been made over the years. In 2019, Google announced that there would be major changes to how it stores user data.
The major change was the auto-delete feature. This feature is expected to affect all the user data stored and accessible through the user's My Activity page. Hence, details like location history, voice commands, search history, etc., will be removed automatically. Before then, Google kept it indefinitely. However, the new changes will remove these data after 3 or 18 months, depending on the user's choice. In June 2020, Google further updated this auto-delete feature for new users.
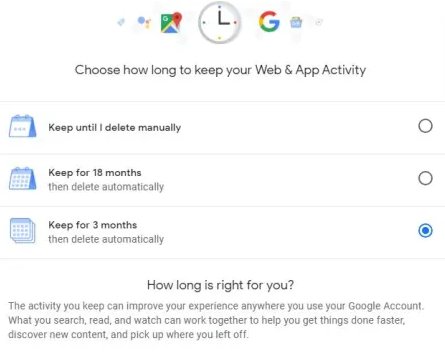
In the new update, users' auto-delete settings will be on by default. However, they can turn it off through their Activity Control page. The change includes setting Google's location history off for new users. But if it is turned on, each record will be deleted automatically after 18 months. Fast forward to July 2023, Google rolled out another news. It stated that it would delete location data for people who visited abortion clinics, fertility centers, weight loss clinics, domestic violence centers, and other sensitive locations.
Part 2: How to Check My Location History on Google Maps
Location history shows places you have been and routes that you have taken. This record is available only to you via your computer or mobile device. Your location history is gathered via all apps attached to your Google account. Hence, if you delete your Location History, you may still find similar information on your Google account. This information was collected through Google services, sites, and apps.
However, if you need the Location History feature, you must turn it on in the Google Maps platform. Here are the steps:
How to Turn on Google Maps' Location History
1. Open your Google Maps web or the app.
2. Load the menu options by clicking on the hamburger sign, your profile picture, or your initial. You will see the Timeline menu option; click on it.
3. Click on Your data in Maps.
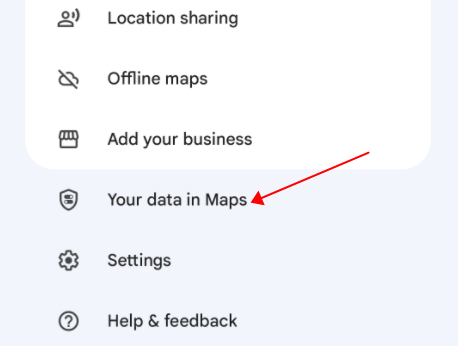
4. Scroll down to the Location History option.
5. Turn on the button.
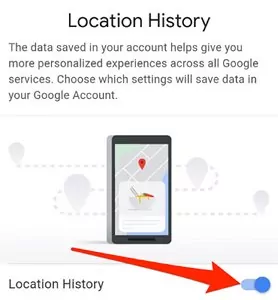
Note: Simply toggle off this button if you want to turn off this feature.
If it shows that Location history is on, proceed as shown below.
1How to View My Location History via Google Maps using the Website
You can use the web of Goolgle Maps to find your location history. Follow the steps below:
1. Once the Google Maps page opens, sign in with your Google Account details.
2. Click on the hamburger icon at the top of the page for menu options.
![]()
3. Click on the Timeline option.
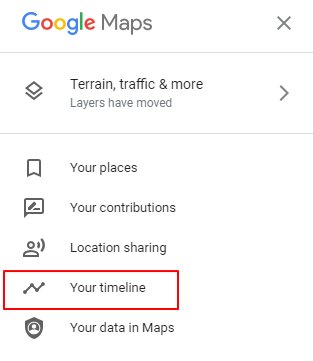
4. Choose the day, month, or year at the top to find a date.
2How to See My Location History on the Google Maps App
Here is how to check your location history on Google Maps Mobile app.
1. Open the Google Maps app on your mobile phone or tablet.
2. Click on your display picture or initials.
3. Click on the Your Timeline button.
4. Click on the Today button to access the calendar feature. This feature will help you access any date you want.
Part 3: How to Check the Location History of Multiple Different Android Devices with the Same Google Account
Google does not filter travel history for separate devices. Therefore, you have to turn off the location reporting of each device, especially the ones you do not want to track. The app to use is the AirDroid Location Tracker.
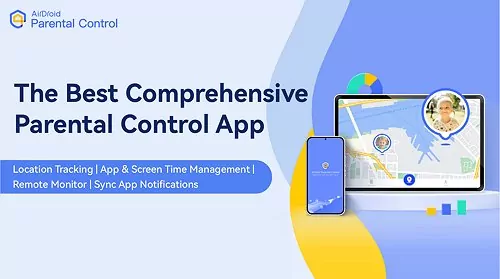
Suppose you have several devices, and the same Google account is working on the device. In that case, the app helps you check the location history of each device. It has several other features for parents. The app lets you check your kid's location history anywhere and set a geofence for your child. You will also get an instant alert when they leave or arrive at certain places.
- Track real-time location and location history of multiple different Android devices
- Remotely watch, hear or record what is happening around the paring Android devices
- Schedule and manage app & screen time usage on the linked Android devices
- Sync the app notifications, including text messages, and mirror kid's Android devices to parents
Part 4: How to Delete Your Google Location History
Here is a popular scenario, "If I have 2 phones with the same Google account connected on them (Phone A and Phone B), and I erase certain days on the Google timeline on phone B, does it erase on Phone A as well?" The answer is that Google will remove the data for only the phone you pick. When you are about to delete it, you will be asked to pick which device data you want to delete. Hence, you can delete both devices. When you delete it for both devices, it will not be on any of the phones.
The data is deleted from your Google account, but the data for each device is categorized separately. Likewise, you will individually delete data for each device at intervals you set, e.g., 3, 18, or 36 months. Data for both devices will not be affected at the same time. With the delete function, you can delete manually for a day, all, a range of days, months, or years. If you delete all, you will not be left with any location history data. More details about the delete location history and how to use it are shown in this section.
1Manually Delete a Range of Location History
There are several options to delete Location History manually. This section will show you how to use the range option. It is very similar to the other options.
Delete Location History Manually using Desktop Web
1. Open the Google Maps history by visiting google.com/maps.
2. Sign in with your Google Account details.
3. Click on the hamburger icon at the top of the page for menu options.
4. Click on the Timeline option.
5. Choose the day, month, or year range you want to delete.
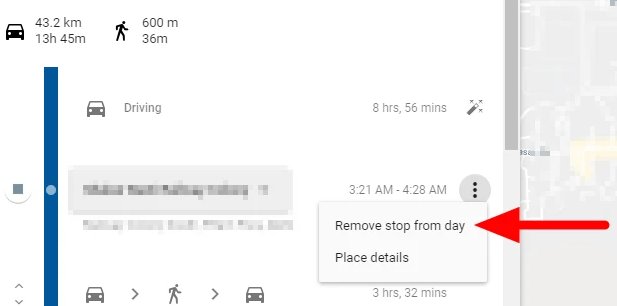
6. Click on the more option and select Remove stop from day.
Delete Location History Manually for Mobile App
1. Open the app on your mobile phone or tablet.
2. Click on your display picture or initials.
3. Click on the Your Timeline button.
4. Click on the hamburger button or More option.
5. Select the Settings and privacy option from the list of more features.
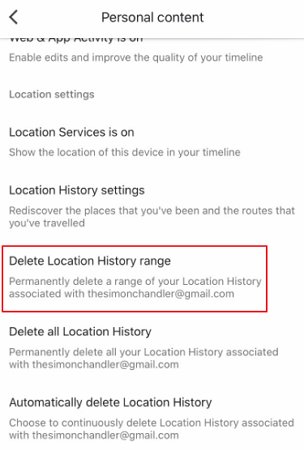
6. Click on the Delete Location History range.
2Want Google Delete Location History Automatically?
If you want to delete location history automatically, this section shows you how to go about it. You can set it up on your web or mobile app.
Delete Location History Automatically using Desktop Web
1. >Open the Google Maps history by using google.com/maps.
2. Sign in with your Google Account details.
3. Click on the hamburger icon at the top of the page for menu options.
4. Click on the Timeline option.
5. Click the Settings icon at the bottom right of the screen.
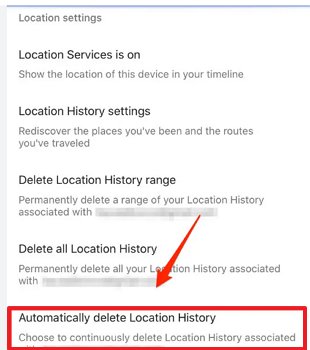
6. Pick the Automatically delete Location History option.
Delete Location History Automatically for Mobile App
1. >Open the app on your mobile phone or tablet.
2. >Click on your display picture or initials.
3. >Click on the Your Timeline button.
4. >Click on the hamburger button or More option.
5. >Select the Settings and privacy option from the list of more features.
6. >Scroll through the options and pick Location settings.
7. >Pick the Automatically delete Location History option.
Summary
Google Maps may have been around for a while, but it constantly evolves daily. With its location history feature, you can find where you have been and the routes you took to those locations. Furthermore, you can delete your location history manually and automatically. These features are available on both web and mobile apps. When deleting manually, you can delete for a day, all, a range of days, months, or years. However, if you want maximum location history privacy, you should use AirDroid Location Tracker.









Leave a Reply.