How to Manage Notifications on Android
When managing your Android device, dealing with an overwhelming number of notifications can be a significant frustration. Every ping and buzz can disrupt your focus, clutter your screen, and ultimately affect your productivity.
Learning to tame this constant flow of alerts can streamline your user experience. It will make sure that you only receive updates that are truly important to you. We will guide you through effectively managing your notifications so your device works for you—not against you.
7 Steps to Manage Notifications on Android
1Customize App Notifications
Personalising your app notifications is a great way to ensure that you only receive alerts that are important to you. Android allows you to customize which apps send you notifications and how they behave.
For instance, you can prioritize notifications from essential apps like your messaging or dialer apps to always appear at the top of your list. In contrast, less critical notifications, such as those from games, can be set not to bother you at all.
Steps to Customize:
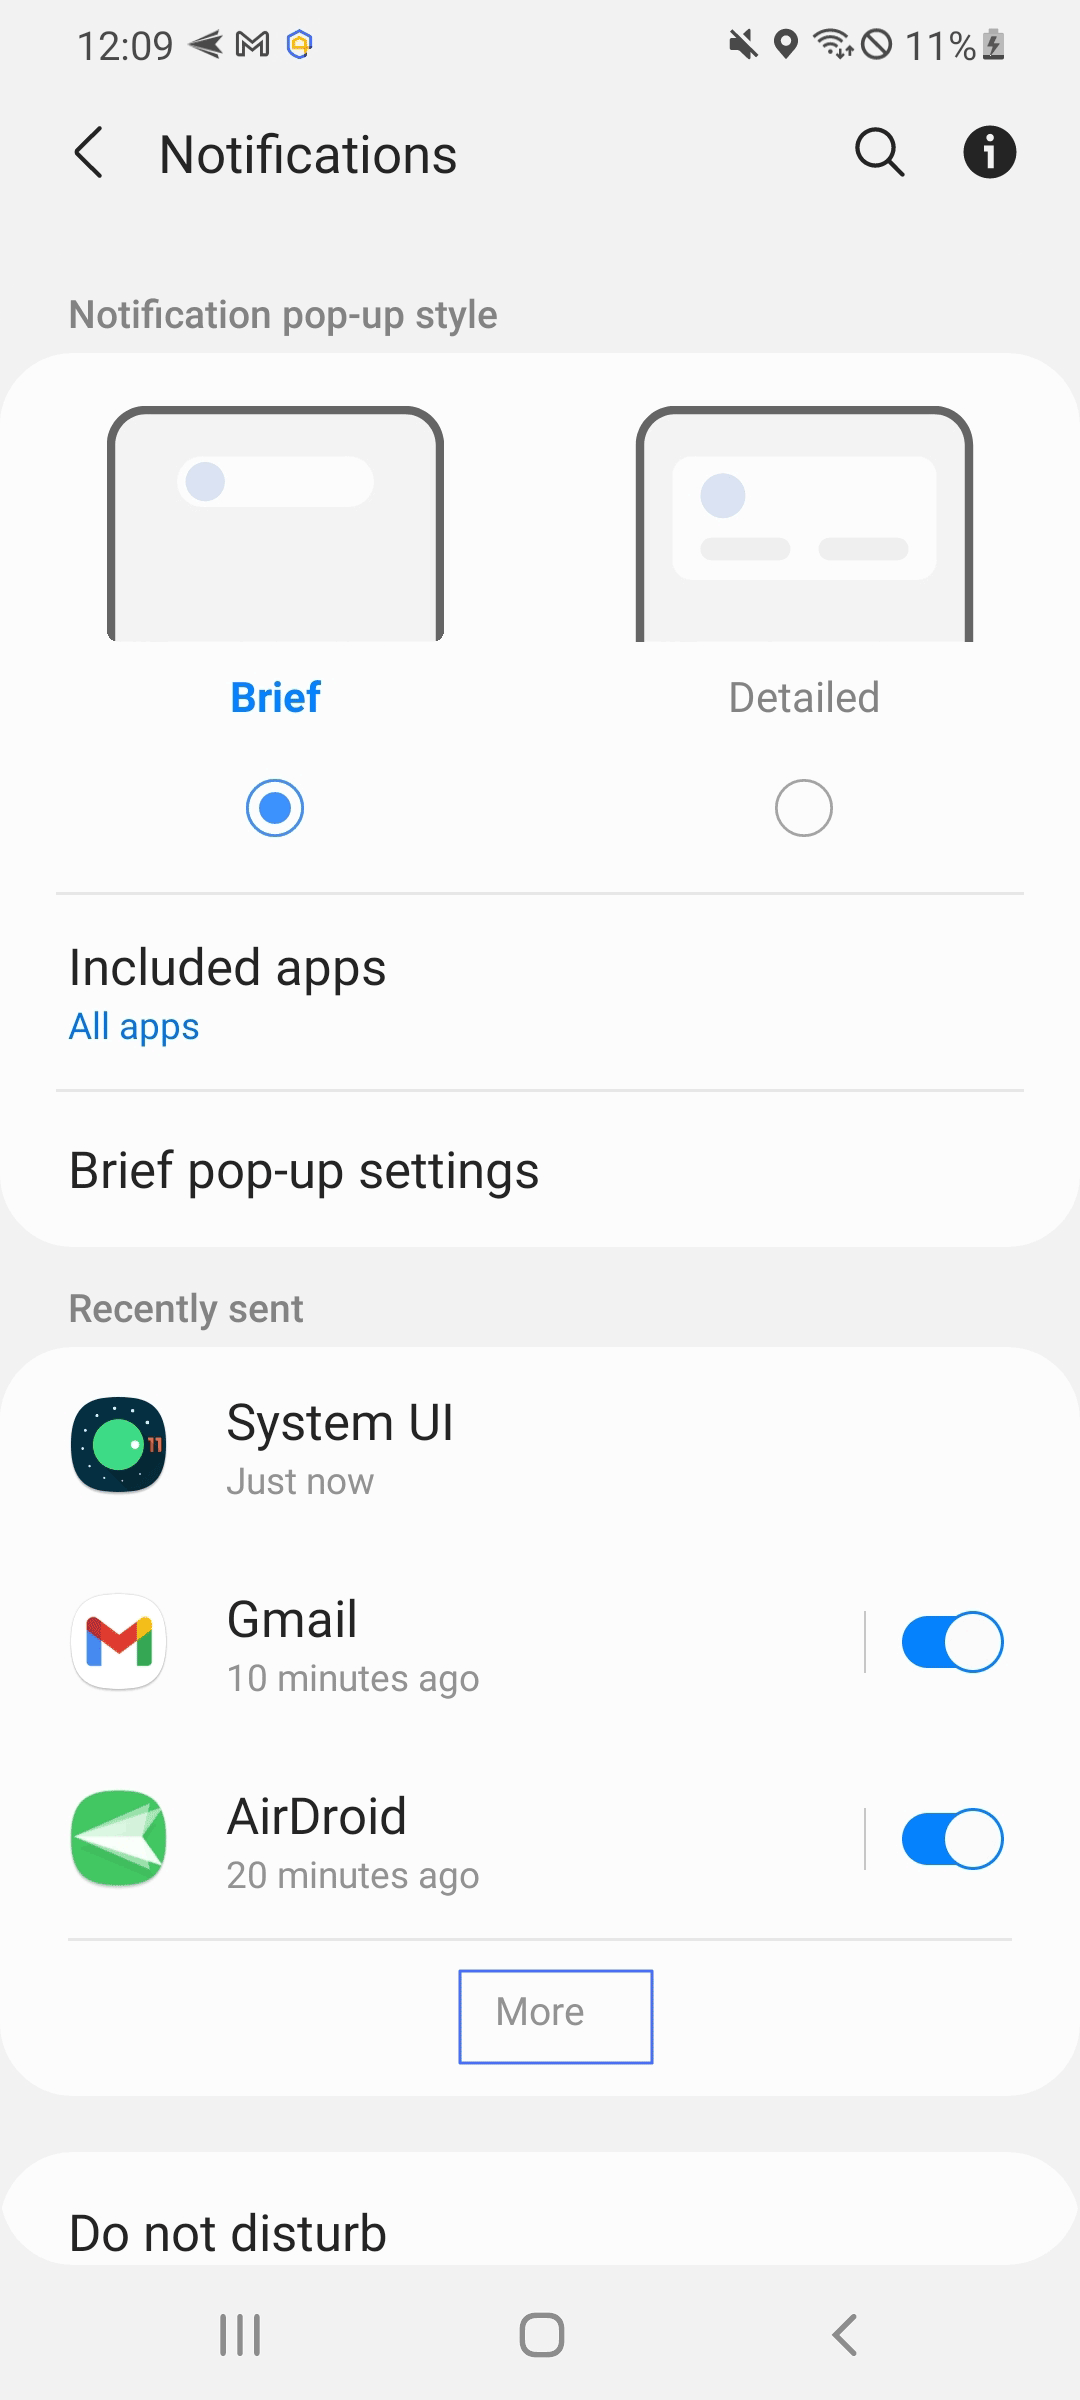
- Go to "Settings" on your Android device and tap on "Notifications."
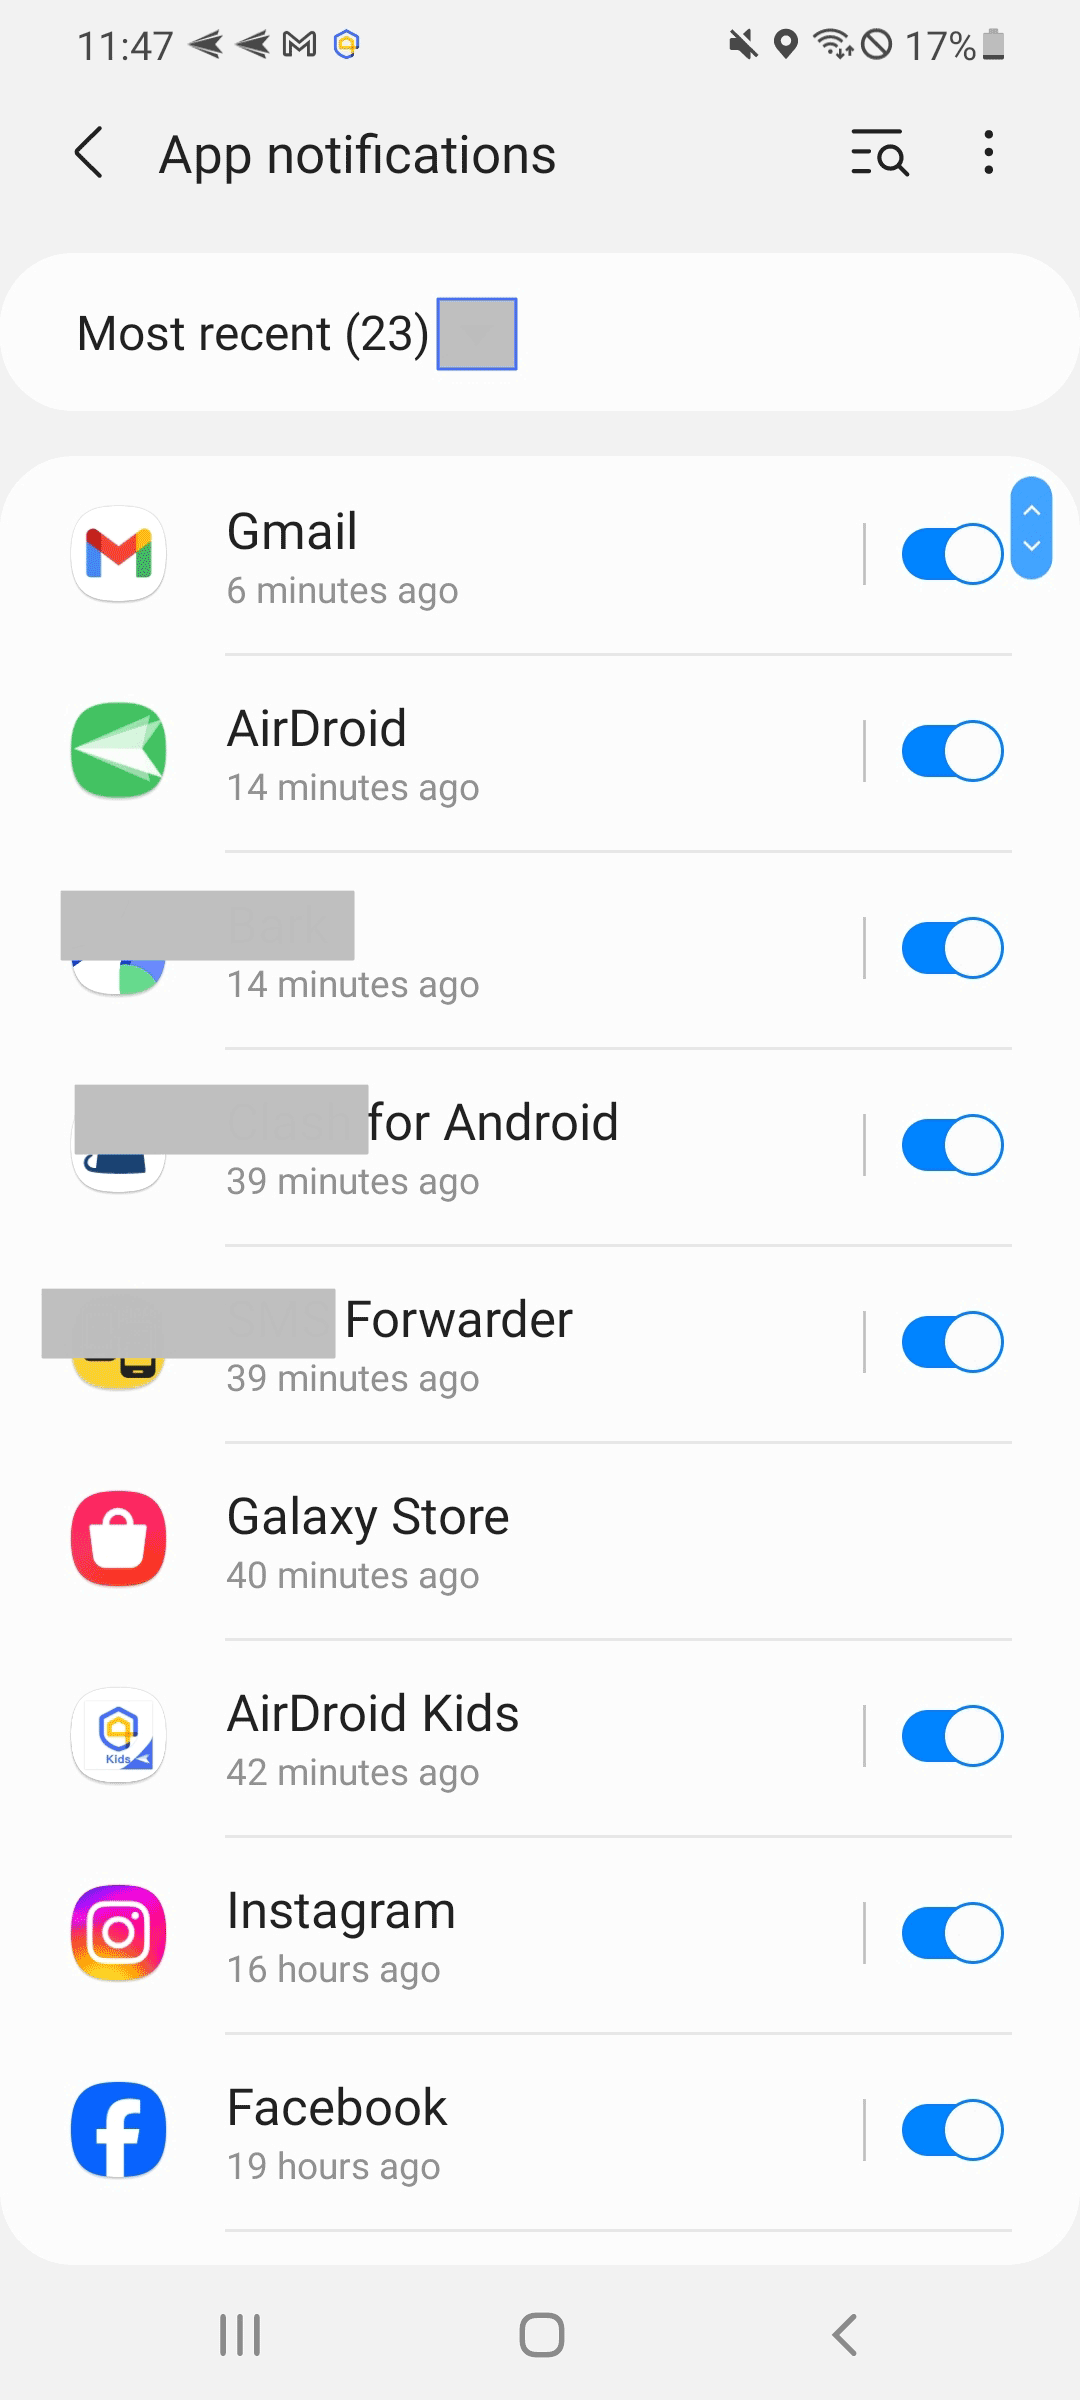
- Tap More under Recently sent to check more apps that send notifications recently. For Some devices, you can tap App notifications.
- You can also switch it to all apps from the drop-down icon. Find and tap on the app you want to customize notifications and adjust the notification settings according to your preferences (e.g., turn on/off notifications, set notification importance, choose notification sound, etc.)

2Mute App Notifications
If you find constant notifications from a particular app annoying, Android gives you the option to mute them entirely. This can be done directly from the notification itself or through the app's settings, providing a peaceful environment without the need to uninstall the app entirely.
Steps to Mute:
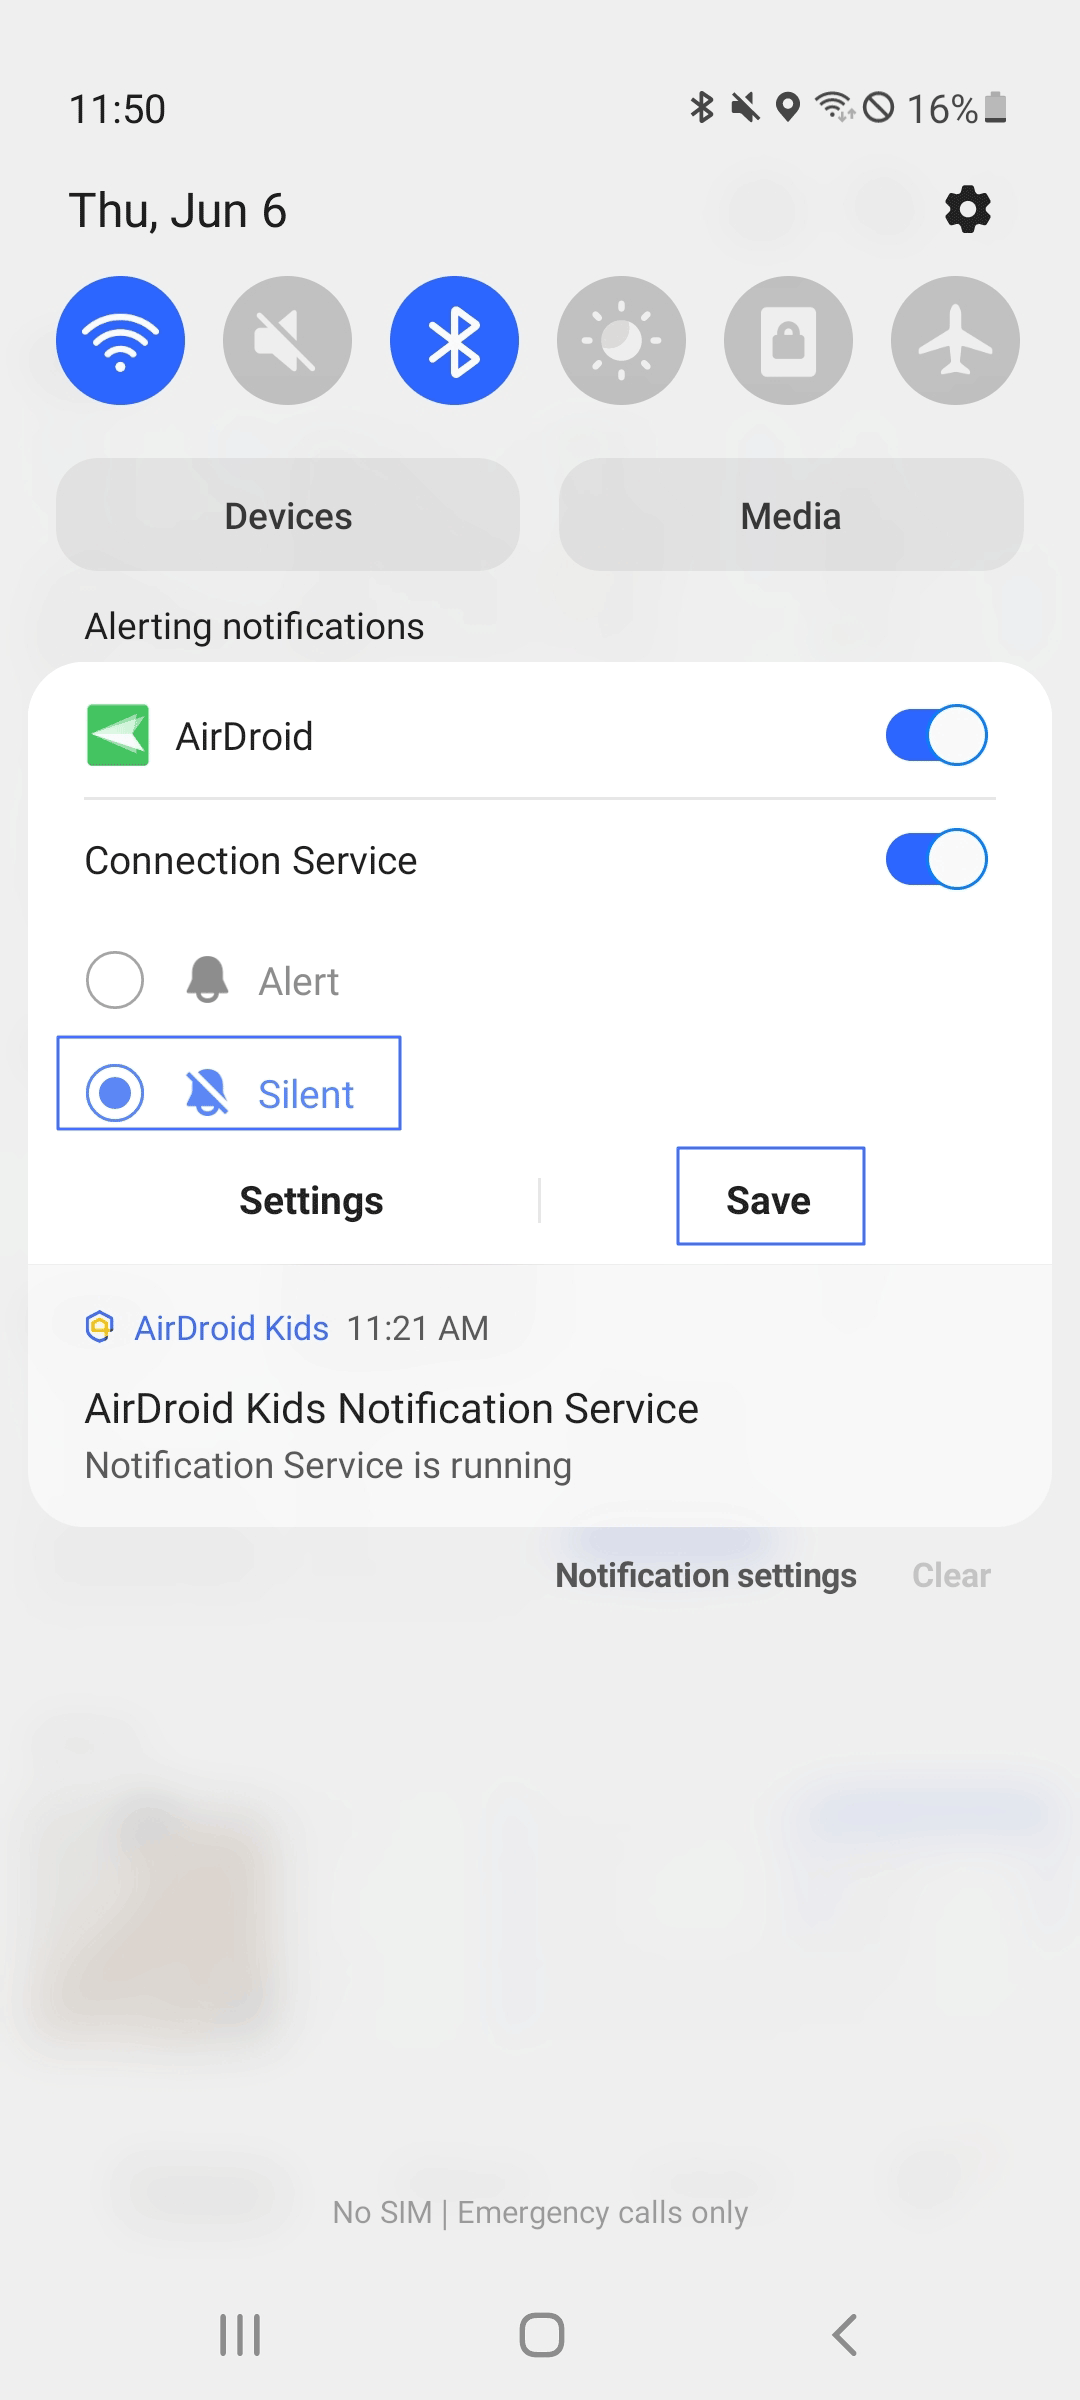
- Long press on a notification from the app you want to silent.
- Tap on "Silent" to turn off the notifications sound for the app.
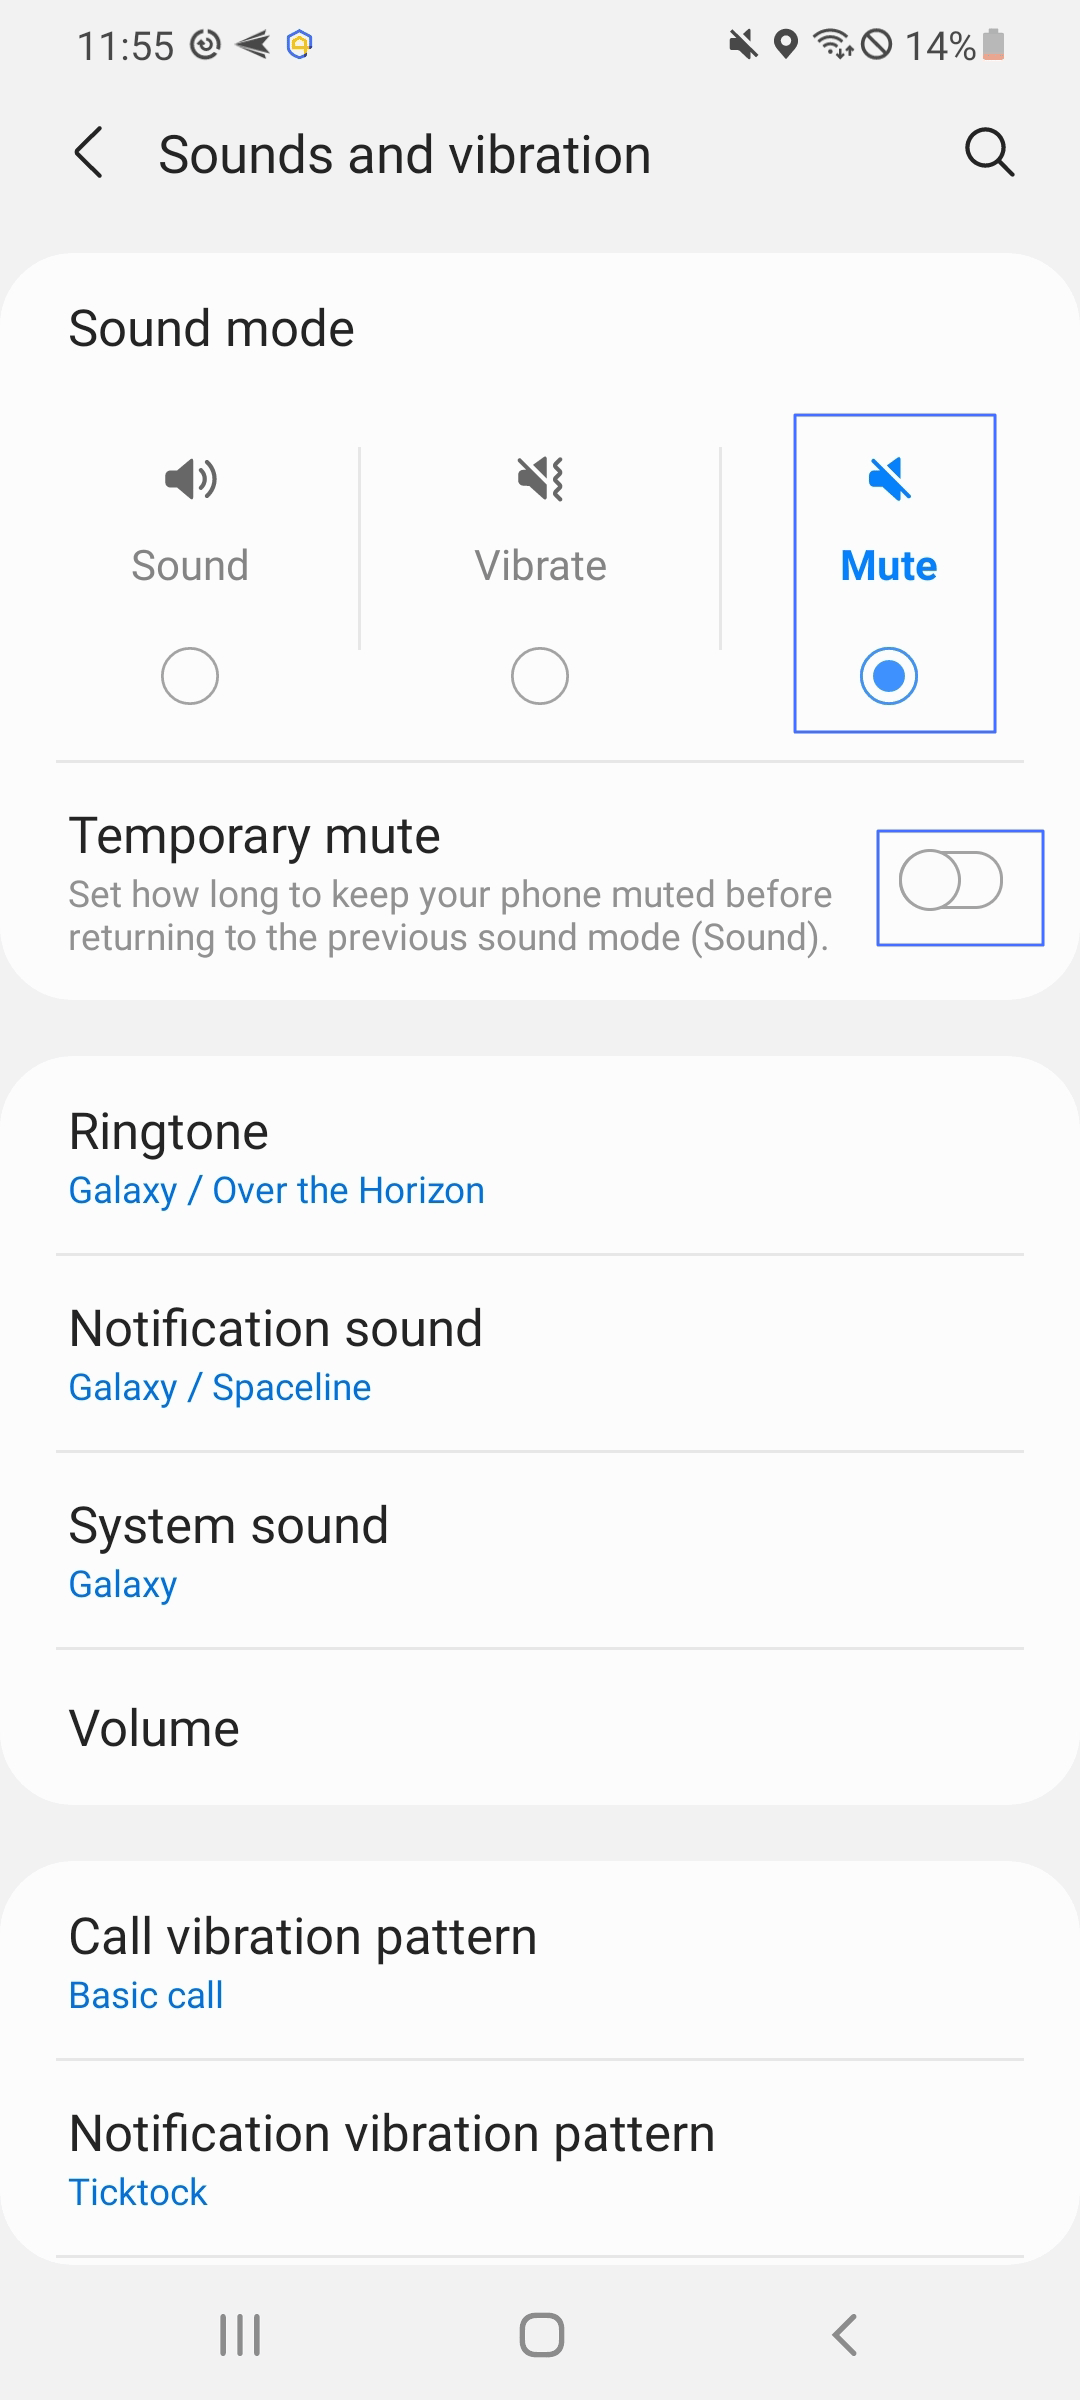
- Alternatively, go to "Settings" > "Sounds and vibration," tick Mute, or toggle on Temporary mute to mute all notifications sounds after or for a period.
3Snooze Notifications
Sometimes, you might not want to deal with a notification immediately. Still, you also don't want to forget about it. The snooze function allows you to dismiss notifications for a set period temporarily.
Steps to Enable Snooze Feature and Snooze Notifications:
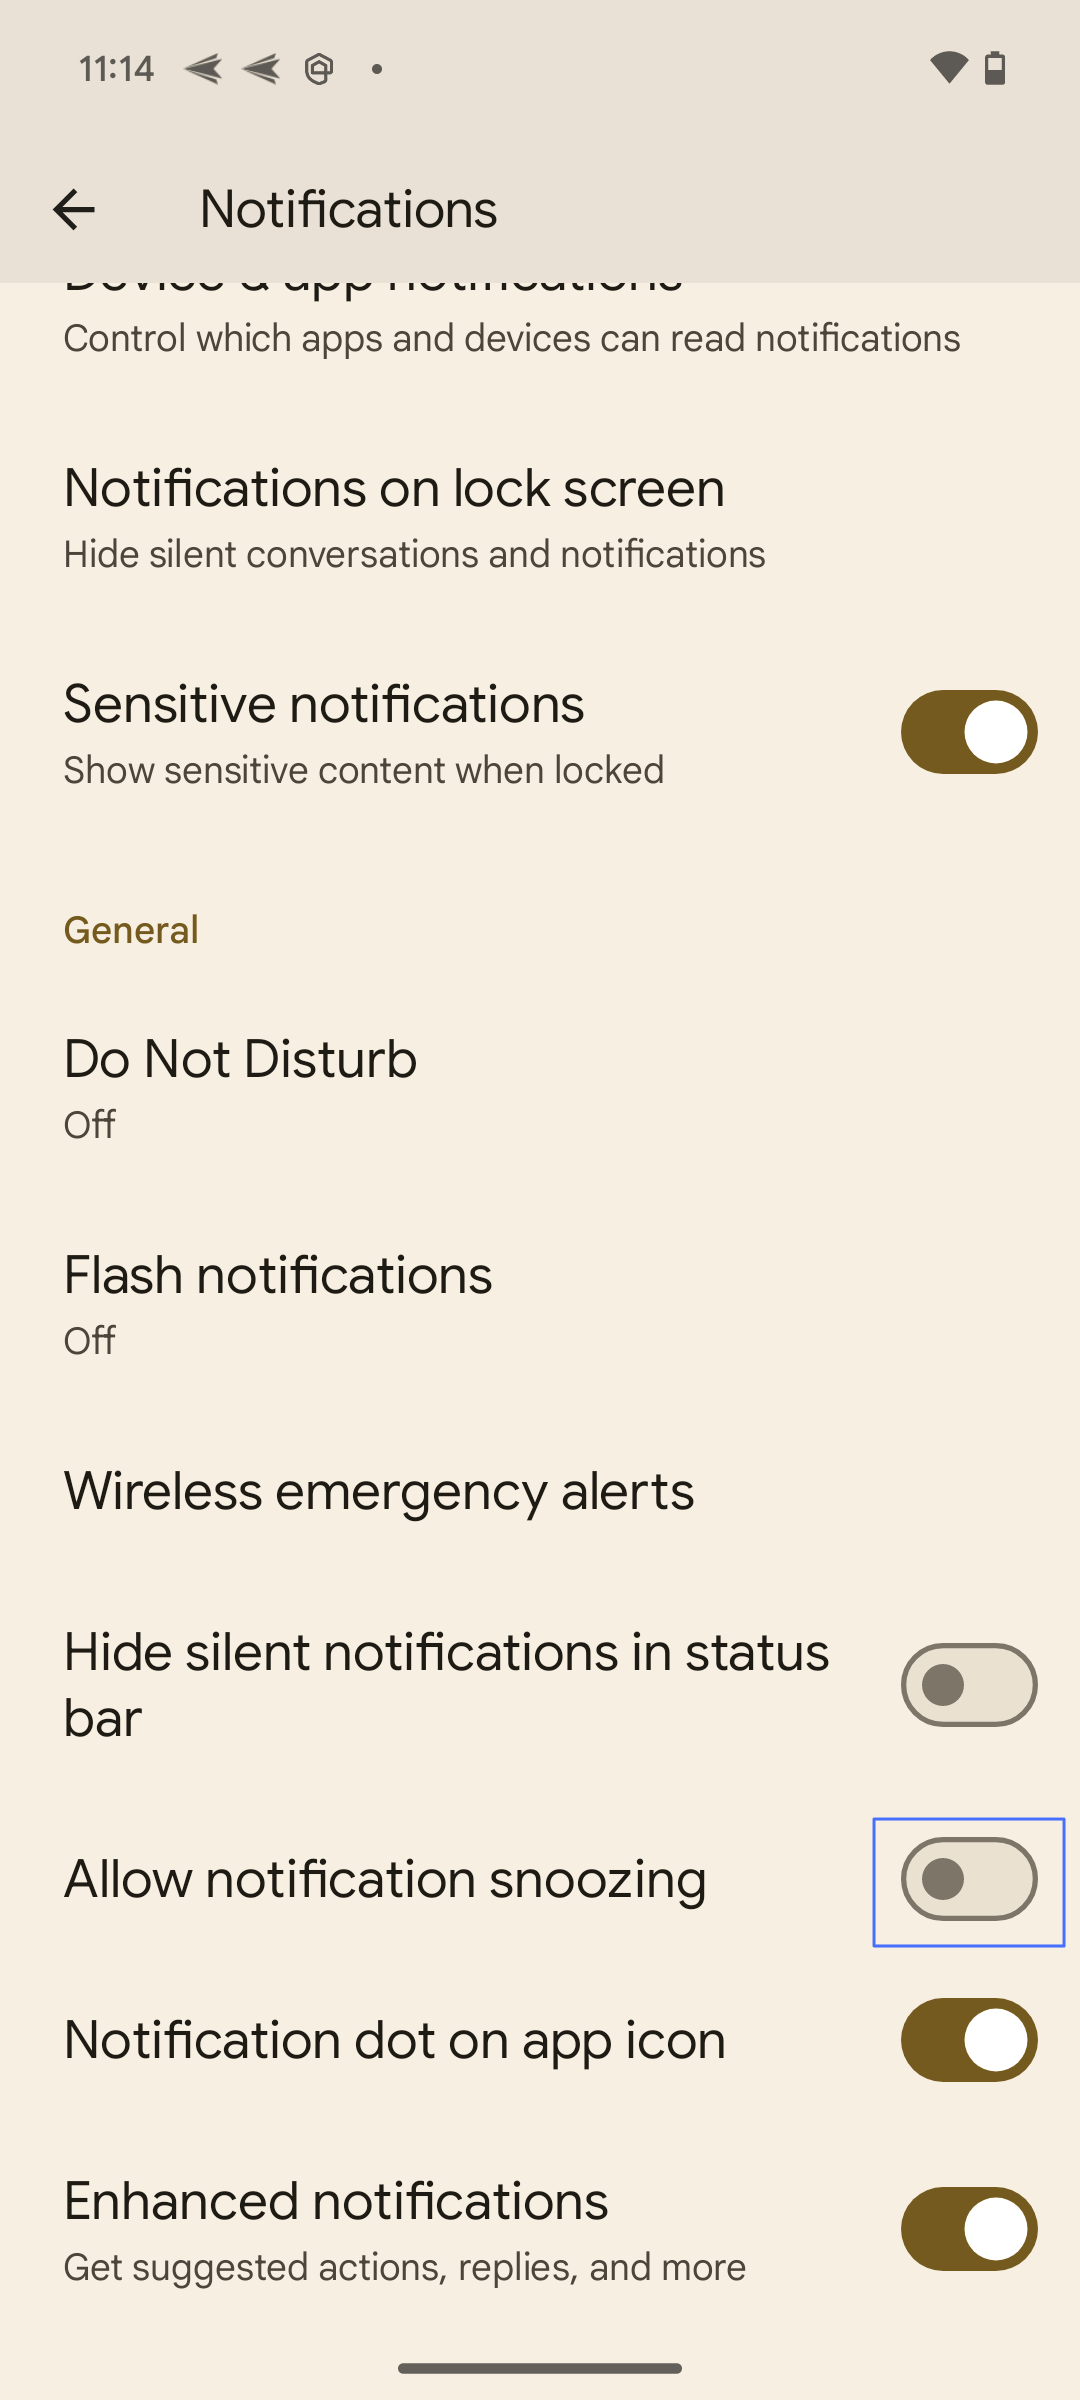
- Open Settings > Notifications, turn on "Allow notifications snoozing."
- Swipe down from the top of your screen to open the notification panel.
- Tap on the "Snooze" icon (clock icon with z).
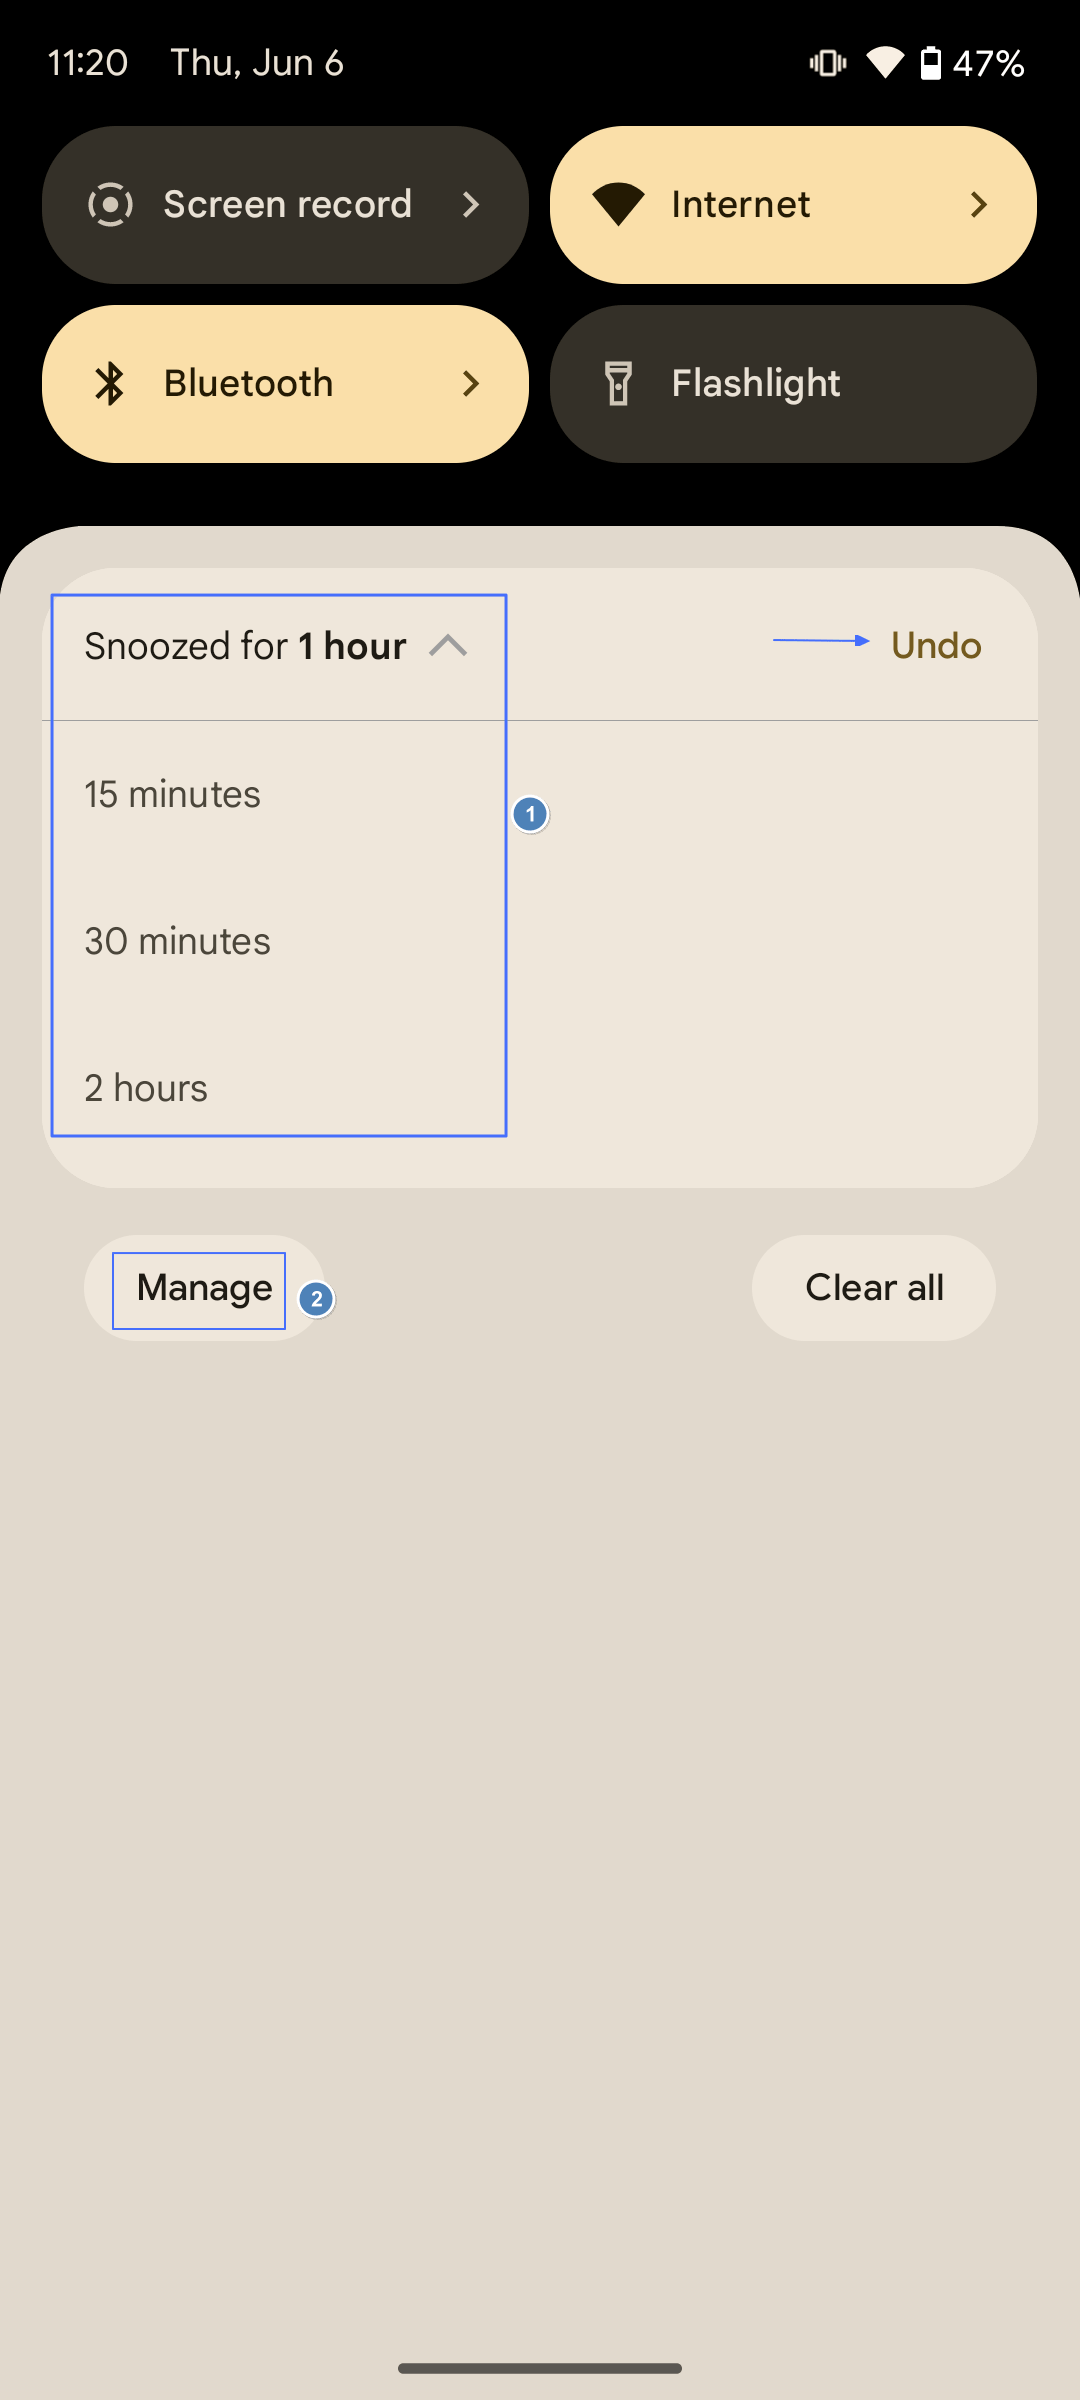
- The default snooze duration is 1 hour; you can also select another desired snooze duration (e.g., 15 minutes, 30 minutes, 2 hours). Click on "Manage" to confirm, or hit "Undo" to reverse the action if you've changed your mind or made an error.
- The notification will be temporarily dismissed and will reappear after the selected snooze duration.
AirDroid Parental Control syncs all the notifications of the linked Android device. You will know what notifications are distracting your teens and give them better advice to manage notifications.
4Enable Do Not Disturb
Do Not Disturb mode silences all calls, alerts, and notifications but can be customized to allow exceptions. For example, you can set it to allow calls and messages from specific contacts or apps. This is extremely useful during meetings, at night, or any time you need to focus without interruptions.
Steps to Enable Do Not Disturb:
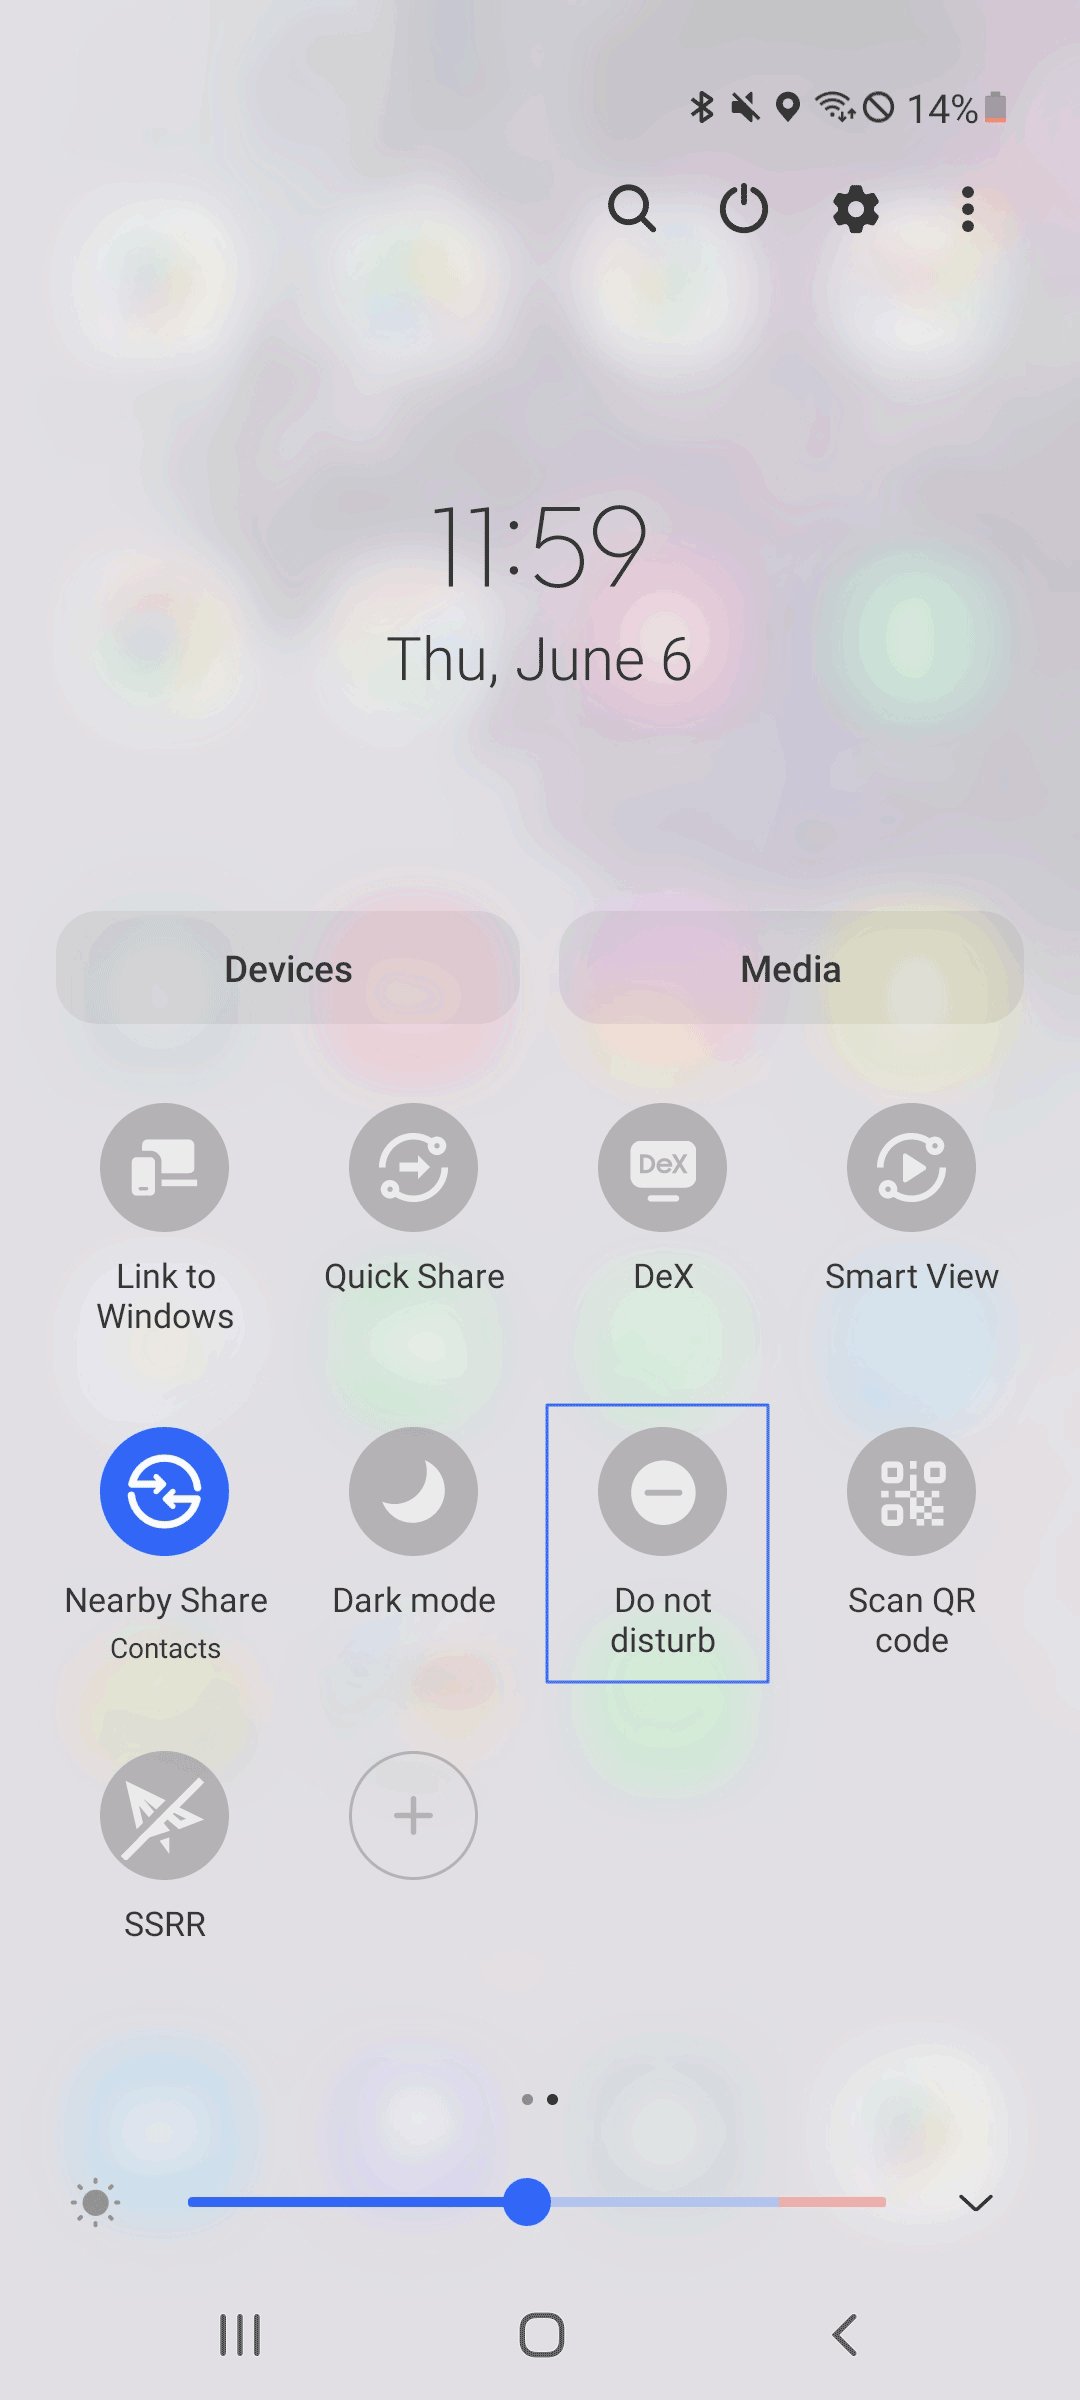
- Swipe down from the top of your screen to access the Quick Settings panel.
- Tap on the "Do Not Disturb" icon to enable it.
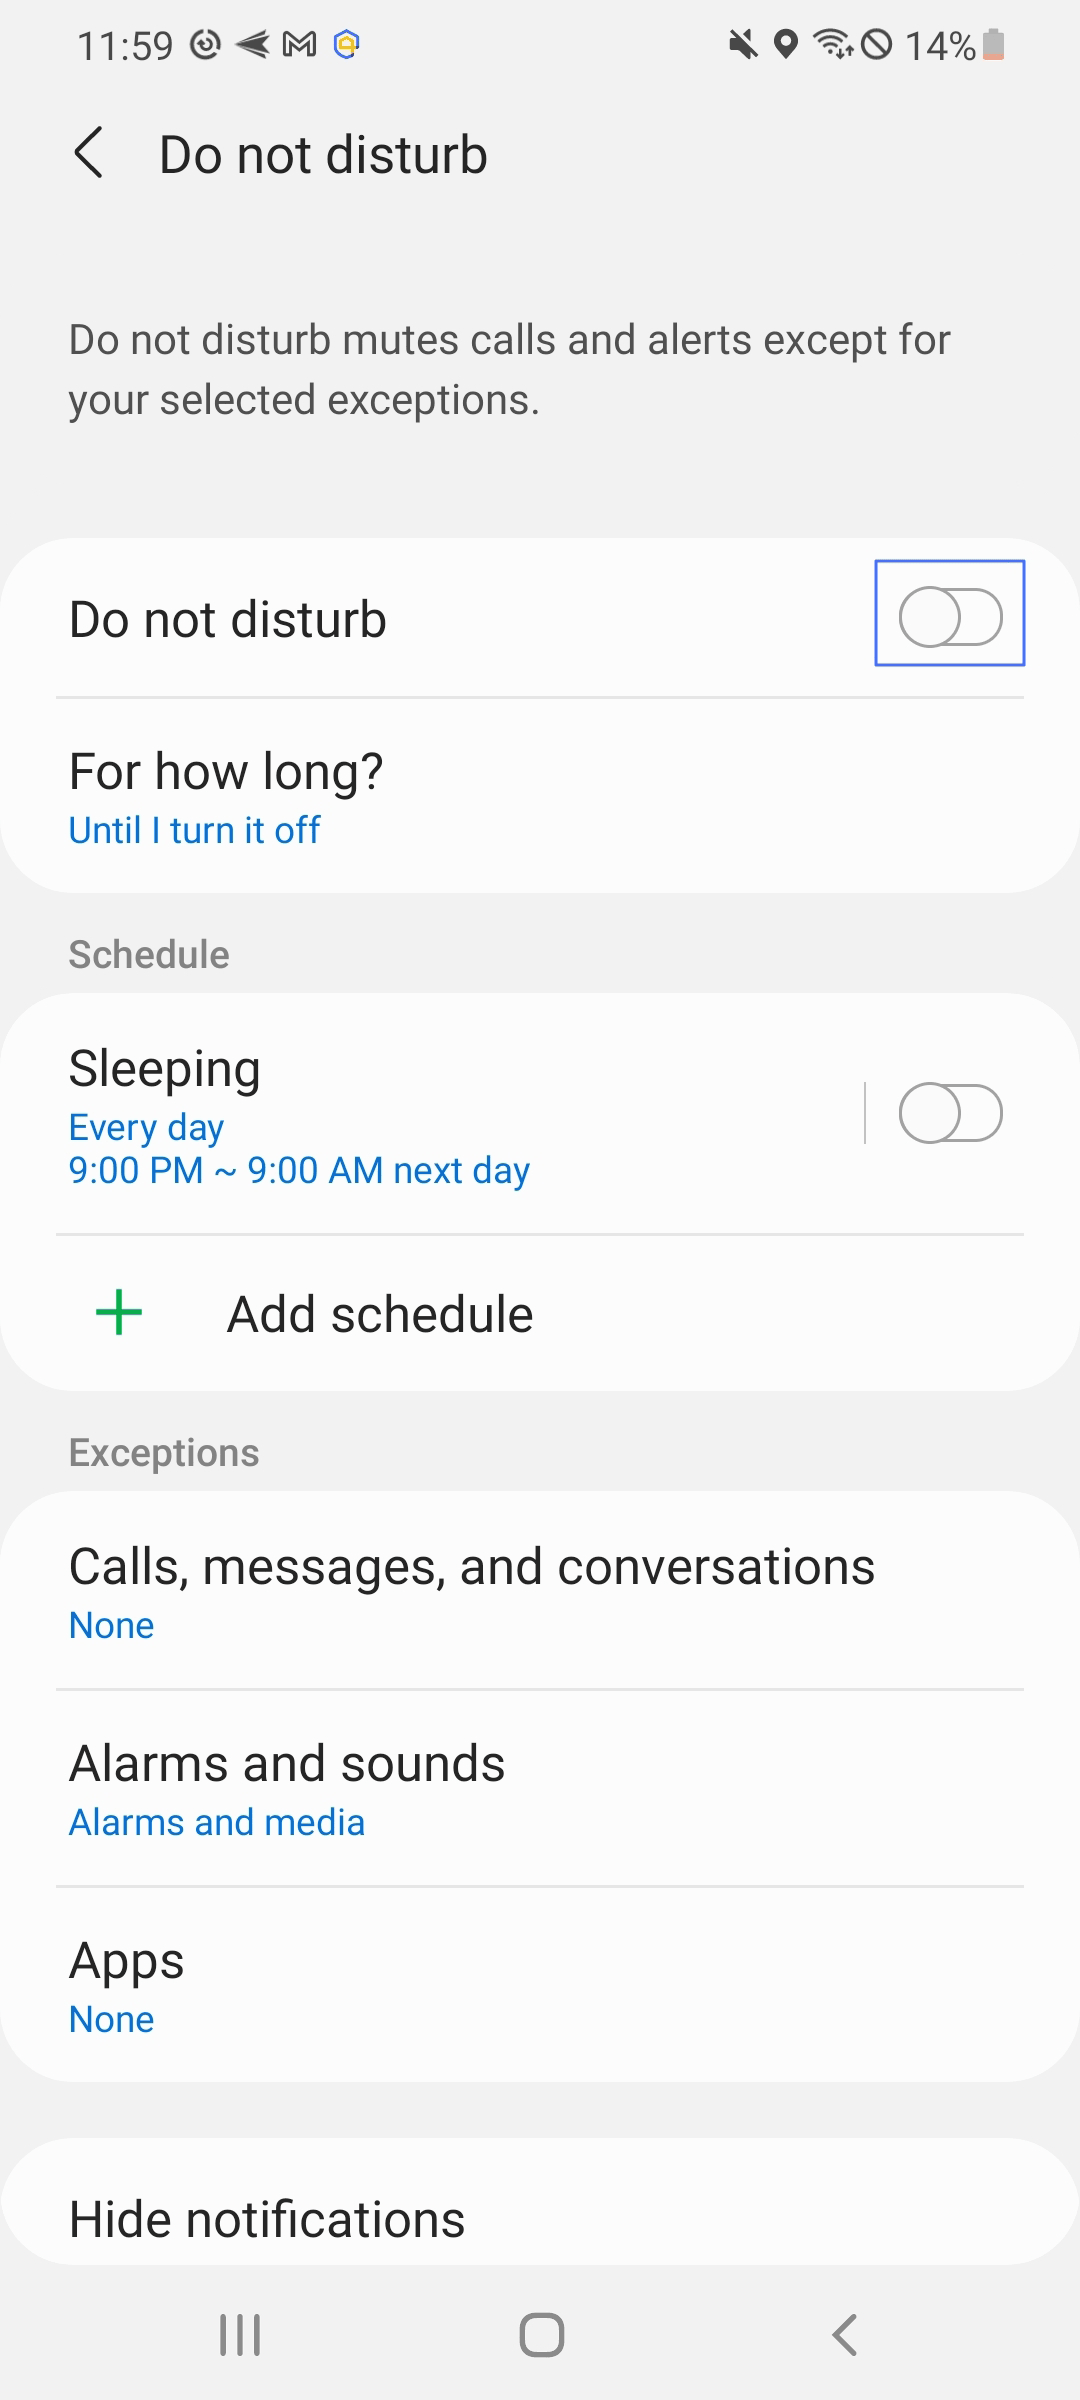
- To customize Do Not Disturb settings, long press on the "Do Not Disturb" icon.
- Adjust the settings based on your preferences (e.g., allow calls from specific contacts, set a schedule, allow alarms)
5Shut Down Notifications on the Smartwatch
For Android users with a smartwatch, managing notifications can also be extended to wearable devices. You can turn off all the phone notifications on a smartwatch or customize app notifications. This helps in reducing distractions on your wrist, especially during activities that demand concentration.
The steps vary from a smartwatch. However, you can generally find the settings from the corresponding wearable apps. You may tap the brand of smartwatches below and follow the steps.
6Hide Private Notifications on Your Lock Screen
To protect your privacy, Android allows you to hide sensitive content of notifications on the lock screen. This means the details of the notification will only be visible when your device is unlocked.
This setting is crucial if you often receive personal or sensitive information and you want to keep it hidden from anyone else who might glance at your phone.
Steps to Hide Private Notifications:
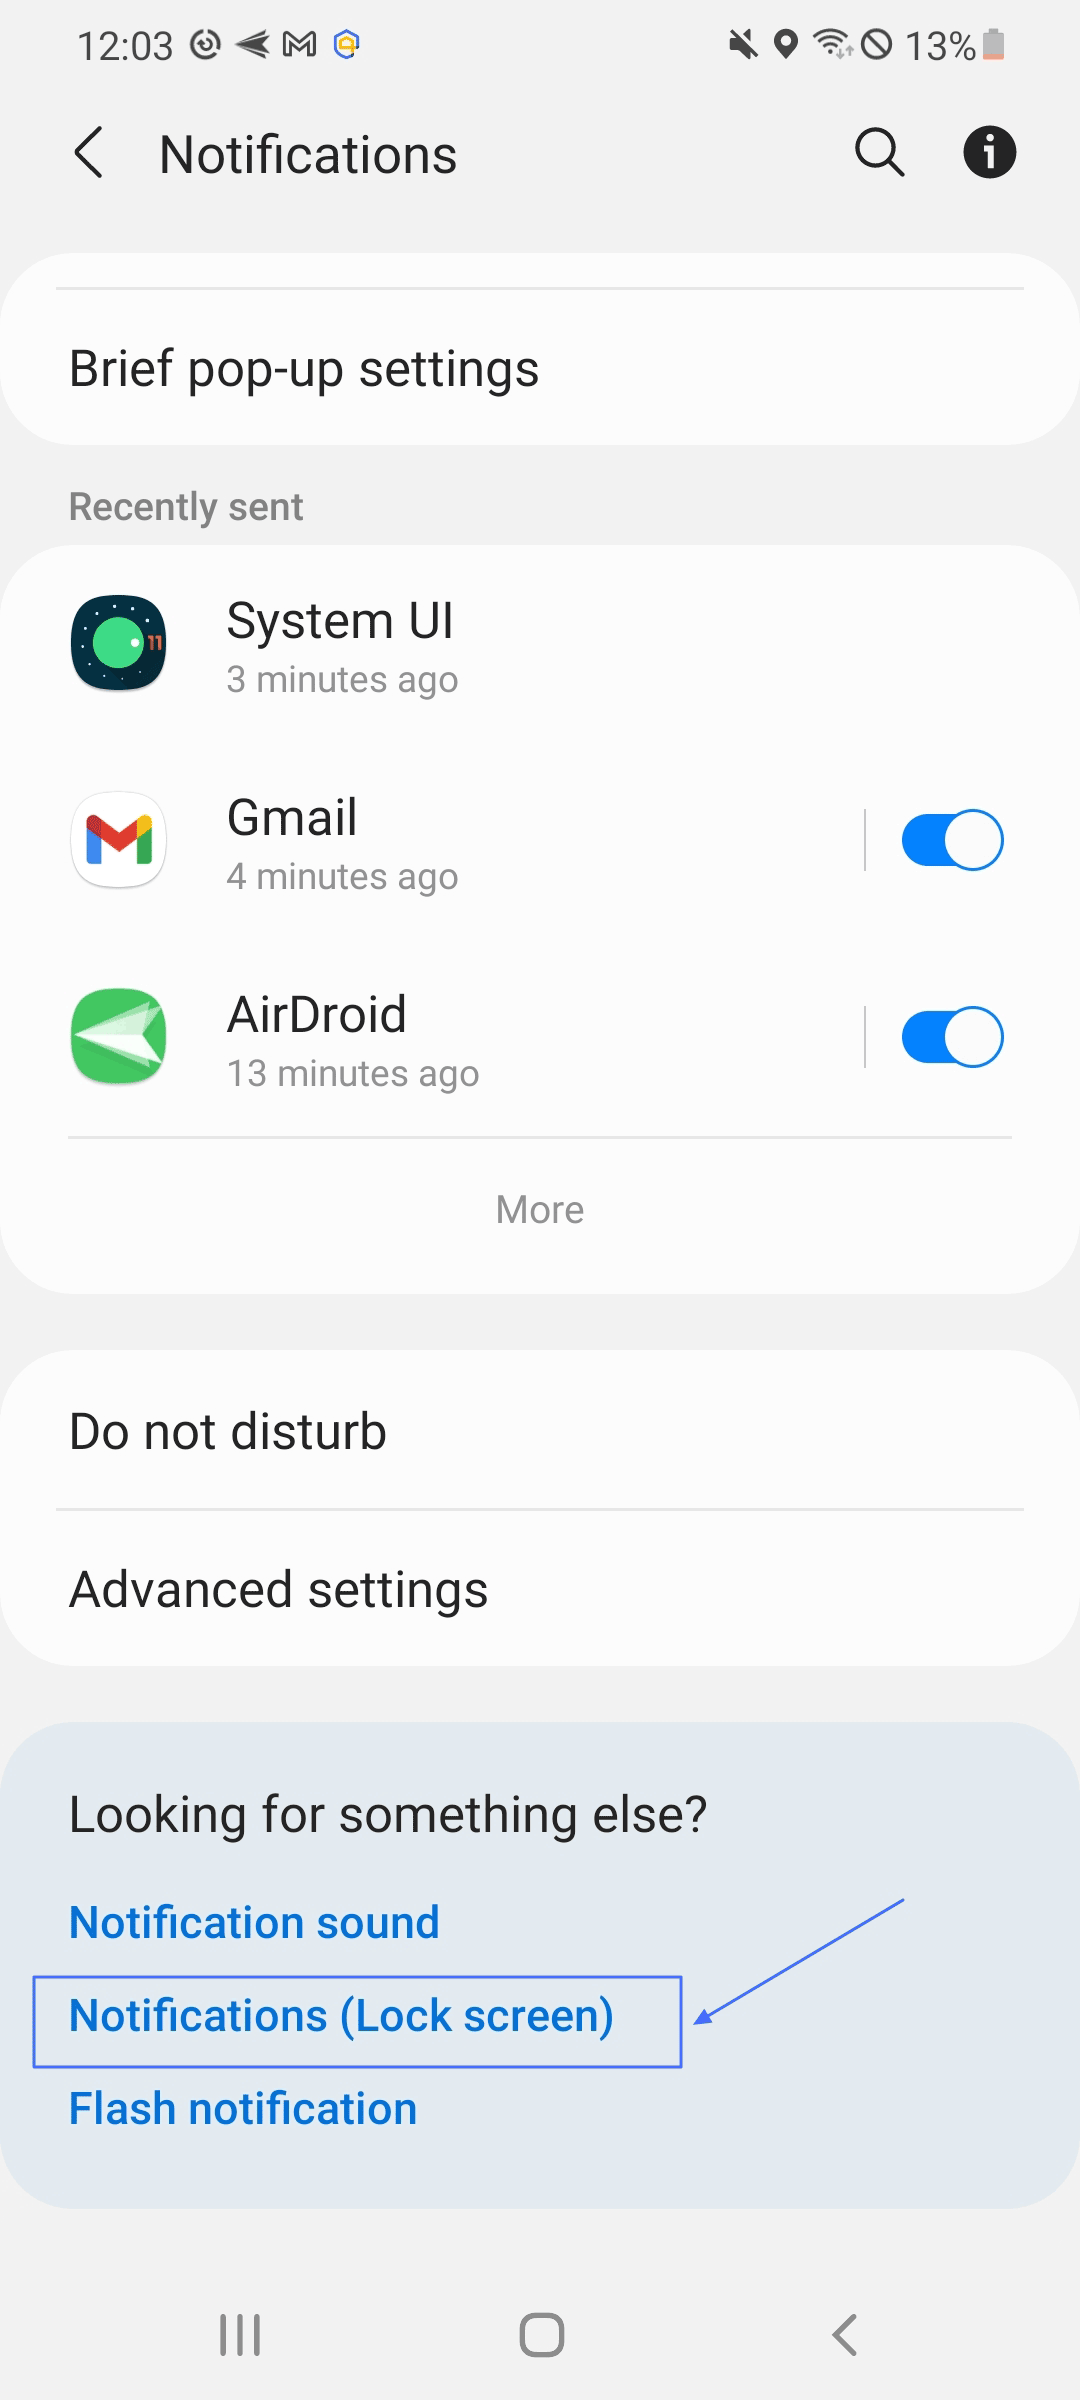
- Go to "Settings" on your Android device and tap on "Notifications."
- Scroll down, and you will see "Notifications (Lock screen)" or "Notifications on lock screen." Tap on it.
- You may choose to display only the icon by picking “Icons only,” you can also turn on "Hide Content" based on your privacy preferences.
7Control Emergency Broadcast Notifications
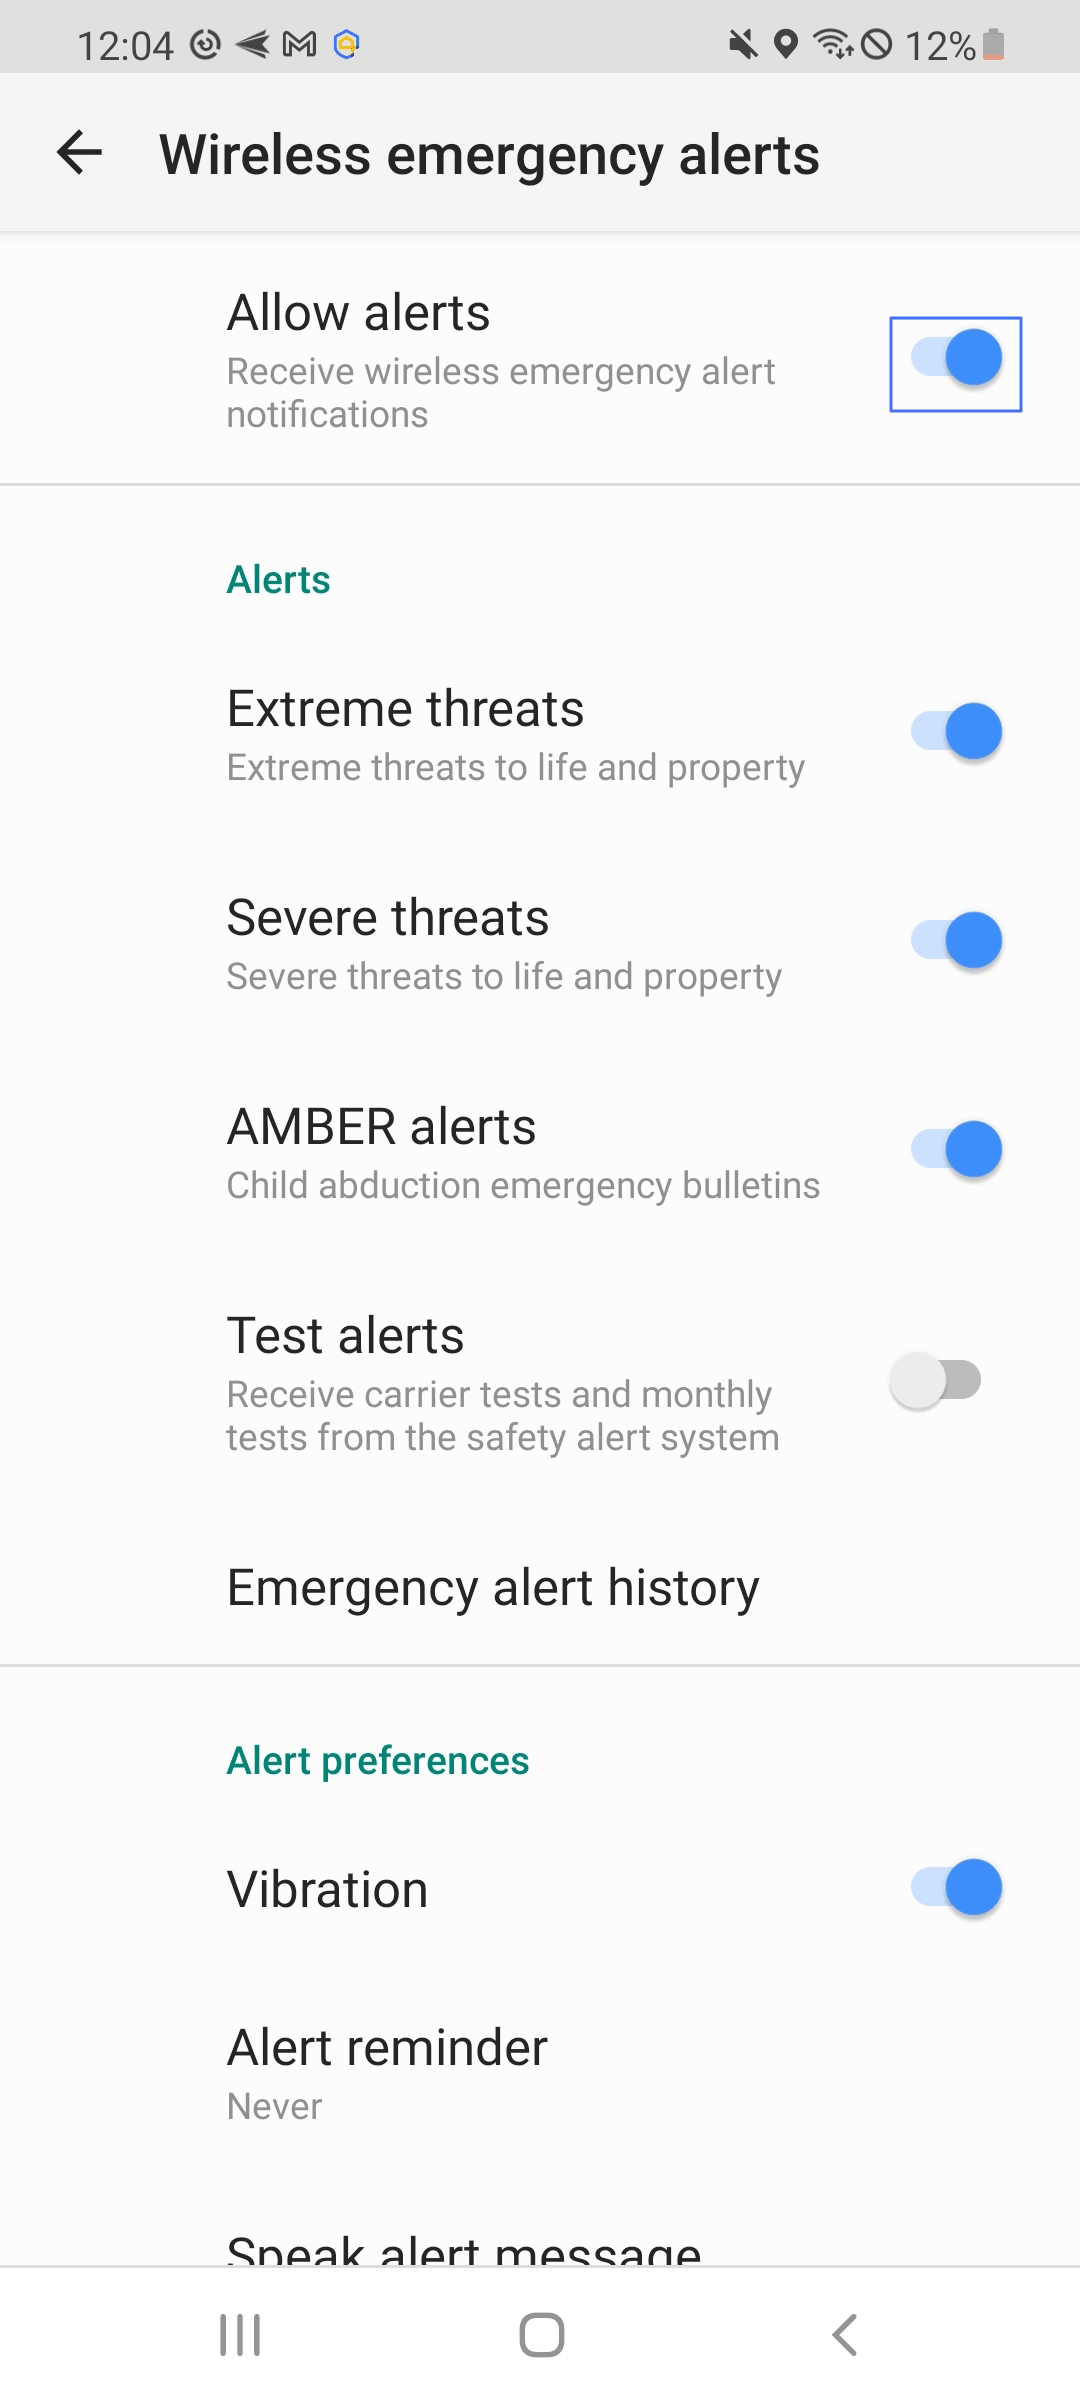
Emergency notifications are crucial for receiving alerts about severe weather, AMBER alerts, or other emergencies. Android allows users to customize these notifications by deactivating or activating them according to their preferences while still ensuring they receive vital information when necessary.
Steps to Control Emergency Alerts:
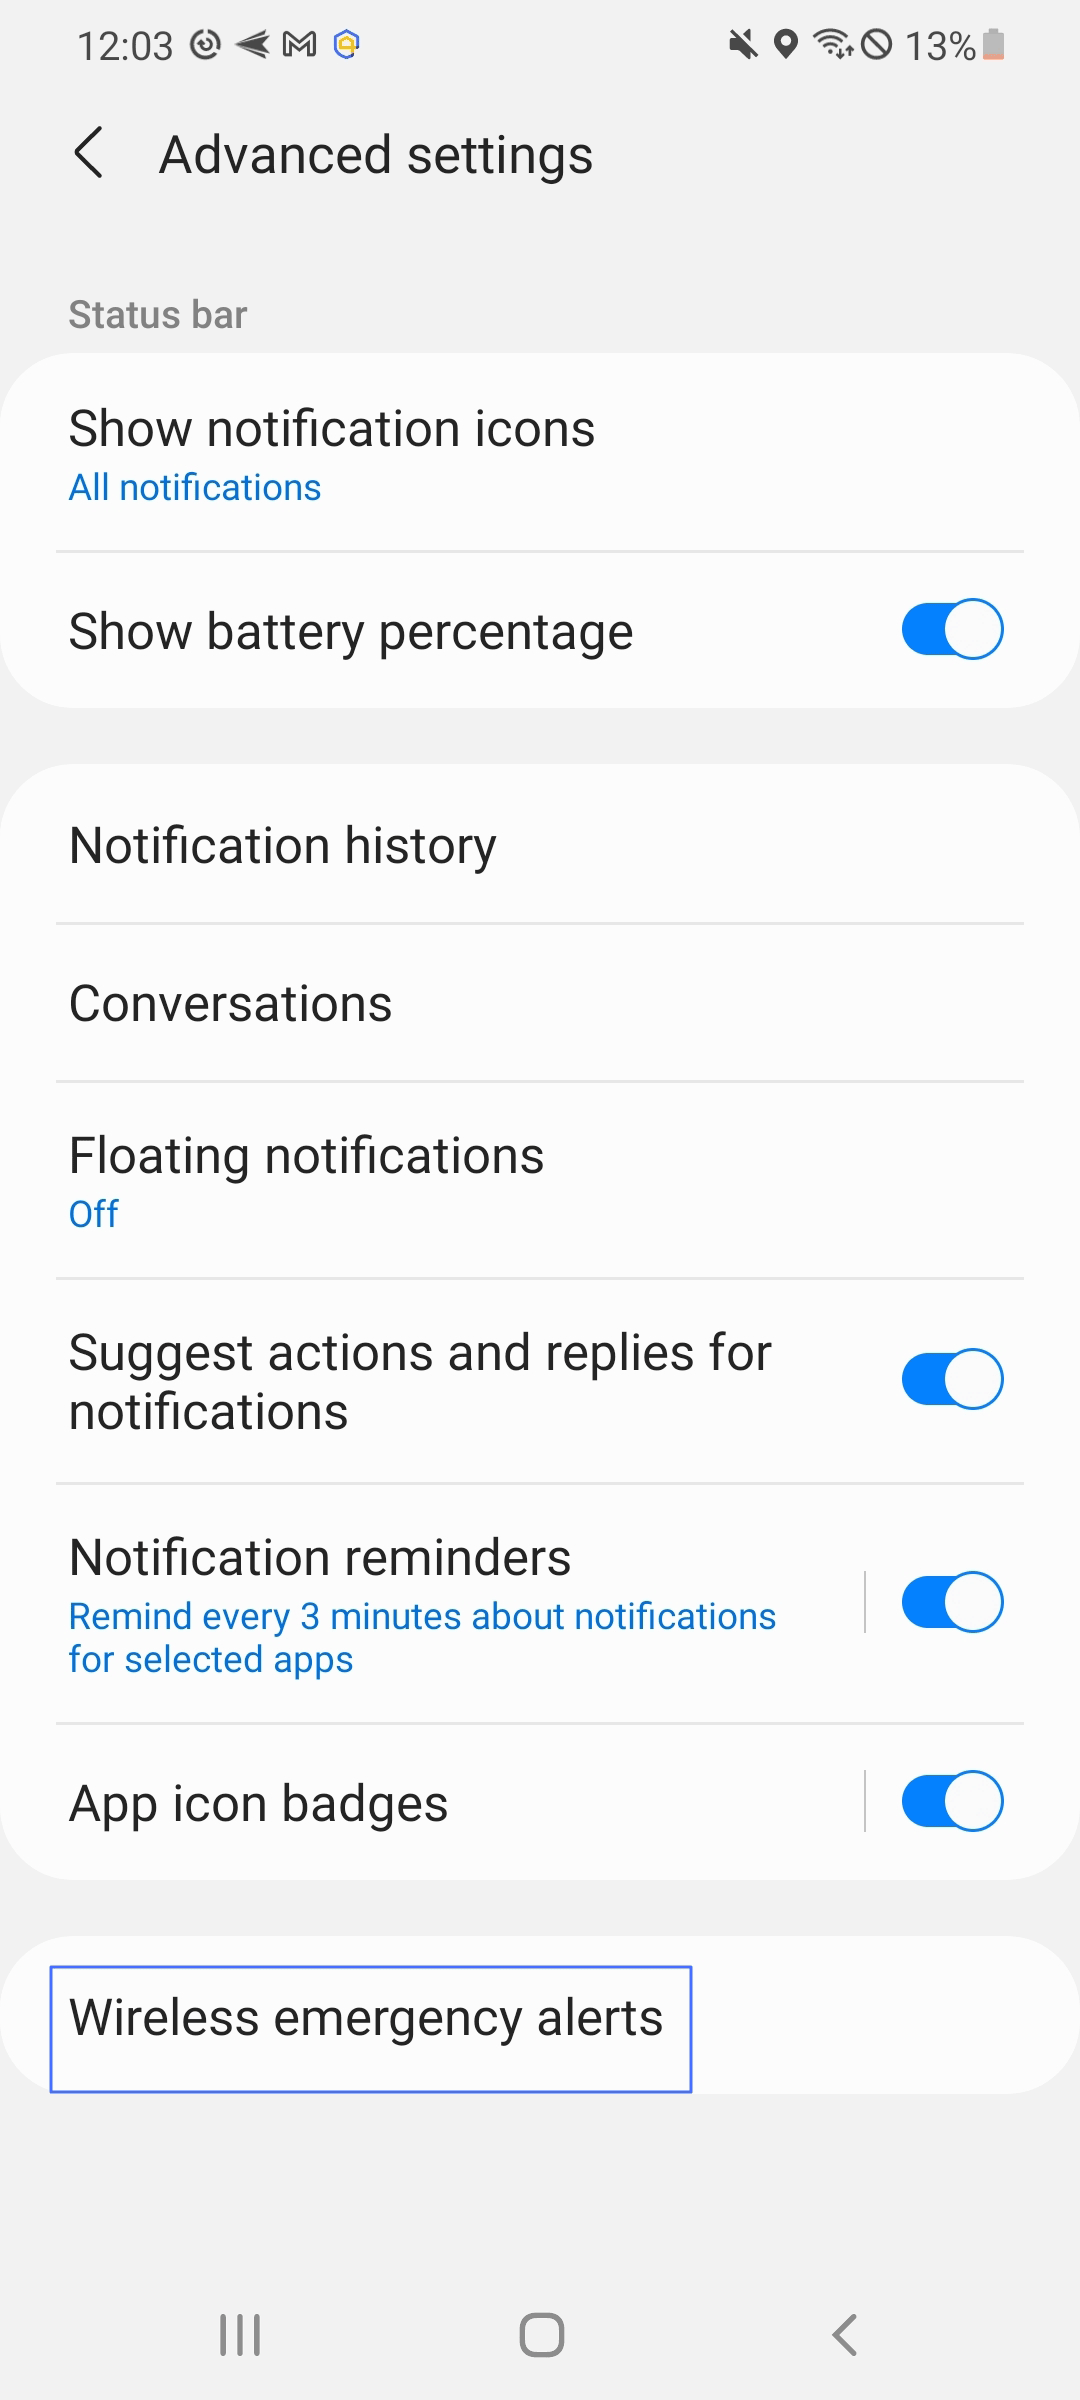
- Go to "Settings" on your Android device and tap on "Notifications."
- Tap on "Advanced settings" and then "Wireless Emergency alerts." You may see "Wireless Emergency alerts" from Notifications directly on some devices.
- Customise the settings for different types of emergency alerts (e.g., AMBER alerts, extreme threats, severe threats) according to your preferences.
Take Control of Your Android Notifications with These 3 Practical Apps
1FilterBox Notification Manager
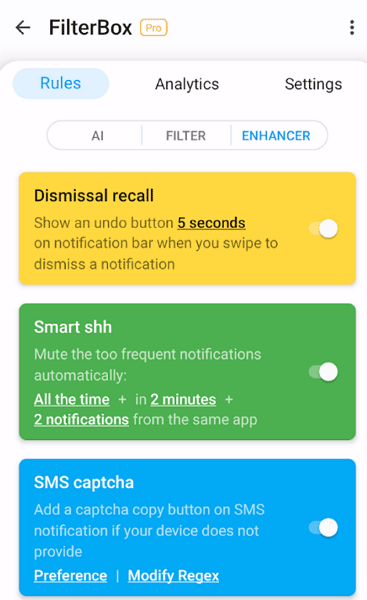
FilterBox is an AI-driven notification manager that filters spam, records notification history and offers extensive customization for managing notifications.
Highlights
- AI-powered Notification Filtering: Utilizes offline AI to filter out spam notifications and learn user preferences.
- Notification History: Records all notifications, allowing users to search and restore accidentally dismissed notifications.
- Custom Rules: Offers extensive customization options such as batch postponement, sound changes, content reading, and converting notifications to call alerts.
- Privacy Protection: Ensures all data processing happens locally on the device with no external data sharing.
Price
Free for the first 90 days with full functionality. After 90 days, a single $3.99 in-app purchase is required to continue using the app.
Typical User Reviews
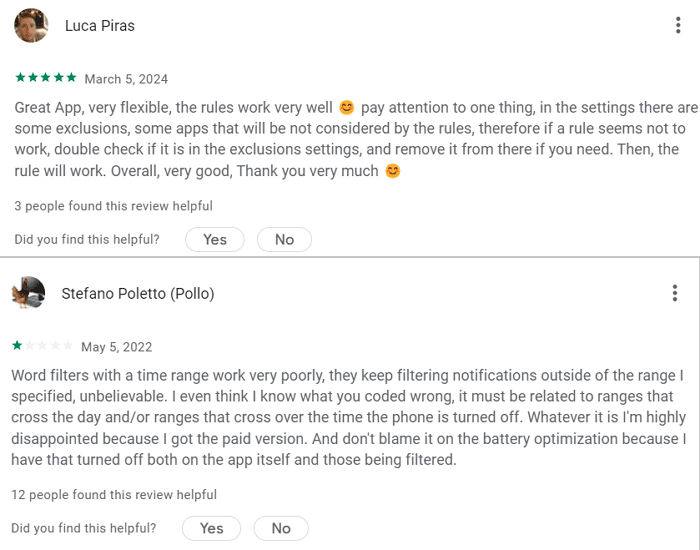
One user appreciated the app's flexibility and effective rule management, advising others to check exclusion settings if a rule doesn't work, as making adjustments could resolve issues.
Another user expressed disappointment, criticizing the app for not adhering to specified time ranges for word filters, suggesting a potential bug affecting functionality when time ranges cross into a new day or when the phone is off.
Editor's Idea
FilterBox is ideal for users who want detailed control over their notifications and prioritize privacy with local AI processing.
2Nap: notification manager
Nap is a notification manager that logs notifications, allows automatic dismissal, and filters notifications while ensuring user privacy with no internet access required.
Highlights
- Notification Logging: Keeps a history of all notifications from various apps.
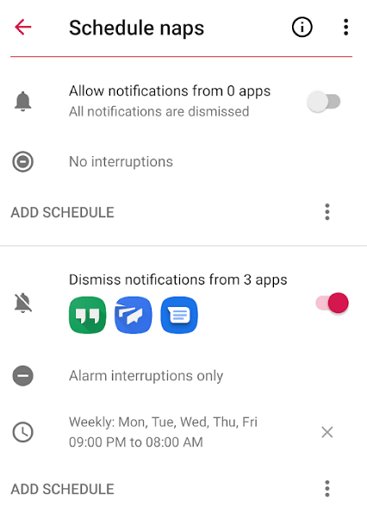
- Automatic Dismissal: Allows scheduling to dismiss notifications automatically and provides summaries afterward.
- Customisable Channels: Filters notifications by apps and sorts them by date and time.
- Privacy Assurance: No internet access is required, ensuring no data leaves the device and no ads or trackers.
Price
Free with in-app purchases.
Typical User Reviews
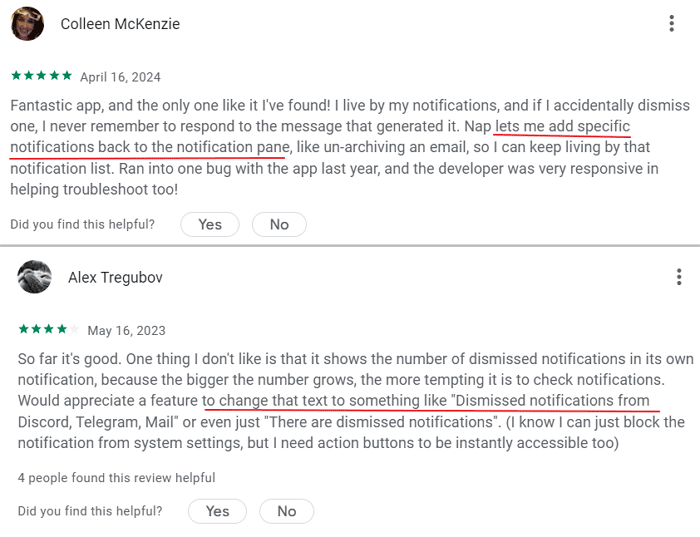
A user highly praised the app for its unique feature that allows re-adding dismissed notifications, which they found essential for keeping track of important messages. They also appreciated the responsive customer support.
Another user liked the app but suggested improvements, expressing a desire to customize how dismissed notifications are displayed to avoid the temptation of constantly checking them.
Editor's Idea
Nap is great for users looking to reduce notification stress and maintain a clean, organized notification history without compromising privacy.
3BuzzKill - Notification Focus
BuzzKill is a notification manager that allows users to set custom alerts, automatic actions, and cooldowns, all while prioritizing user privacy with no ads or trackers.
Highlights
- Custom Alerts and Cooldowns: Set custom sounds, vibration patterns, and cooldown periods to manage repetitive notifications.
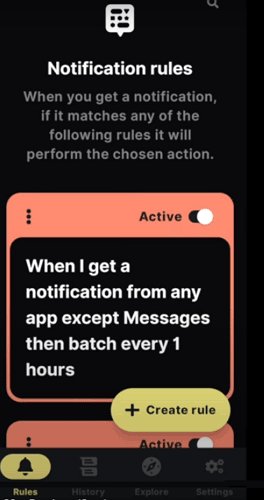
- Automatic Actions: Automatically dismiss, snooze, or remind about notifications based on user-defined rules.
- Privacy First: No ads, trackers, or internet access, ensuring all data remains on the device.
- Wear OS Integration: Companion app for Wear OS to trigger actions on the watch based on phone notifications.
Price: $3.99
Typical User Reviews
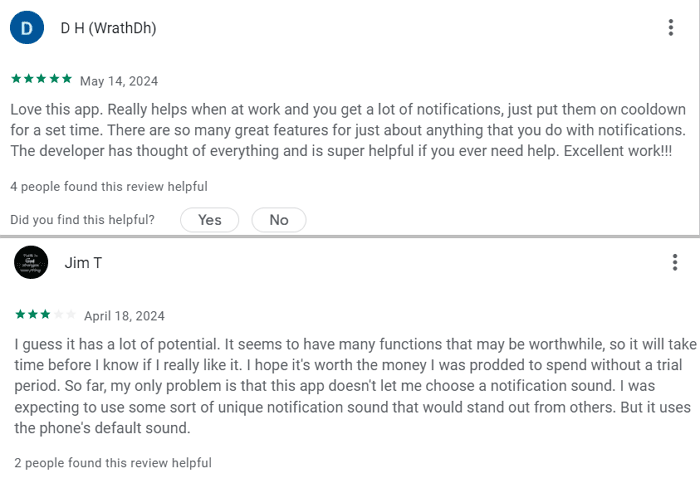
One user was very pleased with the app, noting its wide array of features that assist in managing notifications effectively, especially during work. They also highlighted the developer's helpfulness.
Another user saw potential in the app's various functions but remained cautious, noting the absence of a unique notification sound and the lack of a trial period before purchase.
Editor's Idea
BuzzKill is perfect for users who need granular control over their notifications, and it has a strong emphasis on privacy and customization.
How Android 11 Makes It Easier to Retrieve Swiped Notifications by Mistake
Android 11's Notification History is a dedicated section where all dismissed and interacted notifications are stored for 24 hours. This repository is accessible directly from the settings menu, providing a simple and intuitive way for users to track down past notifications.
To take advantage of this feature, users need to activate it manually. Here’s a step-by-step guide:
- Open Settings: Locate to the settings menu on your Android device.
- Access Notifications: Look for the notifications option and tap on it.
- Find Notification History: Within the notifications menu, you will find an option for Notification History. Toggle this feature on to start keeping track of your notifications.
Wrapping Up
Effectively managing notifications on your Android device is essential for maintaining focus and enhancing productivity. By following these steps, you can create a more organized and less intrusive mobile experience.
Remember, your device should serve as a tool to simplify your life, not a source of constant distraction. Take control of your notifications today, and enjoy the benefits of a more streamlined and purpose-driven digital environment.




Leave a Reply.