[Full Guide] 3 Ways to Access Raspberry Pi Remotely
Many times, we want to access Raspberry Pi without connecting it with a screen, mouse, and keyboard. Sometimes, the board may be embedded in a robot or isn't accessible right now. Alternatively, you may not have a spare monitor or mouse/keyboard to control the board.
To tackle that, the best solution here is to access Raspberry Pi remotely. In this guide, we will decode the three best ways to have remote access to Raspberry Pi.
Part 1. Can You Access a Raspberry Pi Remotely?
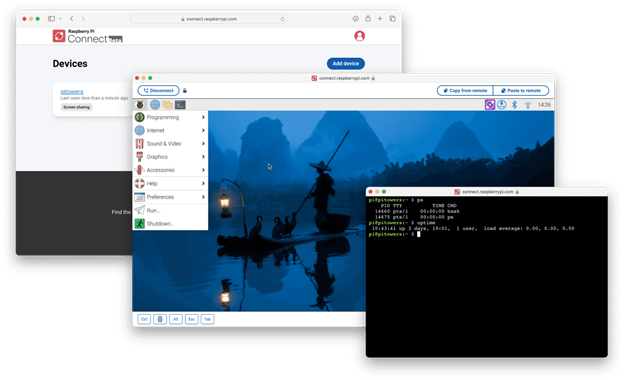
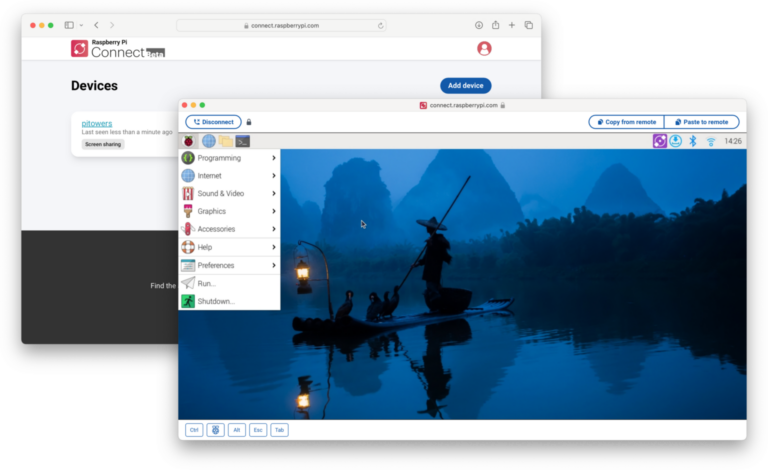
Yes, you can access a Raspberry Pi remotely. There is now a native solution called Raspberry Pi Connect. It allows you to access Raspberry Pi remotely from anywhere, just with your web browser.
All you have to do is head to the Raspberry Pi Connect web portal, sign in with your Raspberry Pi ID, and choose whether you want to access the terminal or desktop remotely. That's it! So, a simple browser-based solution can let you access the board from anywhere, anytime.
However, there are a few prerequisites for using Raspberry Pi Connect. You must be running a 64-bit Raspberry Pi OS Bookworm distribution that involves the Wayland window server. Simply put, you need to be using a Raspberry Pi 5, 4, or 400.
Other than Raspberry Pi Connect, you can also control the board from another device using SSH and VNC. SSH (Secure SHell) provides remote access to Raspberry Pi terminal, while VNC (Virtual Network Computing) provides remote access to Raspberry Pi desktop screen.
In short, there are plenty of ways to connect Raspberry Pi remotely. Head to the next part to learn the steps to use all these three methods.
Part 2. How Do I Access My Raspberry Pi Remotely?
There are three ways to access Raspberry Pi remotely. The details and steps are as follows:
Method 1. Raspberry Pi Connect
Raspberry Pi Connect is the native and easiest way to access the board remotely using a web browser. It provides a secure encrypted connection to Raspberry Pi without requiring the IP address to be input. It allows you to either access the full GUI screen or just the Terminal on the browser.
Raspberry Pi Connect is usable from any device (desktop or mobile) and anywhere via the internet. Follow the below steps to use this native technique for remote access:
Step 1. Raspberry Pi Installation
If it's a new installation, Raspberry Pi Connect is activated by default. Otherwise, you can install it manually using the below commands:
sudo apt update
sudo apt upgrade
sudo apt install rpi-connect
After installation, reboot. Once done, you will be able to see the gray "circle" icon on the top.

Step 2. Register Raspberry Pi Board
Next, you have to register the Raspberry Pi. To do so, you first need to have a Raspberry Pi ID. Click here if you don't currently have one.
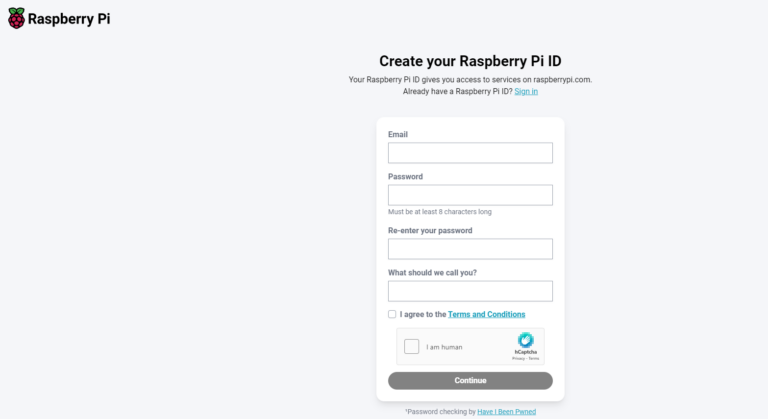
Afterward, follow the below steps to register a Raspberry Pi board:
- 1.Connect your Raspberry Pi to the monitor, mouse, and keyword.
- 2.Click the Connect icon from the top of your desktop.
- 3.Sign in with your Raspberry Pi ID.
- 4.Give your device a unique name and click Create device and sign in.
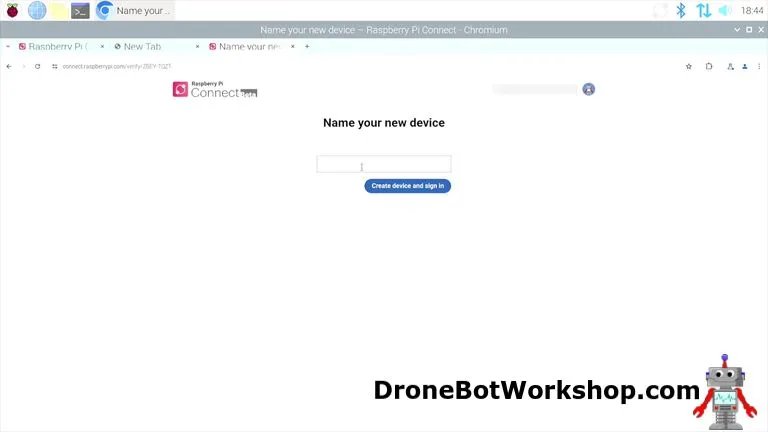
Once done, you have completed the registration for the Raspberry Pi board.
Step 3. Create a Remote Connection
The last step is to create a remote connection using your web browser. The steps include:
- 1.Go to the Connect web portal from your browser.
- 2.log in with your Raspberry Pi ID.
- 3.Select the Raspberry Pi you want to connect. Under Connect via, choose either GUI or Terminal.
- 4.Give your device a unique name and click Create device and sign in.
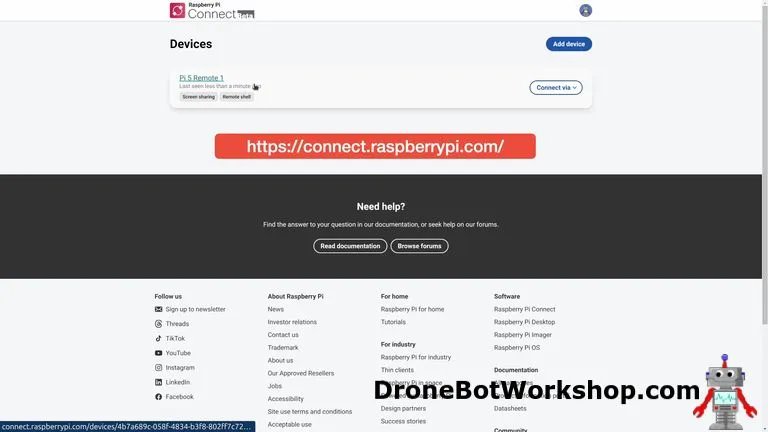
After the connection is made, you will be able to access Raspberry Pi directly from your web browser on computer or smartphone.
Method 2. SSH
Secure Shell (SSH) is a popular protocol for remote accessing devices on the same local network. You can use SSH to access Raspberry Pi remotely.
SSH uses public-key cryptography to authenticate. Afterward, it creates a tunnel for secure data transmission. However, it will only provide access to the "Terminal" not the entire desktop.
The steps to use SSH for remote Raspberry Pi access are as follows:
Step 1. Note the Raspberry Pi IP Address
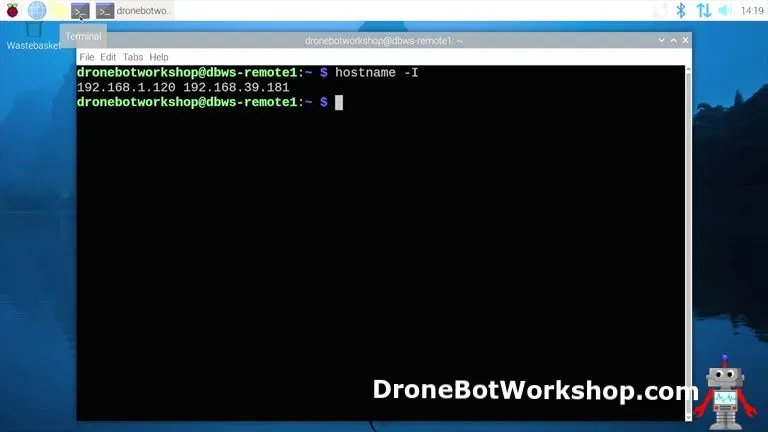
The first step is to note down the IP address of the Raspberry Pi. The easiest way is to click the network icon from the top right corner and note down the IP address.

Alternatively, you can type "hostname -I" in the command line to get the IP address.
Step 2. Enable SSH
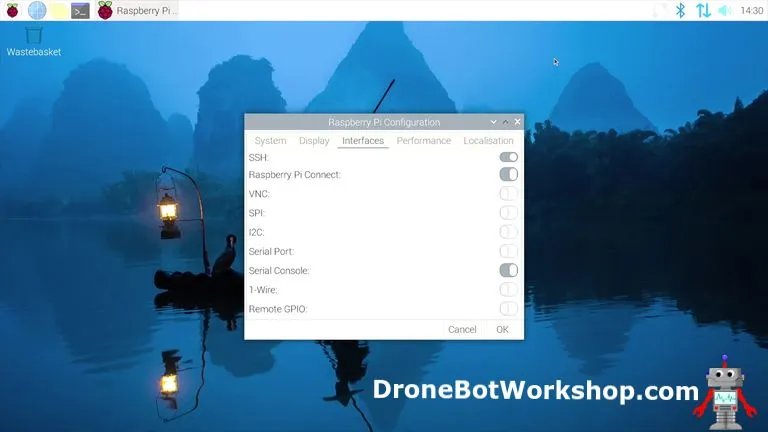
- 1.Launch Raspberry Pi and click its icon from the desktop.
- 2.Navigate to Preferences > Raspberry Pi Configuration.
- 3.Under the Interfaces tab, toggle on SSH and click OK.
Step 3. Install Terminal Software
Next, you need to install the terminal software on your computer to connect to Raspberry Pi. There are many terminal software you can use, such as:
- PuTTY
- Windows Terminal
- Bitvise SSH Client
- Terminal
- Termius
- Konsole
- Tilix
Choose the terminal software that best suits you, depending on your operating system.
Step 4. Create a Remote Connection
After installing the terminal software, you are now all set to make a remote connection. From your computer, open the terminal software and type the below command:
ssh <username>@<ip address>
Replace the ip address with the IP address of Raspberry Pi.
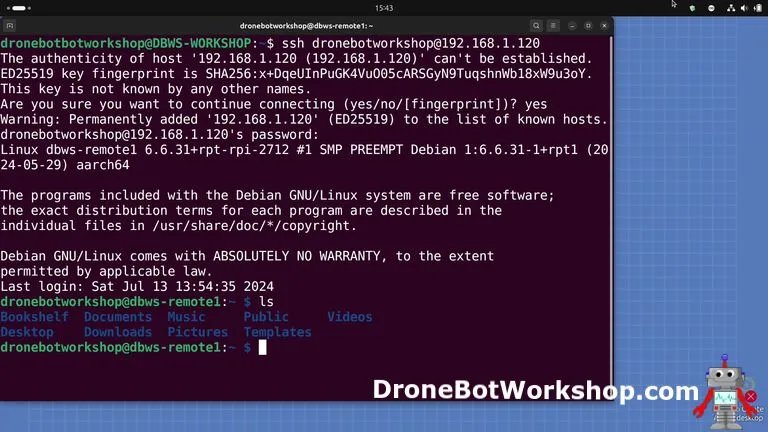
You will get the security message. Click "yes" to continue. Afterward, enter the Raspberry Pi account password. Once done, you will be able to access the Raspberry Pi terminal remotely.
Method 3. VNC
Virtual Network Computing (VNC) is another effective way to access Raspberry Pi remotely. It provides access to the board's complete GUI.
VNC uses the client-server approach to provide access. The server operates on Raspberry Pi, while the client is on Windows/Linux/macOS. The client sends the mouse/keyboard events to the server, and the required actions are performed on the Raspberry Pi. Simply put, it is like using Raspberry Pi directly from your computer.
Here are the steps to use a VNC for remote access to Raspberry Pi:
Step 1. Enable VNC
- 1.Launch Raspberry Pi and click its icon from the desktop.
- 2.Navigate to Preferences > Raspberry Pi Configuration.
- 3.Under the Interfaces tab, toggle on VNC and click OK.
Step 2. Install and Configure the VNC Client
Next, you have to install a VNC client tool on your computer. You can choose any VNC client, but Raspberry Pi prefers to use TigerVNC. It is open-source and accessible for Windows, macOS, and Linux. So, install and configure TigerVNC on your computer.
Step 3. Create a Remote Connection
Now, you are all set to create a remote connection. The steps are as follows:
- 1.Turn on the Raspberry Pi and the computer. Launch TigerVNC.
- 2.Enter the Raspberry Pi IP address and click Connect. You may see a few confirmation messages, so click "Yes" to agree on them.
- 3.Enter the login credentials.

Once done, you will be able to access the Raspberry Pi GUI on your computer screen.
Part 3. Tips for Raspberry Pi Remote Access
Now that we have learned how to access Raspberry Pi remotely, below are a few useful tips to maximize your experience:
- Use strong passwords to avoid unauthorized remote access.
- Use a VPN when accessing Raspberry Pi from a different network.
- Use static IP addresses to have the same IP when connecting to the Raspberry Pi.
- Connect your Raspberry Pi with a stable power source to avoid a sudden shutdown.
In short, the emphasis should be on keeping remote access secure and efficient to maximize usage without unwanted complications.
Conclusion
Accessing Raspberry Pi remotely is a useful way to control the board from another device, especially when you want to maintain multiple remote microcontrollers. Above, we have discussed three ways to access Raspberry Pi remotely. You can choose any one of them that suits you.
If you want a similar remote access to a computer or smartphone, you can use the AirDroid Remote Support tool and get real-time remote control of Windows, Android, and iOS devices.





Leave a Reply.