How to Remotely Connect to IoT Devices via SSH
IoT devices have become commonplace in today's world. They have brought efficiency and convenience into our daily lives by connecting a variety of gadgets and appliances.
With the growing use of IoT devices, the need to remotely connect/control them from anywhere is also increasing. Out of many ways to connect them, Secure Shell (SSH) provides a secure and reliable way to access IoT devices.
In this guide, we will uncover all about how to set up and establish an IoT remote SSH connection. So, let's get started!

Part 1. What is SSH?
SSH (Secure Shell) is a cryptographic network protocol that provides secure remote access to devices from an unsecured network. It creates a secure tunnel that provides an encrypted path for the data to transmit between the IoT device and the other hand.
SSH involves a client-server model, where the server operates on your IoT device, while the SSH client operates on your access devices, such as your laptop or PC.
The IoT remote SSH connection is properly encrypted, which means that the data transfer is secure. This makes it a recommended remote access method for IoT devices when accessing them from unsecured networks, such as the internet.
Part 2. How to Set Up SSH for IoT Devices?
You can easily set up SSH for your IoT devices by following the below steps:
Prerequisites
- Enable SSH: Ensure SSH is enabled on the IoT device. For example, you can enable SSH on Raspberry Pi through the configuration menu by executing sudo raspi-config and tapping Interfacing Options > SSH > Enable.
- Obtain the IoT Device IP Address: To make the connection, you need the IP address of the IoT device. You can get the IP address from the device itself or through the router.
- Network Connectivity: Make sure that the IoT device is connected to a network (either the internet or LAN).
SSH Server Installation
Many IoT devices like Raspberry Pi come with built-in SSH support. In such devices, all you need to do is enable SSH. However, if SSH isn't installed, you can install it manually. For Linux, use:
sudo apt-get update
sudo apt-get install openssh-server
Afterward, configure SSH settings, such as updating default configurations to specify ports, enabling key-based authentication, and setting up access restrictions for additional security.
Network Configuration
If the purpose behind your ;IoT remote SSH connection is to access the IoT device outside the local network, you can use port forwarding on your router. To do so:
- 1.Open router settings from the web browser.
- 2.Locate port forwarding settings.
- 3.Add a new rule, i.e., forward port 22 (SSH default port) to your IoT device IP address.
Secondly, it is also recommended to use Dynamic DNS. Since the IP address of the network may change with time, it can make it difficult to access IoT devices consistently. DDNS can tackle that effectively by linking the IP to a stable domain name. To use Dynamic DNS:
- 1.Sign up with any DDNS service.
- 2.Install the DDNS client on your device/router.
Once done, you have successfully completed the setup of SSH for IoT devices.
Part 3. How to Establish IoT Remote SSH Connections?
Now that SSH is set up for your IoT devices, the next stage is to establish an IoT remote SSH connection. To do so, you need to choose an SSH client, which will help you establish connections when required.
There are many SSH client options to choose from:
- PuTTY: It is a free, open-source SSH client compatible with Windows.
- OpenSSH: It is also an open-source SSH client commonly used in Linux and other non-Windows platforms.
- And many more.
You can pick the SSH client that suits you the best. Afterward, launch your SSH client and fill in the required connection details. They can be related to the hostname or IP address of the IoT device, login credentials, etc.
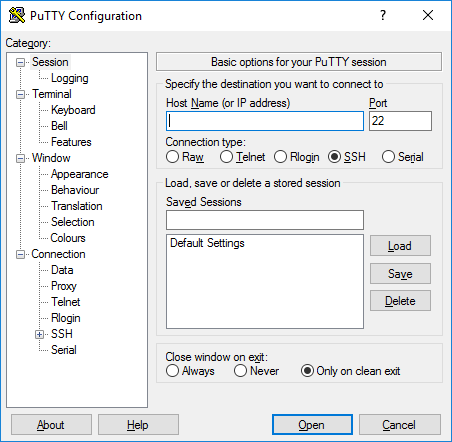
For example, the steps to use PuTTY for IoT remote SSH connection include:
- 1.Open PuTTY and enter the IP address of the IoT device in the Host Name field.
- 2.Specify the port number (22 by default).
- 3.Click Open to establish the connection.

Alternatively, if you are using OpenSSH on Linux or macOS, you can enter the below command in the terminal:
ssh username@device-ip-address
Replace "username" and "device-ip-address" with the actual details. Afterward, you will be asked to authenticate the connection using either an SSH key or password.
Basic SSH commands for IoT management
Once you have established the IoT remote SSH connection, check out the below basic SSH commands you can use for IoT management:
- PuTTY:ls: Lists files and directories within the current directory.
- OpenSSH:cd [directory]: Changes the directory to a specified folder.
- mkdir [directory]: Creates a new directory.
- rm [filename]: Deletes a specified file.
- mv [source] [destination]: Moves files or directories.
- top: Shows active processes and their resource consumption.
- df -h: Displays disk space usage in a human-readable format.
- ping [IP address]: Verifies network connectivity between the IoT device and another IP address.
- Ifconfig: Displays network configuration, allowing you to check IP addresses and network status.
- sudo reboot or sudo shutdown: Restarts or shuts down the device safely.
- systemctl status [service]: Checks the status of specific services.
- scp [local file] [user@IP:/remote/path]: Securely transfers files from your computer to the IoT device.
- rsync -avz [source] [destination]: Synchronize files between your computer and IoT device to update firmware or transfer configuration files.
In short, you should smartly use SSH commands to remotely control your IoT devices.
Best Practices for Secure Connections
The important factor to consider when establishing IoT Remote SSH connections is to keep them secure. In this perspective, below are some best practices to consider:
- Turn Off Password Authentication: Rather than depending on username and password authentication, opt for SSH key-based authentication. Doing so will eradicate the concerns of brute-force attacks. You can turn off password authentication in the SSH server configuration.
- Generate Strong and Unique SSH Keys: For SSH key-based authentication, you should generate strong and unique SSH keys. You can use any relevant tool, such as ssh-keygen, to generate unique keys.
- Update SSH Software: Regularly update your SSH client and server with the latest patches and bug fixes.
- Enable and Monitor SSH Logs: Monitor SSH logs on your IoT device to prevent unauthorized access attempts.
- Enable IP Whitelisting: Enable IP whitelisting so that only trusted IP addresses can establish IoT remote SSH connections.
- Add Two-Factor Authentication (2FA): Add two-factor authentication to add an extra security layer during SSH connections with IoT devices. You can implement OTP or hardware tokens for this purpose.
In short, an SSH IoT remote connection is vulnerable to security threats, but the right security measures can minimize the chances of security breaches.
Part 4. Use of IoT Remote SSH Connection
IoT remote SSH connection is commonly used in three scenarios:
1.Remote Monitoring and Management of Devices
SSH helps provide real-time remote monitoring and management of IoT devices. This helps administrators to keep an eye on the performance and status of devices.
2.Updating Firmware and Software Remotely
SSH eradicates the need for on-site management of IoT devices. You can easily update firmware and software remotely and keep devices protected.
3.Debugging and Troubleshooting IoT Applications
IoT remote SSH connection optimizes debugging and troubleshooting IoT applications. Developers can easily access the necessary systems remotely and troubleshoot issues in minimal time.
Conclusion
SSH is an exceptional tool to securely access IoT devices. It empowers administrators, developers, and other professionals to securely manage and troubleshoot IoT devices. Therefore, follow the above steps to easily establish an IoT remote SSH connection.
If you want a similar secure remote access experience for desktops or smartphones, use AirDroid Remote Support software—the best remote access and control software solution.


Leave a Reply.