[100% Fixed] Quickly Resolve Remote Access to the Server Is Not Enabled
Understanding the "Remote Access to the Server is Not Enabled" Error
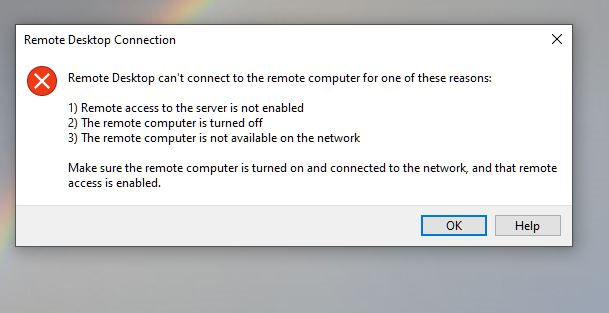
This common error message pops up when using the Windows Remote Desktop Protocol (RDP) service. It indicates that the connection request to the server is denied due to any reason, preventing users from accessing the server.
However, you can easily restore the RDP connection by analyzing and troubleshooting the possible reason behind the issue.
Pre-Checks
Before proceeding to the main solutions, verify the basic settings on your device:
- Make sure no other connection is currently active with the remote PC.
- Ensure the password or IP address of the device is entered correctly.
- Check and install the Windows pending updates.
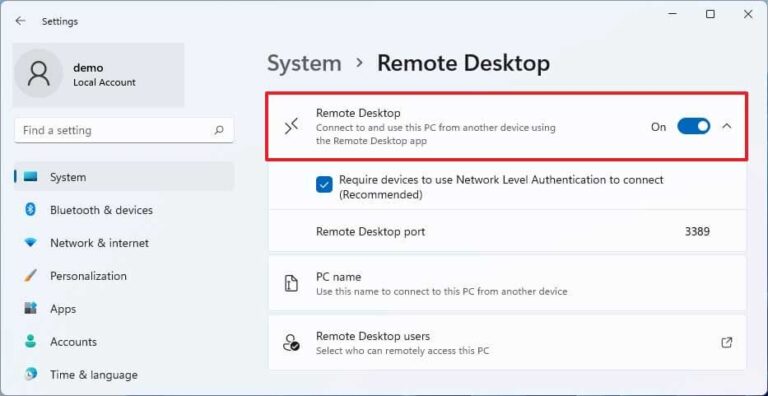
- Enable the Remote Desktop function in System > Remote Desktop.
Quick Tips to Fix
Below are various simple solutions to troubleshoot the remote access to the server is not enabled error.
Tip 1: Check Local User Permissions on Target Server
If the remote connection permission on the remote device is disabled for any reason, the connection request will fail. To check and fix it:
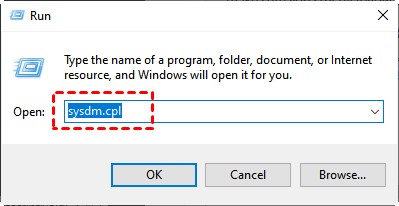
Step 1: Press Win + R to launch the Run dialog.
Step 2: Enter sysdm.cpl and hit Enter. click the OK button.
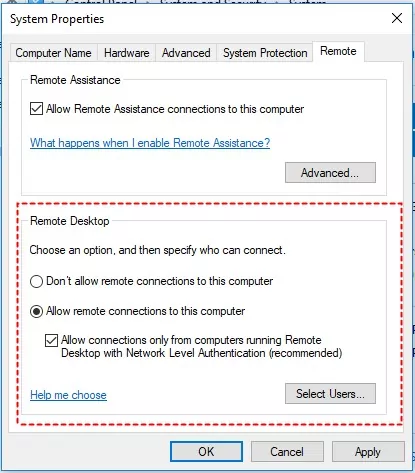
Step 3: Under the Remote tab, check the box "Allow remote connections to this computer."
Step 4: Click OK.
Tip 2. Reset Credentials
A minor glitch in the RDP service often leads to "remote access to server is not enabled Windows 10." Resetting the login credentials on the host device can fix this issue.
Step 1: Search and open the Remote Desktop Connection app.
Step 2: Click "Delete" and confirm the action on the pop-up tab as shown below.
Step 3: Now, set up new credentials and try connecting to the remote device again.
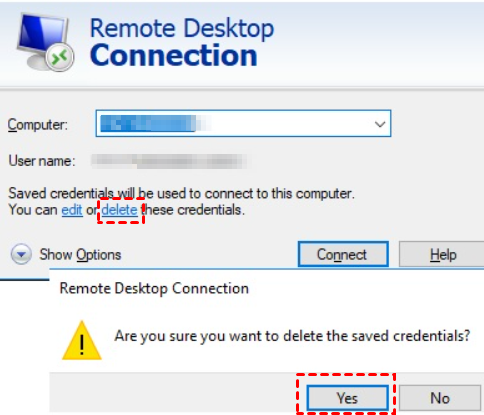
Tip 3: Check RDP Service Status
For smooth remote connection, the RDP service must be functional and active. If not, the server won't recognize the request, prompting the "remote access is not enabled on server" error. Here's how to check it:
Step 1: Search for Services and open the top-most option.
Step 2: Swipe down to Remote Desktop Services and confirm its status is Running.
Step 3: Else, double-click it and set the 'Startup Type" to Automatic. Now, click Start.
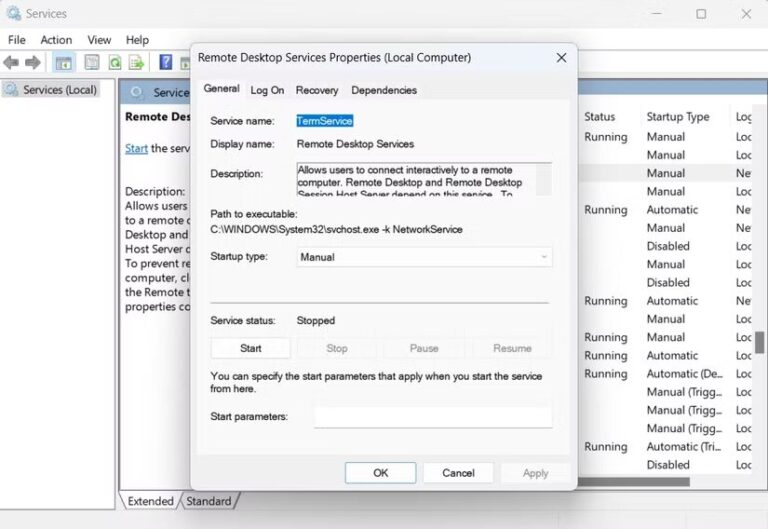
Tip 4: Change Network Settings to Private
You're likely to encounter the "remote access is not enabled on server" issue due to network misconfiguration. To check this:
Step 1: From the Start menu, navigate to Settings > Network & Internet.
Step 2: On the next screen, click Properties under your network connection.
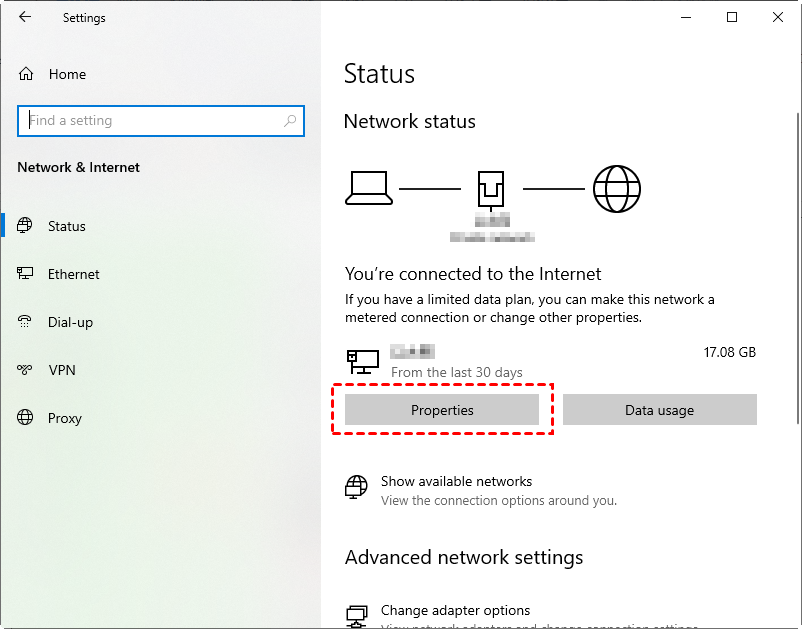
Step 3: Change the profile from Public to Private.
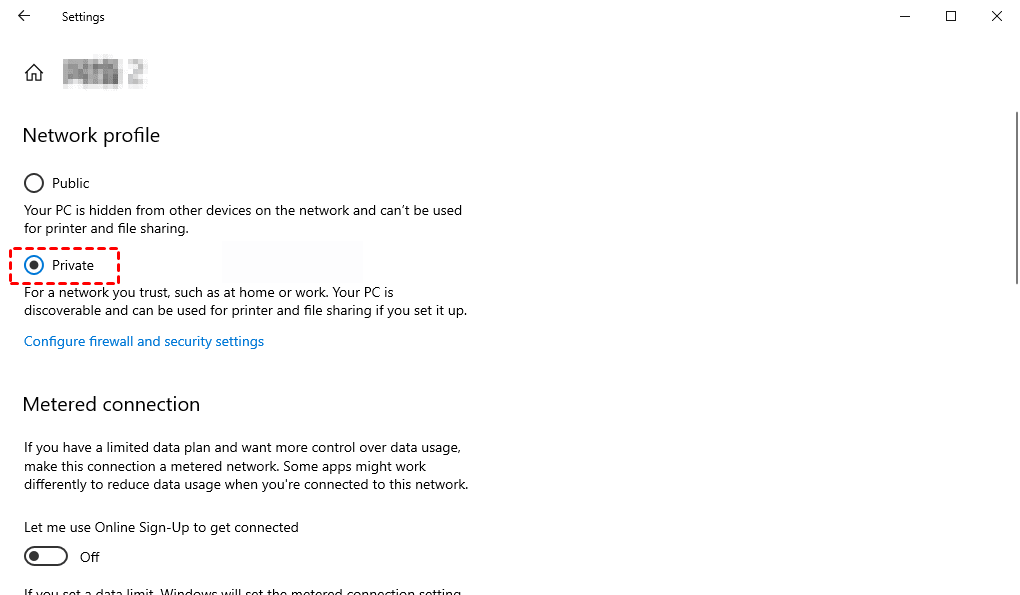
Tip 5: Add the IP Address of the Remote Computer
Are you trying to connect to the remote device whose IP address is not in the host file? Simply, add its address to your PC to eliminate the "remote access to the server is not enabled" error.
Step 1: Search Windows PowerShell, right-click it, and select "Run as administrator."
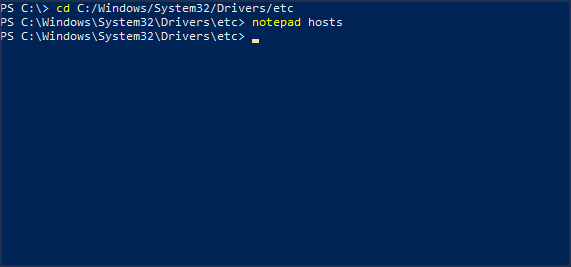
Step 2: Run the below commands one by one:
cd C:/Windows/System32/Drivers/etc
 notepad/hosts
Step 3: Now, add the IP address of the remote PC and close the bar.
Advanced Troubleshooting Tips
In most cases, the aforementioned solutions result in a seamless remote connection with RDP. However, if the issue persists, refer to the below fixes:
Solution 1. Configure Permissions in Group Policy Setting
The Remote Desktop service in Group Policy influences whether remote access to a server is allowed or denied. So, if remote access to server is not enabled Windows 10 message appears, adjust the Group Policy settings:
Step 1: Search and open the "Edit Group Policy" window.
Step 2: Now, navigate to the below destination by expanding each option:
Computer Configuration > Administrative Templates > Windows Components > Remote Desktop Services > Remote Desktop Session Host.
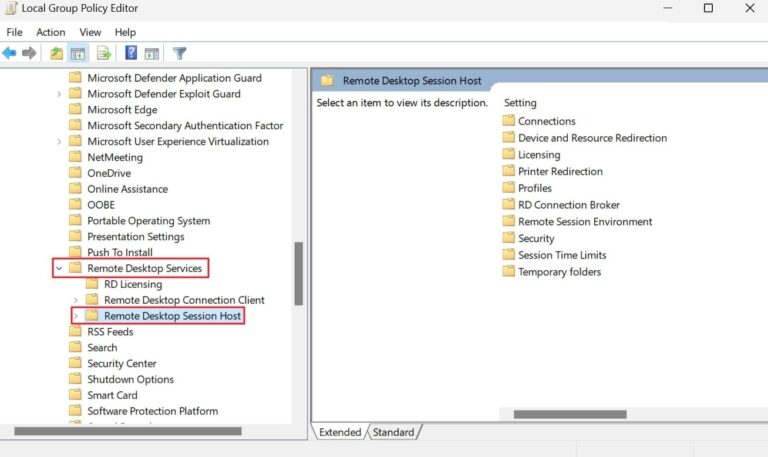
Step 3: Here, open "Connections" on the right panel and within it, and double-click the "Allow users to connect remotely by using Remote Desktop Services" option.
Step 4: Click Enabled and hit Ok.
Solution 2. Modify Firewall Settings
The firewall apparatus on the remote device can block the incoming RDP connection request. All you need to do is check the app permissions in the firewall settings and make necessary adjustment if needed. For that:
Step 1: Type in "Allow an app through Windows Firewall" in the Start menu and open it.
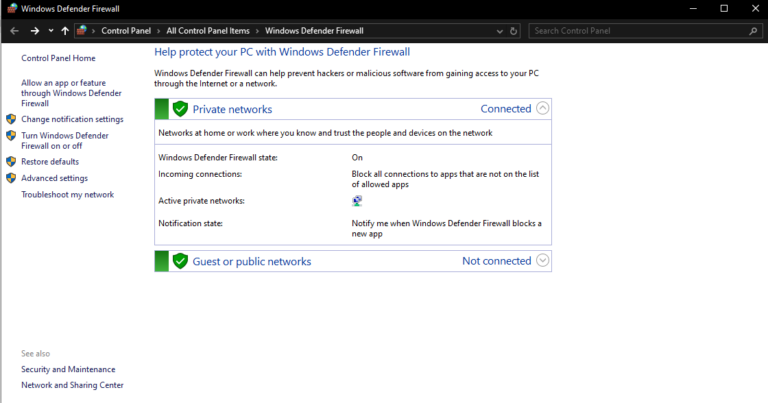
Step 2: Click Change Settings and look for the Remote Desktop option.
Step 3: Tick both Public and Private options in front of it and save the changes.

At the same time, disable any third-party security software temporarily on the remote device. This is necessary to confirm it's not interfering with the RDP connection.
Now, check if the Remote access to server is not enabled message is still popping up or not.
Solution 3. Add RDGClientTransport Key in the Registry
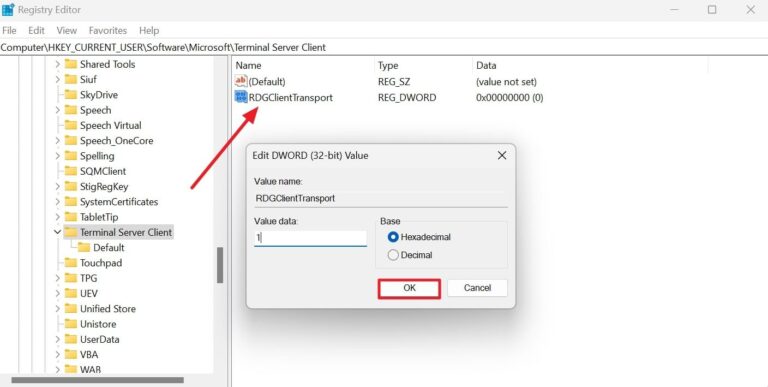
Still getting the "remote access to the server is not enabled" error? One proven way is to force the RDP to use the RPC/HTTP connection instead of HTTP/UDP. This is done by adding the "RDGClientTransport" Key in Registry Editor as demonstrated below:
Step 1: Search and open Registry Editor.
Step 2: Move to the below path:
HKEY_CURRENT_USER > SOFTWARE > Microsoft > Terminal Server Client 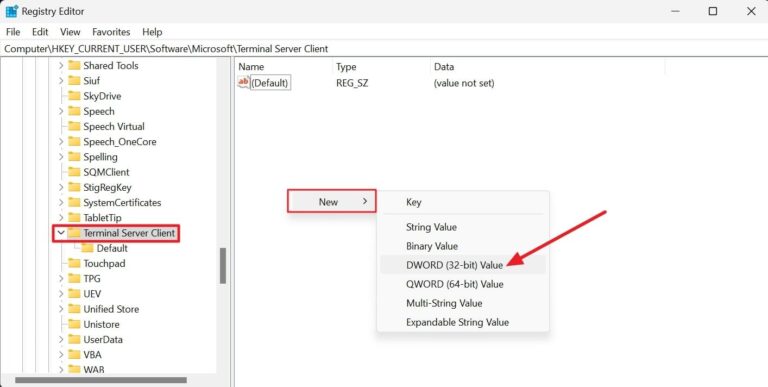
Step 3: Right-click anywhere in the empty space on the right pane and select "New" > "DWORD (32-bit) Value".
Step 4: Now, double-click this new item and set its name to "RDGClientTransport". Also, change the value to 1.
Step 5: Save the changes and close it.
Solution 4. Change the Listening Port in Registry Editor
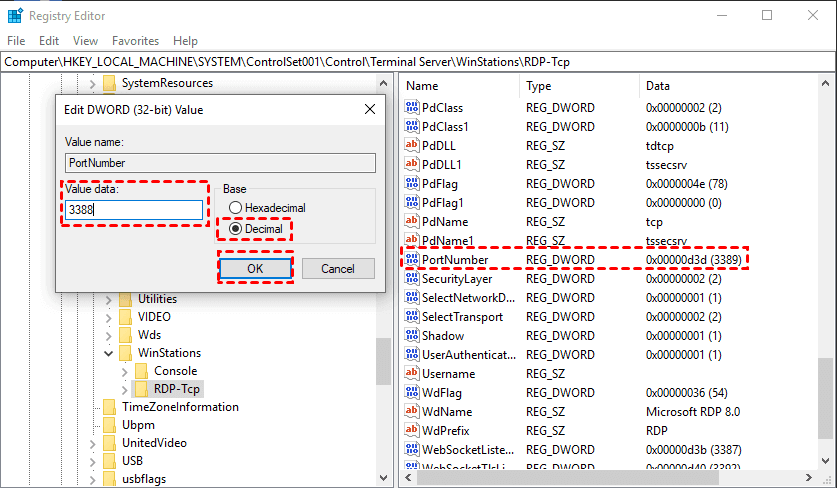
RDP uses port 3389 as the default listening port. If another application is currently occupying this port, you'll get the remote access error. So, make sure this port is free or assign RDP another port in Registry Editor.
For that:
Step 1: Open the Registry Editor and navigate to the following location:
Computer\HKEY_LOCAL_MACHINE\SYSTEM\CurrentControlSet\Control\Terminal Server\WinStations\RDP-Tcp Step 2: Now, double-click PortNumber and set the value to 3389. If it's already 3389, choose another value like 3388 and hit OK.
Step 3: Now, try connecting to the remote device. If the error re-appears, change the port number back to 3389.
Preventing Future Occurrences
Fixing the "Remote access to the Server not enabled" error is time-consuming. If you want to avoid encountering it in the future, consider the below tips:
- Always install the pending updates on both Windows PCs.
- Allow RDP through the firewall and don't tweak firewall settings frequently.
- Ensure a consistent supply of the internet to both devices when using the Remote Connection.
- Don't use similar remote desktop apps when in a remote session via RDP
Try RDP Alternative: AirDroid Remote Support
Are you fed up with the constant connection-related errors like "Remote access to the server is not enabled?" Consider seeking assistance from a professional tool like AirDroid Remote Support. It offers a reliable, uninterrupted remote access service along with a range of stellar remote support features.

Why Use AirDroid
With its ability to connect to and manage multiple remote sessions simultaneously, AirDroid is a perfect choice for both individual and enterprise use. Some of its advantages include:
- Unattended Access: It guarantees both attended and unattended devices access to Windows PCs from any device (Windows and Mac).
- Expanded Compatibility: Supports remote access to Windows PCs from both Win and Mac computer.
- Bulk File transfer: Users can send large files to multiple devices in a remote session at 20MB/sec speed.
- Enhanced Functionality: Offers features like screen sharing, voice chatting, iOS/Android remote camera, individual permission management, and a black security screen on the remote end.
FAQs
Q1: How can I check if my account has remote access permissions?
To check the remote access permissions, head to Start > Settings > System. On the left pane, click Remote Desktop and confirm if Enable Remote Desktop is turned on.
Q2: Why can't I connect even after enabling Remote Desktop?
If the remote desktop is enabled but you still cannot connect, look for the below reasons:
- Windows firewall blocking the RDP service.
- Pot 3389 is currently in use by another application.
- You're entering the incorrect login credentials.
Q3: Is Remote Desktop available on all versions of Windows?
Windows Home editions don't support the RDP service. You can use it on Windows Pro, Enterprise, and Server editions.


Leave a Reply.