- You have not enabled sound on your local computer.
- Windows Audio Service is not running on the remote computer.
- Audio and video playback redirection is not enabled on the remote computer.
- Audio recording redirection is not enabled on the remote computer.
[Answered] How to Enable Remote Desktop Audio
Remote desktop access has become a common phenomenon today. Individuals intend to access their home or work desktops remotely, while IT support teams intend to access the remote desktops of employees/customers to troubleshoot issues. However, there is sometimes a need to access the remote desktop audio as well. For example, listen to the multimedia content stored on the remote desktop.
Therefore, we have designed this guide to teach you how to enable remote desktop audio. So, follow along and learn the steps to use a remote desktop with sound.
Part 1. Can You Hear Sound on Remote Desktop?
YES! You can hear sound on the remote desktop. For all Windows versions, the audio transmission is possible via RDP sound redirection. This support is available for both Windows server and non-server versions, like Windows 7/10/11. However, by default, the microphone sound transmission is only accessible for non-server Windows versions.
To access a remote desktop with sound, you have to enable a few settings in both remote and host desktops. Once done, you will be able to access the remote desktop audio. Head to the next part to learn how to enable remote desktop audio.
Part 2. How to Enable Remote Desktop Audio?
If you want to hear all types of remote desktop audio on Windows, you have to configure a few settings. You have to:
- Ensure that Windows Audio Service is running on your remote desktop.
- Enable "Allow audio and video playback redirection" in Windows Group Policy on your remote desktop.
- Enable RDP audio on your host desktop.
- Set up RDP properties to hear the Windows startup sound on your remote desktop.
- Enable audio from all applications on your remote desktop.
Once you have configured the above settings, you will be able to use a remote desktop with sound.
Don't get worried about the above configurations. You can easily configure them within minutes. Follow along to learn the steps to configure the above settings:
Step 1. Connect to the Remote Desktop
The first step is to connect to the remote desktop so that you can configure its settings remotely. For that, make sure you are connecting as an administrator.
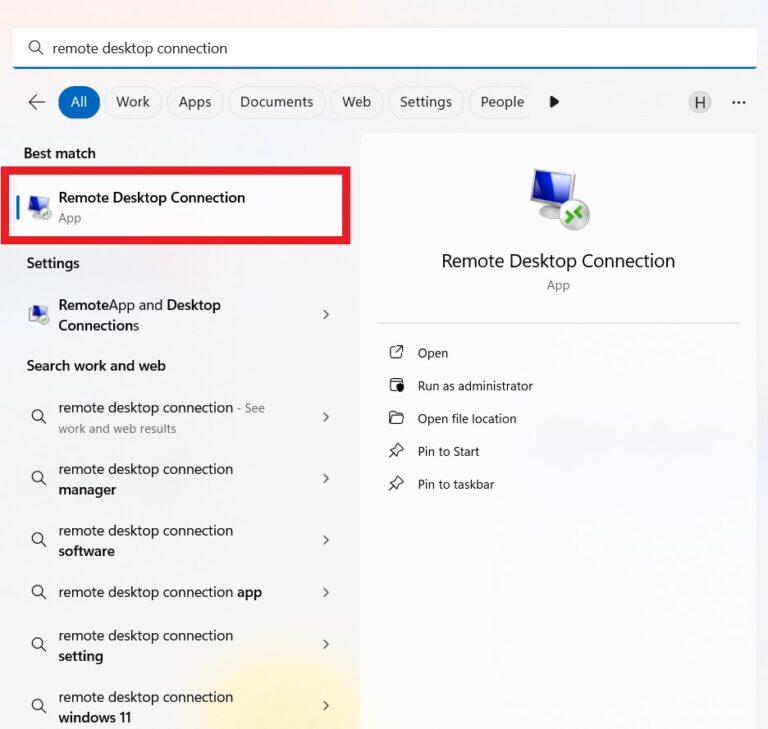
To connect to the remote desktop, open the Start menu, search for remote desktop connection and tap the best match option.
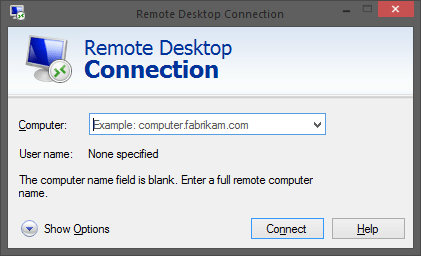
Type the remote desktop IP address and click Connect. Enter the username (administrator) and the password.
Step 2. Check Windows Audio Service on Remote Desktop
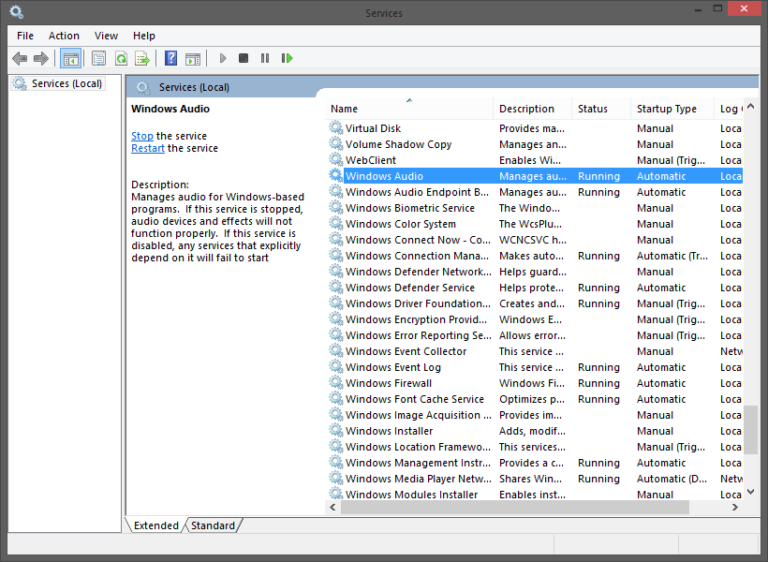
Once connected to the remote desktop, you should check if its Windows Audio service is running.
For that, open the Start menu, search for services.msc and tap the best match option.
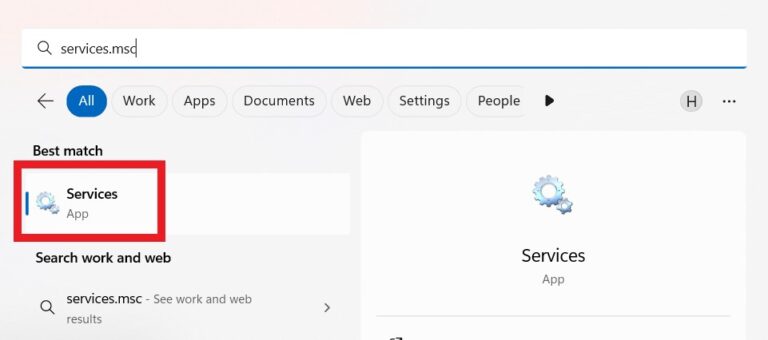
Double-click the Windows Audio service.
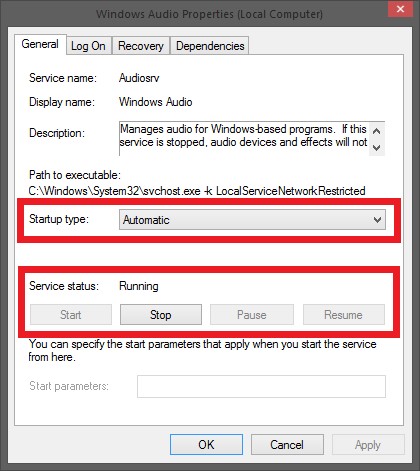
In the pop-up window, change the Startup type to Automatic and click the Start button.
Step 3. Enable "Allow audio and video playback redirection" in Windows Group Policy on Your Remote Desktop
Next, you must ensure that the audio and video playback redirection is also enabled in Windows Group Policy.
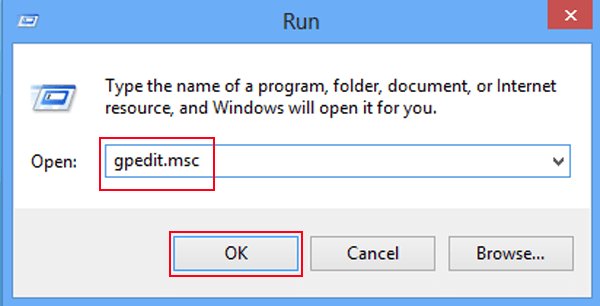
To do this, click Windows key + R to launch the Run, type gpedit.msc, and click OK.
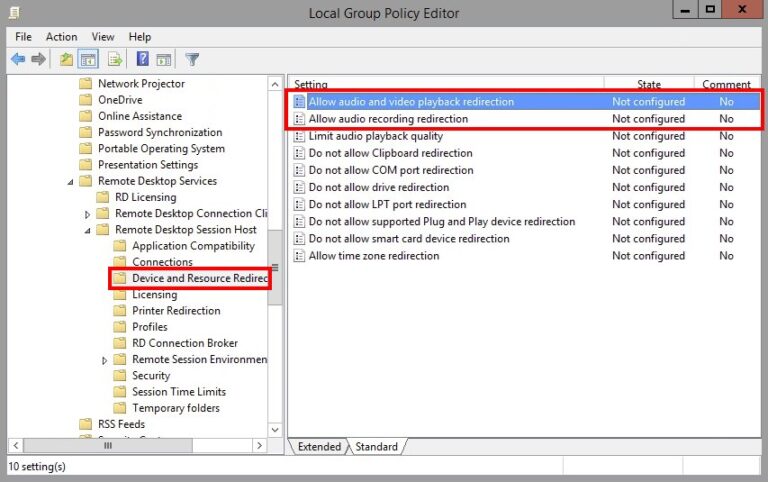
Navigate to Configuration > Administrative Templates > Windows Components > Remote Desktop Services > Remote Desktop Session Host > Device and Resource Redirection.
Double click Allow audio and video playback redirection.
Select the Enabled checkbox and click OK.
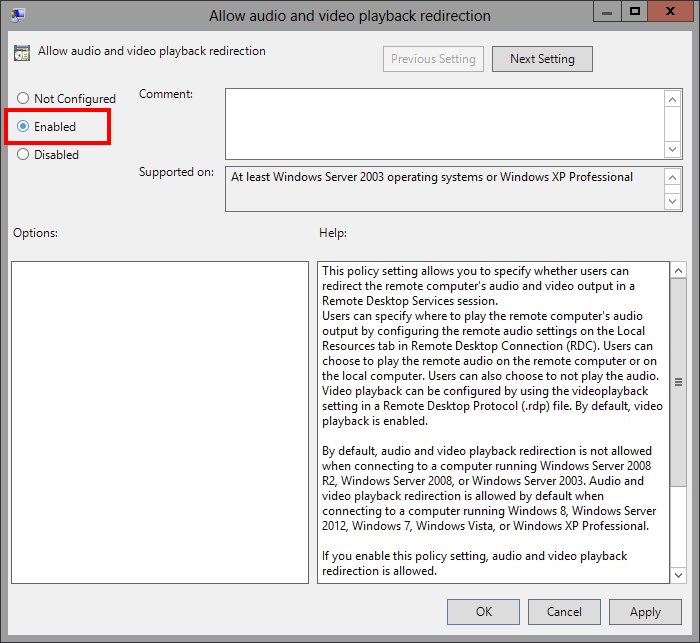
Step 4. Enable RDP audio on Your Host Desktop
You must now enable RDP audio on your host desktop. To do that, launch Windows Remote Desktop Connection and tap Show Options.
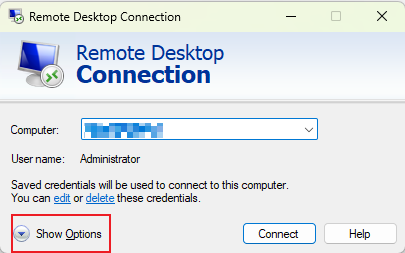
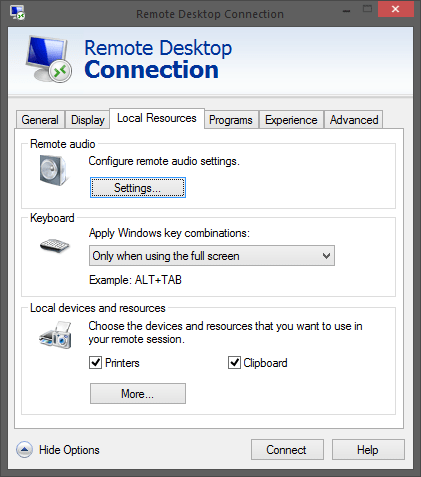
Go to the Local Resources tab and click Settings under the Remote audio section.
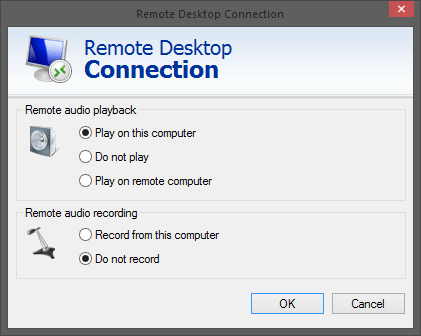
Select the Play on this computer checkbox and click OK.
After this configuration, see if you are able to hear the Windows startup sound when you log into the remote desktop. If yes, then skip step 5 and head to step 6.
Step 5. Set up RDP Properties to Hear Windows Startup Sound
From the remote desktop, launch Run and type tsconfig.msc. Open the Connections folder from the left panel.
Right-click RDP-Tcp and select Properties. Afterward, go to the Client Settings tab.
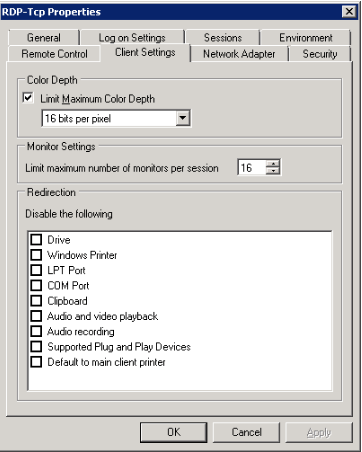
Look at the Audio Mapping checkbox. Make sure all checkboxes are unchecked in the Disable the following section, especially the ones related to audio. Once done, click OK.
When you close the tsconfig, you may get an alert that the changes will not apply to previously connected RDP sessions. So, click it, log out, and log in.
From then on, you should be able to hear the startup sound as well.
Step 6. Enable Audio for All Applications
The last setting configuration to do is to enable audio for all applications.
For that, open the "Settings" app on your remote desktop. Navigate to Control Panel > Sounds and Audio Devices.
Go to the Audio tab and pick Microsoft RDP Audio Driver as the device for default playback. From the bottom, tick the Use only default devices checkbox.
Afterward, go to the Voice tab and pick Microsoft RDP Audio Driver as the device for default playback.
That's it! Once you have reached this stage, you have completely enabled remote desktop audio. You can now connect and use the remote desktop with sound without any hurdles.
Conclusion
Using a remote desktop with sound is useful when you want to play multimedia content, access applications with audio, or do other audio-based activities on the remote desktop. Above, we have discussed in detail how to configure all the settings to enable remote desktop audio.
Therefore, follow the above steps one by one and enjoy the remote connection with audio from now on.
FAQs about Remote Desktop Audio
- Open the Remote Desktop Connection Window on your local desktop.
- Click Show Options and go to the Local Resources.
- Click Settings under the Remote audio section.
- Select the Play on this computer and Record from this computer checkboxes and click OK.
Once done, you will be able to record audio from the remote desktop.
- li>Launch the RDP session.
- Go to the Settings app and open System settings.
- Select Sound from the left sidebar.
- Click App volume and device preferences from the bottom.
- Select the desired audio device for the remote desktop app.
- Open the Remote Desktop Connection Window on your local desktop.
- Click Show Options and go to the Local Resources.
- Click Settings under the Remote audio section.
- Select the Play on this computer and Record from this computer checkboxes and click OK.


Leave a Reply.