How to Fix Remote Desktop Black Screen in Windows?
In this article, we will analyze the "remote desktop black screen" error in detail and provide comprehensive tips to fix it with minimum hassle.
Common Scenarios and Fixes Overview
The remote desktop black screen error can manifest in several ways depending on the underlying reasons.
| Scenarios | Possible Solutions |
|---|---|
| |
| |
| |
|
If the remote desktop's black screen still pops up before or after login, fret not and apply the following workarounds.
Remote Desktop Black Screen Before Login
Fix 1: Check Network and Firewall Restrictions
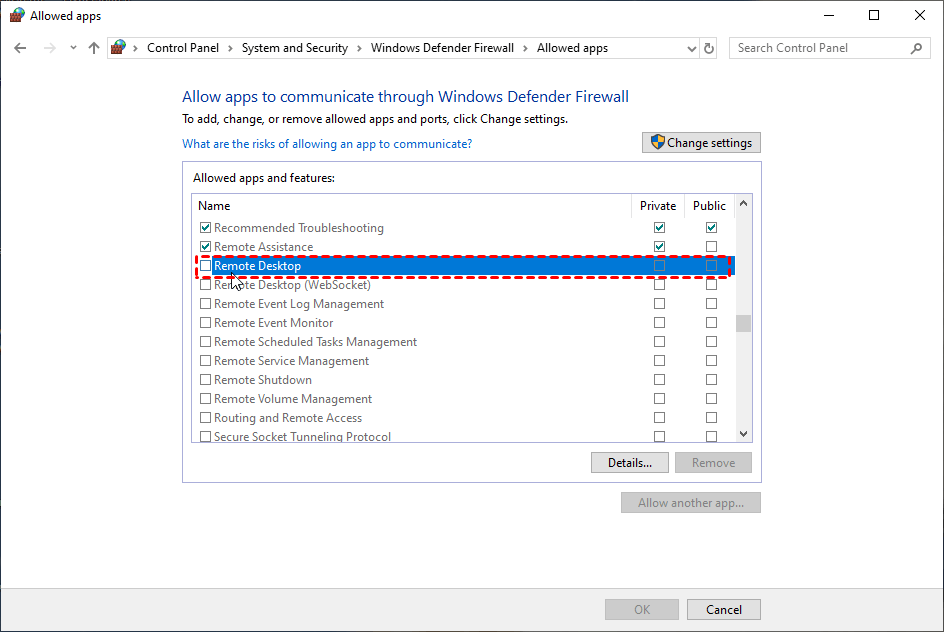
Windows built-in firewall mechanism often blocks certain programs to protect the system from unwanted access. Allow the RDP service through the firewall to eliminate the remote desktop black screen before the login error.
Step 1: First, confirm your device is getting a consistent internet supply.
Step 2: Then, open the Control Panel and navigate to System and Security > Windows Defender Firewall > > Allow an app or feature through …
Step 3: Check the "Public" and Private" options in front of the Remote Desktop.
Fix 2: Update Graphics Drivers
Windows generally update the drivers automatically. But sometimes, a minor glitch can corrupt the display drivers, which can lead to the remote desktop black screen error. To fix this, check and update the graphic drivers as shown below:
Step 1: Open Device Manage and expand "Display Adapters."
Step 2: Now, right-click the Graphic driver and select Update.
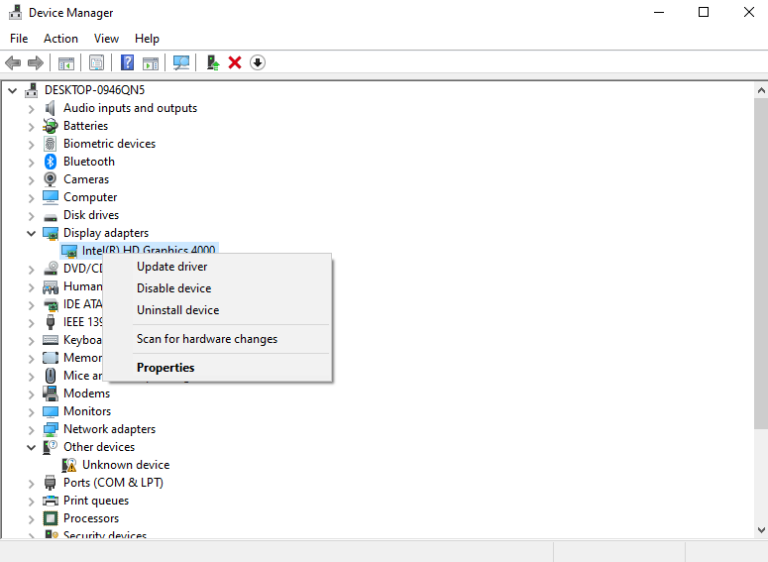
Step 3: On the next screen, select "Search automatically for drivers."
Step 4: If the system fails to update the driver, you can either:
- Right-click the driver, select Uninstall, and restart the device to let Windows automatically install its latest version.
- Use a third-party tool like Genius Drivers to diagnose and install outdated drivers on your PC.
Remote Desktop Black Screen after Login
The issue of the remote desktop showing black screen can be resolved by implementing the below quick workarounds.
Fix 1: Press Ctrl + Alt + Del
This workaround is as simple as it can get. Just press the "Ctrl + Alt + Del" key combination twice or thrice within a few seconds of each other.
Fix 2: End Explorer.exe in Task Manager
An unwanted background process on your machine might hinder the RDP connection, causing the remote desktop black screen on Windows 11. With Task Manager, you can check and end the problematic app/process.
To do this:
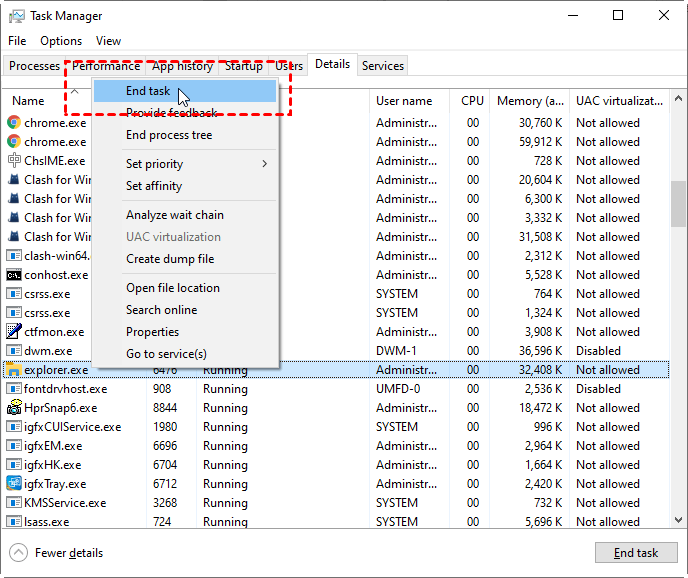
Step 1: Press the "Ctrl+Alt+Delete" keys combination to open the Task Manager.
Step 2: Now, right-click the "Explorer.exe" file and hit "End task."
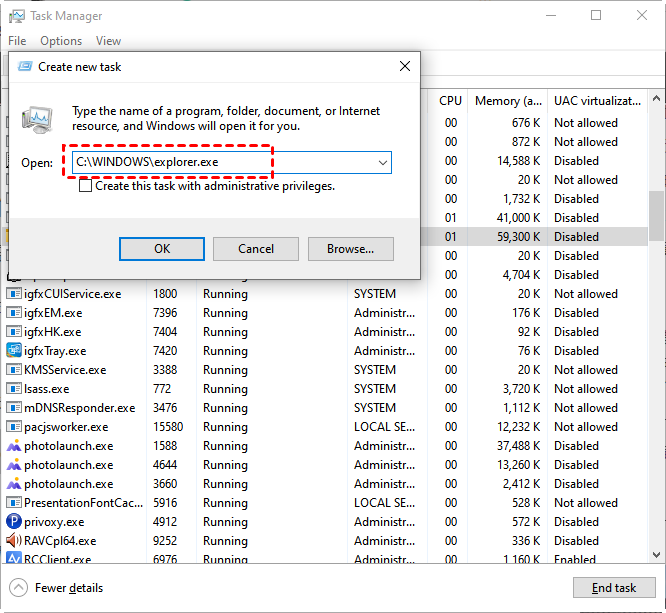
Step 3: On the top menu, click File > Run new task, and type in "C:\WINDOWS\explorer.exe."
Step 4: Click OK.
Fix 3: Change Color Depth
The next method involves changing the color depth in the Remote Desktop Connection client on the remote PC. It's proven configuring the optimum color setting often resolves the "remote desktop black screen before login" error.
Let's try and find out!
Step 1: On the remote desktop, search for Remote Desktop Connection in the search bar.
Step 2: Launch the app and click "Show Options."
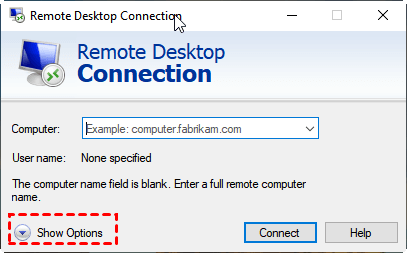
Step 3: Under the Display tab, select the "High Color (16 bit)" option from the drop-down menu. If this resolution is already set, choose any other option.
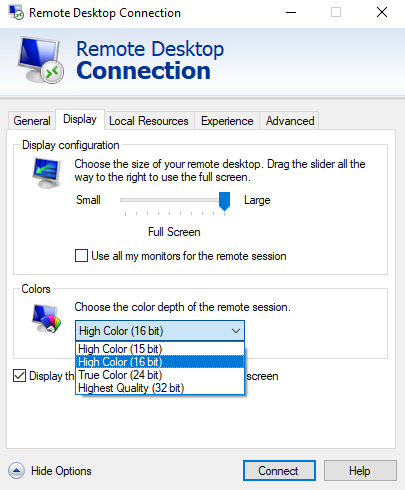
Step 4: Hit Connect and follow the on-screen prompts to proceed.
Remote Desktop Black Screen then Disconnect
Fix 1: Use an HDMI Dummy Plug
An effective method to troubleshoot "remote desktop black screen then disconnect" is to get a dummy HDMI plug. This tricks the GPU into believing that you're connected to an actual display, overcoming the black screen problem.
Fix 2: Disable UDP Protocol in Group Policy Settings
In this workaround, you need to disable the RDP UDP protocol on the home PC. This can be done easily through the Local Group Policy Settings.
Step 1: Press "Win + R" and run the "gpedit.msc" prompt.
Step 2: Navigate to the below path:
Computer Configuration > Administrative Templates > Windows components > Remote Desktop Services > Remote Desktop Connection Client.
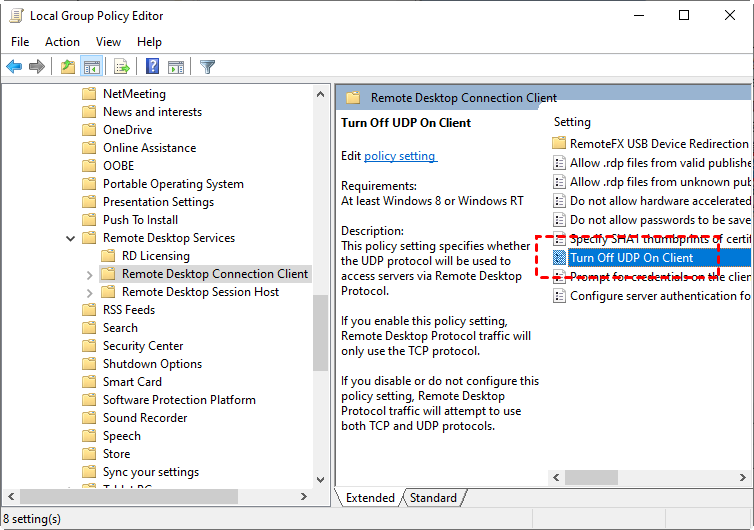
Step 3: Double-click the "Turn off UDP On Client" option and set it to "Enabled."
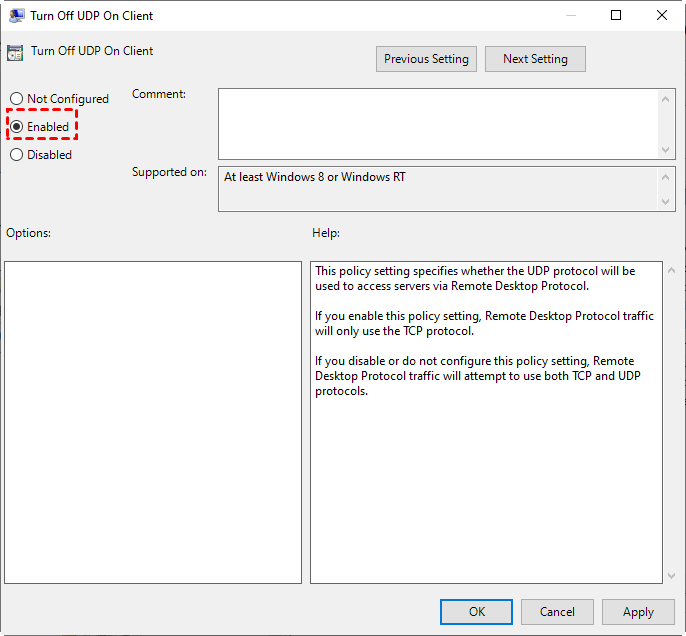
This will disable the UDP support for RDP connections, improving the performance of remote sessions on your Windows. Reboot the device after applying the changes.
Fix 3: Restart Remote Desktop Services
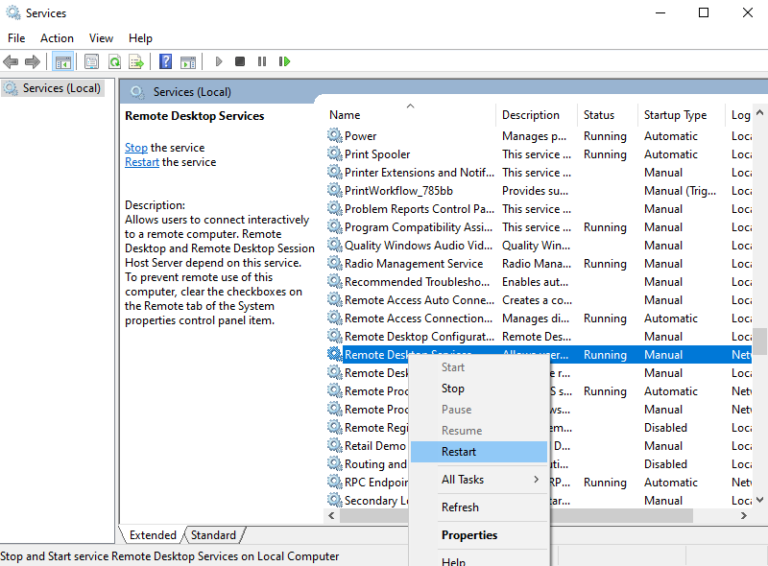
If the issue lies in the Remote Desktop service itself, it can be resolved by restarting the service.
Step 1: Search Services from the Start menu.
Step 2: Swipe down to Remote Desktop Service and right-click it.
Step 3: Select Restart.
Remote Desktop Black Screen Multi-monitor Setups
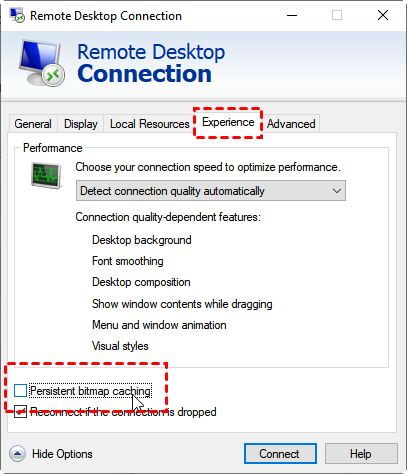
Fix 1: Disable Bitmap Caching
If the remote desktop black screen still pops up after the color adjustment, time to disable the bitmap caching. Doing this bars the RDP client from storing cache files which significantly improves its overall importance.
To disable bitmap caching:
Step 1: Open Remote Desktop Connection from the Start bar.
Step 2: Click Show Options and go to the Experience tab.
Step 3: Uncheck the "Persistent bitmap caching" option and click Connect.
Fix 2: Adjust Display Settings
Sometimes, the display settings on your desktop cause compatibility issues with Remote Desktop Client. Fixing it requires setting the optimum display configuration for a seamless remote connection.
For this:
Step 1: Right-click anywhere on your desktop screen and select "Display Settings."
Step 2: Under the "Scale & Layout" section, change the Display Resolution to a lower option like 640 x 480.
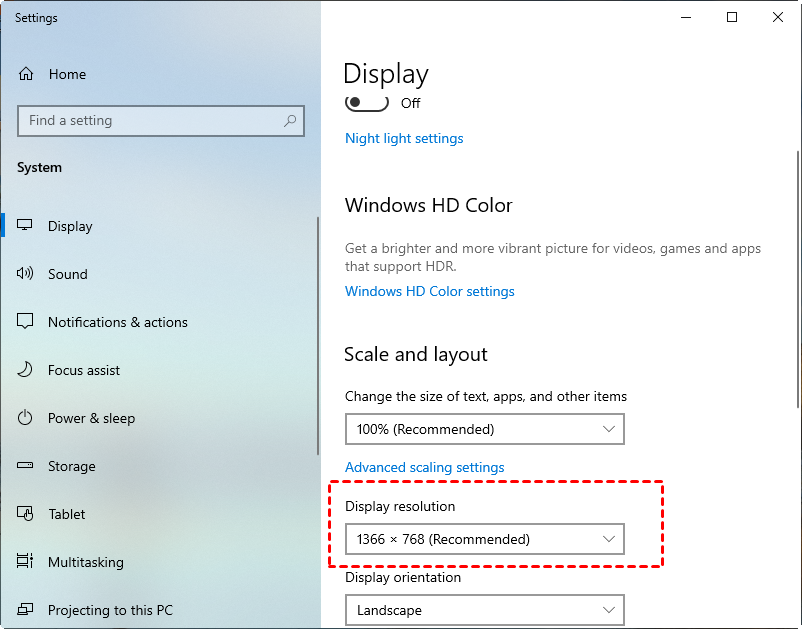
Now, check if the black screen on Remote Desktop still appears or not. If yes, keep reading.
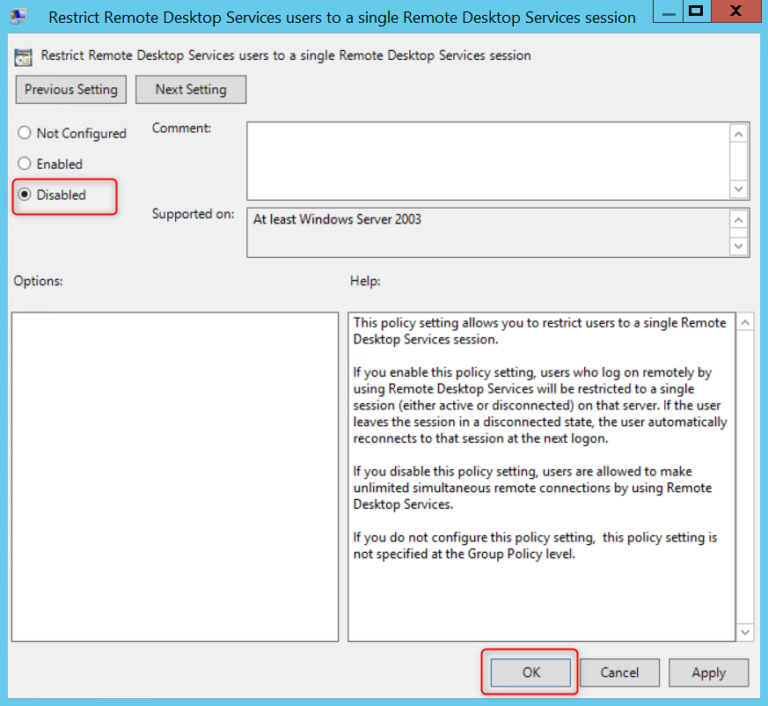
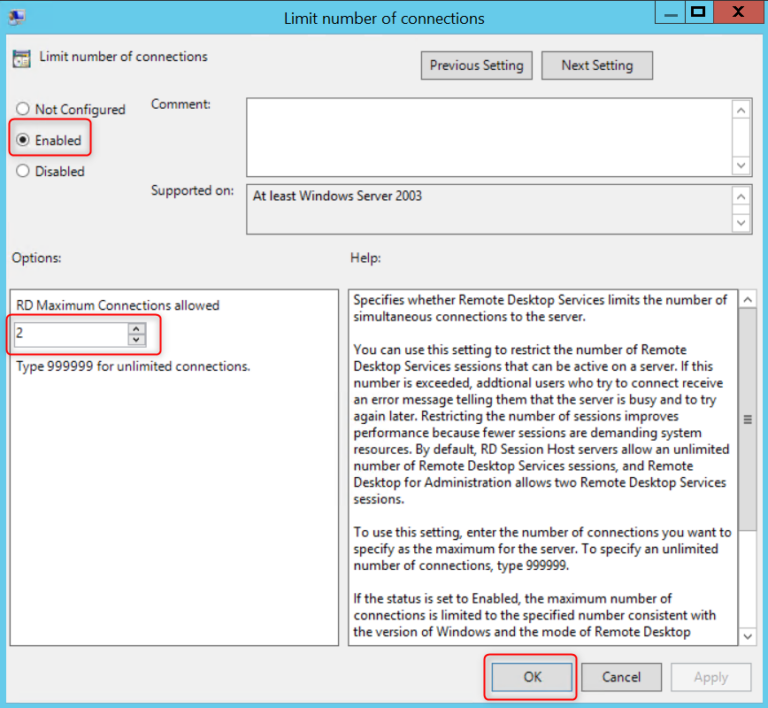
Fix 3: Limit RDP Concurrent Sessions
RDP allows 2 connections simultaneously on a free account while the number expands to 10 for paid users. However, if multiple users are logged into the session, it sometimes creates interference issues and you might encounter the "remote desktop black screen then disconnect" issue.
The best practice is to limit the concurrent sessions to a single user. For that:
Step 1: Open the Group Policy and go to:
Computer Configuration\Administrative Templates\Windows Components\Remote Desktop Services\ Remote Desktop Session Host\Connections
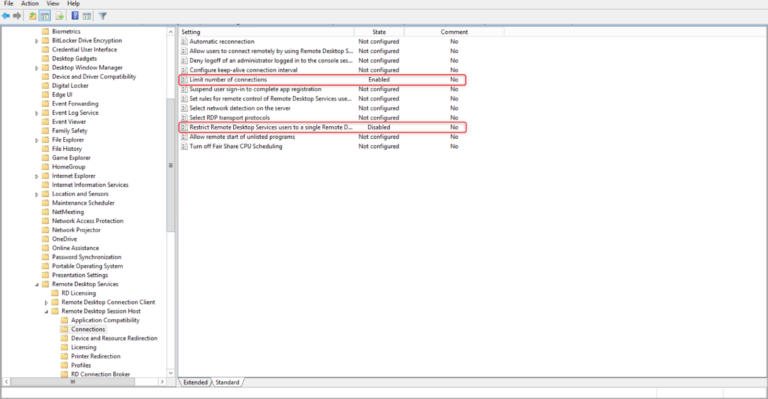
Step 2: Make sure:
- Double-click the "Restrict Remote Desktop Services users …" option and set it to Enable.
- Now, double-click "Limit number of connections" and set the value to 1.
Other Workarounds to Eliminate Black Screen Remote Desktop
In addition to these fixes, you can try several other simple tips if the black screen on remote desktop Windows 10 keeps on appearing frequently.
Tip 1: Run a Second RDP Connection
Many users have verified that initiating a new RDP session on the host device can eliminate the black screen error. But be sure to set the Display Configuration to a low resolution before connecting.
Tip 2: Disable Printer/Smartcard Sharing
Sometimes, turning off the File and Printer Sharing option can remove the black screen on remote desktop. For this:
- Head to Control Panel > Network.
- Right TCP/IP->Dial-up Adapter and select Properties.
- In the Bindings tab, uncheck File and Printer Sharing.
- Restart the PC.
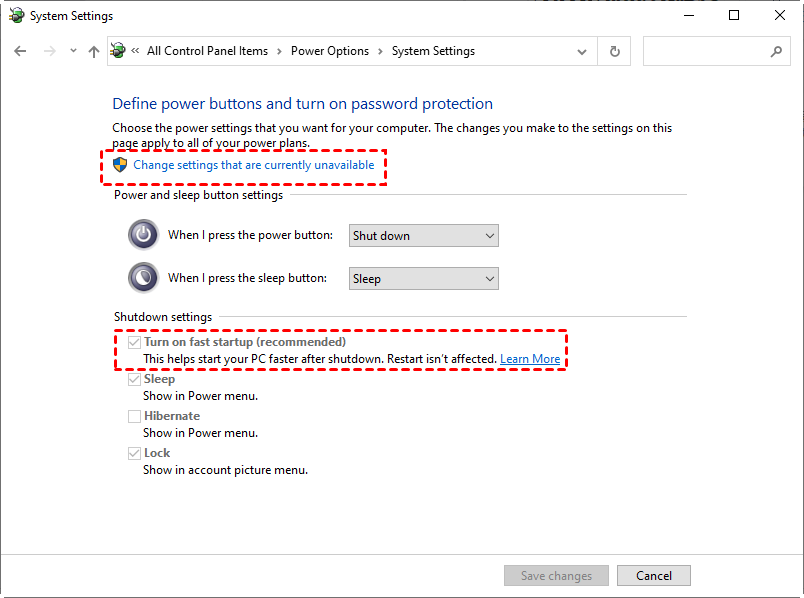
Tip 3: Disable Fast Startup
If you have enabled the Fast Start function, consider disabling it. To do this:
- Go to the Control Panel and click Large icons.
- Now, select Power Options > Choose what the power buttons do > Change settings that are currently unavailable.
- Here, uncheck the "Turn on fast startup" option.
Prevention Tips
Troubleshooting the remote desktop connection black screen error is both frustrating and time-consuming. To avoid experiencing it in the first place, consider the below tips:
- Always install the pending Windows updates on your PC.
- Update the video drivers regularly.
- Use consistent display and resolution settings when accessing the remote desktop.
- Ensure a stable internet supply for seamless connectivity.
Causes of Black Screen on Remote Desktop
Before jumping to solutions, let us take a quick look at the potential reasons behind the remote desktop black screen error:
Firewall Restrictions: The Windows firewall configuration might block the Remote Desktop service, affecting its normal functioning.
Buggy RDP Service: The RDP service on the host or remote device can experience a glitch or background interference with an app.
Outdated Drivers: Corrupt or outdated display drivers is the leading factor of remote desktop black screen.
Incorrect Display settings: Setting higher display settings on your host machine can create compatibility issues with the remote desktop screen.
Alternatives to Remote Desktop for Error-Free Connection
To get rid of the problem of the remote desktop black screen permanently, consider switching to an efficient remote desktop solution.
Alternative 1: RustDesk
Released in 2020, RustDesk is a powerful remote desktop alternative that allows users to access remote PCs effortlessly. It offers a range of powerful features to handle the virtual screen more effectively.
Key Features
- File transfer capabilities
- Easy integration with other tools
- Multi-monitor support
- Session recording
- Cross-platform compatibility
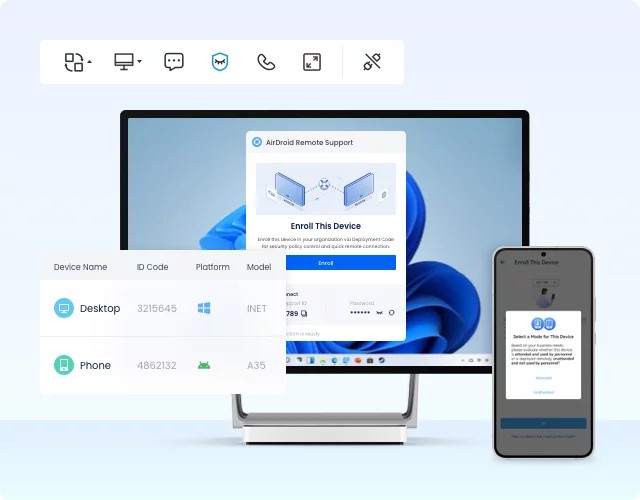
Alternative 2: AirDroid Remote Support
With support for multiple connections, AirDroid is a go-to tool to say goodbye to remote desktop black screen problems. It ensures a stable, consistent, and lag-free remote experience even at slow internet speeds.
Key Features
- One-click unattended access (from both Windows and Mac)
- Advanced AES-256 encryption
- State-of-the-art privacy mode by forcing a black screen on the remote desktop
- Real-time screen sharing to provide troubleshooting tips
Why Choose AirDroid
The biggest plus of this tool is its sleek and friendly interface. Without any prior knowledge, you can set it up and navigate its features to complete your remote tasks. Moreover, it offers the cheapest premium packages to let everyone use this remarkable software for personal or commercial use.
FAQs
Q1: What should I do if my remote desktop session shows a black screen and then disconnects?
If the black screen disconnects after connection:
- Update the display drivers.
- Configure the display settings on your local machine (set it to a lower value).
- Close the Explorer.exe file in the Task Manager.
Q2: How do I fix a black screen on my virtual desktop?
Implement the below solutions one by one:
- Update GPU drivers.
- Disable "Bitmap caching" in Remote Desktop Connection.
Q3: Is there a specific solution for remote desktop black screen issue when using Ubuntu?
To fix this issue on the Ubuntu machine, enter the below commands one by one:
- sudo apt install xrdp
- sudo systemctl enable xrdp
- sudo ufw allow from any to any port 3389 proto tcp




Leave a Reply.