Remote Desktop Can't Connect to the Remote Computer – How to Resolve
Remote Desktop Connection is a tool that helps many users in their daily lives. Indicatively, you can use RDC to work from home, access your work computer while you are away, troubleshoot an issue on a remote server, and even use it for personal reasons. This is the reason why the issue "Remote Desktop can't connect to the remote computer" is so frustrating.
However, you can resolve this common issue and continue your work uninterrupted. In this article, you will find what methods fix the issue "this computer can't connect to the remote computer".
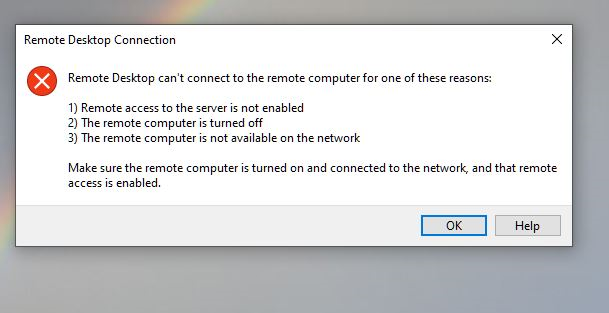
Part 1. What Does "Remote Desktop Can't Connect to the Remote Computer" Mean?
An error message is usually a cause for worry. Therefore, you might be anxious to learn what it means when you see the "Remote Desktop can't connect to the remote computer" issue. In reality, this is an indication that the RDC client is unable to establish a remote connection due to numerous reasons. For this, it is important that you are aware of what might be causing it to apply the appropriate fix.
When you see "this computer can't connect to the remote computer", then it means that you have encountered one of the most common scenarios. For instance, you might be having network issues or your firewall is restricting the connection. Moreover, you might have incorrect remote desktop settings or simply have used incorrect or expired credentials. Regardless of the scenario though, this issue can have a huge impact on your productivity as it prevents you from reaching out to the remote device.
Part 2. Possible Causes of "Remote Desktop Can't Connect to the Remote Computer"
But what can be the cause of the "Remote Desktop can't connect to the remote computer" error message? Correctly identifying it is the first step toward resolving it. Here is a list of some common reasons behind this issue:
- Network Connectivity Issues: The speed and stability of your Internet connection play a significant role in remote connections.
- Remote Desktop Settings Misconfiguration: You might encounter the issue due to incorrect settings on the host computer.
- Firewall Blocking: Your firewalls or antivirus might be blocking the remote connection because they flag it as dangerous.
- RDP Port 3389 Blocked: Port 3389 might be blocked by a firewall or network configuration, which prevents remote connections.
- DNS or IP Address Issues: Incorrect DNS settings or an incorrect IP address can cause various issues, including this particular one. Incorrect DNS settings or an incorrect IP address can cause various issues, including this particular one.
- Group Policy Settings: Your organization’s policies might prevent remote connections.
Part 3. Solutions for "Remote Desktop Can't Connect to the Remote Computer" Error
Now that we have identified the potential causes, we can start looking at possible solutions based on them. Here are the most effective methods to resolve the "Remote Desktop can't connect to the remote computer" issue:
1Check Network Connection
Since having a stable internet connection is essential for remote connection, this is the first thing you need to check. Here are the steps to do it:
- Step 1.Check if both the client and host computers have an internet connection. Furthermore, you can try moving closer to the router and try a wired Ethernet connection.
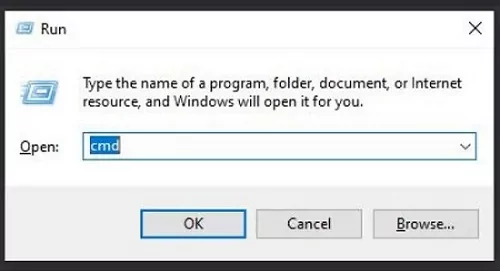
- Step 2.Press Win + R and type cmd to open the Command Prompt.
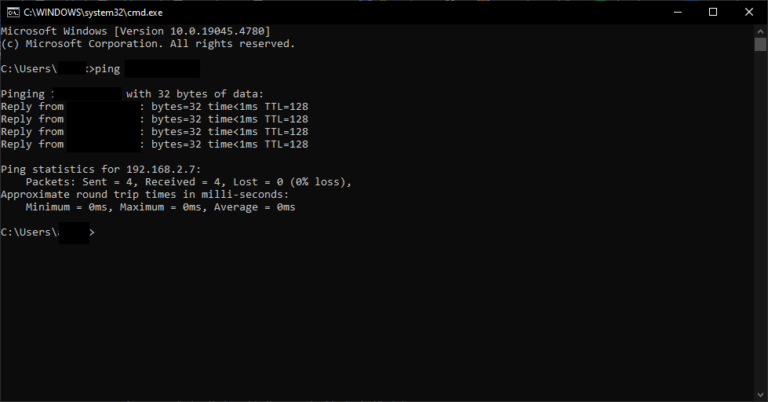
- Step 3.Type the command ping [remote IP address] and press Enter. If the ping fails, then you have a network issue.
2Verify Remote Desktop Settings
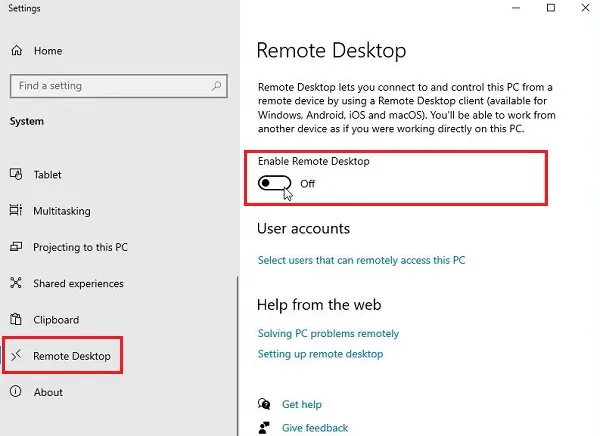
If the issue stems from misconfigured settings on the remote computer, then here are the steps you need to take:
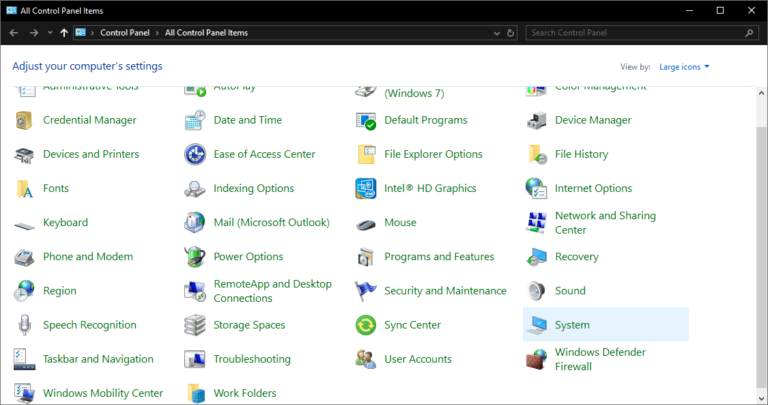
- Step 1.On the remote computer, open the Control Panel and click on System.
- Step 2.Click on Remote Desktop in the left sidebar and ensure that remote desktop is enabled.
- Step 3.Moreover, make sure that the Allow remote connections to this computer option is selected. If the issue persists, you can also try temporarily unchecking the option Allow connections only from computers running Remote Desktop with Network Level Authentication (recommended).
3Adjust Firewall Settings
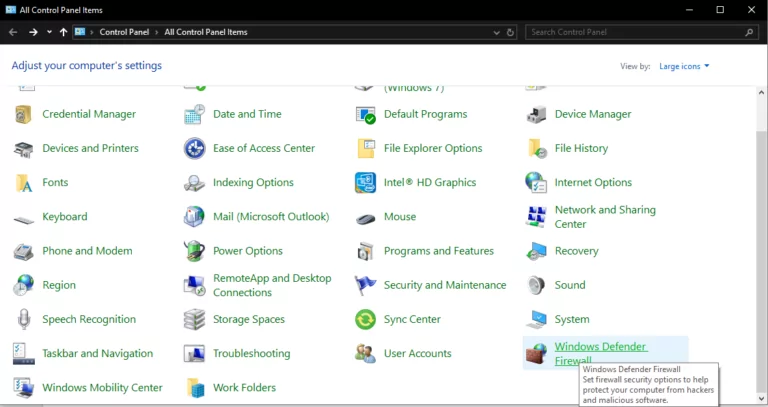
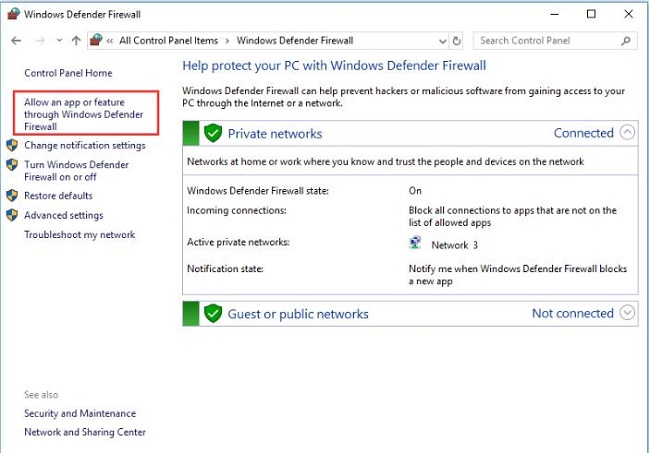
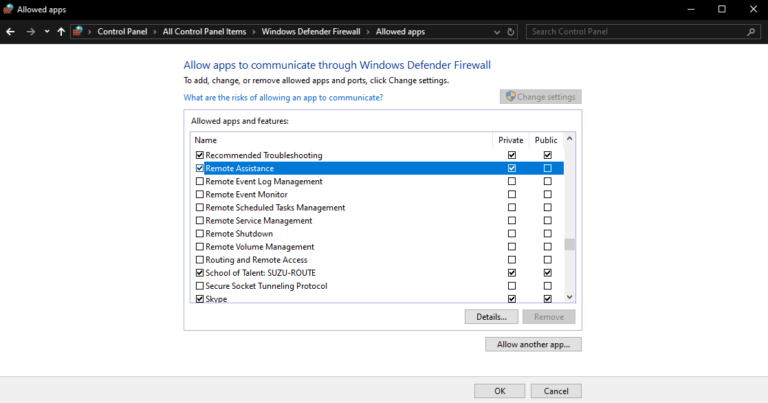
In the case where your firewall is blocking the remote connection, here is what you need to do:
- Step 1.On both the client and host computers, go to the Control Panel and click Windows Defender Firewall.
- Step 2.Click on Allow an app or feature through Windows Defender Firewall in the sidebar.
- Step 3.Locate Remote Desktop and ensure that both Private and Public boxes are checked. If not, click the Change settings button and check them.
4Check the RDP Port Configuration
The default port that RDC uses is port 3389. Here is how to ensure that it‘s not blocked:
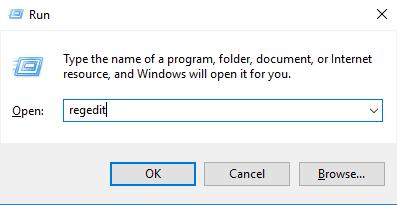
- Step 1.Press Win + R and type regedit to open the Registry Editor.
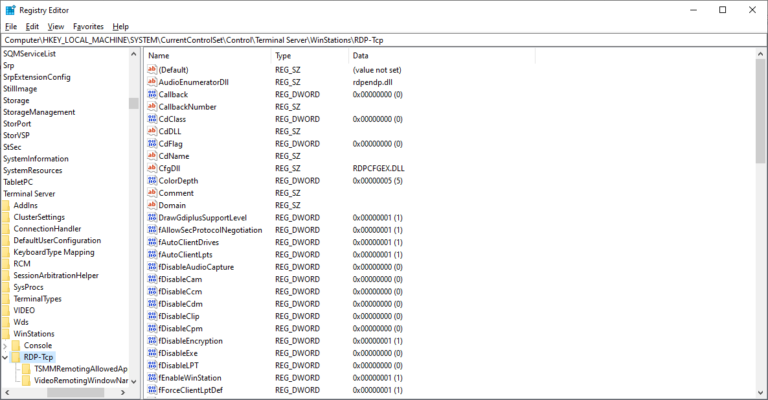
- Step 2.Go to HKEY_LOCAL_MACHINE\System\CurrentControlSet\Control\Terminal Server\WinStations\RDP-Tcp.
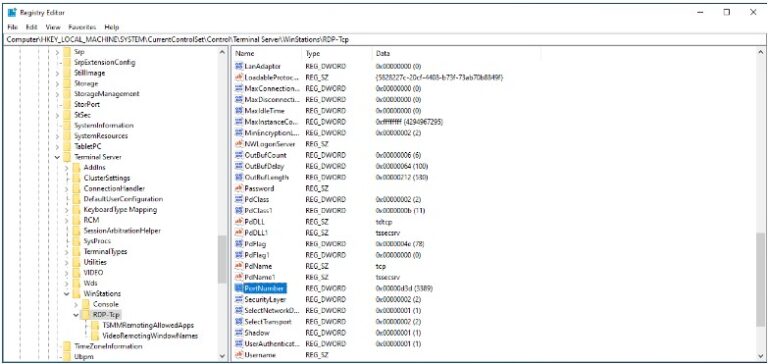
- Step 3.Find the file PortNumber and ensure it’s set to 3389.
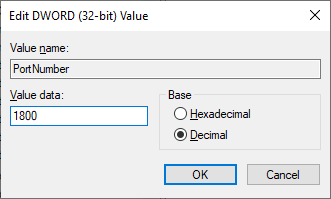
- Step 4.If not, double-click on PortNumber, type it in the Value data field, and click OK.
5Confirm the Correct IP Address
To establish a remote connection, you need to know the IP address of the remote device. Here is how to ensure that you have the correct one:
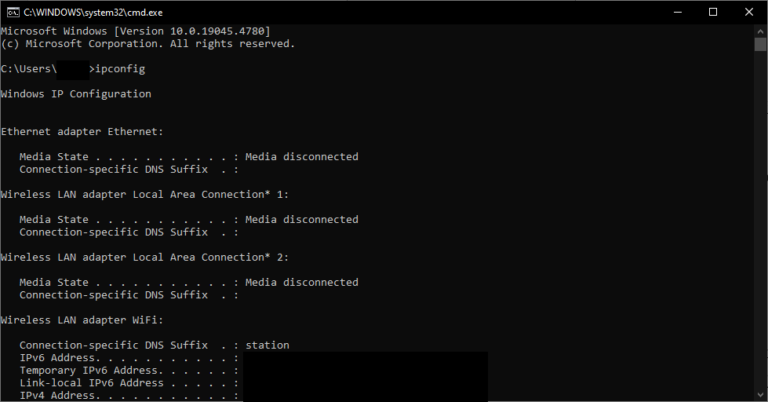
- Step 1.On the remote device, open Command Prompt.
- Step 2.Type ipconfig and press Enter. The IP address is the number next to IPv4 Address.
6Check Group Policy Settings
If you are in a corporate setting, then it’s possible that your organization‘s Group Policy is causing this issue. Here is what you can do to resolve it:
- Step 1.Press Win + R and type gpedit.msc to open the Group Policy Editor.
- Step 2.Go to Computer Configuration > Administrative Templates > Windows Components > Remote Desktop Services > Remote Desktop Session Host > Connections.
- Step 3.Find the policy Allow users to connect remotely using Remote Desktop Services and ensure that it’s set to enabled.

Part 4. A Better Remote Desktop Solution
While knowing how to troubleshoot the issue "this computer can't connect to the remote computer" is very helpful, sometimes you need a more reliable remote support solution. AirDroid Remote Support is a powerful alternative that allows you remote access in just a few, simple steps. The tool has been designed to meet the demands of professionals and individuals. For this reason, it comes with a set of features that cover all of your needs.
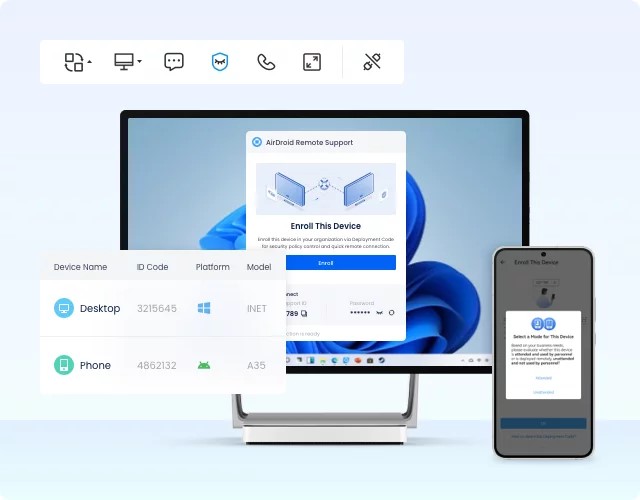
Indicatively, some key features of AirDroid Remote Support are: s
- Easy Setup and Connection: AirDroid Remote Support has a quick setup process and an even quicker connection. In fact, you have to option to register your remote devices, which allows you to connect to them with just one click.
- Screen Sharing and Remote Control: Take full attended and unattended remote control of your devices. Moreover, you can also share your screen in real time for more efficient remote assistance.
- File Transfer, Chat, and Voice Chat: Securely transfer files between devices, while you can also communicate via the built-in chat and voice chat.
AirDroid Remote Support also stands out for how user-friendly and easy-to-use it is. Here is how to establish a remote connection with this tool:
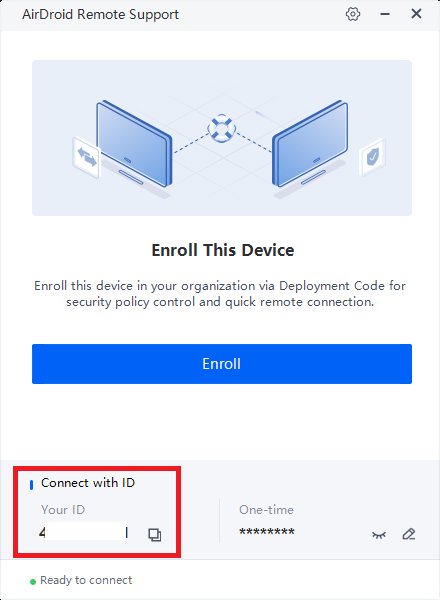
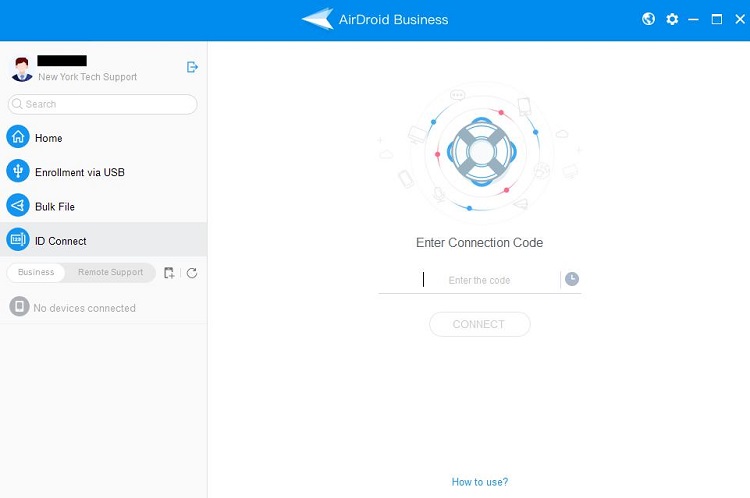
- Step 1.Get AirDroid Remote Support on the remote computer and AirDroid Business on the client. Moreover, create your free AirDroid account.
- Step 2.Launch AirDroid Remote Support on the remote computer and not the 9-digit that you will find.
- Step 3.Launch AirDroid Business on the client and type the 9-digit code at the ID Connect tab. Click Connect to establish the connection.
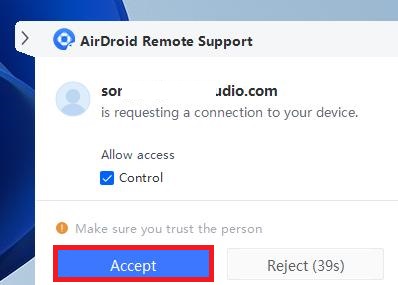
- Step 4.Click Accept on the remote computer to establish the remote session.
In Conclusion
Now you know what it hides behind the “Remote Desktop can’t connect to the remote computer” error and how to resolve it. However, if you are seeking another remote access solution, then AirDroid Remote Support is the tool you need to try. With a set of advanced features, it makes remote access and management easier than ever before. Try AirDroid Remote Support today for free and experience seamless and uninterrupted remote connectivity.


Leave a Reply.