2025 Update | How to Transfer Files Between Remote Desktop and Local PC
Windows Remote Desktop Connection provides the easiest way to control remote PCs. However, we also sometimes want to transfer files alongside remote control. For example, you may have an important work file in your home computer that you want to transfer to your work computer.
There are multiple ways for remote desktop file transfer. In this guide, we will teach the four best ways to effortlessly perform RDP file transfer.

Method 1. Transfer Files from Remote Desktop via Copy/Paste
The easiest of all ways is the simple copy/paste approach. You can directly open the local folder in the remote desktop window, select the file or folder you want to transfer, and copy and paste it into the folder on the local desktop.
Follow the below simple steps to perform Remote Desktop file transfer via copy/paste approach:
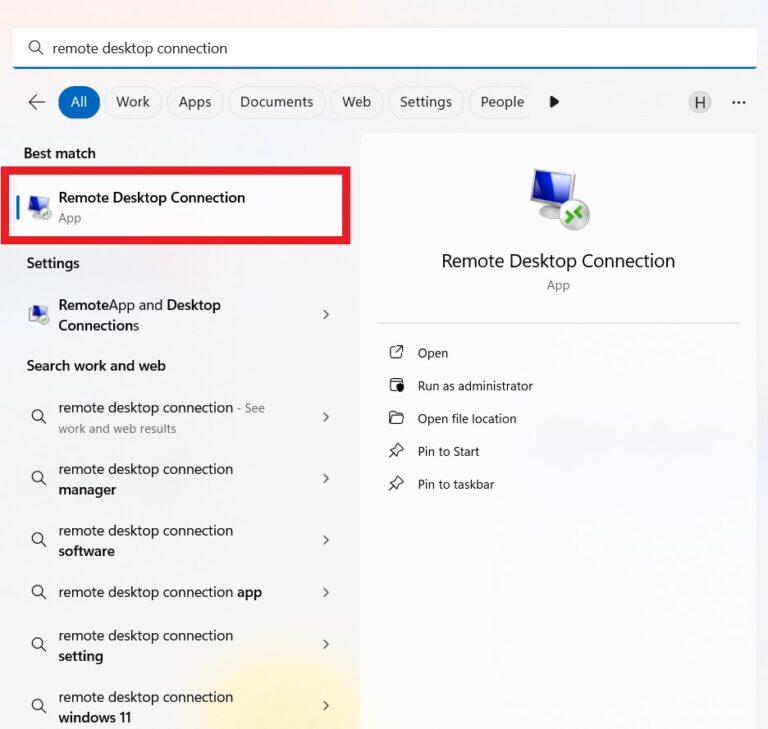
- Step 1.Open the Start menu, search for Remote Desktop Connection, and open it.
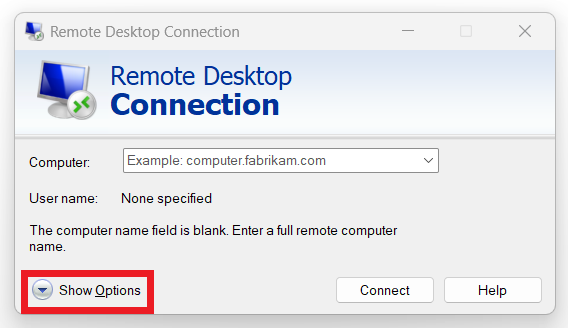
- Step 2.Click the Show Options button.
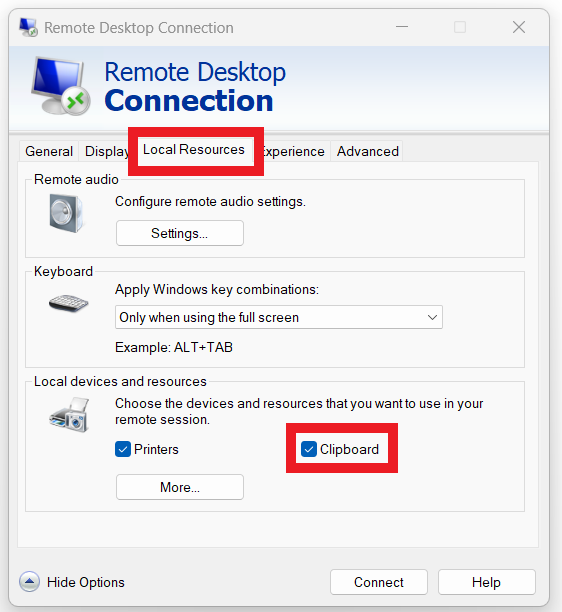
- Step 3.Under the Local Resources, tick the Clipboard checkbox. This setting allows you to copy-paste files/folders between local and remote PCs.
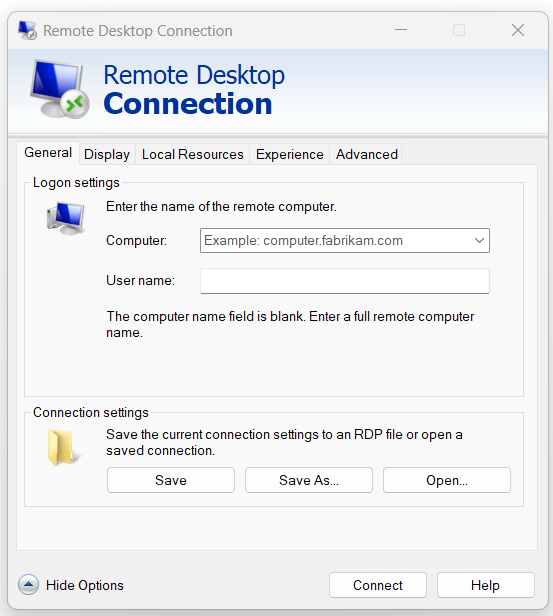
- Step 4.Go back to the General tab and connect to the remote computer by entering its IP address.
- Step 5.After establishing the remote connection, select the file from the remote desktop you want to transfer and click Ctrl + C to copy.
- Step 6.Go to the folder in your local PC where you want to paste the file, and click Ctrl + V to paste.
This way, you can effortlessly transfer files from a remote desktop.
Troubleshooting Copy/Paste Issues
Some users have reported the "No, clipboard only works for text" issue. This issue causes them to only copy text, not files. To resolve this issue:
- 1.Make sure you have enabled Clipboard settings before connecting to the remote desktop.
- 2.Restart rdpclip.exe, as it handles the copy/paste functionality. To do so, open Task Manager, search for rdpclip.exe, and tap End Task. Afterward, click File > Run new task, type rdpclip.exe, and press Enter to restart it.
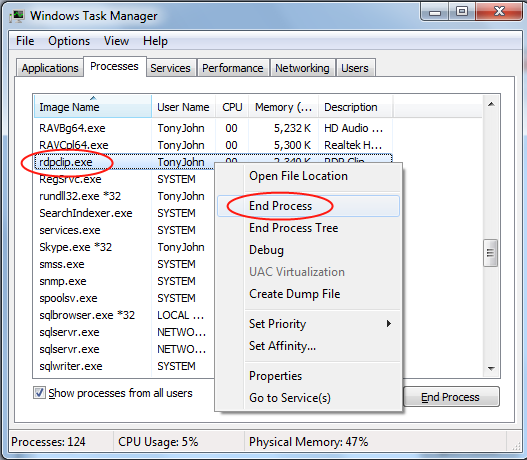
In addition, remember not to copy any other file when the current file is being transferred. Otherwise, you will interrupt the file transfer, and an error will pop up.
Method 2. Using the File Transfer Function of Microsoft Remote Desktop
Microsoft Remote Desktop has a dedicated File Transfer function. Through this function, you can access all the remote computer's drives from the "This PC" section on your local computer. This enables smooth file transfers, similar to those between local folders.
Here's how to perform remote desktop file transfer using the RDP file transfer function:
- Step 1.Launch the Remote Desktop Connection window on your local computer and click Show Options.
- Step 2.Under the Local Resources tab, click More.
- Step 3.Tick the Drives checkbox and click OK.
- Step 4.Go to the General tab and connect to the remote computer by entering its IP address.
- Step 5.Open This PC. You will see the accessible drives under the Devices and drives section.
- Step 6.Copy/paste the files and folders from the shared drives easily.

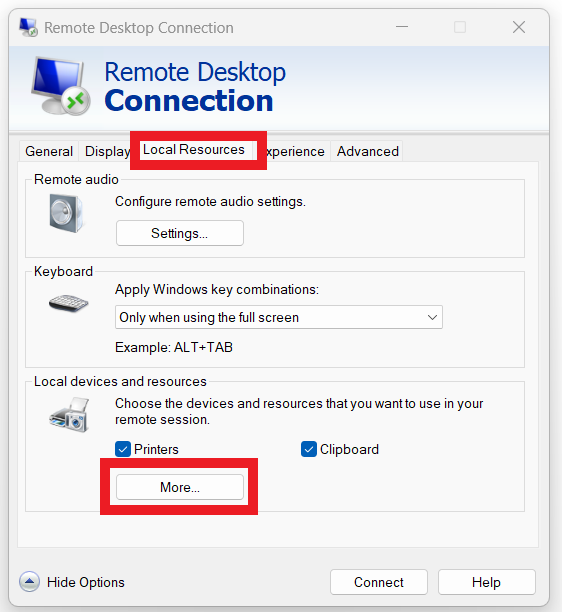
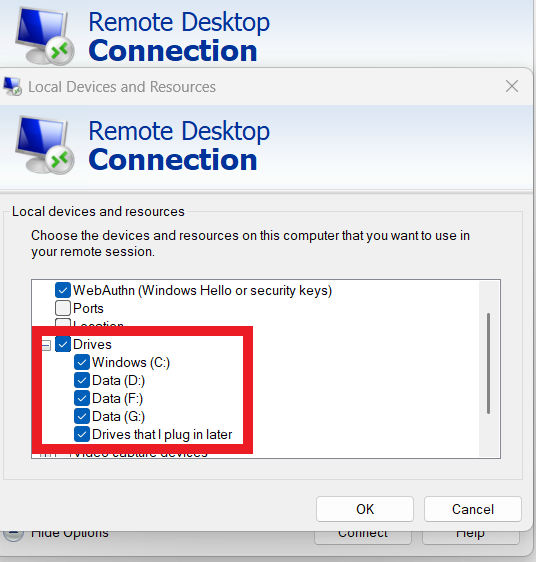
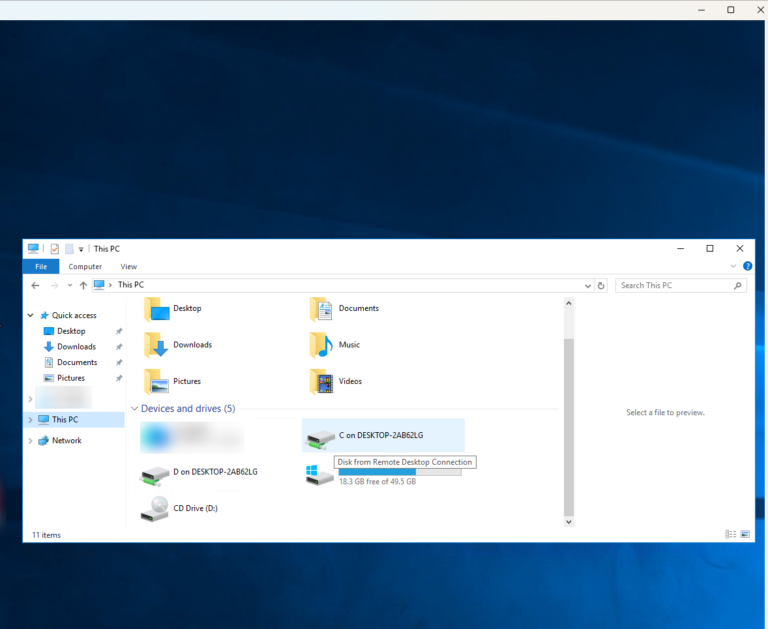
That's how you can easily leverage the file transfer function of Remote Desktop to transfer files securely.
Method 3. Transfer Files from Remote Desktop via FTP
File Transfer Protocol (FTP) is a widely used way to send a high volume of files between local and remote computers over the network. It follows a client-server model, where you must set up an FTP server on the remote computer and an FTP client on the local computer. Afterward, you can transfer files between local and remote computers with a simple drag-and-drop approach.
Follow the steps to perform RDP file transfer via FTP:
Step 1. Create an FTP Account
You have to create an FTP account. To do so, go to your cPanel account through https://yourdomain.com/cpanel. Here, replace "yourdomain.com" with the actual domain or the provided URL.
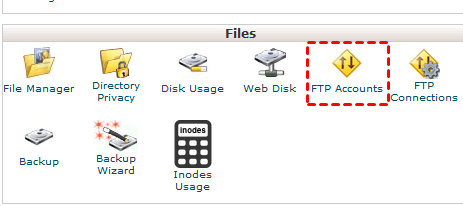
From the cPanel dashboard, click FTP Accounts.
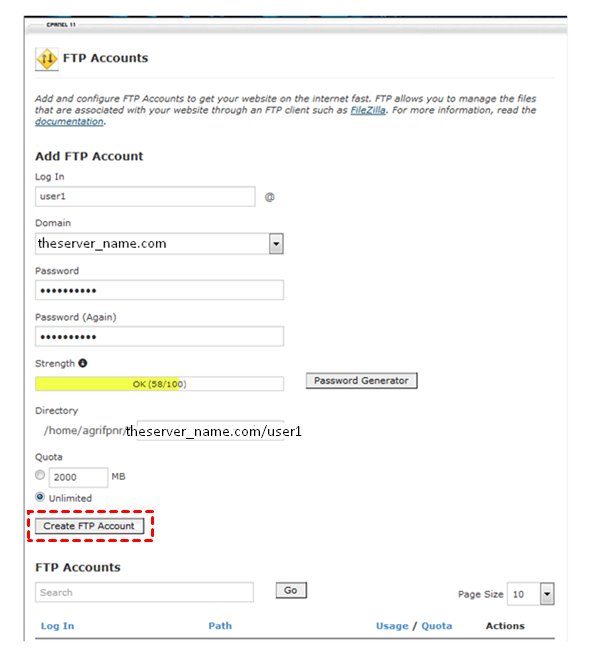
Enter the required details, including:
- Log In: Username for the new FTP account.
- Password: A strong password.
- Directory: Specify the directory accessible to the FTP account.
Fill in the other details asked and click Create FTP Account.
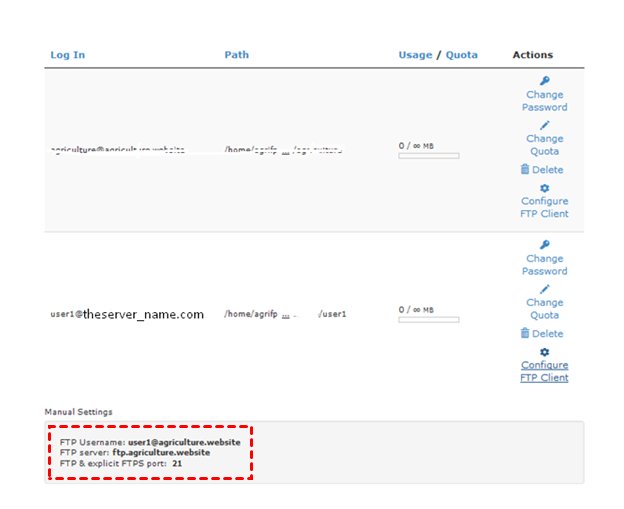
Once the FTP account is created, you will be able to see its account details in the cPanel dashboard, such as username, server, and port.
Step 2. Install the FTP Client
Next, you have to install the FTP client on your local desktop. You can choose any FTP client, such as WinSCP, FileZilla, etc. Let's pick WinSCP.
Go to the WinSCP website and download and install the tool.
Step 3. Configure WinSCP Client and Make the Connection
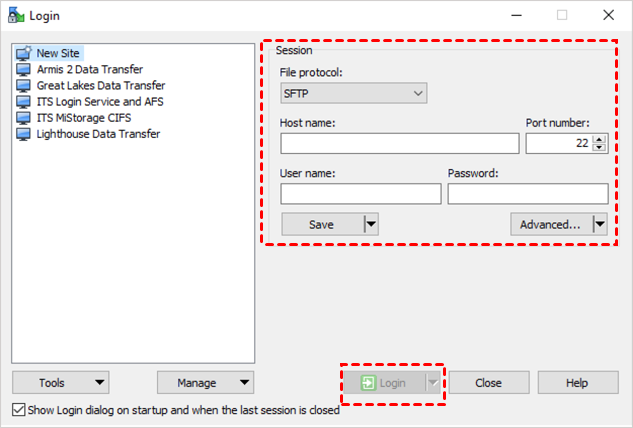
Launch WinSCP. On the login page, enter the required details, including:
- File Protocol: Select the protocol to use for the connection, such as FTP, SCP, or SFTP.
- Hostname: Input the remote server's IP address or domain name.
- Port Number: Specify the port number (the default port is 22).
- Username: Provide the username associated with the remote server.
- Password: Enter the password for authentication.
After entering all the details, click Save. Afterward, click the Login button to make the connection.
Step 4. Transfer Files
Now, you are all set to transfer files. You will have two panels, where the left panel presents a local desktop and the right panel presents a remote desktop. You can drag and drop files between them easily using the panel.
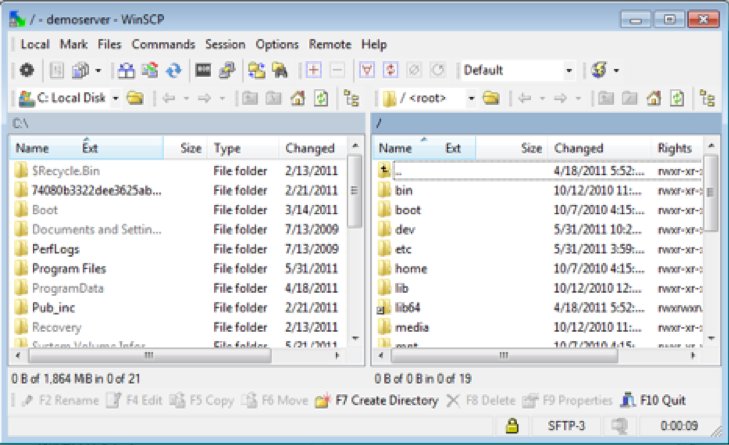
This way, you can use FTP to perform remote desktop file transfer. It does require a few additional steps but can facilitate secure data transfer.
Method 4. Transfer Large Files to Remote Desktop via AirDroid Remote Support
If you want to transfer many files or large files, AirDroid Remote Support is the perfect tool for it.
AirDroid Remote Support is a feature-packed remote access and control software. It incorporates a powerful "File Transfer" feature for smooth and secure transfer of many or large files.
Basically, AirDroid Remote Support allows you to link local and remote devices first and then use the File Transfer feature to copy-paste files from local to remote PC or remote to local PC. The entire process is click-based with no complex configurations.
Besides that, AirDroid Remote Support also allows you to share files during the remote control session using the chat section. Here are the simple steps to perform remote desktop file transfer with AirDroid Remote Support:
- Step 1.Install AirDroid Business on your local PC and AirDroid Remote Support on your remote PC.
- Step 2.Launch AirDroid Remote Support. Note down the 9-digit code.
- Step 3.Launch AirDroid Business on your local PC. Enter the connection code in ID connect section and click Connect.
- Step 4.On the remote PC, click Accept on the pop-up window.
- Step 5.After establishing the connection, click Message icon and you will see the chat window. Click the file icon to select and send files.
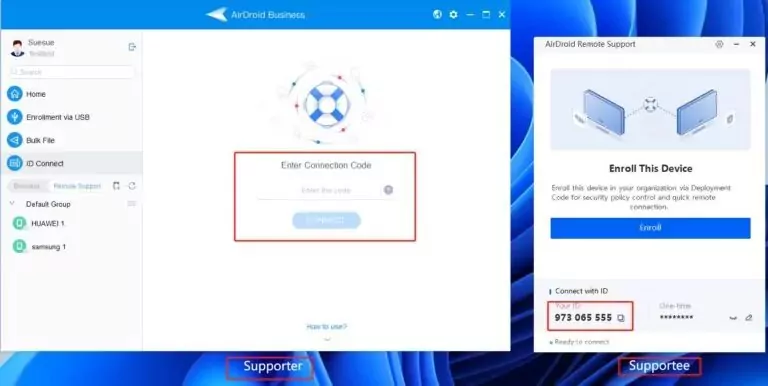
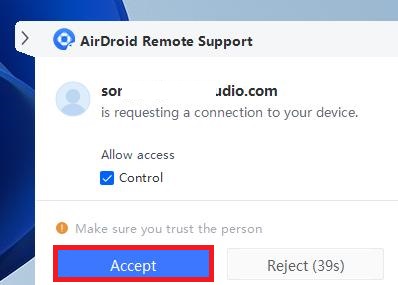
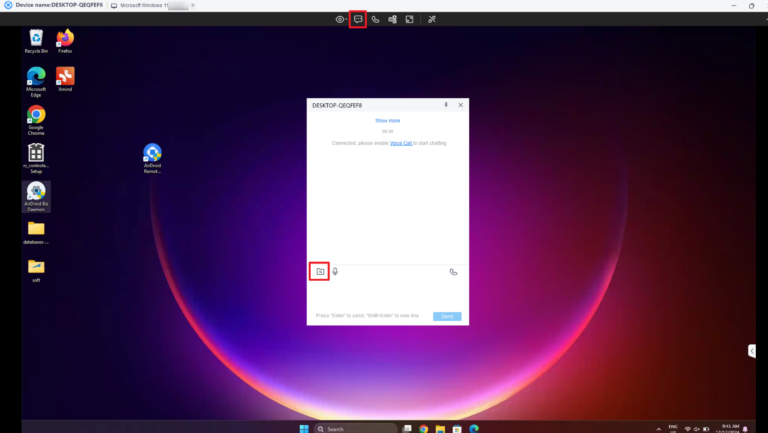
Other than file transfer, AirDroid Remote Support is your full-fledged remote access tool. So, some of the other features you can get with AirDroid Remote Support include:
- Real-time remote access and control of Windows and Android devices.
- Text messaging and voice communication during remote support.
- Unattended access mode
- Black screen mode
- Controllable clipboard and keyboard.
- Log remote access sessions.
- Assign permissions/policies for individuals, teams, and devices.
Overall, AirDroid Remote Support is your one-stop tool to remote control devices and share large files without any technicalities.
Conclusion
Remote desktop file transfer makes it easy to access files remotely anytime, anywhere. Above, we have learned four ways for RDP file transfer. You can use the copy-paste approach, file transfer function, FTP, or AirDroid Remote Support.
Out of all of them, our top pick is AirDroid Remote Support. There are two reasons for that. First, it allows smooth and secure transfer of any number of files. Second, it provides a wide range of features for a modernized remote control experience. Therefore, we will wrap up by recommending that you try AirDroid Remote Support and transfer files effortlessly.


Leave a Reply.