[Easy Guide] How to Setup Remote Desktop Port Forwarding
If you need to connect to your devices remotely, then chances are that you are already using Remote Desktop Protocol (RDP). This popular tool developed by Microsoft allows you to establish a remote connection with your devices quickly and effortlessly. One of the key elements that facilitates this remote connection is the remote desktop port forwarding, which ensures that remote desktop requests are correctly routed to the intended device in the network.
In this guide, we will walk you through the process of setting up RDP port forwarding and introduce a reliable alternative method for remote assistance.
Part 1. How to Configure Remote Desktop Port Forwarding
One of the most crucial things to do in remote desktop port forwarding is to change the default port, which is port 3389. This is because many RDP attacks are targeting this specific port since hackers know that most users don’t change it. Therefore, you can eliminate this risk by simply setting up RDP port forwarding for another port.
The steps for completing this task are the following:
Step 1 – Open your Registry Editor
- 1.Press Win + R, type regedit, and click OK. This will open your device’s Registry Editor.
- 2.At this stage, you can also back up your Windows Registry to ensure that any missteps won’t affect your work. To do that, click File and then Export.

Step 2 – Go to the RDP-Tcp Folder
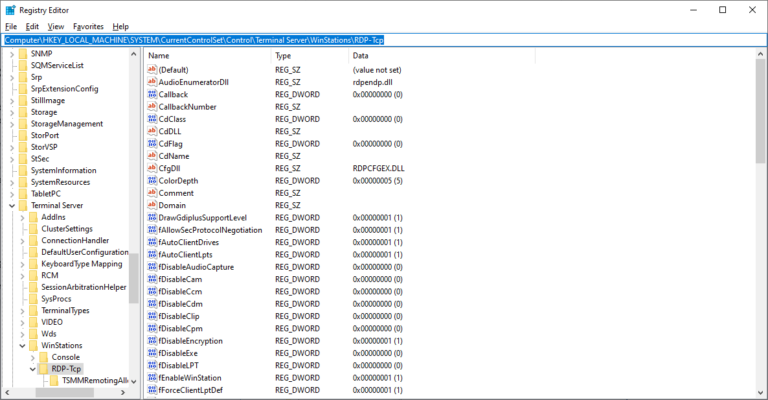
To find the RDP-Tcp registry key, go to the following path:
"HKEY_LOCAL_MACHINE\System\CurrentControlSet\Control\Terminal Server\WinStations\RDP-Tcp".
Step 3 – Change the Port Number
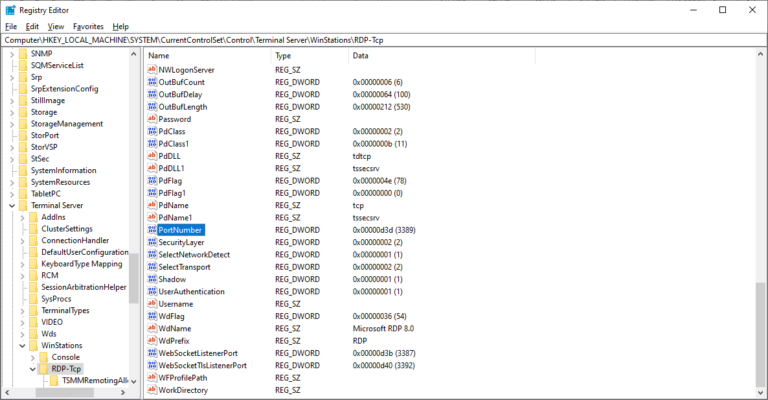
- 1.Find the entry PortNumber. Double-click on it to open its properties in order to change them.
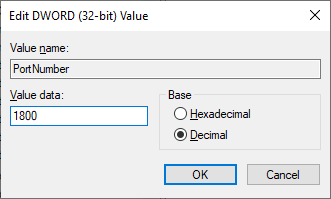
- 2.Insert a new value data that is between 1025 and 65535, and is different from 3389. Furthermore, select Decimal under the Base section.
- 3.Click OK to save the changes.
Step 4 – Note your IP Address
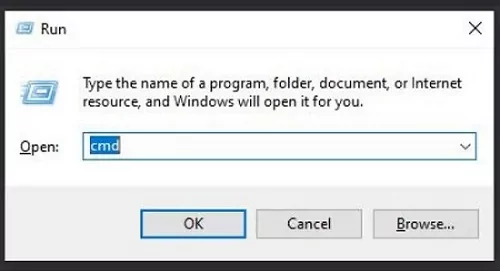
- 1.Press Win + R, type cmd, and click OK to launch the command prompt.
- 2.Type ipconfig and tap Enter.
- 3.Note the numbers next to the IPv4 Address.

Step 5 – Change Your Router’s Settings
- 1.Log into your router’s control panel. Type your router’s IP address on your web browser and type your credentials. Most routers include the username and password you will need to log in on the user manual or on a sticker that you will find at the back of your router.
- 2.Go to the port forwarding section, which might look be in the Advanced, Network, or NAT settings, depending on your specific router.
- 3.Create your new port forwarding rule. Remember to set it up for the port number you have entered during step 3.
- 4.Restart your router for the changes to take effect.
Part 2. How to Use Remote Desktop Without Port Forwarding
While remote desktop port forwarding is a common method for enabling remote desktop on your devices, it can pose security risks especially if you don’t change the default port 3389. An alternative solution to this is to use an app specifically designed for remote support and assistance. AirDroid Remote Support is a user-friendly tool that promises to become your go-to tool for your remote needs without the need for port forwarding.
AirDroid Remote Support is a powerful tool that aims to make remote assistance easier and more efficient than ever before. For this reason, it provides a robust set of features that allow you to perform any task you might need remotely. In more detail, the key features of AirDroid Remote Support that make it stand out are the following:
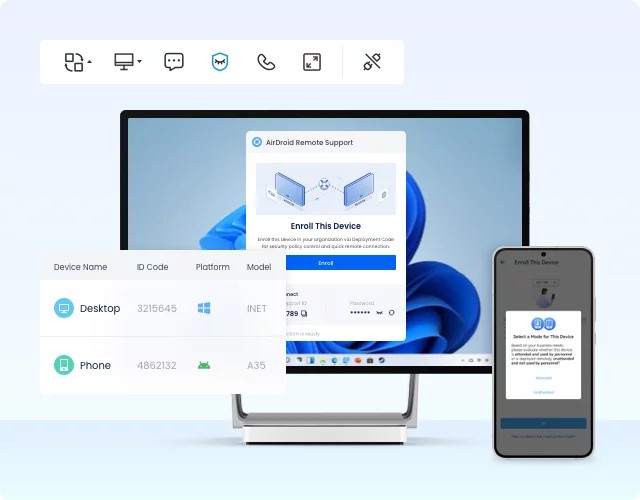
- It has a very easy setup process. Unlike RDP port forwarding, you don’t need to mess up with complicated router configurations.
- Gives you screen-sharing capabilities so that you can view and control the remote screen in real time.
- You can easily transfer files between your devices.
- It has several collaborative features, such as text and voice chat.
- It has a black screen mode that enhances your privacy when controlling an unattended device.
And what makes this app even more compelling is that it is super easy to install and use. Here is a detailed guide on how to use AirDroid Remote Support:
- Step 1.Install AirDroid Remote Support on Your Devices
- Before you can use AirDroid Remote Support, you must download it on your devices. Get the AirDroid Remote Support app on the remote device and the AirDroid Business app on the local device.
- Step 2.Start a Remote Connection
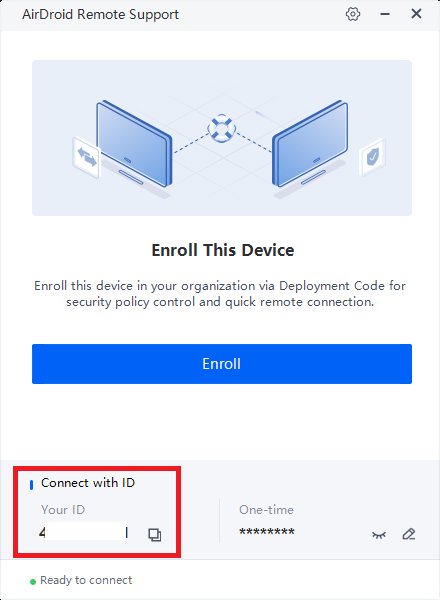
- Launch AirDroid Remote Support on the remote device. Locate and copy the 9-digit code under the Connect with ID section.
- Step 3.Establish the Remote Session
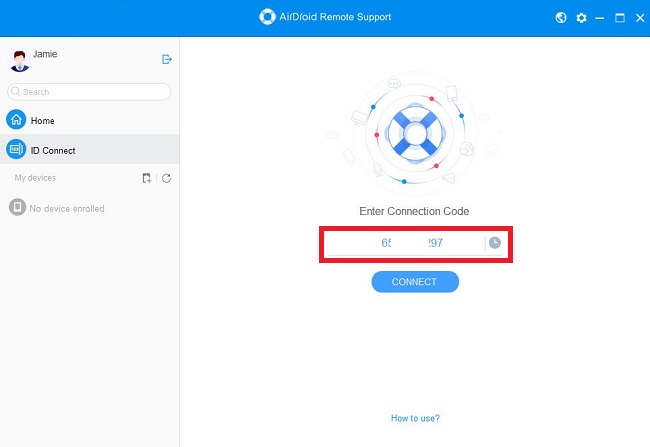
- Go to the local device, launch AirDroid Business, and type the 9-digit code. Click the Connect button.

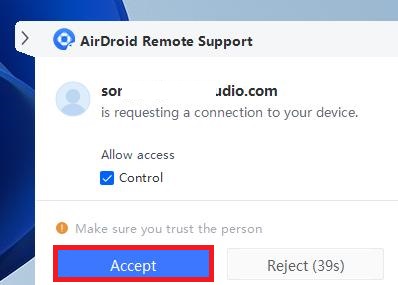
Accept the connection request on the remote device to establish it.

In Conclusion
Now you know how to set up remote desktop port forwarding so that you can access your computer from anywhere. However, if the process seems too complex or you want to avoid any potential risks, we recommend that you use a remote support tool that doesn’t involve port forwarding. One such secure remote desktop solution is AirDroid Remote Support which is an excellent choice for both personal and professional use. Create your account for free and start using AirDroid Remote Support immediately!




Leave a Reply.