[5 Methods] How to Remotely Manage Registry
Managing computer systems often means accessing hard-to-find settings in the operating system. Advanced users and IT professionals need to change registry values remotely. This is important for fixing problems and updating multiple systems without being at each computer. While everyday users don‘t usually access the registry, there are times when it’s necessary. Let‘s explore five simple methods for managing the Windows Registry remotely, so you have the tools to do it with confidence.
Part 1. Prerequisites for Remote Registry Management
Before you can remotely manage registry settings, there are a few important prerequisites to consider. Here's a brief overview of what you need to do:
Enabling Remote Registry Service
First of all, the Remote Registry service must be running on the target computer for remote access to work. You can enable this service through the Group Policy Management Console. Look for the option related to services under Computer Configuration.
Network and Firewall Settings
For remote registry management to function properly, you need to ensure that the appropriate network and firewall settings are in place. By default, the Windows firewall may block remote registry access, so you'll need to create a rule that allows traffic on the necessary ports. Specifically, allowing TCP traffic on port 445 is essential for enabling remote management.
User Permissions
The user account you use to connect remotely must have the necessary permissions to access and modify the registry. This means that the account should be part of the Administrators group on the remote machine.
Part 2. Methods to Remotely Manage the Registry
Now that we have covered the prerequisites for remote registry management, let's explore the various methods you can use to manage registry on your remote computer. We will discuss 4 different helpful methods in this section, and start with the first one using the Windows Registry Editor.
Method 1: Using Windows Registry Editor (regedit)
The Windows Registry Editor, commonly known as regedit, is a built-in tool in the Windows operating system that allows users to view and edit the Windows Registry. Regedit serves as a powerful interface that allows IT professionals and advanced users to connect to and modify the registry of another computer on the same network. Here's how you can remotely manage registry using regedit:
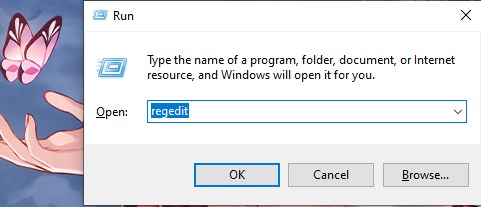
- Step 1.Open the Registry Editor by typing regedit in the Run dialog box. Then press Enter to launch the application.
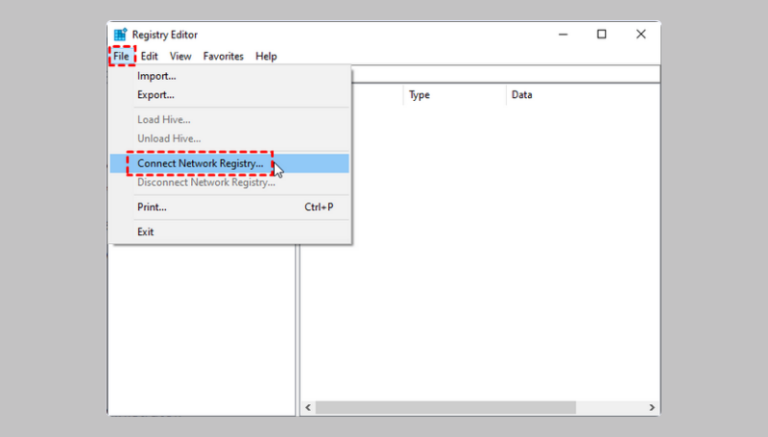
- Step 2.In the Registry Editor, go to the menu and click on File, then select Connect Network Registry.
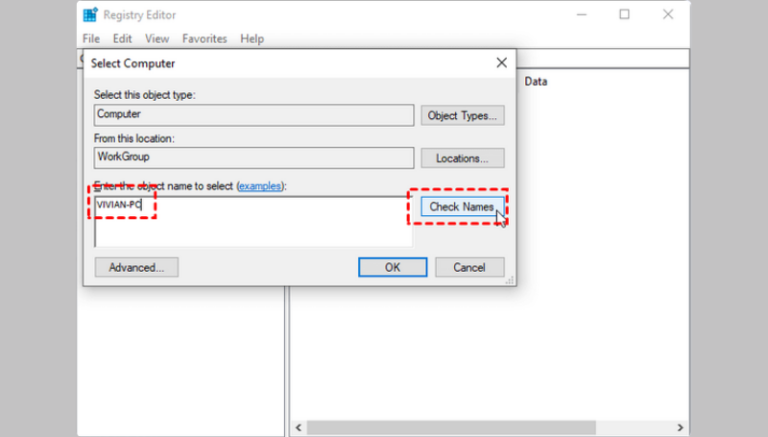
- Step 3.In the dialog box that appears, type the name of the computer whose registry you want to access.
- Step 4.Most simple networks will have the default settings for Object Types and Locations as Computer and the current workgroup. If you are on a more complex network, you may need to adjust these settings based on the workgroup or domain of the remote computer.
- Step 5.Click on the Check Names button and after a few moments, if the name is correct and the computer is accessible, you should see the remote computer's full path displayed.
- Step 6.If prompted, enter the credentials for an account on the remote computer that has access rights to the registry.
- Step 7.Once connected, you will see both your computer and the remote computer listed in the Registry Editor. You can now navigate through the registry of the remote machine.
- Step 8.With the connection established, you can view and edit the registry settings as needed. Be cautious while making changes, as incorrect edits can affect the system's performance.
Method 2: Using PowerShell
PowerShell is a powerful scripting language and command-line shell designed for system administration in Windows. It provides a wide range of cmdlets that allow administrators to manage system and network tasks efficiently. It allows users to remotely manage registry settings.
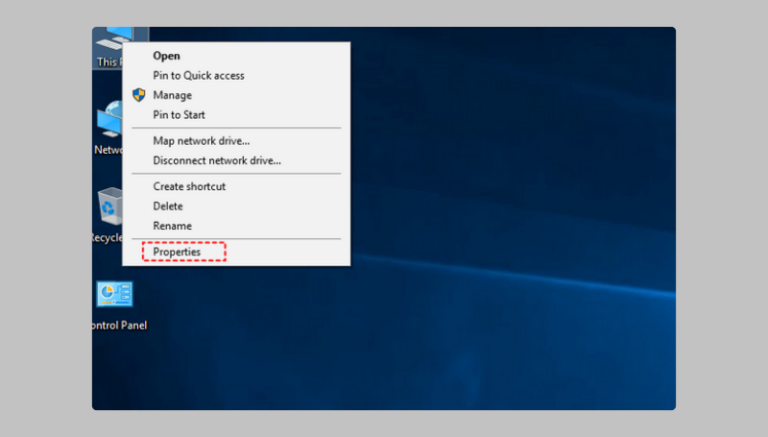
- Step 1.Before you start, you need the name of the remote computer. Right-click on This PC on the remote desktop, then select Properties and note down the device name.
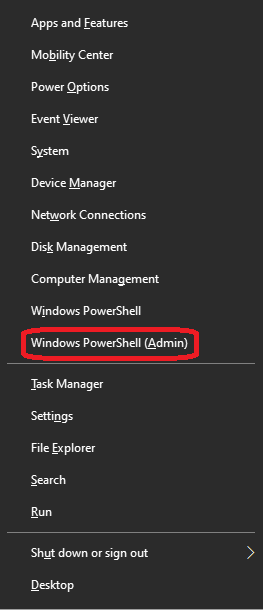
- Step 2.On your local computer, right-click the Start button and choose Windows PowerShell (Admin) to open PowerShell with administrative privileges.
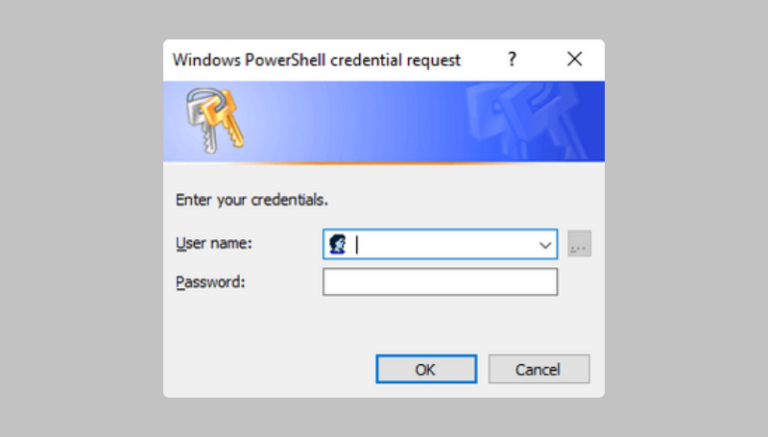
- Step 3.Enter the following command to get a credential object for the remote connection:
Get-Credential
You will be prompted to enter the username and password for an account on the remote computer. - Step 4.Now, use the following command to enter a remote PowerShell session:
Enter-PSSession -ComputerName "REMOTE_COMPUTER_NAME"
Replace "REMOTE_COMPUTER_NAME" with the name you noted earlier. - Step 5.After that, you can set your working location to the desired registry path:
Push-Location
Set-Location HKCU:\Software - Step 6.To create a new registry key, use the following command:
New-Item -Path "HKEY_CURRENT_USER\Software" -Name "HSG" - Step 7.Now, for creating a new property under the key you just created, use:
New-ItemProperty -Path "HKCU:\Software\HSG" -Name "PropertyName" -Value "PropertyValue" -PropertyType String
Make sure to replace "PropertyName" and "PropertyValue" with the actual name and value you want to set. - Step 8.After making your changes, you can return to your previous location and exit the remote session:
Pop-Location
Exit-PSSession
Method 3: Using PsExec
The next tool to remotely manage registry is PsExec. It is a powerful command-line utility from the Sysinternals suite that allows you to execute processes on remote systems. It's a very useful tool, especially when you need to remotely manage registry settings if Remote Registry is not enabled on the target machine. Next are the steps to modify registry key remotely using PsExec:
- Step 1.First, ensure you have PsExec downloaded and available on your local machine. You can get it from the Microsoft Sysinternals website (https://docs.microsoft.com/en-us/sysinternals/downloads/psexec).
- Step 2.Right-click on the Start button and select Command Prompt (Admin) or Windows Terminal (Admin).
- Step 3.Make sure you know the name or IP address of the remote computer where you want to change the registry key.
- Step 4.To modify the “HKEY_CURRENT_USER” hive for a specific user, you need to find that user's Security Identifier (SID). Use the following command to get the SID of the logged-in user:
cmd
psexec \\COMPUTERNAME query user
This will list the currently logged-in users on the remote computer. - Step 5.If you know the username (e.g., "johndoe"), you can find the SID by running:
cmd
psexec \\COMPUTERNAME wmic useraccount where name='johndoe' get sid
Note that this may not always return the expected results due to user permissions and visibility issues. - Step 6.Once you have the correct SID, you can modify the registry key associated with that user. The command would look like this:
cmd
psexec \\COMPUTERNAME reg add "HKEY_USERS\SID\Software\Microsoft\YourKey" /t REG_DWORD /v YourValueName /d YourValueData
Replace "SID" with the actual SID you obtained and fill in "YourKey", "YourValueName", and "YourValueData" with the appropriate values for your registry modification. - Step 7.After executing the command, it’s a good idea to verify that the changes were made successfully. You can do this by querying the registry again or checking the registry on the remote computer directly.
Method 4: Using Group Policy
Group Policy is another feature that allows administrators to manage and configure operating system settings for computers in an Active Directory environment. It's an effective way to remotely manage registry across multiple machines in a network without needing to log into each computer individually.
- Step 1.On your domain controller or a computer with the Group Policy Management Console (GPMC) installed, open the Group Policy Management tool. You can find it by searching for gpmc.msc in the Start menu.
- Step 2.Right-click on the Organizational Unit (OU) where you want to apply the policy (this could be a specific group of users or computers) and select Create a GPO in this domain, and Link it here. And then, give your new GPO a descriptive name.
- Step 3.Now, right-click on the new GPO and choose Edit to open the Group Policy Management Editor.
- Step 4.In the Group Policy Management Editor, go to:
For user-specific settings: User Configuration > Preferences > Windows Settings > Registry
For computer-specific settings: Computer Configuration > Preferences > Windows Settings > Registry - Step 5.Right-click on Registry, select New, and then choose the type of registry item you want to create (e.g., Registry Item, Registry Key, etc.).
- Step 6.Fill in the details for the registry item:
Action: Choose whether you want to create, update, or delete the registry key.
Hive: Select the appropriate hive (e.g., HKEY_CURRENT_USER or HKEY_LOCAL_MACHINE).
Key Path: Enter the path of the registry key you want to modify.
Value Name: Specify the name of the registry value.
Value Type: Choose the type of value (e.g., String, DWORD, etc.).
Value Data: Enter the data for the registry value. - Step 7.Click OK to save the registry item and once you have added all desired registry settings, close the Group Policy Management Editor.
- Step 8.To apply the changes immediately, you can run the following command on the target computers:
cmd
gpupdate /force
Alternatively, the changes will be applied at the next Group Policy refresh cycle.
Part 3. An Easier Way to Remotely Manager Registry
We have discussed about different methods to remotely manage registry on Windows computers. While these methods can be effective at times, many users find them to be quite technical and complicated. If you're one of those users, don't worry because we have a solution that makes this process much simpler.
AirDroid Remote Support is the highest-performing, most secure, and best-value remote access software that allows you to easily access another computer and edit the registry according to your needs, all without the hassle of complex commands or technical steps. Beyond its user-friendly interface, AirDroid Remote Support gives you complete control over the remote computer with a wide range of features.
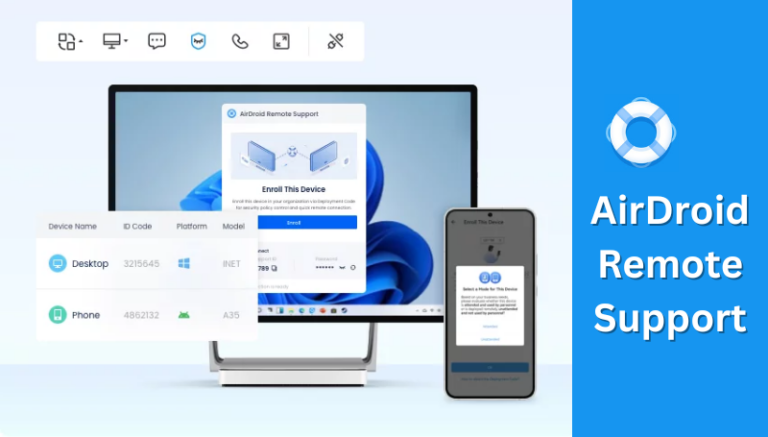
- One-Click Remote Access: Easily connect to remote computers without complicated commands or setups.
- Voice Chat: Communicate with users on the remote computer to provide instant support and feedback.
- Secure Connection: Ensure your data and communications are protected with robust security measures.
- Multi-Platform Support: Access Windows, Mac, and mobile devices from any platform
Steps to Use AirDroid Remote Support
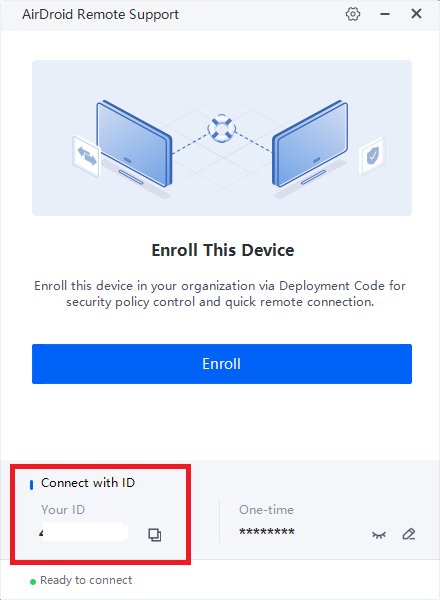
- Step 1.Download AirDroid Remote Support on the remote PC and download AirDroid Business on the local PC.
- Step 2.Launch AirDroid Remote Support and note down the 9-digit code.
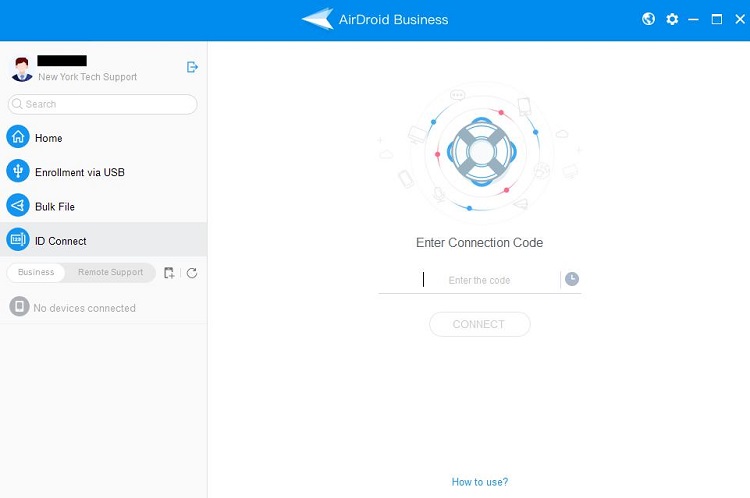
- Step 3.Launch AirDroid Business and go to ID connect tab. Enter the connection code and click Connect.
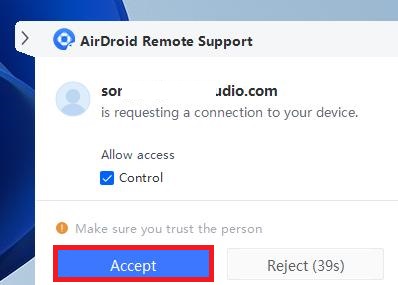
- Step 4.Click Accept to establish the remote connection.
Conclusion
Each method we have discussed in this article has its own advantages and can be useful in different scenarios. However, If you want a seamless way to remotely manage registry and enhance your overall remote support experience, we encourage you to try AirDroid Remote Support. It could be the solution you’ve been looking for!


Leave a Reply.