4 Methods for Screen Sharing with Sound
Screen sharing with sound is useful in various contexts, such as remote work, virtual meetings, and online education. In all these scenarios, the combination of screen and sound becomes essential for effective collaboration. Therefore, this guide will teach you how to share a screen with sound. So, the next time you need to share your screen, you will know exactly what to do.

Part 1. How to Enable Screen Sharing with Sound
There are multiple ways to enable screen sharing with sound. All it depends on is which screen-sharing platform you use. Below, we have shortlisted 4 easiest methods to share screen and sound effectively:
1Zoom Screen Sharing with Sound
Zoom is a reputed communication platform that supports connecting with others via audio, phone, chat, or video. Its screen-sharing feature also allows you to share the computer audio with the attendees when you are in a meeting.
Compatibility: Windows, Mac, Linux, web (in Chrome web browser), iOS, and Android.
Usability Scenarios: Online education, presentation, and remote collaborative work
Here's how to use Zoom for screen sharing with sound:
- Step 1.Join or start a Zoom meeting.
- Step 2.From the meeting toolbar, tap Share Screen.
- Step 3.Select the desktop or program you intend to share. Step 4.Tick the Share Sound checkbox. Afterward, click the located right to the Share Sound option. From the audio options, pick between Mono or Stereo audio options.
- Step 5.Lastly, click the Share button to begin sharing the screen and background audio.
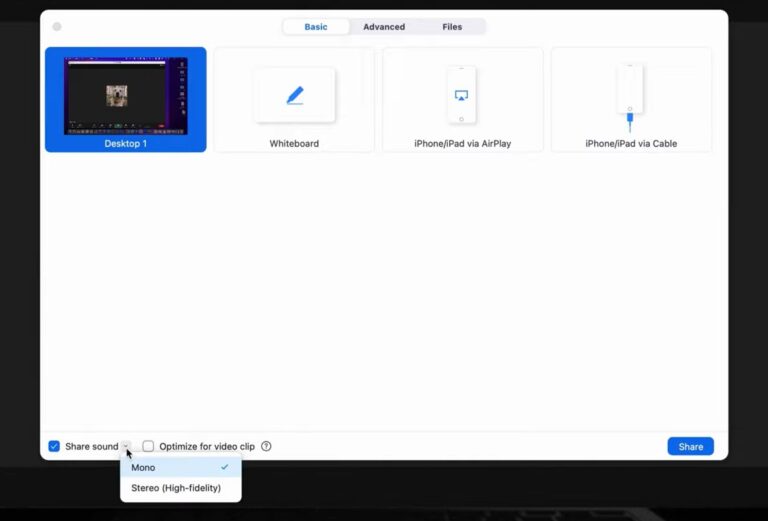
This way, you can easily share screen and sound when you are in a Zoom meeting.
2Google Meet Screen Sharing with Sound
Like Zoom, Google Meet is another communication platform that allows voice/video meetings with others. Talking about its screen-sharing capabilities, it allows you to share the entire screen or specific windows from your computer along with background audio.
Compatibility: Windows, iOS, and Android. For Mac, you can only share audio from the Chrome tab.
Usability Scenarios: Presentation and remote work.
Follow the below steps to share screen and sound with Google Meet:
- Step 1.Join or share a Google Meet meeting.
- Step 2.Click the Present Now icon from the bottom menu toolbar.
- Step 3.You will have three options for sharing the screen: Chrome tab, window, or entire screen. Select your option and toggle on the share audio button. Once you've done this, click Share.
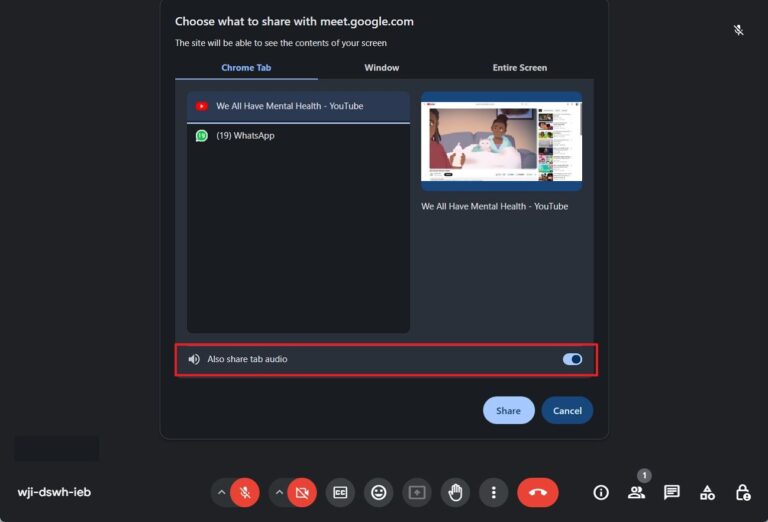
This way, you can quickly share the screen with sound using Google Meet.
3Enable Screen Sharing with Sound via AirDroid Remote Support
AirDroid Remote Support is a powerful and intuitive tool for screen sharing with sound. As the name implies, it is a remote access software that allows users to remotely control other desktop and mobile devices. The remote desktop control also offers support for sharing the screen with background sound. In short, you are getting a wholesome experience of screen sharing with sound and the ability to control the PC remotely.
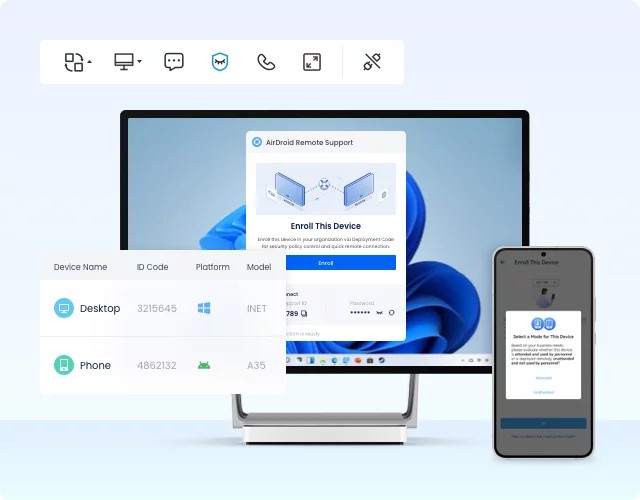
The key features of AirDroid Remote Support include:
- Click-based interface to share screen and sound.
- Real-time sharing of both microphone and media sounds.
- Share screen with complete remote control of the other device.
- Log remote sessions to keep a record of device activities.
- Unattended remote access for after-hours maintenance, server management, and more.
- No connection time limit.
- Text and voice communication support during a remote session.
- AES 256-bit encryption for secure remote sessions.
Overall, AirDroid Remote Support eliminates the need for a video/voice call to share screen and sound. All you have to do is link the two PCs and share screen and sound with one click.
Here's how to share the screen with sound using AirDroid Remote Support:
- Step 1.Install AirDroid Business on the host PC and AirDroid Remote Support on the remote PC whose screen and audio you want to share.
- Step 2.Launch AirDroid Remote Support on the remote PC and note down the 9-digit unique ID. If you see the option to enroll the device, then follow the onscreen instructions to enroll this device in your organization.
- Step 3.Launch AirDroid Business on the host computer. Paste the 9-digit ID of the remote PC and click Connect.
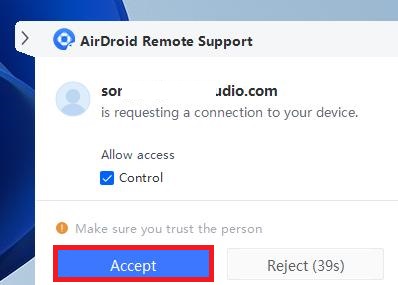
- Step 4.From the remote PC, click Accept to complete the connection.
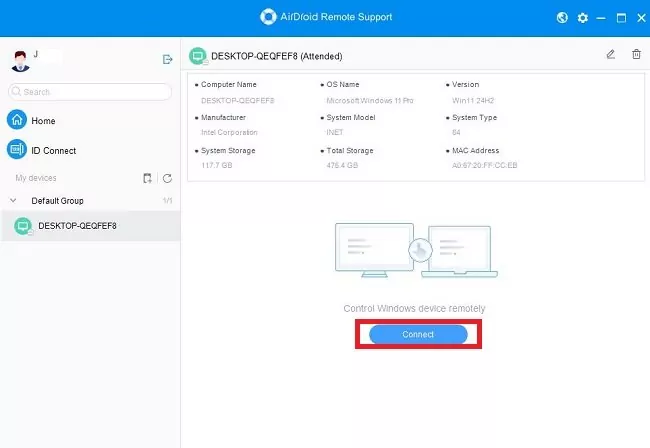
- Step 5.From the AirDroid Business app, select the remote PC from the left sidebar and click Connect. Once the connection is made, you will be able to see the screen and listen to the audio of the remote PC.
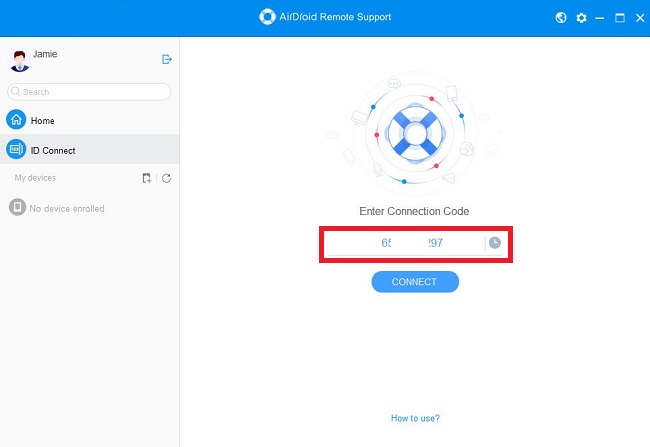
That's it! This way, you can use AirDroid Remote Support to easily access screen sharing with sound along with remote control of the remote PC.
Part 2. Best Practices for Screen Sharing with Sound
For a smooth experience of screen sharing with sound, check out the below six best practices:
- Use a Stable Internet Connection: Make sure you are using a stable internet connection to have interrupted and smooth screen mirroring and sound clarity.
- Minimize Background Noise: If you are sharing screen and sound during a presentation or remote work, try to minimize the background noise. This will ensure attendees don't get disturbed by your background noise.
- Share Specific Windows: Unless necessary, share only the specific windows that you want to show to the attendees.
- Adjust Audio Settings: Adjust the audio settings in the screen-sharing software to make it soft instead of too loud.
- Use High-Quality Audio Devices: If you are screen sharing with microphone sound, try to use high-quality audio devices for clear audio transmission.
- Turn Off Notifications: To avoid interruptions, turn off all notifications before you share screen and sound.
Overall, the best approach is to perform a test run beforehand with another PC to make sure that screen sharing with sound is operating smoothly.
Part 3. Why Is There No Sound When I Share the Screen?
Sometimes, you may face an issue that there is no sound when you share the screen. This can happen due to multiple reasons. Some of the common reasons and their fixes are as follows:
- Audio Sharing is Disabled: Many screen-sharing software requires you to enable audio sharing. It is likely that you haven't turned on audio sharing. So, check the connection with the software and make sure audio sharing is enabled.
- Muted Audio: You may have muted the computer audio. So, check your computer audio settings and make sure the audio is not muted.
- Software Permissions: PCs require software to get permission to capture audio. The software you are using for sharing a screen with audio may not have this permission. So, check the software's permissions from your OS settings and grant it access to capture audio.
- Poor Internet Connection: A weak internet connection can cause trouble transmitting audio. So, make sure your internet connection is fast and stable.
- Incorrect Audio Source: The screen-sharing software may have selected an incorrect audio source. To fix that, check the audio settings and select the proper audio source.
- Outdated or Corrupt Audio Driver: An outdated or corrupt audio driver can also cause problems. So, go to Device Manager and make sure your audio driver is up-to-date.
- Audio Enhancements: Audio enhancements can also cause multiple audio glitches. To disable them, navigate to Control Panel > Hardware and Sound > Sound > Playback > right-click audio device > Properties > Advanced > uncheck audio enhancements.
The lack of sound with screen sharing is mostly due to a minor technical glitch. So, follow the above fixes and see if the issue gets resolved.
Conclusion
Screen sharing with sound is best when you are presenting, collaborating, tutoring online, or doing similar activities. Above, we have discussed a few effective ways to share screen and sound easily. Now, you can evaluate your needs and choose one of the methods. However, for the best experience with complete remote control support, AirDroid Remote Support is the top pick.




Leave a Reply.