- 1.Start a Zoom meeting as the host and share the computer audio with the attendees.
- 2.Click "Record" from the meeting toolbar.
- 3.Select either "Record on this Computer" or "Record to the Cloud". In both types, Zoom will record the audio you play from the computer.
[Must Know] How to Share Computer Audio in Zoom
Often, there is a need to share the computer audio during meetings. For example, you may be sharing the computer screen with the attendees and need them to hear the audio from a video or presentation. Similarly, you may be having a team meeting on a project and need to play specific audio clips.
Zoom offers many features to ensure the best meeting experience. One such top-notch feature is the ability to easily share computer audio in Zoom meetings. Therefore, this guide will teach you how to share computer audio in Zoom with the exact steps to follow. So, let's head right to it!

Part 1. How to Share Computer Audio in Zoom?
When you are in the team meeting, Zoom allows you to send the computer audio in stereo or mono to the attendees. It gives you the option to share the audio alongside the desktop, application, window, or video you are sharing with the attendees.
To share computer audio in Zoom, make sure you have installed either:
- Zoom Windows, Linux, or macOS desktop client (global minimum version or higher).
- Zoom web app directly in the Chrome web browser.
Once done, here are the six simple steps to share computer audio in Zoom:
- Step 1.Join or start a Zoom meeting.
- Step 2.From the meeting toolbar at the bottom, click the Share Screen option.
- Step 3.Select the window or application you want to share.
- Step 4.Check the Shared Sound checkbox in the share selection window.
- Step 5.(Optional) click the down-arrow icon next to the Share Screen" option and choose between Mono or Stereo (high fidelity) audio types.
- Step 6.Click the Share button to begin sharing screen and computer audio with the meeting participants.

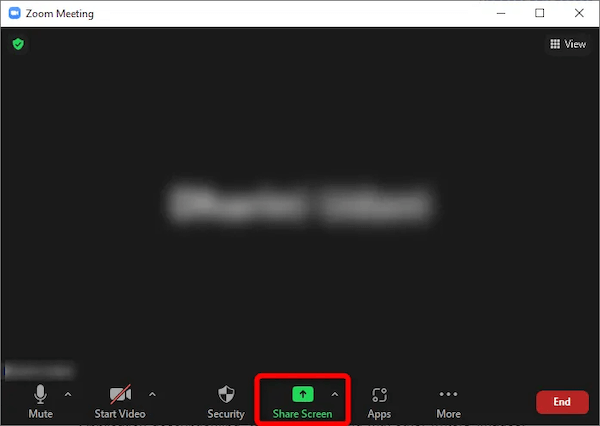
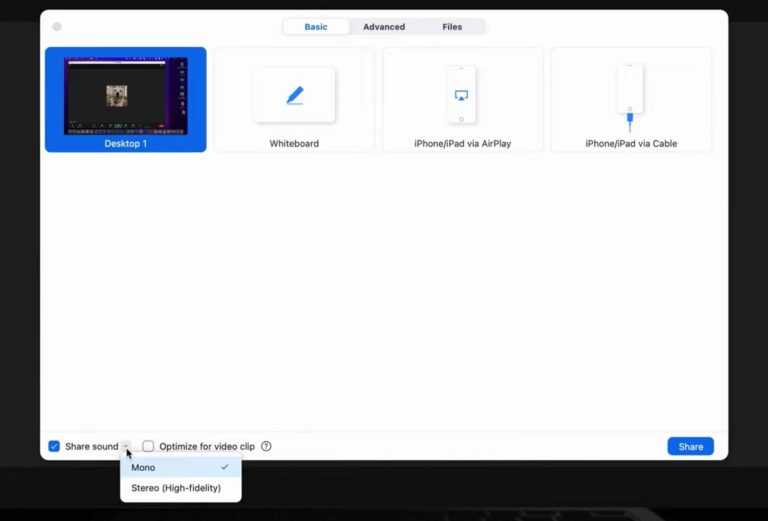
That's it! This way, you can quickly share computer audio in Zoom without any hassle.
Part 2. An Alternative Way to Share Computer Audio in Zoom
Although Zoom offers a handy way to share computer audio, there is an alternative way that offers a more enhanced experience when sharing computer audio. This alternative is known as AirDroid Remote Support.
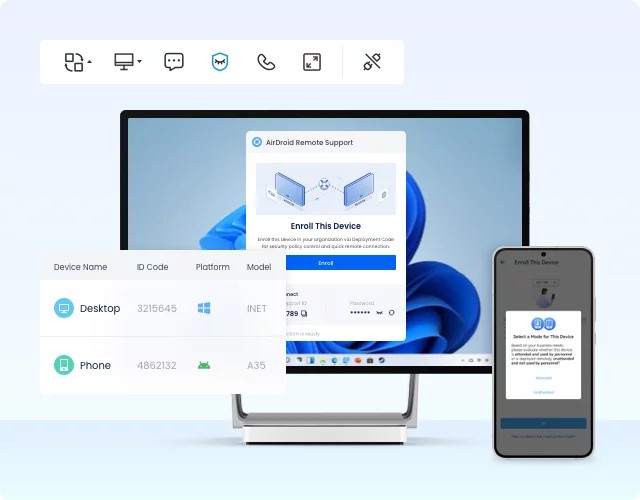
AirDroid Remote Support is a remote access software solution. It offers a seamless way to share screen and audio along with advanced remote management capabilities. This implies that the tool allows you to share computer audio and also lets you easily access, control, and manage remote desktop and mobile devices anytime, anywhere.
The key features of AirDroid Remote Support are as follows:
- Intuitive user interface to share remote computer's screen and audio.
- Real-time sharing of computer's audio and microphone.
- Remotely control computers and smartphones for troubleshooting and maintenance.
- Unattended mode to access and control the remote device for after-hours maintenance.
- Transfer files between host and remote devices.
- AES 256-bit encrypted remote sessions.
- No connection time limit.
- Keep track of all remote support activities with detailed logs.
In short, AirDroid Remote Support elevates the audio-sharing functionality of Zoom by offering remote control functionality. Here's how to use AirDroid Remote Support to share computer audio:
- Step 1.Install AirDroid Remote Support on the remote computer whose audio you want to hear. Secondly, install AirDroid Business on the host computer.
- Step 2.From the remote computer, launch the AirDroid Remote Support app and note the 9-digit unique ID.
- Step 3.From the host computer, launch the AirDroid Business app, paste the 9-digit ID, and tap Connect.
- Step 4.Click Accept from the pop-up that appears on the remote computer.
- Step 5.Select the remote computer from the left sidebar on the AirDroid Business app and click Connect. After the connection is finalized, you will be able to see the remote computer screen and listen to the computer audio.
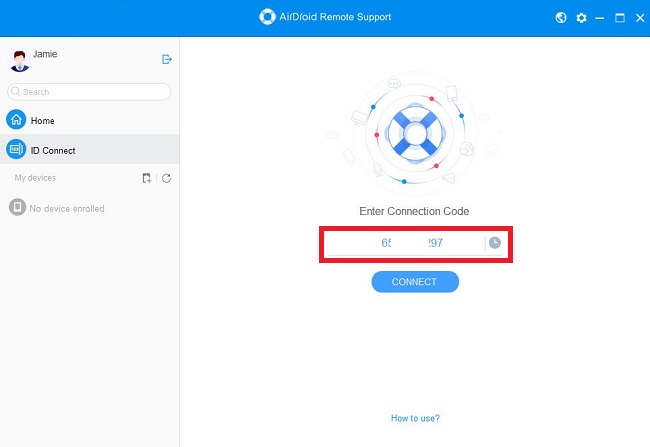
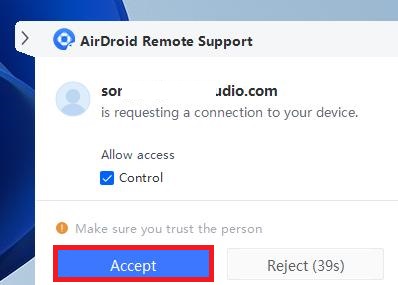
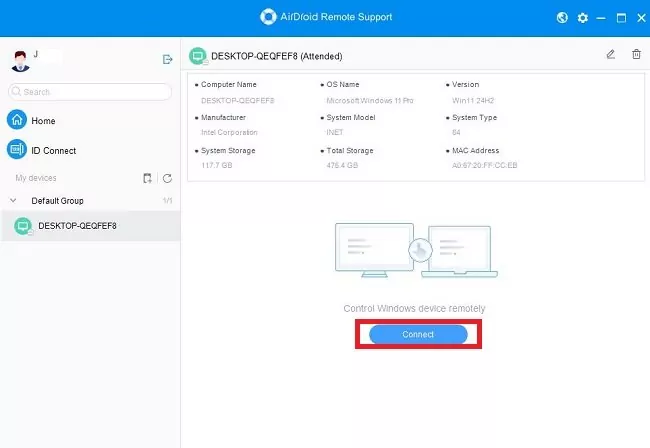
This way, AirDroid Remote Support offers a one-stop platform to share the computer audio and also control the remote computer/mobile.
Part 3. Can You Share Computer Audio on Zoom Without Sharing Screen?
Yes, Zoom also supports sharing only the computer audio without sharing screen. It allows you to share background music or computer audio alone during the meeting.
Follow the below steps to learn how to share computer audio on Zoom without sharing screen:
- Step 1.Join or start a Zoom meeting.
- Step 2.From the meeting toolbar at the bottom, click the Share Screen option.
- Step 3.Click the Advanced tab and select Computer audio. You can also click the down-arrow next to Computer audio to select either mono or stereo options.
- Step 4.Click the Share button.
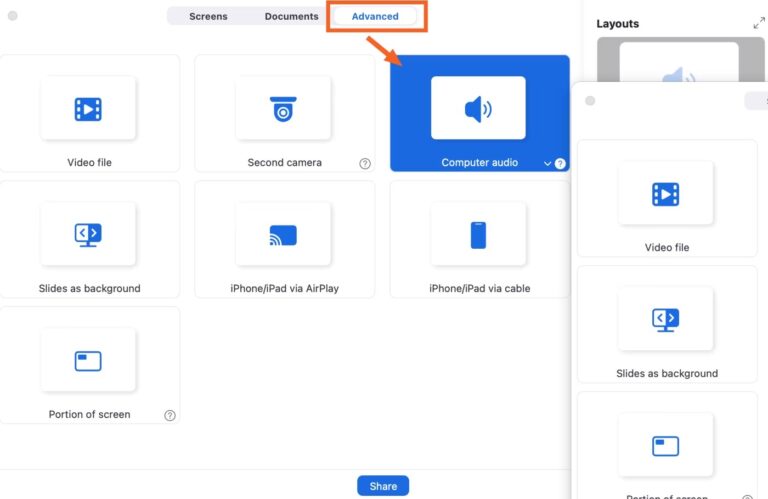
Once done, your computer audio will be shared with the attendees without the screen.
Part 4. Why Is My Computer Audio Not Sharing on Zoom?
Despite the simple way to share computer audio on Zoom, some users have reported that they are unable to share the audio. This could happen due to multiple reasons. Some of the common ones and their solution are as follows:
- Muted Audio: Your computer's audio may be muted. Check the audio and ensure that it is turned on.
- Zoom Don't Have Permission: Zoom may not have permission to capture audio. So, check and grant Zoom permission to access audio.
- Problematic Mic/Speaker: Your mic or speaker may be problematic. Try using a different mic/speaker.
- Weak Internet Connection: If your internet connection is weak, Zoom may not be able to share your computer audio. So, make sure you are using a reliable and fast connection.
- Corrupt/Outdated Audio Driver: The computer audio drive may be corrupted or outdated. To fix this, update the audio driver from the "Device Manager".
- Issues in Zoom Advanced Audio Settings: Zoom's advanced audio settings help enhance audio and reduce background noise. However, they can also sometimes cause an issue. So, go to Zoom's advanced audio settings and make sure they are configured correctly./li>
- Malfunctioning Zoom App: The Zoom app can sometimes malfunction. Try uninstalling and reinstalling the app to see if it fixes the issue./li>
In short, there is no one-size-fits-all solution when computer audio is not getting shared on Zoom. Therefore, follow the above solutions one by one and see which one works for you.
Conclusion
Sharing computer audio on Zoom is helpful in various scenarios, especially when sharing audio content with others. Above, we have discussed how to share computer audio on Zoom with or without screen sharing. However, if your purpose is to troubleshoot the computer, then AirDroid Remote Support is a better alternative. It allows you to share screen and audio along with remote control functionality. So, why not get AirDroid Remote Support right away and have the best experience sharing computer audio with remote access.
FAQs about Sharing Computer Audio in Zoom
- Join or start a Zoom meeting.
- From the meeting toolbar at the bottom, click the "Share Screen" option.
- Select the window or application you want to share.
- Check the "Shared Sound" checkbox in the share selection window.
- Click the "Share" button to begin sharing screen and internal audio with the meeting participants.
To share only internal audio in Zoom, click the "Share Screen" option. Afterward, click the "Advanced" tab and select "Music or Computer audio". Lastly, click the "Share" button.
- Launch the Zoom desktop client and sign in.
- Click on your profile picture.
- Click "Settings".
- Click "Audio".
- Tick the "Automatically join audio by computer when joining a meeting" check box.


Leave a Reply.