[Step-by-step Guide] How Do I Share Screen on Teams
Nowadays, virtual meetings have become a part of most professions and the education system, therefore chances are that you have already taken part in one. Microsoft Teams is one of the most popular platforms for team communication and collaboration, becoming one of the top choices when it comes to online meetings. Whether you're leading a business meeting, teaching a class, or troubleshooting a technical issue, you need to know how to share screen on Teams.
In this article, we will show you how Teams screen share works, how to do it on all of your devices and present you with an excellent alternative to Teams screen sharing.

Part 1. How Do I Share My Screen on Microsoft Teams?
Before getting deeper into how to share screen in Teams, it will be useful to go through what Microsoft Teams share screen has to offer. In more detail, Microsoft Teams is a great platform for screen sharing since it allows you to quickly perform it on all of your devices. Furthermore, you can use this feature to share more than just your screen, like:
- Desktop – you can use Teams to share your entire screen, including all active apps and open windows.
- Window – you can choose to share only a specific window, thus protecting your privacy.
- PowerPoint – you have the capability to share a PowerPoint presentation directly on Microsoft Teams, which is especially useful in education.
- Whiteboard – you can use Teams to collaborate in real-time on a digital whiteboard with your colleagues.
Now, it’s time to explain the steps to share screen Teams on a PC. The process is very simple and you can use the feature on both Windows computers and Macs.
However, it is important to note that the first time you use Teams on Mac, you must first grant the app permission to record your screen. Just go to Apple menu > System preferences > Security & Privacy to grant the necessary permissions. Then, you can follow the process below to share your screen as needed.
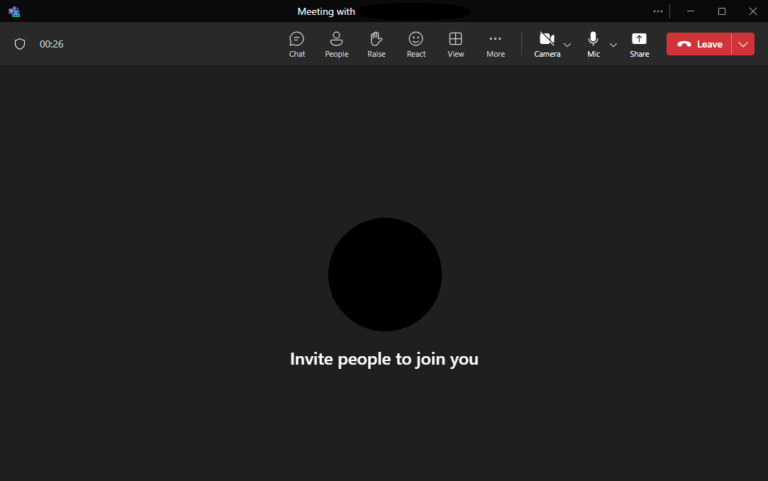
Here is the step-by-step guide on how to share screen on Teams:
- Step 1.Start or join a meeting using Microsoft Teams.
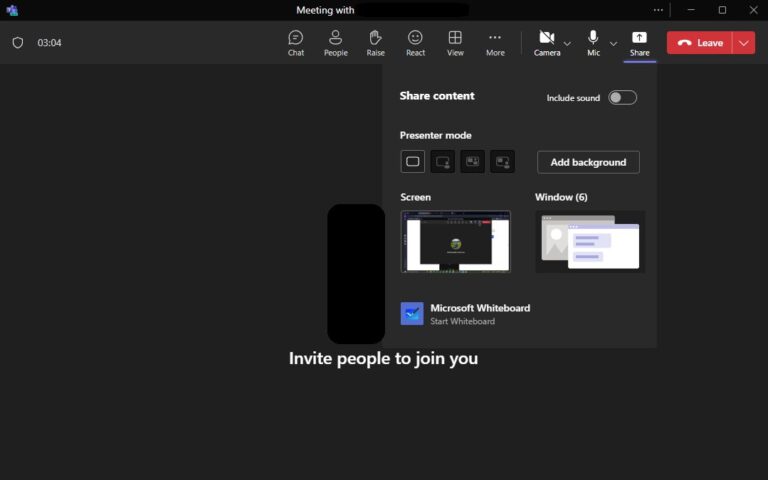
- Step 2.Click the Share button, which will look like an upward arrow inside a square.
- Step 3.Choose what you will be sharing, i.e. desktop, window, PowerPoint presentation, or whiteboard.
- Step 4.Click the desired option to start screen sharing. At this stage, you will see a red border around your screen, or the area of your screen you are sharing.
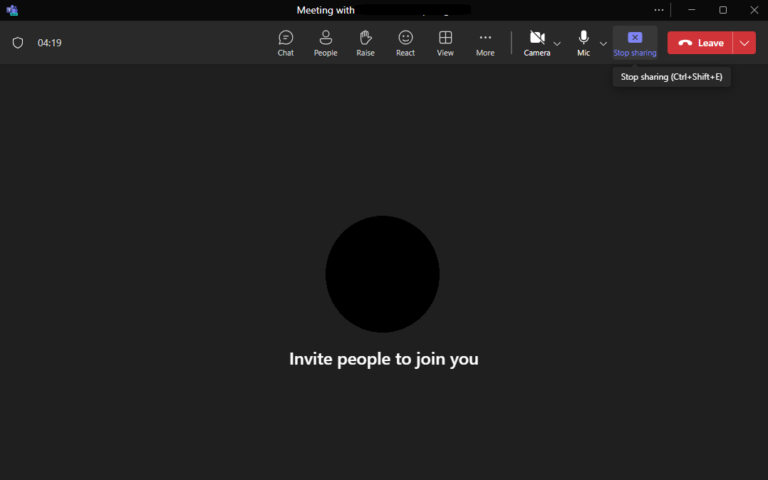
- Step 5.Click Stop Sharing to end the session. You can continue your meeting for as long as you need.
The previous guide shows you how to share screen in Teams on your computer. However, you can also use the feature on your mobile devices. The steps to using Teams screen sharing on mobiles are the following:
- Step 1.Download and launch the Teams app on your mobile.
- Step 2.Join a meeting on the platform.
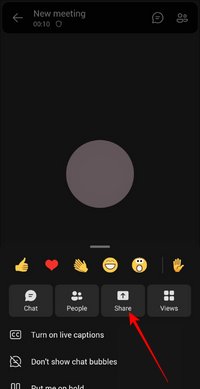
- Step 3.Tap on the three dots at the bottom of the screen and tap Share. If this is the first time you are using this feature, you will see a message that requests permission to access and share your screen. Grant it to continue.
- Step 4.Choose what you want to share, which is either your screen, photos or videos, or a PowerPoint presentation.
- Step 5.Confirm your selection and start sharing your screen.
- Step 6.When you are done, tap the Stop Presenting button.
Part 2. Why Can’t Share Screen on Teams?
Despite Microsoft Teams being one of the top platforms for online meetings, there are instances where the share screen Teams feature isn't working. This might happen due to various reasons, the most important of which being the following:
- Permission Issues – in some cases, you might simply not have granted the required permissions. To solve this issue, go to your device’s settings and give the necessary permissions to Teams.
- Outdated Software – if the version of Teams you are using is outdated, then you might not be able to access all of its features. That’s why you need to regularly check for updates.
- Network Problems – if you can’t share your screen on Teams, then you might have some network issues, like a poor internet connection. Check your network connection status and try a wired connection for enhanced stability.
- Conflicting Applications – some other apps might prevent you from sharing your screen because they use your device’s resources. To fix this, go to Task Manager and close all unnecessary applications that might be causing the conflict.
- Organizational Policies – if you are trying to use Teams in your work, then you might be facing some restrictions imposed by your organization. If that’s the case, contact your IT department.
Part 3. Alternative Way to Share Screen in Teams
While Microsoft Teams offers robust screen-sharing capabilities, there might be instances where you need an alternative solution. AirDroid Remote Support is an excellent alternative, dedicated to remote troubleshooting and support.
AirDroid Remote Support is designed to facilitate remote assistance, thus providing you with all the tools you might need to make the process as simple and easy as can be. For example, it has powerful screen sharing and control features, as well as an innovative AR camera feature for mobile devices. Most importantly, it's free to use.
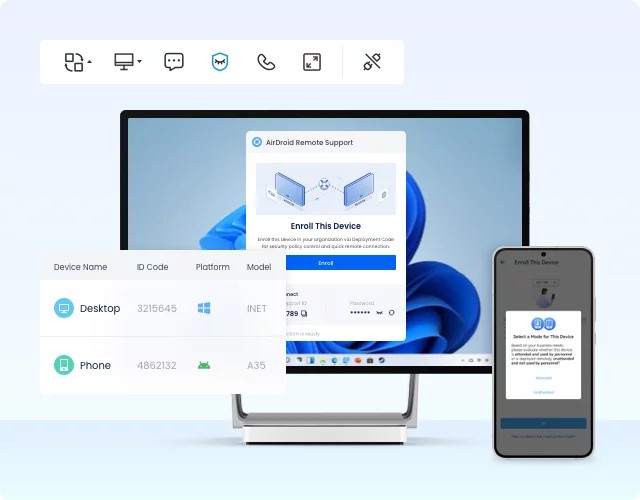
In more detail, the key features that make AirDroid Remote Support the best alternative to Teams screen sharing are the following:
- Screen Sharing: share your screen in real time with remote users.
- Remote Control: take control of the remote device to perform tasks directly on the remote device.
- Voice Call: communicate via voice call for clearer instructions and support.
- Annotation: use on-screen annotations and signs to guide users through the steps.
- AR camera: use this feature on Android and iOS devices to place markers on physical objects.
- Messaging: send direct messages to the remote users during screen sharing.
Here is a detailed step-by-step guide on how to use AirDroid Remote Support for screen sharing:
- Step 1.Install AirDroid Business on the host PC and AirDroid Remote Support on the remote PC whose screen you want to share.
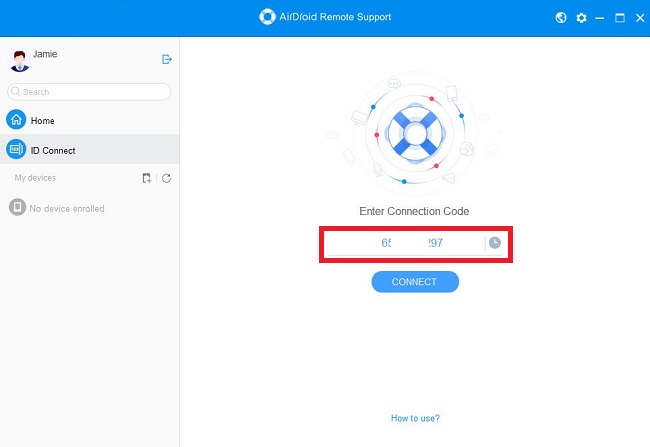
- Step 2.Launch AirDroid Remote Support on the remote PC and note down the 9-digit unique ID. You can also using "enroll the device" option.
- Step 3.Launch AirDroid Business on the host computer. Paste the 9-digit ID of the remote PC and click Connect.
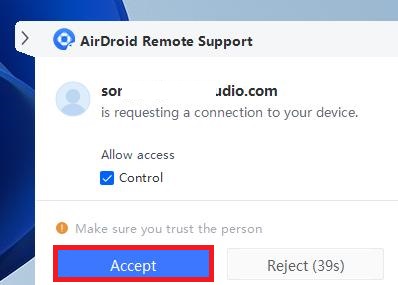
- Step 4.From the remote PC, click Accept to complete the connection.
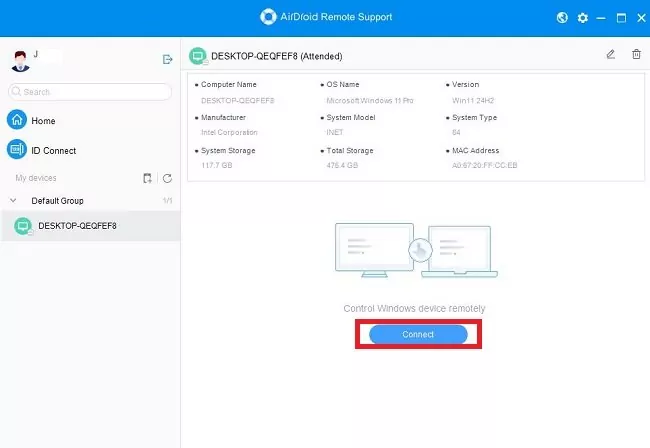
- Step 5.From the AirDroid Business app, select the remote PC from the left sidebar and click Connect. Once the connection is made, you will be able to see the screen and listen to the audio of the remote PC.
In Conclusion
If you know how to share screen on Teams, you have an invaluable tool at your disposal. This step-by-step guide shows you how to do it on both computers and mobile devices. Nevertheless, if you are looking for an enhanced remote support experience, then we recommend the best alternative to sharing your screen. Download and try AirDroid Remote Support for free, which is a powerful tool for screen sharing and remote control.




Leave a Reply.