Proven Fixes for TeamViewer Not Connecting Issues
Experiencing connectivity issues when securing access to a remote PC using TeamViewer? If yes, you're not alone. Lately, many users are reporting the TeamViewer is not connecting errors and seeking its workable solutions.
This frustrating issue can manifest in many ways including:
- Not Ready Check Your Connection
- Connection Failed No Route
- Partner Did Not Connect to Router
- Protocol Negotiation Failed

Given this, we will cover all the possible tips to help you restore the TeamViewer connection for a seamless remote experience.
Part 1: Quick Pre-Checks and Fixes
Before starting, implement the below quick workarounds to eliminate the TeamViewer not connecting or TeamViewer cannot control remote computer problem.
Tip 2: Install the app properly if you're using the .exe version.
Tip 3: Install the pending Windows updates on both devices.
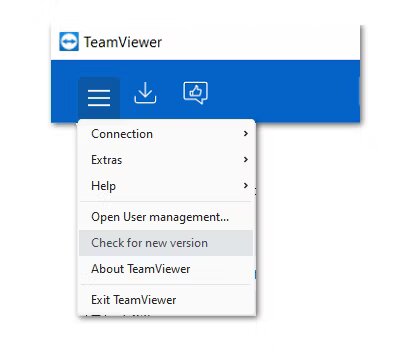
Tip 4: Update the TeamViewer app on both devices in the three-line icon > Check for the new version.
Part 2: Advanced Troubleshooting Tips: Common Scenarios Explained
Here is a breakdown of different scenarios of TeamViewer not working errors along with possible solutions.
| Scenario | Workable Solutions |
|---|---|
Not Ready Check Your Connection | Fix 1: Check and restart the internet connection Fix 2: Configure TeamViewer Access settings to Full Access Fix 3: Adjust the TeamViewer settings to Automatic |
Connection Failed No Route | Fix 1: Remove the TeamViewer host file from its folder Fix 2: Re-configure Remote Assignment settings |
Partner Did Not Connect to Router | Fix 1: Disable IPv6 Fix 2: Allow TeamViewer through firewall and proxy settings |
Protocol Negotiation Failed | Fix 1: Change the DNS Address Fix 2: Reinstall TeamViewer as a last resort Fix 3: Use a professional TeamViewer Alternative |
Tip: As the solutions for different TeamViewer connection-related scenarios often overlap, it's best to implement them all one by one.
With that said, let us dive into the detailed step-by-step guide for each method. Be sure to verify the connection after applying each method.
Solution 1: Restart Your Network Connection
The biggest reason for the "TeamViewer wait for connect failed" error is either the unstable internet connection or a bug in your network settings. To resolve this, make sure both devices are getting a consistent supply of the internet.
If it's not working, restart your modem or contact the service provider.
Solution 2: Configure TeamViewer Access Settings
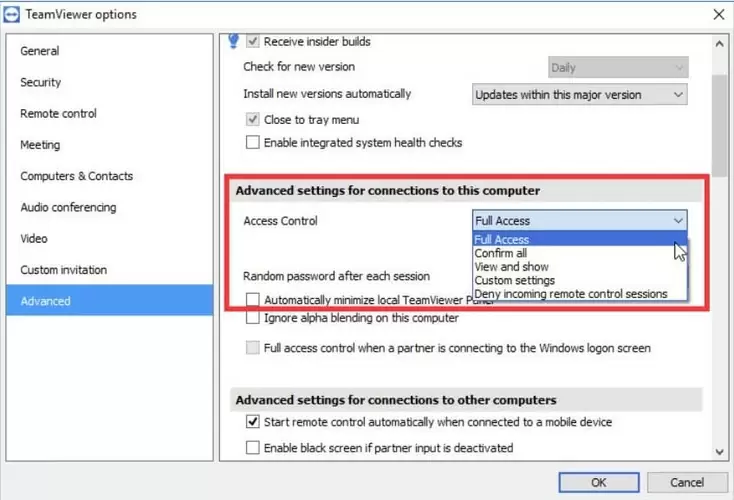
The TeamViewer connection failed error appears when the remote device is denying the incoming connection requests. Allowing Full Access in the device's settings can fix this issue.
For that:
Step 1: Open TeamViewer on the remote device and click Options (top right corner) > Settings.
Step 2: Under Advanced Settings, use the drop-down arrow to select "Full Access."
Step 3: Also, tick the "Full access control …" option as shown in the figure.
Solution 3: Restart and Configure TeamViewer Service
Sometimes, a minor glitch in the TeamViewer app itself is hindering the remote connection request, leading to the "TeamViewer not ready check your connection" error. The quickest way is to force restart the TeamViewer app.
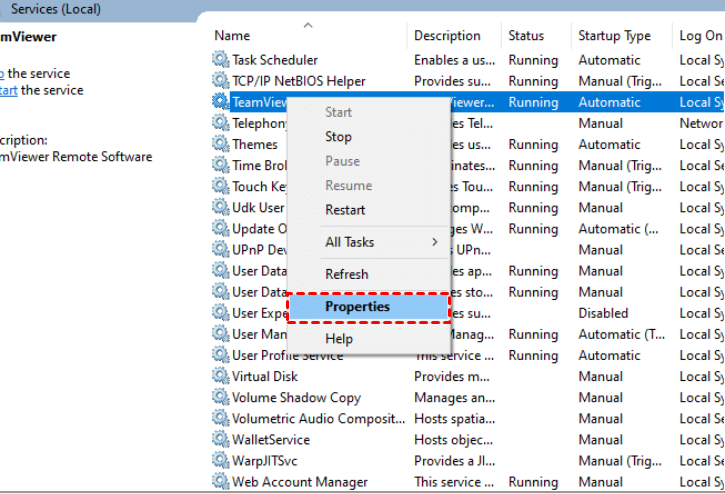
Step 1: Search "Services" in the bottom search menu and open it.
Step 2: Swipe down to TeamViewer and right-click it. Select Restart.
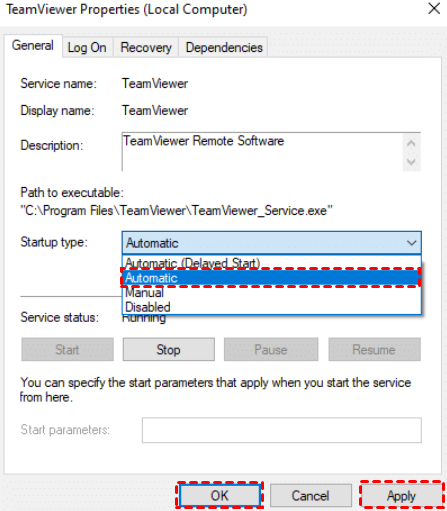
Step 3: Also, go to Properties and select the Startup Type to "Automatic."
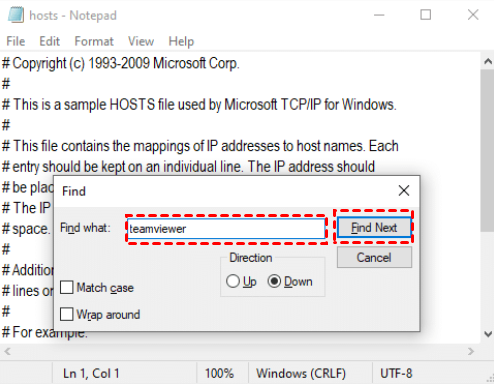
Solution 4: Remove TeamViewer from the host File
It's likely that a corrupt TeamViewer file on your computer is causing the "TeamViewer could not connect to partner" error. Finding and deleting this file from your system can fix the problem.
Step 1: Open Windows Explorer and click the View tab at the top. Tick the "Hidden Items" option.

Step 2: Now, navigate to C > Windows > System32 > Drivers >> Etc.
Step 3: Right-click the "hosts" file and open it with Notepad.

Step 4: Bring up the Finder by pressing Ctrl + F keys and search TeamViewer. Click Find Next.
Step 5: If it finds any file, select and delete it. Finally, hit Ctrl + S to save the changes.
Solution 5: Remove Assignment from Remote Side
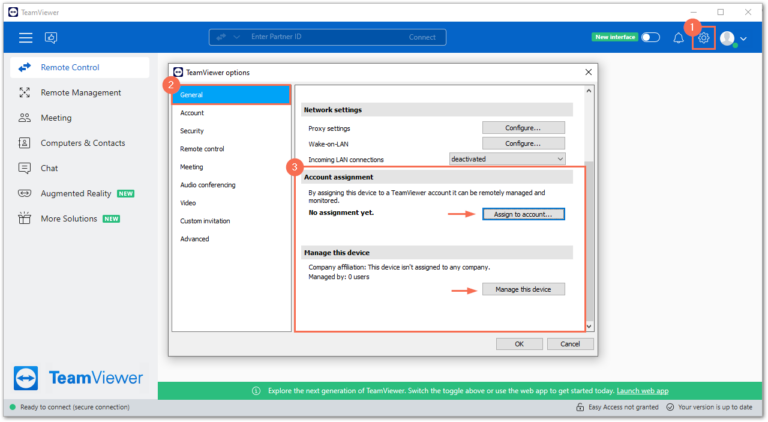
Still encountering the "TeamViewer not connected" issue? Reset the "Assignment" settings on the remote PC to fix it. This method has worked for many users and it's worth a shot.
To do this:
Step 1: Go to Settings > General.
Step 2: Under "Account assignment," click "Remove." After a few seconds, hit "Assign to account" to reconfigure it.
Step 3: While you're here, also configure the "Manage this device" option to let the device appear automatically ion your contact list.
Step 4: Hit Ok to save the changes.
Solution 6: Disable IPv6 on Both Computer
If "TeamViewer is not connecting", try disabling the IPv6 option.This works when your device is not compatible with the IPv6 protocol.
For this:
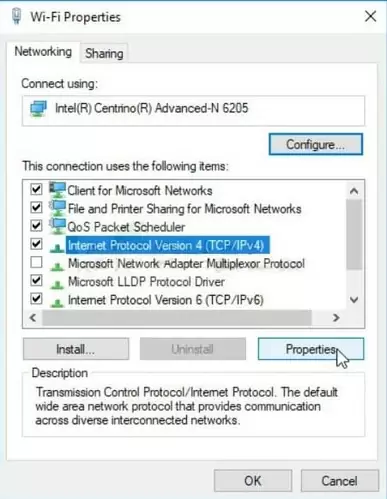
Step 1: Go to the Control Panel > Network and Internet > Network and Sharing Center.
Step 2: On the left pane, click Change adapter settings.
Step 3: Right-click the network you are currently using and choose Properties.
Step 4: Uncheck Internet Protocol Version 6 (TCP/IPv6) option click OK.
Solution 7: Allow TeamViewer Through Firewall
In many cases, the Windows Firewall settings block the TeamViewer connection request for security reasons. If this happens, you'll get the "TeamViewer could not connect to partner" error. Modify the firewall and proxy settings to allow TeamViewer connections.
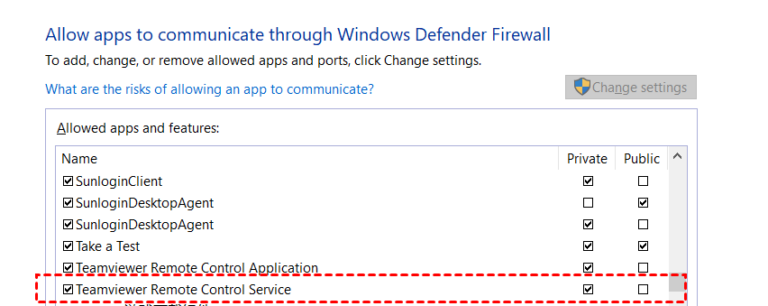
Step 1: Search for Windows Defender Firewall and open it.
Step 2: Click "Allow apps …" on the left pane.
Step 3: Tick both Public and Private options for TeamViewer Remote Control Service.
After tweaking firewall, you need to configure the proxy settings if the "TeamViewer not connected" error persists. The steps are:
Step 1: Go to the Control Panel > Network and Internet > Internet Options.
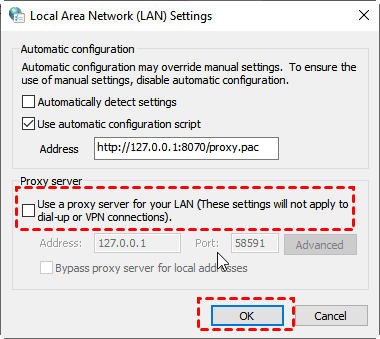
Step 2: Click the LAN Settings under the Connections tab.
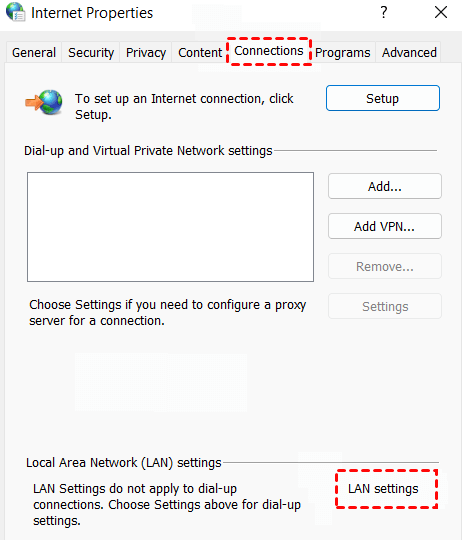
Step 3: Here, uncheck the box for "Use Proxy Server for your LAN". Click OK.
Solution 8: Change DNS Settings
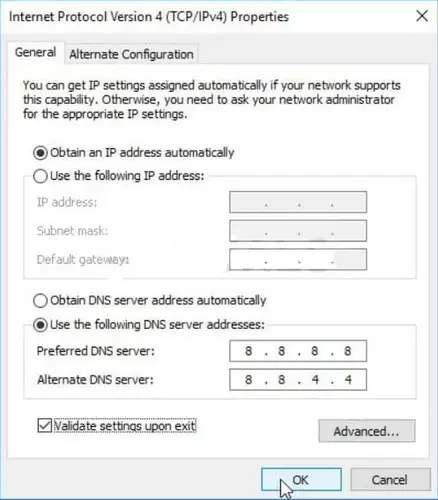
Changing the default DNS settings can prove handy in bypassing the "Partner did not connect to router connection error in TeamViewer." To proceed:
Step 1: Open the Wi-Fi Properties dialog box and click "Properties."
Step 2: Under the General tab, tick the "Use the following DNS server addresses" option if it was set to another.
Step 3: Now, type in the below addresses:
Preferred DNS server: 8.8.8.8
Alternate DNS server: 8.8.4.4
Step 4: Check the "Validate settings upon exit" option and hit Ok.
Solution 9: Reinstall TeamViewer
If nothing changes after implementing the above solutions, consider re-installing the TeamViewer apps on both devices. This will remove all the glitches in the app that might be causing the TeamViewer not connecting error.
Step 1: Go to Programs and Features in the Control Panel.
Step 2: Right-click TeamViewer and click Uninstall.
Step 3: Now, head to the TeamViewer website and download the latest version.
Step 4: Set up the app and check if it connects.
Why Is My TeamViewer Connection Not Working?
If you are trying to use TeamViewer for remote access, and it's not working properly, there could be many reasons to blame. Here are some possible and common issues that could prevent the software from working.
- Connection issues include difficulty establishing a connection between two devices, slow data speeds, or dropped connections.
- Make sure to update TeamViewer. An outdated version may cause the problem.
- Permission: Most often, permission issues occur when users do not have the proper permissions to access TeamViewer functions, grant access to others, or modify settings.
Bonus Tip: Use A Professional Remote Desktop Program for Error-Free Experience
It's not surprising to get connection errors in TeamViewer. Even worse is it's often difficult to pinpoint the reason behind TeamViewer not connecting, let alone fixing it. Thus, we recommend using a dependable alternative like AirDroid Remote Support to get a stable and bug-free remote connection.
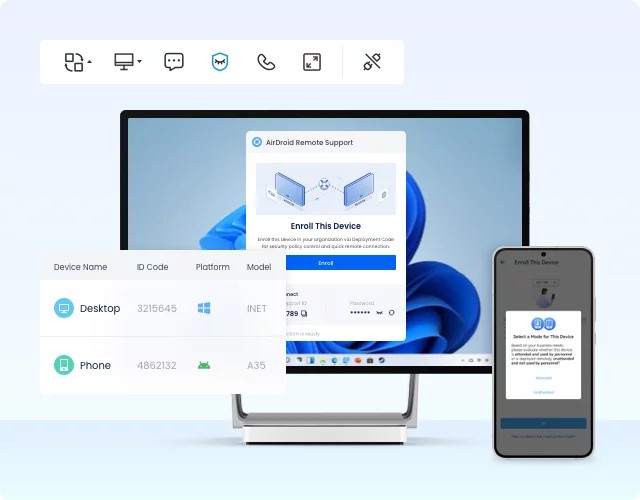
This tool allows users to control multiple Windows PCs simultaneously from any device (Windows and Mac) with both attended and unattended access. Features like multi-device file transfer, permission management, and screen share make it the go-to remote management software for both personal and commercial use.
Key Features
- No freezing, lagging, or disconnection issues.
- Absolutely easy and quick to setup and use.
- Comes with a rich variety of solutions to handle all your remote tasks conveniently.
- Allows users to work in "Black screen" for enhanced privacy.
- Offers multiple payment plan options.
FAQs
Q1: Why is my TeamViewer not connecting to my partner?
TeamViewer displays connectivity issues due to poor internet connection, misconfigured permission settings, and firewall access control. Go through these settings as outlined in this article to eliminate the TeamViewer not connecting to my partner issue.
Q2: Why can't I access TeamViewer?
If you cannot access TeamViewer on a remote device, make sure the app is updated to the latest version. Also, grant Full Access to TeamViewer to accept the incoming connection requests.
Q3: Is TeamViewer no longer free?
No, the basic version of TeamViewer is free for personal use.
Final Remarks
With these solutions, you can address the TeamViewer not connected issue easily. The best practice is to configure the TeamViewer and firewall settings properly for seamless remote connection.
However, it's always a preferable idea to seek assistance from AirDroid Remote Support to control Windows and Android devices without authorization. Get the free trial version to explore various features before buying it.
Feel free to ask any questions.




Leave a Reply.