[Explained] What is winvnc.exe?
Have you ever found yourself needing to access your home computer while at work, or perhaps assist a friend with their technical issues from afar? In such situations, remote desktop software can be a lifesaver. A common choice for remote access is winvnc.exe, but you might be wondering what exactly is it, and how does it work.
In this post, we will explore winvnc.exe, its role as part of the WinVNC software, and where you can typically find it on your Windows system.

Part 1. What is winvnc.exe?
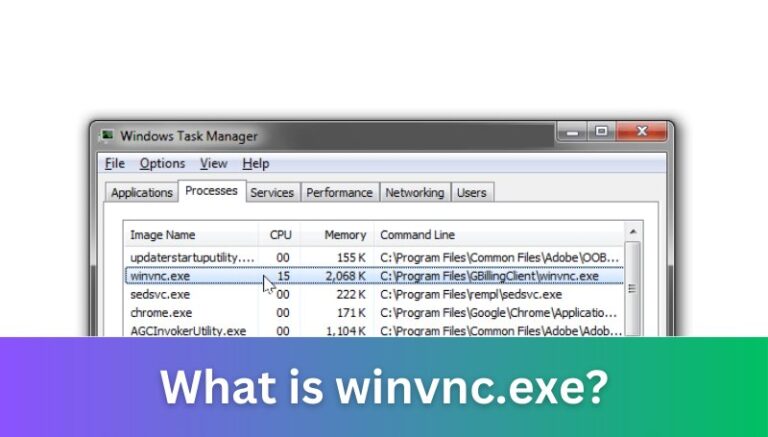
To put it simply, winvnc.exe is an executable file that serves as the core component of the VNC (Virtual Network Computing) server for Windows known as UltraVNC. This powerful software allows users to view and control a computer remotely over the internet. With UltraVNC, you can see what's happening on another computer's screen and interact with it using your mouse and keyboard.
As for the location of winvnc.exe, it is typically found in a subfolder of "C:\Program Files (x86) or within the C:\Windows or C:\Windows\System32 directories. Common paths include C:\Program Files (x86)\UltraVNC\ or C:\Program Files (x86)\GBillingClient\.
Part 2. How to Install and Configure WinVNC?
You can establish remote access with WinVNC by following a few simple steps. This guide will take you through the installation and configuration process.
p align="center">
Step 1: Download WinVNC
First of all, go to the official UltraVNC website or a trusted software repository to download the UltraVNC installer.
Step 2: Install WinVNC
The installation process of WinVNC involves the following steps:
- Run the Installer: Locate the downloaded installer file (usually in your Downloads folder) and double-click on it to run the setup program.
- Follow the Setup Wizard: A setup wizard will appear guiding you through the installation process. Click Next to proceed with the default settings.
- Select Installation Components: You may be prompted to choose which components to install. Ensure that “VNC Server” is selected. You can also choose to install additional tools if you require them.
- Install Default Registry Settings: After installation, you can opt to install the default VNCHooks registry settings. This is done by selecting “Install Default Registry Settings” from the WinVNC folder in your Start menu. This step helps WinVNC work well with some applications that may interfere with remote access.
- Complete the Installation: Once you have made your selections, click “Install” to complete the process. After the installation finishes, you may need to click “Finish” to exit the setup wizard.
Step 3: Configure WinVNC
You can start WinVNC by going to the Start menu and selecting it from the list of installed programs. After that, you need to configure the following settings:
- Add to Startup (Optional): If you wish for WinVNC to run automatically every time you log in, you can create a startup shortcut. Go to Start -> Settings -> Taskbar menu, and add WinVNC to your Startup group.
- Access the System Tray: After starting WinVNC, a small green VNC icon will appear in your system taskbar, indicating that the server is running.
- Right-Click for Option: Right-click on the VNC icon in the system tray. A menu will appear with several options:
Properties: Click this option to open the Properties dialog. Here, you can adjust various settings, such as security options, display settings, and network configurations.
Kill All Clients: This option will disconnect all currently connected clients from the server if you need to stop remote sessions.
Close: Selecting this will shut down the WinVNC server.
Step 4: Set Password and Security
For security reasons, it's essential to set a password for remote access. In the Properties dialog, look for the Authentication section and set a strong password. Depending on your needs, you can also configure other settings related to display, performance, and user permissions.
Part 3. What is WinVNC Used for?
As we have discussed earlier, WinVNC or UltraVNC is a powerful tool with a range of applications. Here are some of the common uses of winvnc.exe that highlight its versatility:

1. Remote Technical Support
WinVNC is widely used for remote technical support. It allows IT professionals to troubleshoot issues on distant systems without being physically present. IT professionals can connect to a user's computer from anywhere. Support staff can see the user's screen, control their mouse and keyboard, and resolve problems quickly.
2. Remote Access to Personal Devices
Another major application of WinVNC is its ability to allow users to connect to their personal computers remotely. If you are traveling or away from your home or office, you can connect to your desktop computer. It is particularly useful for accessing files, applications, or software that are only available on your home system.
3. File Transfer
With WinVNC, users can easily transfer files between the connected systems and streamline tasks like sharing documents or important data across devices. This feature is especially beneficial for sharing documents, images, or software without needing to use email or other file-sharing services.
4. Collaboration and Training
In educational settings or collaborative projects, winvnc.exe can be used for training sessions or presentations. A trainer or instructor can share their screen with multiple participants so that they can guide them through processes or software in real-time.
5. Monitoring Systems
For system administrators, WinVNC is an essential tool. It provides the capability to monitor servers and manage multiple computers remotely in order to ensure efficient system oversight. You can keep an eye on system performance, check logs, and make sure everything is running smoothly.
Part 4. Is WinVNC Safe?
When using winvnc.exe, it is crucial to verify the integrity and safety of this executable file to ensure that it is not malware. The trustworthiness of the file largely depends on where it is located on your computer. To check whether winvnc.exe is safe, you can follow a simple process.
- First, access the Task Manager by pressing Ctrl + Shift + Esc on your keyboard.
- In the Task Manager, look for the process labeled winvnc.exe, right-click on it, and select Open file location.
- If the file is located in C:\Program Files\UltraVNC, it indicates that the application is legitimate and safe for use.
- However, if you find winvnc.exe in directories such as C:\ or C:\System32, it may pose a security risk and could potentially be malware.
To ensure that your remote desktop connections using WinVNC remain secure, it is essential to adopt best practices that can help mitigate potential threats.
- Use Strong Passwords: Create complex passwords with a mix of letters, numbers, and special characters.
- Enable Encryption: Utilize encryption options available in winvnc.exe to protect data during transmission.
- Limit User Access: Only allow trusted users to connect and set specific permissions for their access.
- Use a Secure Network: Connect through private and secure networks and try to avoid public Wi-Fi as much as possible.
- Monitor Connections: Regularly check active connections and disconnect any unauthorized users.
- Keep Software Updated: Ensure that winvnc.exe and your operating system are regularly updated to the latest versions for optimal security.
Part 5. Better Remote Access Solution than WinVNC to Try
While WinVNC has been a popular choice for remote access, there are several reasons why you might consider looking for a better solution. Security concerns are one of the primary issues, as winvnc.exe may not provide the robust encryption and security protocols that some users require.
In situations where you need a more comprehensive and secure solution for remote access, AirDroid Remote Support emerges as a powerful and most suitable alternative. With its intuitive interface and effortless navigation, AirDroid Remote Support enhances security protocols to protect your data and make it an excellent choice for various remote access needs. This software is designed to provide seamless remote support across a wide range of devices and ensure that users have the tools they need for effective and secure remote assistance.
- Black Screen Mode provides a black screen on the controlled device to protect sensitive information from being seen by unauthorized viewers during a session
- All remote support sessions are secured by AES-256-bit encryption, TLS 1.2, and other industry-grade security features, which ensure that your data is protected throughout the connection
- AirDroid is equally effective for managing a large number of devices and users that makes it a suitable option for businesses and teams requiring remote support
- The platform ensures quick and efficient support, which allows users to resolve issues in real time without unnecessary delays
How to remote control android using Airdroid
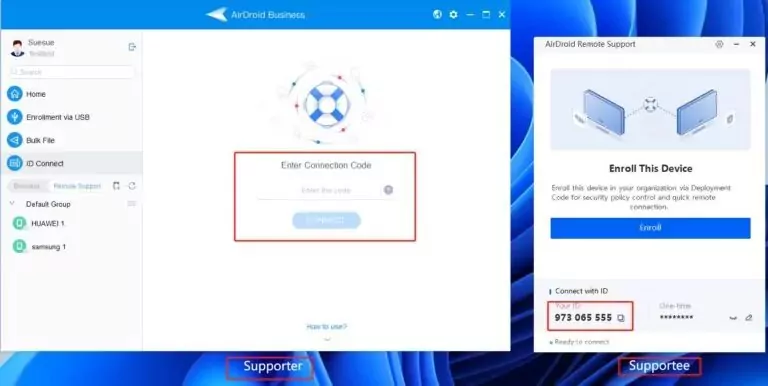
- Step 1.Download the installer from AirDroid official website. Install the software on both local and remote PC.
- Step 2.Launch AirDroid Remote Support on the remote PC and note down the connection code. Enter the code on local PC and click Connect.
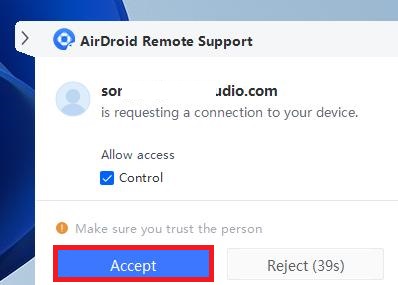
- Step 3.Click Accept on the remote PC to establish the connection.
p align="center">
p align="center">
Conclusion
We have tried to cover everything you need to know about winvnc.exe, including how it works, its features, and the security concerns associated with its use.
While WinVNC is a handy tool for remote access, its security vulnerabilities and limitations might lead users to look for more dependable alternatives. We recommend trying AirDroid Remote Support. By choosing this tool, you can enhance your remote access experience while ensuring that your data remains protected.


Leave a Reply.