How to Run Android on Ubuntu [5 Latest Ways]
Seamlessly integrating Android apps into Ubuntu in today's technical landscape is vitally important. However, this article explores the complexity inherent in technology. It reveals why people aim at combining Android apps or games with Ubuntu. This article will explore these basic theories and how to run Android on Ubuntu and hopefully give you useful help.
Can I Run Android Apps/Games on Ubuntu?
Of course. Indeed, integrating Android applications and games in the Ubuntu setting is a realistic possibility. These connections are facilitated by various means in which the major techniques include the use of emulator and compatibility layer.
Why Do People Need to Run Android Apps/Games on Ubuntu?
Different users with different objectives require running their Android apps and games on Ubuntu as imperative. Notably:
Developers Seeking Linux Compatibility
It is important for Android application developers to test their applications within a Linux environment. This ensures that Android apps run smoothly on Ubuntu and allows developers to optimize their programs for a wider audience.

Gaming Enthusiasts Integrating Android Titles
Aggressive gamers considering Linux OS yearning to play Android games on Linux PC. The integration brings about a unique gaming experience using the abilities of Ubuntu and the wide range of Android games.
Power Users Harnessing Linux and Android Synergy
This includes power users who are known to be keen on using advanced options, and they see the benefit in combining Linux and Android capacities. They can take advantage of the strong capabilities of the Linux environment and easily integrate with Android application functionalities by running Android apps.
Principles of Running Android Apps/Games on Ubuntu
In most cases, when you run an Android app on Ubuntu, the app is actually running in a sandboxed environment. This means that the app is isolated from the rest of your system and cannot access your personal files or data.
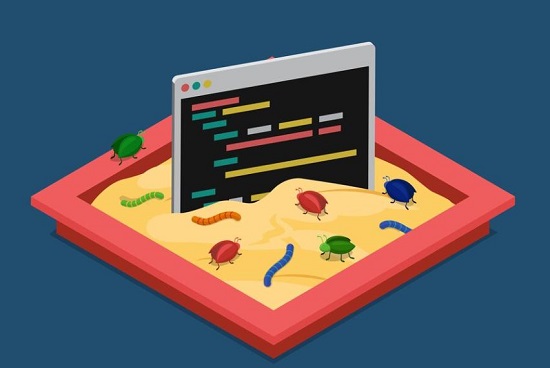
This sandboxed environment is created by the emulator or compatibility layer that you are using. The emulator or compatibility layer also translates the Android app's instructions into instructions that the Linux kernel can understand.
5 Ways to Run Android on Ubuntu
In this section, we explore various up-to-date viable options for running Android on Ubuntu and discuss the system requirements, how-to's, and benefits of these alternative methods. The well-known Anbox, although very successful, has been deprecated since February 3, 2023 and is no longer actively maintained. In its stead, we present five latest methods for seamless integration:
AirDroid Personal - The Easiest Way
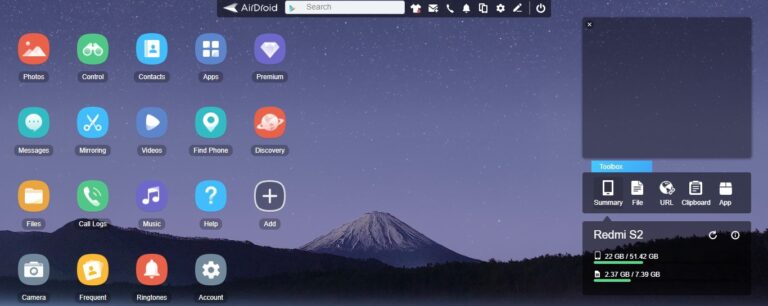
AirDroid Personal stands out as a user-centric solution, seamlessly bridging Android devices with Ubuntu. On Ubuntu, you can easily access your Android device on AirDroid Web for various operations. Offering a departure from dedicated emulators, it empowers users to run Android apps and games on their Ubuntu computers directly. What's more, it can also access your personal files or data.

Requirements: Recommended to use Google Chrome to access AirDroid Web.
Step by Step Guide
Step 1: Download and install AirDroid Personal on your Android phone.
Step 2: Access the AirDroid Web site through your browser. Sign in with the same account or click on Scan QR code and scan that QR code on your Android phone app. (If you don't have an account, create one.)
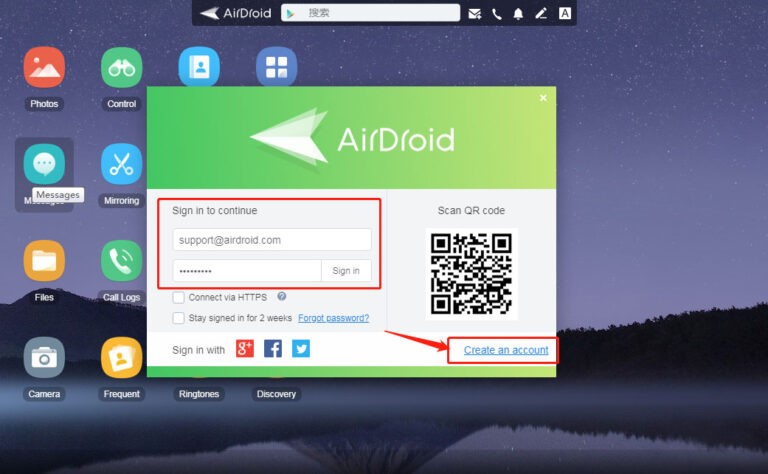
Step 3: The program will establish a remote connection by web. After that, you can use your mouse and keyboard to enjoy all the features, including playing Android mobile games on your Ubuntu PC.
Pros
- It eliminates the need for a separate emulator, streamlining the integration process.
- Users can run Android applications and games directly on their Ubuntu computers.
- It has a user-friendly interface, catering to both novice and experienced users.
Cons
- One notable drawback is the reliance on internet connectivity for the seamless operation.
Android x86 - Android Virtual Machine
Reliable emulation environment is what supports efficiency in testing and developing in many cases, and it is Android x86 that takes a particular position for introducing Android in a virtual machine under Ubuntu. This approach is tailored towards developers and testers, allowing users to experiment with app designs and test them on an actual Android environment.
Requirements: Standard virtualization-capable hardware.
Step by Step Guide
Step 1: Acquire the Android x86 ISO from the official source. Burn the downloaded file to cdrom, or create a bootable USB flash drive (the most recommended way).
Step 2: To start the installation, click on "Install Android-x86 to harddisk."
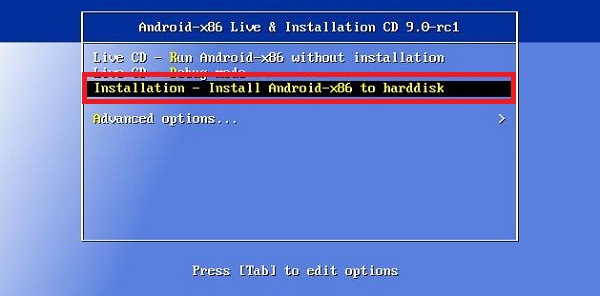
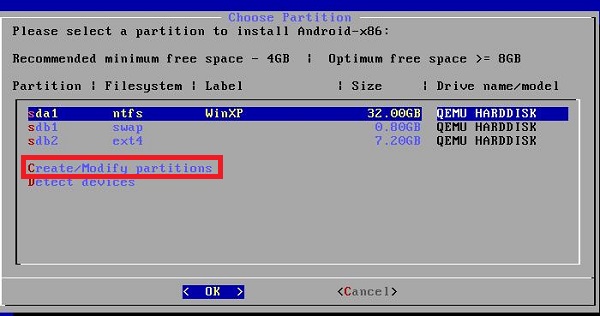
Step 3: After booting for a while, a partition selection dialog will appear. You can select an existing partition to install Android-x86, or you can create or modify one.
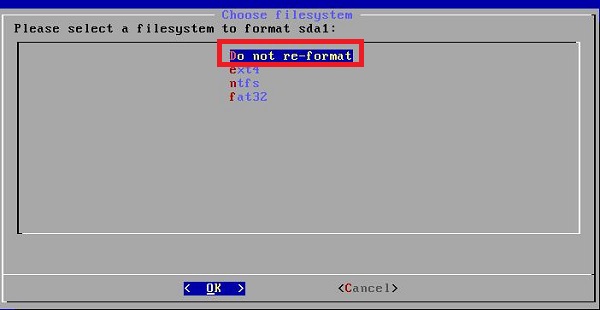
Step 4: Since Android-x86 coexists with other operating systems or data on the selected partition, if the partition is already formatted, you can click on "Do not re-format" to preserve the existing data.
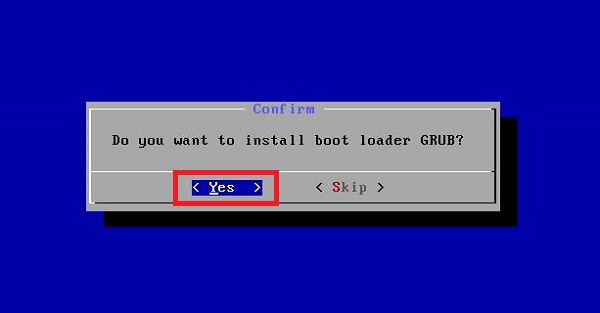
Step 5: In the next step, select "Yes" to answer whether or not to install the boot loader GRUB.
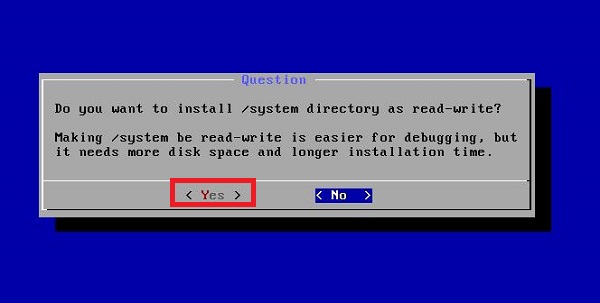
Step 6: Then, if you need to modify your system, select "Yes" to the question "Do you want to install /system directory as read-write".
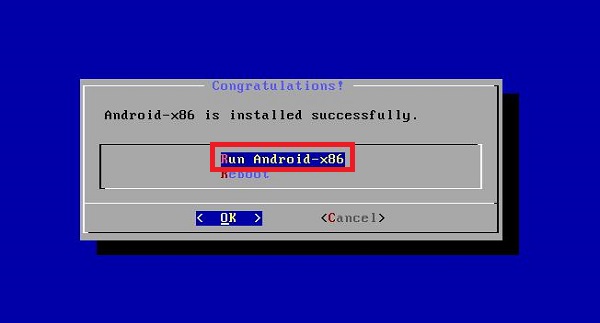
Step 7: After the above steps, your installation is complete. You can either run Android-x86 directly, or reboot and run it.
Pros
- It provides users with a direct and authentic Android environment, offering an immersive experience for testing and development.
- It facilitates evaluating and refining Android applications within a virtualized space.
Cons
- Operating Android x86 within a virtual machine can be resource-intensive, potentially impacting overall system performance.
- Users unfamiliar with virtualization concepts may face a learning curve.
Waydroid - Full App Integration
Waydroid is a solution for booting a complete Android system on Ubuntu. Waydroid makes it possible for users running Ubuntu to access Android applications by integrating functionalities of both operating systems into one.
Requirements: Meet the CPU and GPU requirements supported by Waydroid.
Step by Step Guide
Step 1: Download the Waydroid installation package from Waydroid's official site.
Step 2: On Ubuntu, install the pre-requisites. Execute the following command:
sudo apt install curl ca-certificates -y
Step 3: Next, add the official repository. Execute the following command:
curl https://repo.waydro.id | sudo bash
Step 4: Then, you can install waydroid. Execute the following command:
sudo apt install waydroid -y.
Once the installation is complete, you can launch Waydroid from the Applications menu.
Pros
- It provides a seamless interaction experience between Android applications and the Ubuntu environment.
- With complete application integration.
Cons
- Its compatibility is contingent on the supported CPU and GPU.
- Installation is more complicated.
Android Studio - Better for Developers
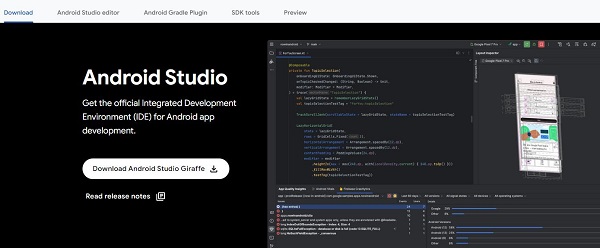
Android Studio is a cornerstone for Android app development, offering a robust environment with extensive debugging tools. To harness its power on Ubuntu, ensure your system meets the requirements and follow these steps for installation and usage.
Requirements: System with sufficient processing power and memory.
Step by Step Guide
Step 1: Navigate to the official Android Studio download page and acquire the Linux version of Android Studio.
Step 2: For the 64-bit version of Ubuntu, you need to install some 32-bit libraries by executing the following command:
sudo apt-get install libc6:i386 libncurses5:i386 libstdc++6:i386 lib32z1 libbz2-1.0:i386
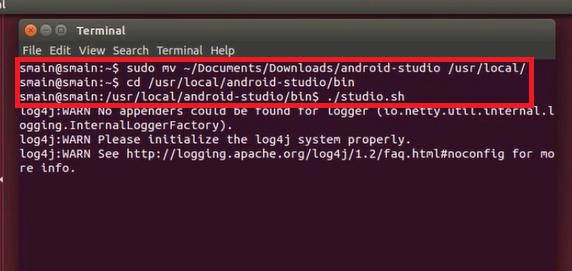
Step 3: Unpack the downloaded installation package to the appropriate location for your application, e.g. /usr/local/.
Step 4: Open a terminal to start Android Studio, enter the android-studio/bin/ directory, and execute studio.sh.
Step 5: Select whether you want to import previous Android Studio settings, then click "OK".
Step 6: The Android Studio Setup Wizard guides you through the rest of the setup, including downloading the Android SDK components required for development.
Pros
- It provides a comprehensive and feature-rich environment for Android app development.
- It assists in identifying and resolving issues during the development process.
Cons
- Might be complex for users with casual or non-development intentions.
Genymotion - Android Virtual Devices
Genymotion, renowned for its versatility in creating virtual Android devices, serves as a valuable tool for testing on Ubuntu. To harness its capabilities, adhere to the outlined requirements, installation steps, and insights into its usage.
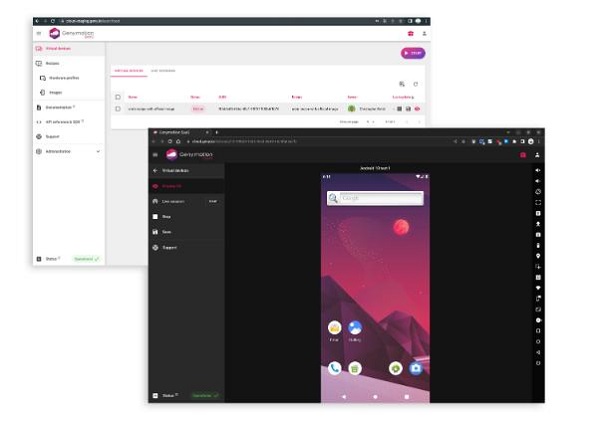
Requirements: Systems feature virtualization-capable hardware.
Step by Step Guide
Step 1: Visit the official Genymotion website and download the appropriate version for your Ubuntu system.
Step 2: Open terminal and enter to Download folder.
Step 3: Execute the following command to grant run permissions to the Genymotion installer binary:
chmod +x genymotion-X.Y.Z-linux_x64.bin
Step 4: Execute the following command to run the installer:
./genymotion-X.Y.Z-linux_x64.bin -d PATH
Pros
- It offers a range of virtual Android devices with diverse configurations.
- The intuitive interface simplifies the process of creating and managing virtual devices.
Cons
- Some advanced functionalities may require a subscription.
Restrictions and Precautions of Running Android on Ubuntu
Running Android on Ubuntu, while feasible and advantageous, has limitations. It's crucial to be aware of these constraints and take necessary precautions to ensure a smooth experience. Here are some key restrictions and precautions:
Restrictions
Open Source Methods Are More Complex to Install
Utilizing open-source methods for running Android on Ubuntu may introduce complexity during installation. Users opting for open-source solutions should be prepared for a certain level of technical proficiency.
Mostly Based on the Creation and Execution of Virtual Machines and Systems
Many Android-on-Ubuntu solutions are centered on the creation and execution of virtual machines and systems. While this approach provides versatility, it may demand additional system resources and could pose challenges for users unfamiliar with virtualization concepts.

Sluggish Virtualization
The virtualization process itself can sometimes lead to sluggish performance, especially on systems with limited resources.
Some Applications May Not Work Properly
Despite advancements in compatibility, certain Android applications may not function optimally within the Ubuntu environment. This can be attributed to differences in system architecture, hardware, or other compatibility issues.
Precautions
Choose Solutions Based on Skill Level
Select Android-on-Ubuntu solutions based on your skill level. If you are less experienced, opt for user-friendly solutions with straightforward installation processes.
Check System Requirements
Before installing any Android-on-Ubuntu solution, verify that your system meets the specified requirements.

Monitor Virtualization Performance
Keep an eye on the performance of virtualization, especially if you experience sluggishness. Adjust virtual machine settings, allocate sufficient resources, and consider upgrading hardware if needed.
Test Critical Applications
Prioritize testing of critical Android applications within the Ubuntu environment. Identify any compatibility issues early on and seek alternative solutions if essential applications do not function as expected.
Bonus: Can I Install Ubuntu on Android?
While our focus has been on running Android applications on Ubuntu, the inverse is also possible — installing Ubuntu on Android. Below are step-by-step guides for two different methods: Ubuntu Touch and UserLAnd.
Ubuntu Touch
Ubuntu Touch is an official mobile version of the Ubuntu operating system. It offers a unique user interface designed for touch-enabled devices. Installing Ubuntu Touch on your Android device provides a mobile experience powered by Ubuntu, allowing users to explore a convergence of mobile and desktop environments.
Installation Steps
Step 1: Download the Ubuntu Touch image specific to your device from the official website.
Step 2: Connect your device to your computer using USB.
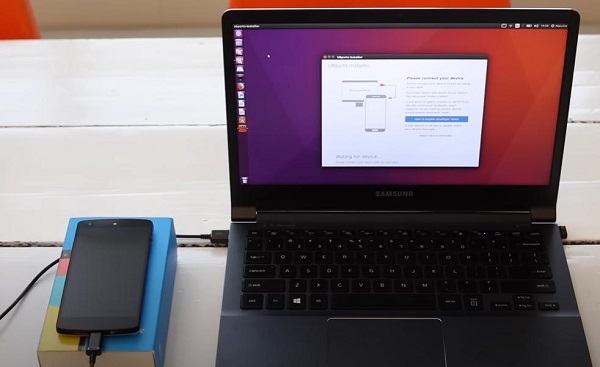
Step 3: Follow the on-screen instructions. Select your device from the drop-down list and choose which operating system you want to install.
Step 4: While the device is off, press and hold "Volume Up" + "Power". Then, press "Continue" on the installer.
Step 5: Reboot by pressing the "Power" and "Down" buttons and the installer will download Ubuntu Touch and send the files to your device.
Step 6: After waiting for the installation process and disconnecting the USB connection, you can run Ubuntu Touch on your Android phone.
UserLAnd
UserLAnd is an Android app that enables users to run a Linux distribution, including Ubuntu, on their Android devices. It simplifies the installation process and doesn't require rooting for some functionalities. UserLAnd facilitates a user-friendly way to have a Linux environment directly accessible from your Android device.
Installation Steps
Step 1: Download and install the UserLAnd app from the Google Play Store.
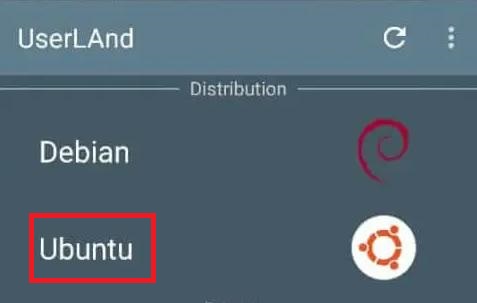
Step 2: Open UserLAnd and choose "Ubuntu" as the distribution.
Step 3: Customize the installation settings, such as username, password, and VNC settings.
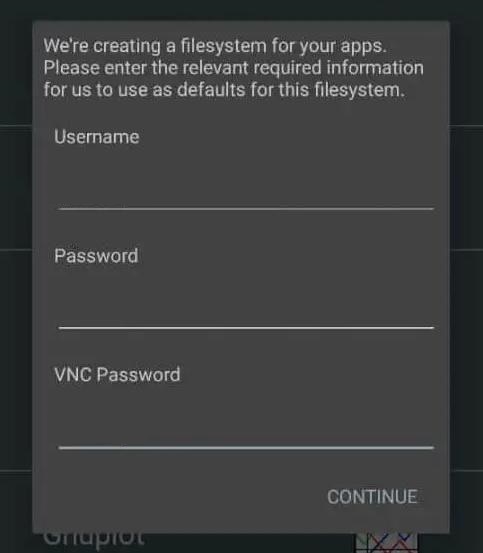
Step 4: Initiate the installation process, and once completed, launch the Ubuntu environment through the UserLAnd app.
Conclusion
In conclusion, the intersection of Android and Ubuntu opens up a realm of possibilities for users seeking diverse functionalities. Whether running Android apps on Ubuntu for seamless integration or exploring methods to install Ubuntu on Android devices, the landscape is rich with options.
Each method presents its unique advantages and considerations, catering to a spectrum of user preferences. Whether you are a developer, a tech enthusiast, or someone seeking cross-platform versatility, the evolving synergy between Android and Ubuntu offers a dynamic and expanding ecosystem to explore.


Leave a Reply.