How to Set Up AnyDesk Automatic Accept [Step-By-Step Guide]
Quick Answer
To use AnyDesk automatic setup:
1. Install the app and go to Settings > Security > Unlock Security Settings > Enable Unattended access > Set password for unattended access.
2. Then, paste the AnyDesk ID on your local machine and type in the password for getting unattended access in the future.

Imagine connecting to your home PC from work without waiting for someone to accept the connection request! This feature, also called Unattended access, is a built-in functionality of many remote desktop tools like AnyDesk. Can’t wait to try it out?
Let us teach you how to set up “AnyDesk automatic accept” to directly secure access to a remote PC from anywhere. The blog post covers all the necessary information about AnyDesk unattended access to give you a smooth experience.
Know About AnyDesk Automatic Accept Connection, Is It Safe Enough?
Generally, accessing a remote computer requires local permission to begin the session. It’s not always feasible to have someone at the other end to accept the connection request. The AnyDesk unattended access overcomes this problem by allowing a direct connection between the devices using a password, without a request for permission.
For this, the AnyDesk software must be installed on both devices. Also, ensure the remote device is turned on and connected to a stable internet connection. This means once you set up “auto accept on AnyDesk” on a device, accessing it is just a couple of clicks away.
Security Considerations
However, with great convenience, comes great responsibility. Setting up the AnyDesk automatically accept connection is straightforward, but it necessitates stringent security measures to ensure security. To do this:
- Set up a complex unattended access password, containing a mixture of numbers, alphabets, and special characters.
- Use two-factor authentication.
Note that anyone who knows your password and AnyDesk ID has full access to your computer, including its content. So, keep your credentials secure.
Step-by-step Guide on Set Up AnyDesk Automatic Accept Connection
Below are the detailed steps to establish an AnyDesk auto-accept connection on your device.
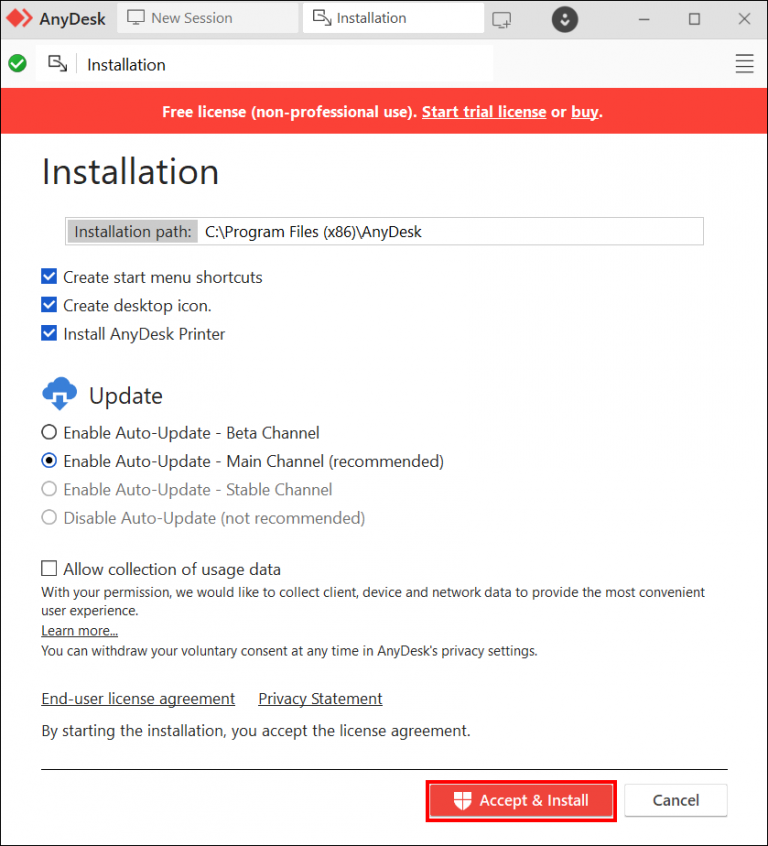
Step 1: Install and launch AnyDesk on the device you want to control automatically.
Step 2: Complete the setup process and log in, if you already have an account, or register with a new account.
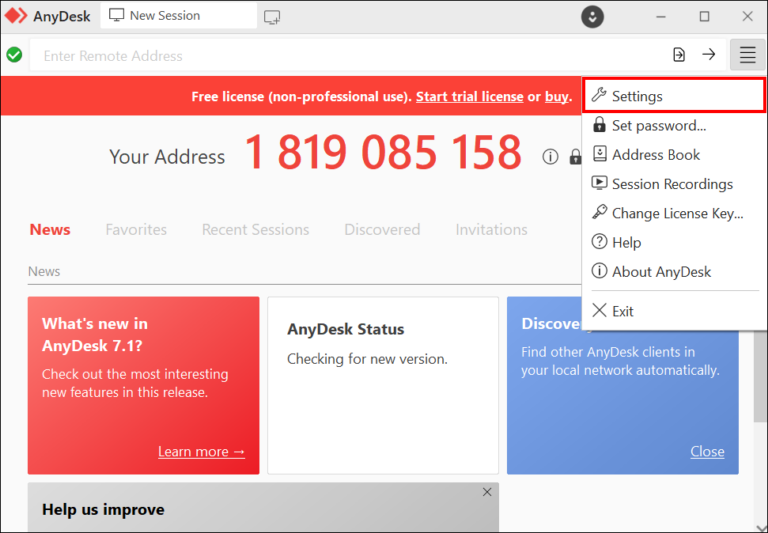
Step 3: Click the three-line icon at the top and choose Settings
Step 4: Navigate to the Security tab from the left plane and click “Unlock security settings.”
Step 5: Now, tick the “Allow other devices to save login information for this desk” and “Enable Two-Factor Authentication” options.
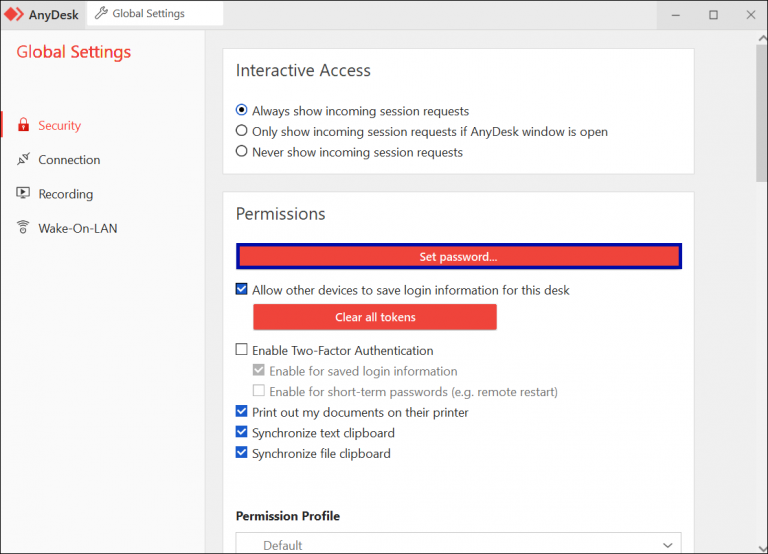
Step 6: Click “set password” and type in a unique password that you’ll use to access this device remotely.
Step 7: Use the drop-down arrow of “Profile Permissions” to select “Unattended access.”
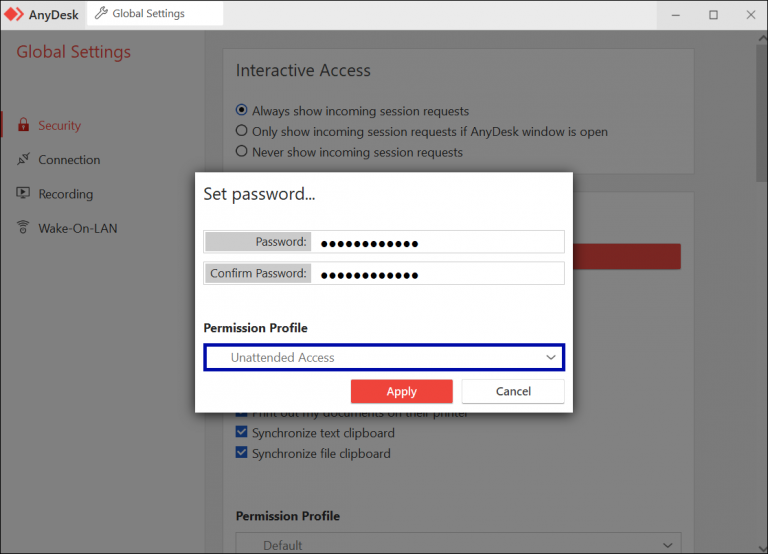
Step 8: Click Apply to save the settings.
Now, it’s time to connect your devices to complete the “AnyDesk accept connection automatically” setup process. For that:
Step 1: Launch the AnyDesk application on both devices.
Step 2: On the remote device, copy the 9-digit AnyDesk ID and paste it on your local PC.
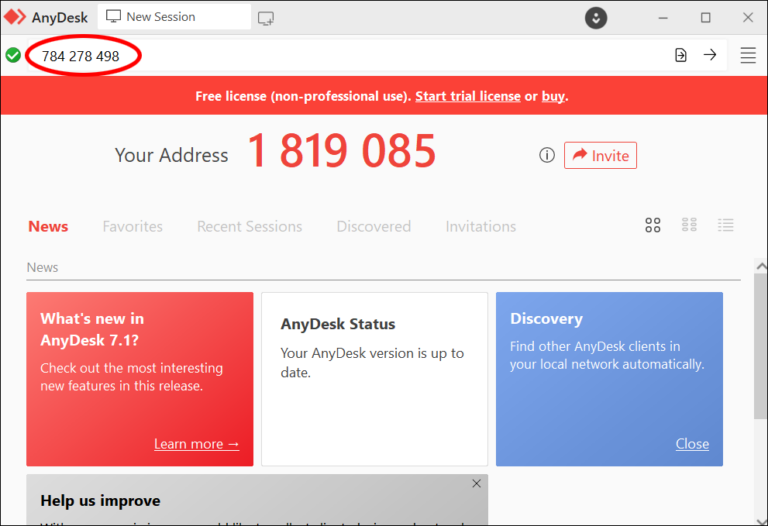
Step 3: When it prompts, enter the password you have just set up.
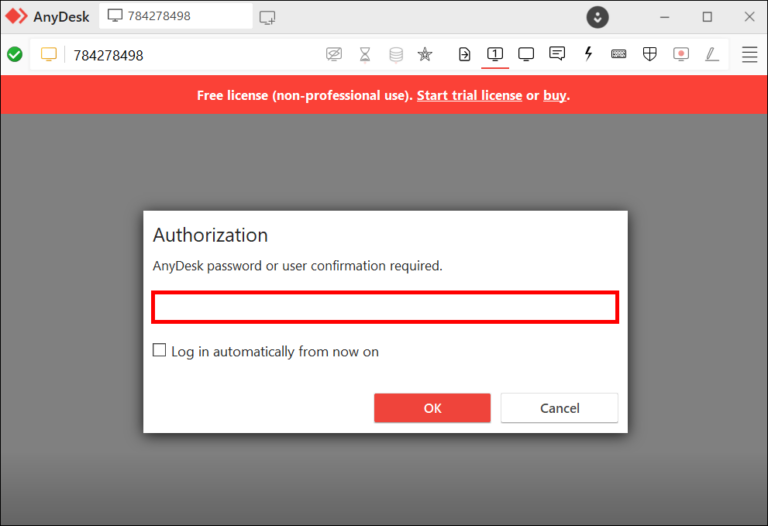
(Tip: Tick the “Log in automatically from now on” if you don’t want to type in the password every time. You can undo this option from the remote device’s security settings by selecting “Clear all tokens.”)
Step 4: Hit Ok and voila, you have successfully set the AnyDesk auto-accept feature.
Now, connect to this remote device from anywhere without having someone to manually accept the invitation.
Benefits of Automatic Accept Connection in AnyDesk
Having the ability to secure access to a remote device automatically servers a host of benefits, like:
Saving Time: You don’t need a person to go to the remote PC and accept the invitation request. Just enter the password to initiate the AnyDesk auto accept session, saving a lot of time.
Increase Efficiency: This feature makes it easier to hop between your home and office PCs effortlessly. Also, it’s ideal for effectively managing multiple devices in a workplace environment.
Added Convenience: The whole idea of unattended access is to boost convenience, allowing users to access remote PCs (already set up) from anywhere with a single click.
Shortcomings of AnyDesk Automatic Accept
AnyDesk is a handy tool to secure unattended access to remote devices. However, it doesn’t come without its share of downsides. Users complain of several common issues when using AnyDesk automatic accept, including:
1. Frequent Glitches: Many operations of the unattended access often don’t work properly, hindering the workflow.
2. Difficult Learning Curve: AnyDesk has complex security settings to manage permissions and other tasks, which can be challenging for not-so-tech-savvy users.
3. Sluggish Performance: The software frequently gets slower when accessing a remote device unattended. It can be due to poor internet but users believe AnyDesk needs additional improvement.
4. Regular Disconnections: The biggest drawback of AnyDesk is frequent disconnections, especially when there’s no activity for a few minutes. Having to reconnect multiple times during a session can be pretty frustrating.
Bonus Tip: A Perfect Alternative to AnyDesk Automatic Accept for Better Efficiency
Luckily, AnyDesk is not the only player in the game that offers unattended access. If you’re having difficulty in setting up AnyDesk to accept connection automatically or want an even better solution, consider trying AirDroid Remote Support.
Designed for both individual and commercial use, AirDroid offers rich functionality, a better interface, and an easy learning curve. Unlike AnyDesk, it doesn’t encounter sluggishness or disconnections when using unattended access. Moreover, the admin has plenty of options to customize its interface as per requirements.
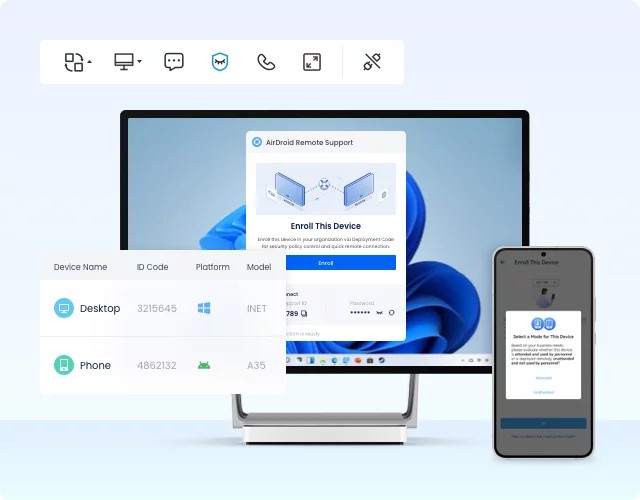
Advantages of AirDroid Remote Support
Here are all the features of AirDroid Business that make it the best tool to access unattended Android devices.
1. Uninterrupted Unattended Access
Secure unattended access within seconds with premium-level security protocol. With this tool, you never have to worry about disruption in the connection or system glitches. It is compatible with mobile devices as well, allowing users to ensure smooth operations from anywhere.
2. Black Security Screen
To ensure utmost security, the user can force a black screen on the controlled device. This allows users to perform personal tasks without worrying about passersby peeking into what they’re doing.
3. File Transfer and Voice Chatting
It comes with the additional benefits of file transfer capabilities. You can share files to multiple remote devices in one go as well as collaborate with them in real-time over voice chatting. It is ideal for handling various office tasks remotely.
4. Lightweight Remote Management
AirDroid gives you access to all the IT infrastructure of your organization from a single, intuitive interface. You can assign various roles and permissions to individual systems, gain access to session logs, and mirror the remote screen to provide support.
5. AR Camera
This feature is available for Android and iOS devices to help you troubleshoot problems and provide real-time support.
FAQs
Q1: How to keep AnyDesk running all the time?
If you want to keep AnyDesk running by default whenever the PC is turned on:
- Open the app and head to Settings.
- Under the Sessions tab, tick the “Start AnyDesk with Windows" option.
- AnyDesk will now launch automatically on startup.
Q2: Can I connect to AnyDesk without connection request?
Yes, AnyDesk comes with unattended access functionality that enables you to connect to AnyDesk without a connection request. After setting up the unattended access, you can easily connect to the remote device directly with a password.
Q3: How do I know if someone is connected to my AnyDesk?
To check the active AnyDesk connections, go to the Sessions tab and check the Source address and Destination address. It will show you the address of the devices that started and accepted the connection requests.
Q4: How do I stop AnyDesk access on my laptop?
To end unattended access on AnyDesk, go to Settings > Security, and untick the "Enable unattended access" option. Also, click "Clear all tokens" to end the existing permissions
Final Remarks
And that’s all for today. Now, you know how to set up AnyDesk's automatic accept feature to gain unattended access to remote devices. As it also brings considerable security risks, be sure to set a strong password.
For a more personalized and seamless experience, get assistance from AirDroid Remote Support. It offers enhanced functionality with better customization options for unattended remote management, making it a top choice for individuals and businesses alike.
Feel free to ask any questions.


Leave a Reply.