[Detailed Guide] AnyDesk Screen & Session Recording
The remote workers attached to online businesses connect with the help of remote support software, a great innovation of the latest technology. These tools facilitate session recording and ease in keeping a record of everything that occurs during remote connections like remote meetings.
AnyDesk stands out as an option that supports recording sessions from both ends of the connection. This means that it can record not only outgoing connection sessions, but also incoming ones. Next, let's explore how to record AnyDesk screens & sessions.
Part 1: How to Set Up Session Recording on AnyDesk
AnyDesk screen recorder feature saves content during online meetings and makes it easier to locate technical issues in a system and share presentations. However, setting up AnyDesk session recording is a main concern. Follow this step-wise guide to execute session recording settings.
Step 1: Navigate to the main menu of AnyDesk and find "Settings."
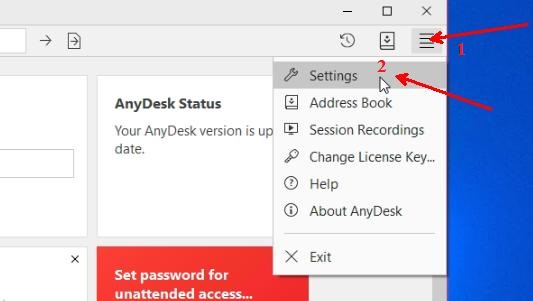
Step 2: Scroll down the settings and find the " Recording " option.
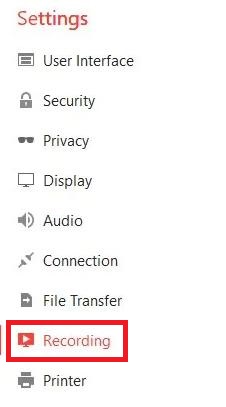
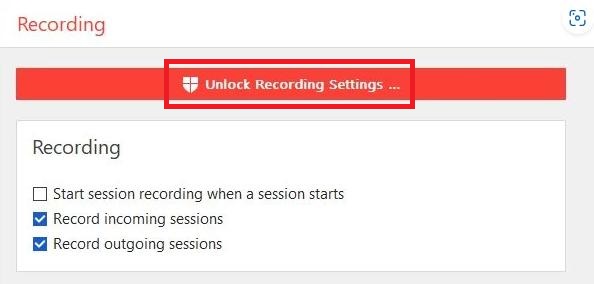
Step 3: Click "Unlock Recording Settings" and select the type of session you want to record in the "Recording" options.
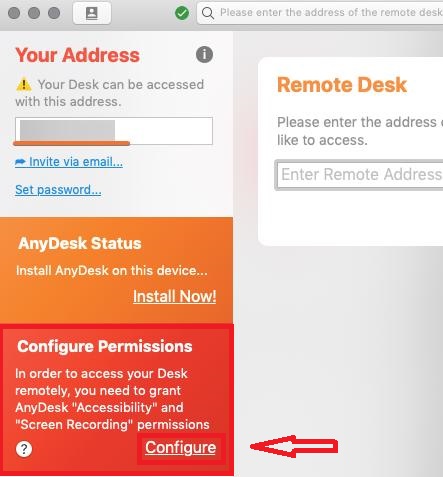
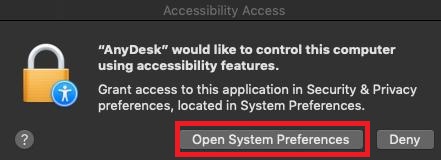
Important to Know: MacOS must grant the appropriate Accessibility and Screen Recording permissions to perform operations such as remote input, screen recording, and disc access on AnyDesk. Let's address how to enable security permissions on MacOS.
Step 1: Tap on the "Configure" option to open the MacOS system preferences and set up permissions for AnyDesk accordingly.
Step 2: Tap on "Open System Preferences ."
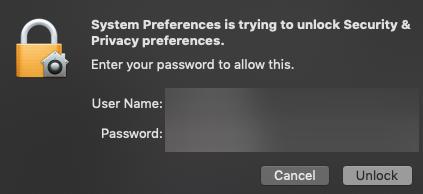
Step 3: Click the lock symbol and unlock "Security & Privacy."
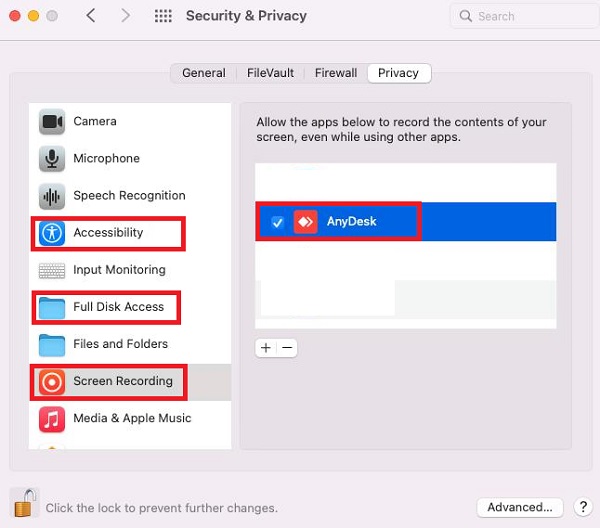
Step 4: Then, glide to the Privacy tab.

Step 5: Add AnyDesk to reliable applications under the Accessibility, Full Disk Access, and Screen Recording sections to grant required permissions.
Part 2: How to Record AnyDesk Screen & Session
Check out the step-wise guide to record AnyDesk screen and session given below. You can choose to record AnyDesk sessions manually or set up automatic recording in the settings.
Manual Recording
In a remote session, press the "Record" button to record the active session on AnyDesk.

Automatic Recording
Step 1: Launch the AnyDesk application and go to "Settings" - "Recording".

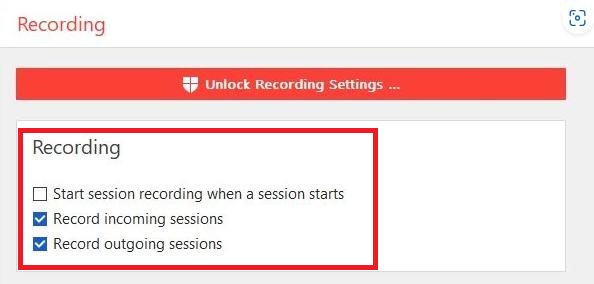
Step 2: Select the type of session you want to record in the "Recording" options.
**Start session recording when the session starts: Turn on the Global recording option
**Record incoming sessions: Allow recording only incoming sessions
**Record outgoing sessions: Allow recording only outgoing sessions
Important to Know: There are a few important points to consider, like all your recordings will be stored locally on your PC only to start AnyDesk session recording. These are saved in the Anydesk file extension and require the AnyDesk app to be accessed or played.
It's not possible to convert this file to any other media type like mp4, etc. Regarding recordings, you can make the application record either only the incoming sessions, only the outgoing sessions, or both of these sessions.
Part 3: How to Access and Play Recorded Files
Once you have finished recording, you can easily access the contents of the recorded session. This section covers the essential details on how to access and play recorded files on AnyDesk.
Access Recorded Files
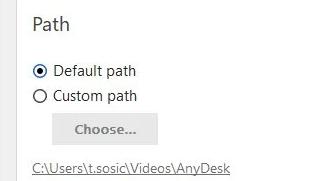
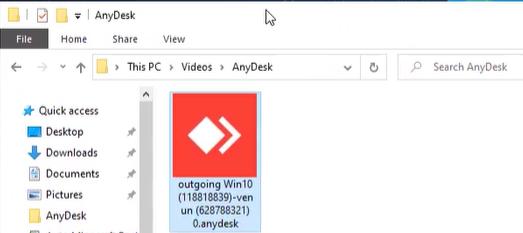
Way 1: You can access the recorded files in the default path where AnyDesk session recordings are saved.
**Windows: %homepath%\Videos\AnyDesk
**macOS: ~/.anydesk/AnyDesk
**Linux: ~/Videos/AnyDesk
Way 2: You can also change the recording file saving location yourself. Go to "Settings" - "Recording" - "Path" and click "Custom path" to choose the location you want to save.
Play Recorded Files
The recorded files can be played from within the AnyDesk app itself with the help of an embedded player that allows you to play all your saved recordings.
Session player is capable of executing some other important functionalities such as start/pause, skip to a certain point, fast forward, and super-fast forward.
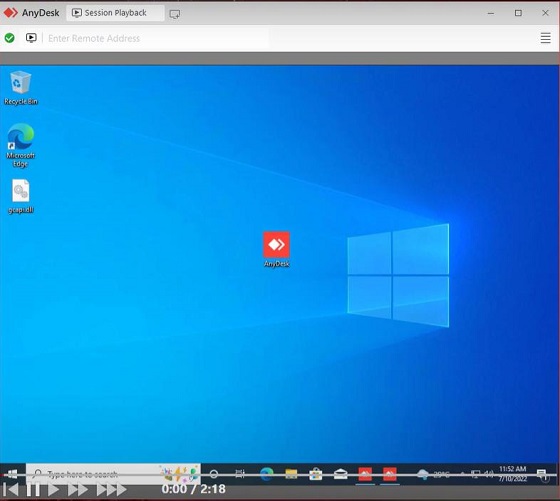
Playing a recording file is also simple. According to the saving path of the recording file introduced in the previous section, find the path where the recording is saved and double-click it to open and play the recording.
Part 4: How to Convert AnyDesk Recording File Format
AnyDesk's built-in session recording feature can only store recorded files in AnyDesk in a specific .ANYDESK file format. This means that AnyDesk session recordings can only be played back using the AnyDesk desktop client and do not support .ANYDESK file format conversion.
However, this is an inconvenience for many users. If users want to send recorded files to others or convert them to the most versatile .mp4 format, this is not possible in AnyDesk.
So, how to convert the format of AnyDesk recording files? Many users choose to use third-party software to convert recording formats.
Users need to download and install the reliable video converter, upload AnyDesk recording files, and choose which format to convert AnyDesk recording files to, such as .mp4 or .avi.

Alternatively, you can record AnyDesk sessions directly using third-party recording software. For example, download OBS Studio and open this free, open-source screen recording software. Then, select the window or screen where AnyDesk is running and start recording on OBS Studio. You can choose the file format you want to record.
Part 5: AnyDesk Screen Recorder Alternative without Extra Settings
If you're looking for an AnyDesk alternative that focuses on recording mobile device screens and remote support sessions, consider AirDroid Remote Support.
AirDroid Remote Support provides great convenience for supporting mobile devices remotely and without additional setup for session recording with the built-in screen recording tool. It allows you to record customer actions and provide support accordingly. It can also be coupled with real-time remote assistance to effectively solve technical issues for the smooth operation of your organization.
To record screen & session at AirDroid Remote Support, there are only three steps:
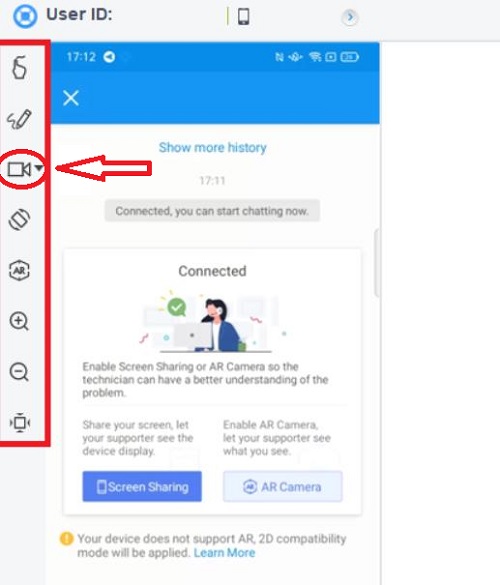
Step 1: Initiate a remote support session.
Step 2: Launch screen sharing. Both the support specialist's end and the customer's end can initiate screen sharing.
Step 3: Click on "Start recording" icon in the left column on the desktop client for screen/session recording.
Conclusion
The emergence of various remote support software featuring session recording is undoubtedly convening remote employees and easing business operations. With this, we conclude the guide on everything you need to know about AnyDesk session recording, including settings, how to record sessions, access recorded files, and convert AnyDesk file format with third-party applications.
But gliding to the best remote support software remains the priority. To end your search, we have recommended AirDroid Remote Support, which serves unparalleled in recording sessions, screen sharing, and solving issues without any complex settings.



Leave a Reply.