How to Change Network from Public to Private
When your network is set to private, your computer is discoverable to other devices on the network. Private networks are typically more secure, as they enable features like file and printer sharing, while the public networks limit these options to protect your data.
In this article, we have list 5 effective solutions to change your network from public to private which enhance your security and improve accessibility among devices.
- Solution 1. Using Windows Settings(For Windows 10/11)
- Solution 2. Control Panel(For Windows 7)
- Solution 3. Change Network to Private by using PowerShell
- Solution 4. Change Your Network from Public to Private using Registry Editor
- Solution 5. Change from Public Network to Private using Local Group Policy Editor
Windows Public vs. Private Networks
The most difference between public and private networks, the primarily revolves around security and network discoverability.
Public Network: This network is use in environments where you do not trust the network, such as cafes, airports, or other public places. Windows disables network discovery and file sharing features on public networks to protect your device from potential threats. This setting helps reduce the risk of unauthorized access and data breaches.
Private Network: This network intended for trusted environments, such as your home or workplace, where you can control access to the network. Windows allows devices to communicate freely and share resources. On the private networks, Windows enables network discovery, which suite for you trust the network and the devices connected to it.
5 Solutions to Change Network from Public to Private
Here are the 5 solutions to help you change from a public to a private network in Windows:
Solution 1. Using Windows Settings(For Windows 10/11)
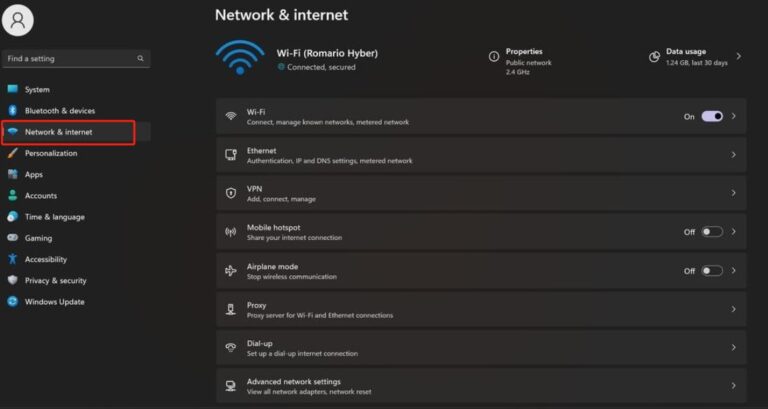
Step 1. Press Win + I, and open Settings app.
Step 2. Go to Network & Internet.

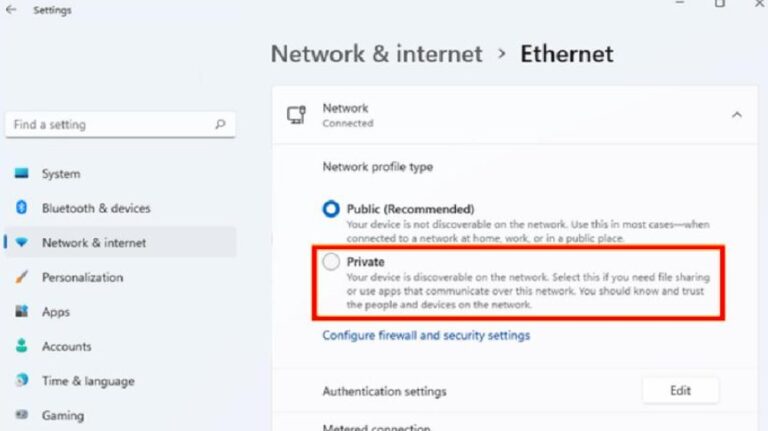
Step 3. Depending on your connection (Wi-Fi or Ethernet), select either Wi-Fi or Ethernet and click on your connected network.
Step 4. Under the network profile section, select Private.

If necessary, make sure your firewall settings align with your private network settings for better security. You may also want to to enable Network Discovery and File and Printer Sharing under the Advanced Sharing Settings in the control Panel.
Solution 2. Control Panel(For Windows 7)
Step 1. Go to Control Panel > Network and Sharing Center
Step 2. Click on Change advanced sharing settings in the left sidebar.
Step 3. Look for the current network and select Private, and save any changes you make.
Solution 3. Change Network to Private by using PowerShell
Step 1. Press Wins + X and select Windows PowerShell(Admin) or Terminal(Admin)
Step 2. Type the command ‘Get-NetConnectionProfile’ to view your current network profiles,
Step 3. Identify the network you want to change and use the command, replacing ‘NetworkName’ with the name of your network:
Set-NetConnectionProfile -Name "<NetworkName>" -NetworkCategory Private
Step 4. Run the ‘Get-NetConnectionProfile’ command again to confirm that the network type has changed to Private
Note: This method is faster for experienced users and you can quickly script changes for multiple networks if needed.
Solution 4. Change Your Network from Public to Private using Registry Editor
Step 1. Press Windows + R to open the Run dialog, type ‘regedit’, and press Enter to open the Registry Editor.
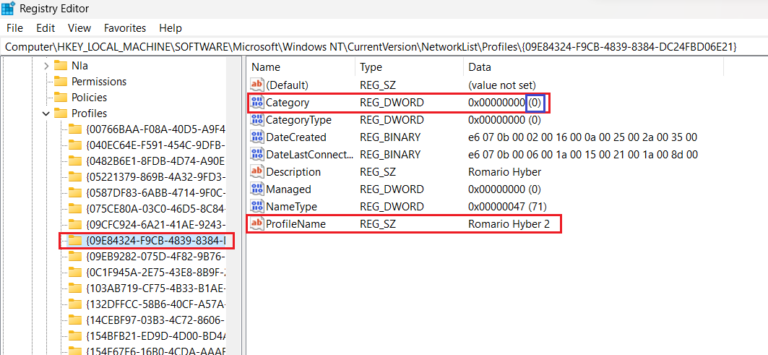
Step 2. Navigate to the network key:
HKEY_LOCAL_MACHINE\SOFTWARE\Microsoft\WindowsNT\CurrentVersion\NetworkList\Profiles
Step 3. Find your network profile(look for the ProfileName)

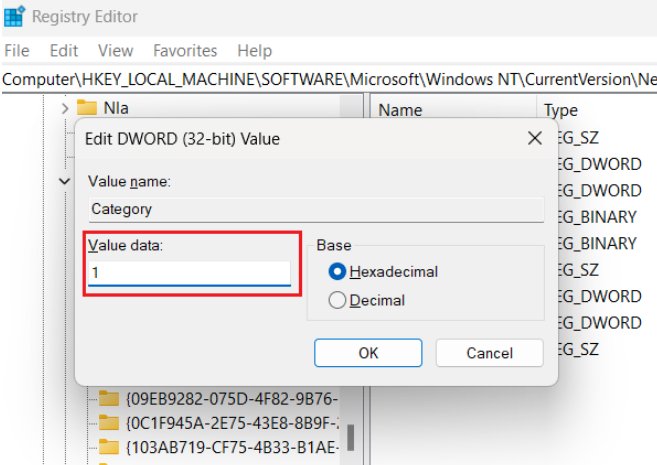
Step 4. Double-click on the ‘Category’ value. Change it to:
- 0 for Public
- 1 for Private

Step 5. Close the Registry Editor and restart your PC for the changes to take effect.
Note: Be cautions when using the Registry Editor,as changes can affect system stability. Always back up the registry before making any changes.
Solution 5. Change from Public Network to Private using Local Group Policy Editor
Step 1. Press Win+R, type ‘gpedit.msc’ and press Enter.
Step 2. Navigate to Computer Configuration > Windows Settings > Security Settings > Network List Manager Policies
Step 3. In the right pane, locate the network you want to change. Right-click it, and select Properties.
Step 4. Under the Network Location section, select Private, then click OK.
Note: The Local Group Policy Editor is only available in certain editions of Windows(like Enterprise and Pro). If you are using a Home version, you won’t have access to this tool.
Conclusion
With multiple methods to change your network from public to private, through Windows Settings, Control Panel, PowerShell, Registry Editor, or Local Group Policy Editor, you can choose the one based on your Windows version and comfort level with system settings. Change your network is set to private can bolster security while enabling easier collaboration among devices on your network.


Leave a Reply.