How to Enable Remote Desktop Using Group Policy? [A Complete Guide]
For IT administrators managing multiple computers in a network domain, remote desktop access is a vital tool. It allows for efficient troubleshooting, software installation, and overall system management without physically visiting each machine.
Imagine you're managing a network of computers in a company. Rather than visiting each machine individually to enable remote desktop, Group Policy allows you to configure this setting centrally, saving you significant time and effort.
It is a powerful feature within Windows Server environments that provides a centralized method to configure settings across a group of computers. This article will guide you through enabling remote desktop access on target computers using Group Policy.
Part 1: How to Install Server Manager on Windows 10
Before diving into the installation process, let's establish a clear understanding of RSAT and Server Manager. RSAT is a suite of tools designed to manage roles and features on Windows Server machines from a remote Windows 10 client.
Server Manager, included within RSAT, acts as the central hub for administering these servers. It provides an intuitive interface to monitor server health, configure roles and features, and perform various administrative tasks.
So, here are the step-by-step guidelines:
Step 1: Check System Requirements
Ensure your Windows 10 version is Professional or Enterprise, as Server Manager cannot be installed on Windows 10 Home edition.
Step 2: Open Windows Settings
1. Press Win + I or type "Settings" in the start menu to open the Settings window.
2. Navigate to Apps & Features -> Optional Features.
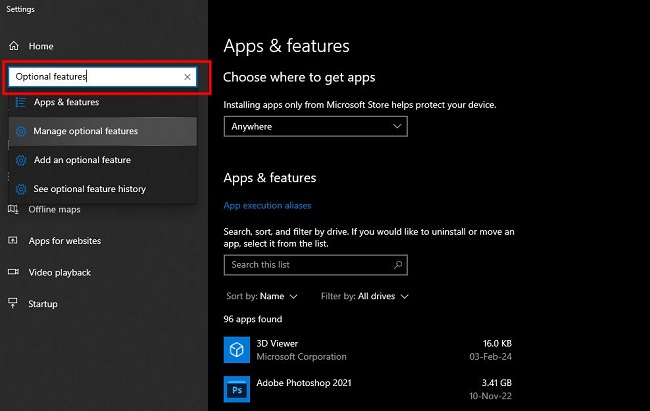
Step 3: Add a Feature & Install Server Manager
1. Click on "Add a feature" at the top of the page.
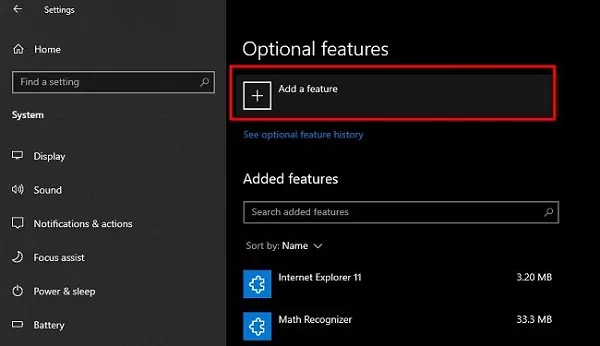
2. In the search box, type "Server Manager" to find the feature. From the list, select "RSAT: Server Manager" by checking the box next to it. Click the "Add" button to begin the installation process.
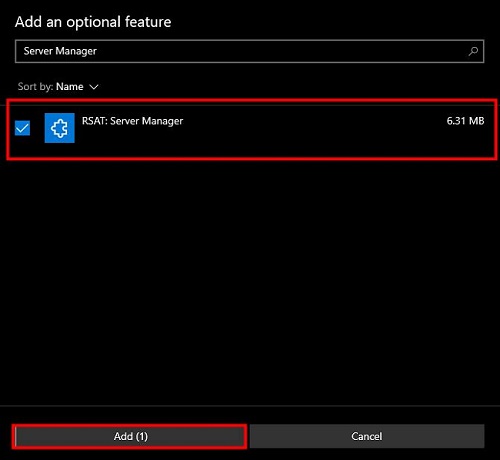
Be patience in this stage. The installation may take a few minutes.
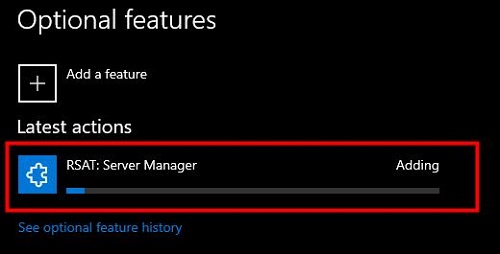
Step 4: Install the RSAT Group Policy Management Tools
After adding the server manager, you also need to install the "RSAT: Group Policy Management Tools." Procedure is the same like installing server manager.
1. Just go to Settings, click on "Apps".
2. Type "optional features" on the search bar and select "Add an optional feature" from the drop down menu.
3. Now, type "RSAT: Group Policy Management Tools" in its search bar and check mark on it.
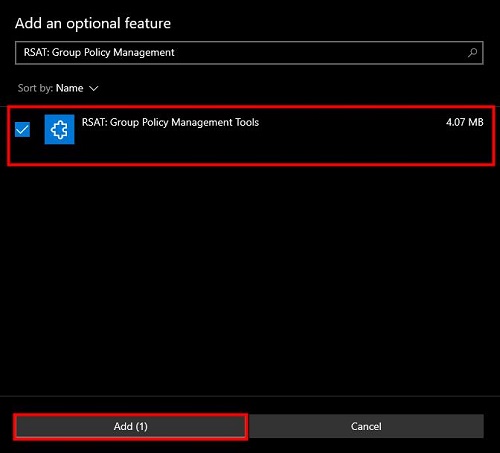
4. Then click on the "Add" button.
It will take some moments to install the application.
Step 5: Access Server Manager
Once installed, you can access Server Manager by searching for it in the Start menu or by typing servermanager in PowerShell or Command Prompt.
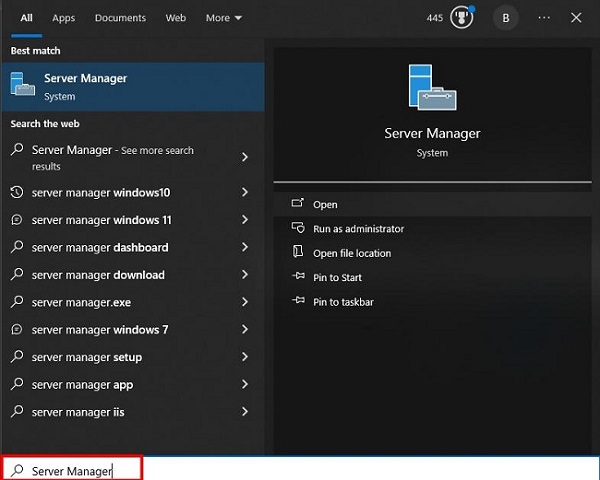
Step 6: Manage Your Servers
Congrats! You’ve successfully installed Server Manager on your Windows 10 PC, and you’re ready to manage your servers more efficiently.
With Server Manager open, you can now add or remove roles and features, create server groups, and manage servers remotely.
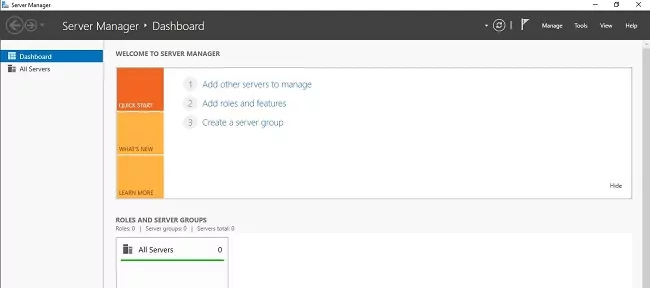
Note : If you encounter any issues during the installation, make sure you have a stable internet connection and sufficient permissions on your PC to install features.
Part 2: How to Enable Remote Desktop Using Group Policy
Here's a step-by-step guide to allow rdp group policy or enabling remote desktop access using Group Policy:
Step 1: Creating a GPO to Enable Remote Desktop
1. Open the Group Policy Management Console (GPMC). You can access it by searching for "gpmc.msc" in the Windows Start menu.
2. Alternatively, open the Server Manager application in the Windows Start menu. In the top bar, click on the "Tools" option and select the "Group Policy Management" from the drop-down menu.
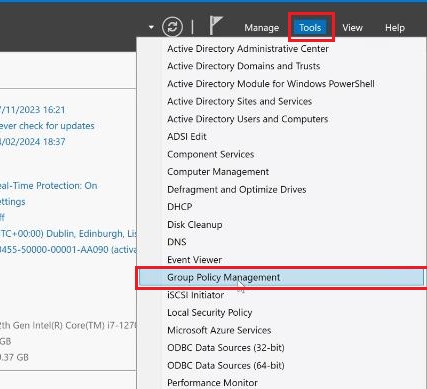
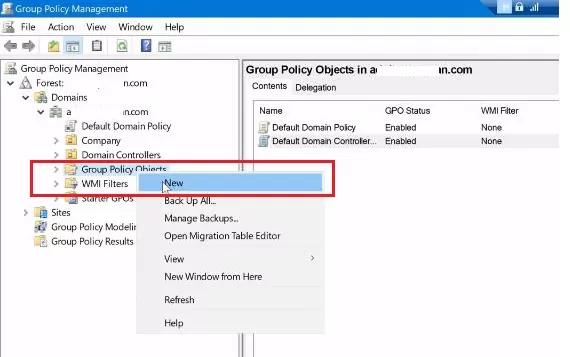
3. Expand the forest and domain nodes in the left-hand pane. Next, right click on the "Group Policy Object (GPO)" and select "New" in the drop-down menu.
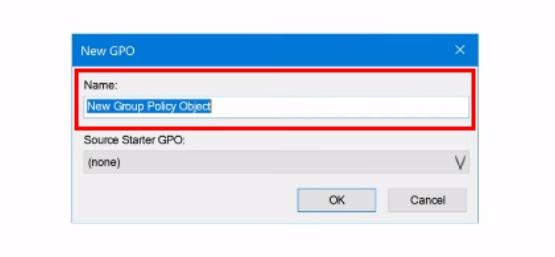
4. Provide a descriptive name for the GPO (Group Policy Object), such as "Enable Remote Desktop." Then Click "OK" to create the new gpo to allow remote desktop.
Step 2: Enable Allow Users to Connect Remotely by Using Remote Desktop Services
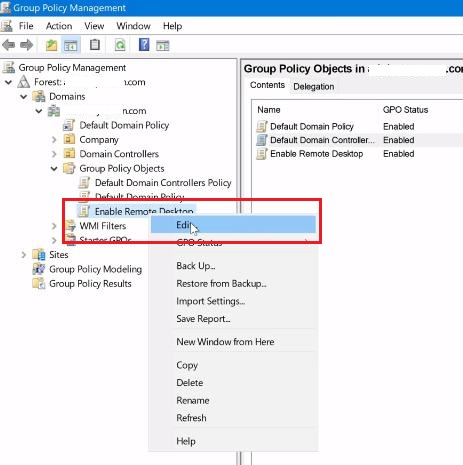
1. In the GPMC console, right-click on the newly created GPO and select "Edit." This will launch the Group Policy Management Editor (GPME). Also, the gpo allow remote desktop smoothly.
2. Navigate to the following location within the Group Policy settings:
Computer Configuration > Policies > Administrative Templates > Windows Components > Remote Desktop Services > Remote Desktop Session Host > Connections
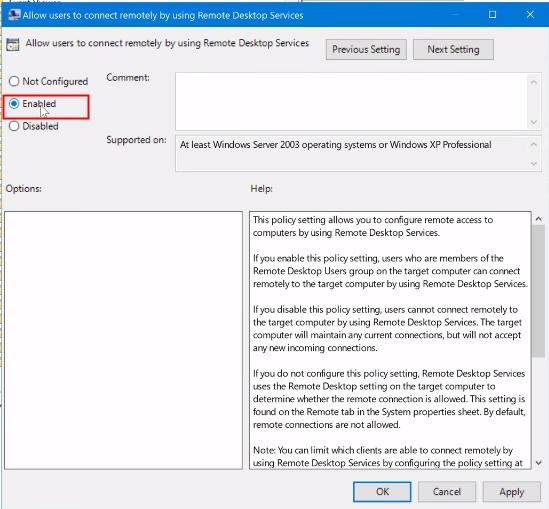
3. Next, locate the policy setting named "Allow users to connect remotely by using Remote Desktop Services." Then, double-click on this policy setting.
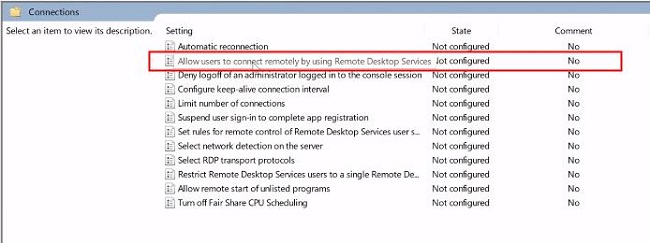
4. You will get a new pop menu regarding allow users to connect remotely by using Remote Desktop Services. This box indicates a "Not configured" option.
5. In the new window, select the "Enabled" option. Click "Apply" and "OK" to save the changes.
Step 3: Enable Network Level Authentication for Remote Connections
1. While still within the GPME, navigate to: Computer Configuration > Policies > Administrative Templates > Windows Components > Remote Desktop Services > Remote Desktop Session Host > Security.
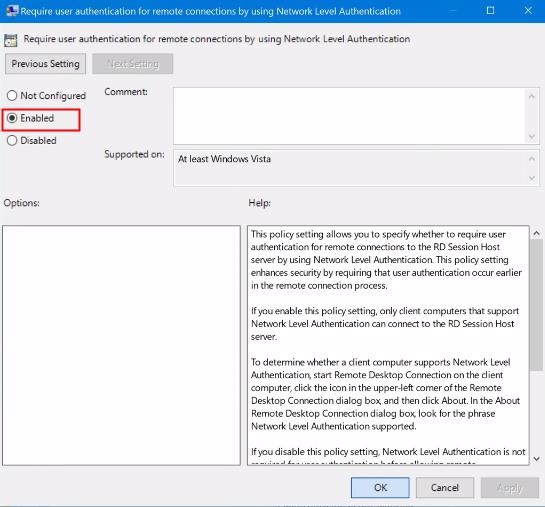
2. Then, locate the policy setting named "Require user authentication for remote connections by using Network Level Authentication." Double-click on this policy setting.

3. Select the "Enabled" option for enhanced security. Network Level Authentication (NLA) adds an extra layer of security during remote desktop connections. Click "Apply" and "OK" to save the changes.
Step 4: Allow Port 3389 (Remote Desktop Port) through Windows Firewall
By default, Windows Firewall might block incoming connections on port 3389, the standard port used for remote desktop access.
1. Within the GPME, navigate to: Computer Configuration > Policies > Administrative Templates > Network > Network Connection > Windows Defender Firewall > Domain Profile
2. Locate the policy setting named "Windows Defender Firewall with Advanced Security"
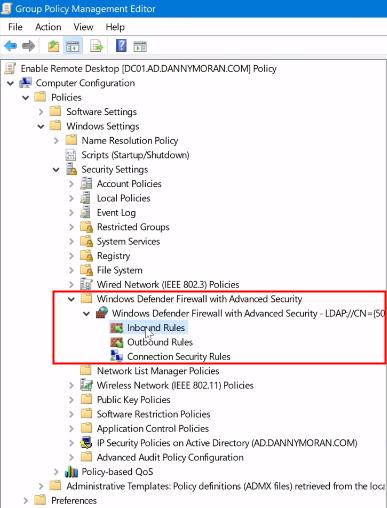
3. Next, right click on the "Inbound Rules" and select "New Rule" from the drop-down menu.
4. Now, mark on the "Predefined" box. Then scroll down and select "Remote Desktop".
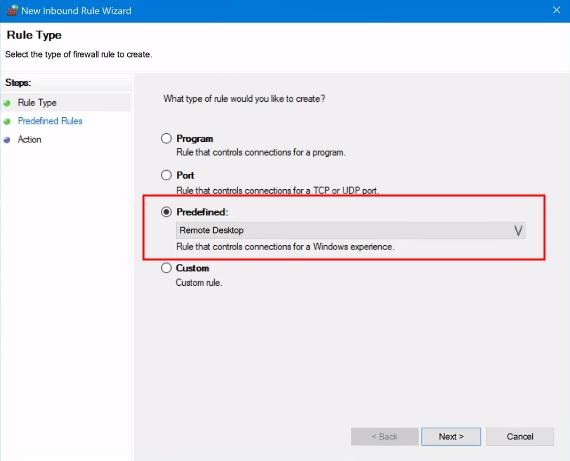
5. Click on the "Next" button.
6. Therefore, you will see the whole things about "New Inbound Rule Wizard"
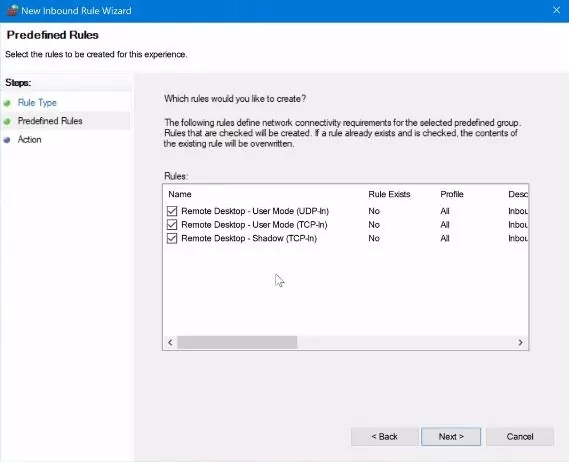
7. Click on the "Next" button.
8. Allow the connection and press on the "Finish" button.
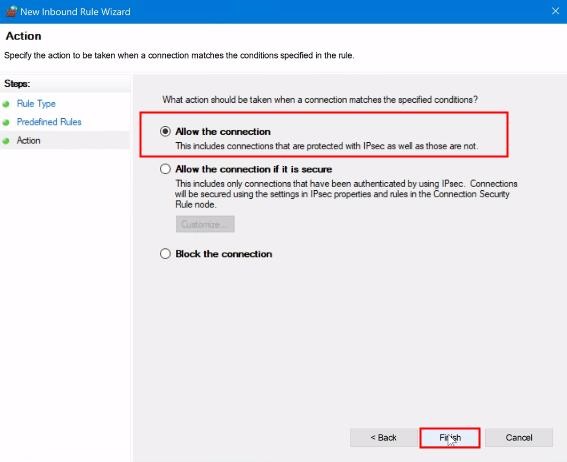
Now, you will see that your group policy is set off with indicating green mark.
Step 5: Update Group Policy and Check Remote Desktop Settings
After configuring the necessary settings within the GPO, it's crucial to enforce the policy on the target computers. Hence, we need to take our enabled remote desktop group policy and then apply it to our servers organizational units.
So for mine all of my servers are house within a servers OU, so I can take my enable remote desktop and then drag it over the servers. Then you will get a new pop-up named "Group Policy Management" and press "OK" to link it to that.
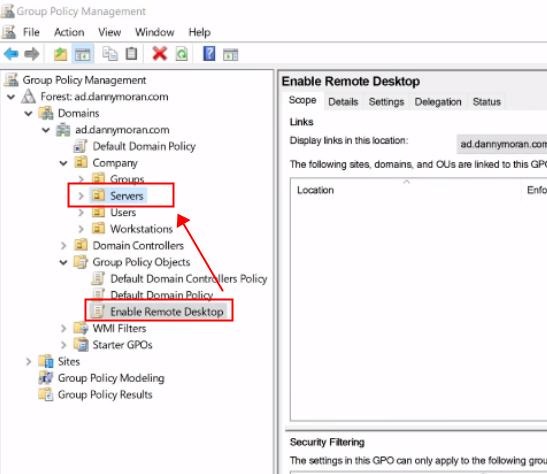
Now if I select servers, we can see that we've got enabled remote desktop linked.
Using Command Prompt
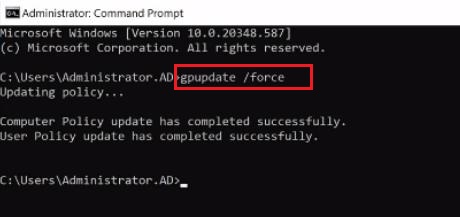
You can also manually trigger a Group Policy refresh on the target computers by running gpupdate /force from the command prompt.
1. To do this, Open the "Command Prompt" application.
2. Then use a command prompt- gpupdate /force, and press "Enter" this prompt. It will take some moments to update both your computer policy and user policy successfully.
3. Now, we come back to the system properties and then press on the "Remote" tab. We can see that "Allow remote connection to this computer" is ticked and we are unable to change it.
Because it set by group policy. Also the "Allow connections only using network level authentication" that is also ticked and can't be changed as it is set by using Group Policy.
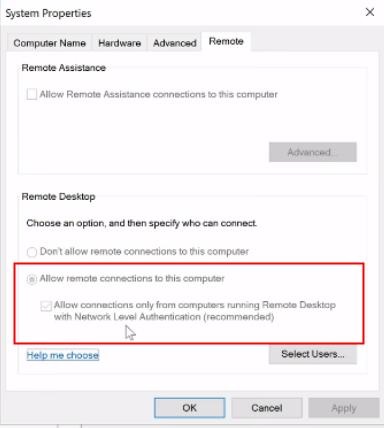
Next, if we come to our Windows Firewall and then under in bound rules, we just want to make sure that our remote desktop inbound rules are set so.
However, we can see that we've got remote desktop user in "Port 3389" and that is set to be enabled. It's got the green tick that means there won't be any firewall issues for connecting with remote desktop from the local network.
Connection
Once the policy update is complete and other settings are okay, you should verify remote desktop access on a target computer. To do this function quickly, you can use the "Remote Desktop Connection" application to attempt a connection.
1. Open "Remote Desktop Connection" on your PC and put your computer’s name (username) and press "connect".
2. Next, place your password and click on the "OK" option.
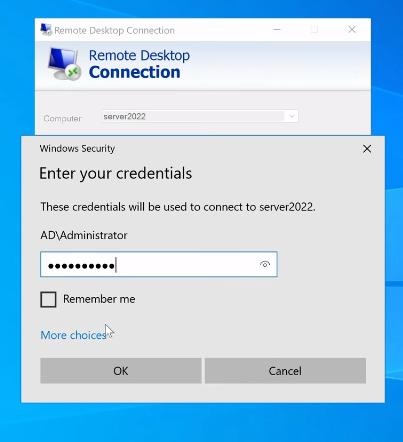
It will take some seconds connecting to that initial server using remote desktop connection.
That’s it. Congratulations! You are finally learned on how to enable Remote Desktop using Group Policy.
Part 3: Extra: How to Add Administrator Rights to Target Computers
By default, users attempting remote desktop connections might require local administrator rights on the target computer. Here's how to configure Group Policy to allow specific user groups remote access:
Step 1: Within the GPME, navigate to: Computer Configuration > Windows Settings > Security Settings > Restricted Groups
Step 2: Right-click on "Restricted Groups" and select "Add Group."
Step 3: In the "Group" field, type the name of the security group containing the users you want to grant remote desktop access.
Step 4: Click "Check Names" to verify the group name is recognized.
Step 5: Click "OK" to add the group.
Step 6: In the "This group is a member of" section, click "Add."
Step 7: Type "Remote Desktop Users" in the "Enter the object names to select" field and click "Check Names" again.
Step 8: Click "OK" to add the "Remote Desktop Users" group. This grants the specified security group permission to connect remotely using Remote Desktop.
Step 9: Click "Apply" and "OK" on all open windows to save the changes within the Group Policy Editor.
Bonus for Business: Improve Efficiency for IT Admins to Remote Access and Manage Desktop
Remote desktop access is important for IT administrators who manage multiple computers in a network domain. If your enterprise has the need to remotely access and manage desktop and mobile devices, you can try AirDroid Remote Support.
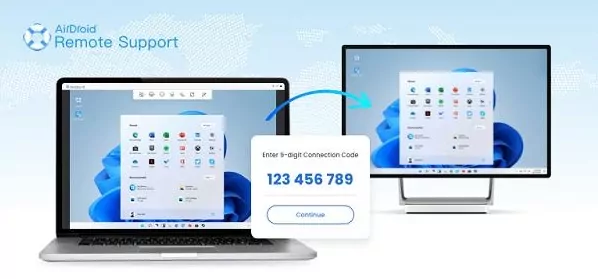
AirDroid Remote Support is a comprehensive enterprise remote access and support solution. It provides instant remote support or collaboration and is ideal for IT operations. IT administrators can remotely monitor the health of corporate devices or applications in real time, make configuration adjustments, or keep them running optimally.
Reap the Benefits of AirDroid Remote Support
- Quick and Easy to Connect: Get secure, easy & quick access to devices with just a few clicks, without the need of sharing ID and password.
- Industry-leading Security: All remote support sessions secured by AES-256-bit encryption, TLS 1.2, and other industry-grade security features, such as two-factor authentication, conditional access and more.
- Reduced Downtime: Help IT teams address technical issues on the air and save all the hassle of on-site supports anywhere, at any time.
- Scalability: Best for support a large number of devices and users, making them ideal for growing businesses across different locations.
Key Considerations
1# Workgroup vs Domain Environments
This guide focused on enabling remote desktop access on domain-joined computers, which are managed centrally through Active Directory.
For workgroups, a less centralized approach is needed. You'll likely need to configure Remote Desktop on each machine individually.
But the core steps remain similar: enabling remote desktop, configuring user permissions, and ensuring firewall rules allow remote connections.
2# Testing and Validation
Before deploying any Group Policy Object (GPO) across a large number of computers, it's crucial to validate the configuration in a non-production environment. This could involve creating a separate OU containing a representative sample of machines.
By testing the GPO in this isolated environment, you can identify and rectify any potential issues before impacting your core production systems.
3# Multi-Factor Authentication (MFA)
While Network Level Authentication (NLA) offers a layer of security for remote desktop connections, it can be further enhanced by implementing multi-factor authentication (MFA).
MFA requires users to provide an additional verification factor beyond just a username and password. This could involve a code from an authenticator app, a fingerprint scan, or a security token.
By requiring MFA, you significantly reduce the risk of unauthorized access to your network, even if attackers manage to steal a user's credentials.
4# Client Compatibility
It's also important to consider the compatibility of remote desktop client software. Ensure that the version of Remote Desktop Connection (RDC) used to connect remotely is compatible with the operating system version running on the target computers.
Microsoft regularly releases updates for RDC, so it's advisable to keep both client and server software up-to-date for optimal performance and security.
Final Thoughts
In a nutshell, enabling Remote Desktop through Group Policy offers a centralized and efficient way to manage multiple computers in a Windows domain environment.
By following the steps outlined in this guide, you can empower IT administrators and support specialists to remotely troubleshoot, install software, and manage systems with greater ease.


Leave a Reply.