How to Remotely Access Another Computer over the Internet?
Overview of Solutions
- Port Forwarding: This is a simple way to access a remote computer online by linking its port and IP address through your router.
- VPN Solution: A VPN lets you connect remotely without revealing your identity. Reliable options include Tailscale, WireGuard, and ZeroTier.
- Professional Alternative: For more control, use professional tools like Chrome Remote Desktop, TeamViewer, and AirDroid Remote Support, which offer excellent features for remote work and management.
Port Forwarding
Coming to the main part about how to remote to another computer over the internet, let's start with the first method – Port Forwarding. The default port used by remote desktop connection is TCP port 3389 (subject to vary).
You need to forward this port to the router to remotely access the computer over the internet.
Prerequisites
Before proceeding, you need to set up the PC for a remote connection.
1. Find the Internal IP address of your PC
Use the "ipconfig" command on the Command Prompt. Copy ID Address, Subnet Mask, and Default gateway options.
2. Find the Public IP Address
Besides the computer's local or internal IP address, you also need to find the Public IP address of the router to establish a remote connection to the PC over internet. To find it:
- Open the web browser and search "What's my IP address."
- It will display the router's IP address.
3. Set up Static IP for Port Forwarding
Now, you need to set up the Static IP address to make sure the internal IP addresses don't change. For that:
- Open the Control Panel > Network and Internet > Network and Sharing Center.
- Click "Change Adapter Settings (on the right pane), right-click your network adapter, and select Properties.
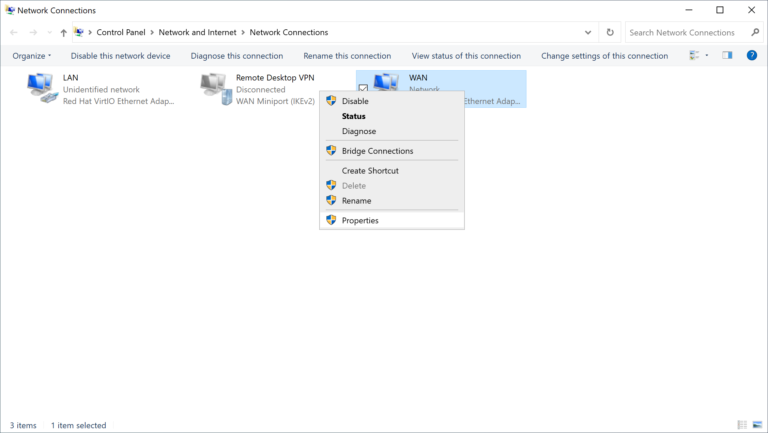
- Tick the "Internet Protocol Version 4 (TCP/IPv4" option and click Properties.
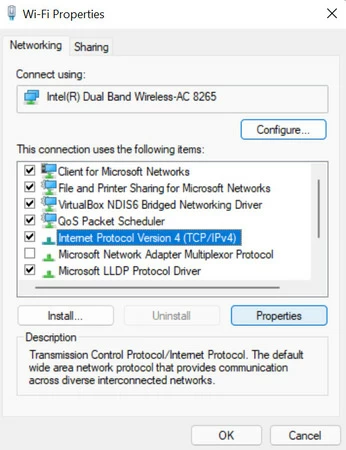
- Next to "Use the following IP address", paste the values you copied in Step 1.
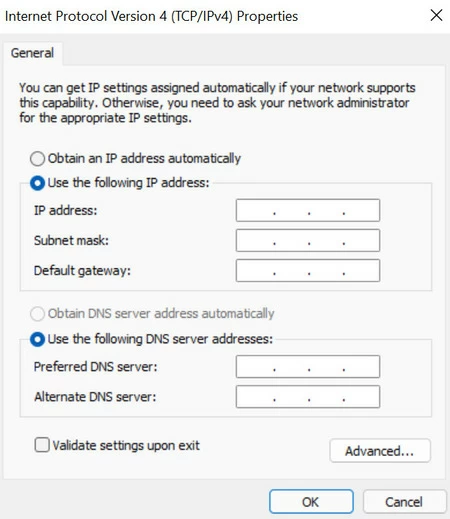
And it's done. Now, your router will always point to the correct IP.
How to remote access a device over the internet Via Port Forwarding
After checking all the requirements, it's time to connect to PC remotely over the internet for free. Follow the below steps to proceed:
Step 1: Now, log into your router by pasting the router IP address into a browser window.
Step 2: Enter the Administrative password when prompted to give admin access to your router. Note that this also makes your PC vulnerable to digital threats.
Step 3: Locate and click the option like "Port forwarding option." The name can vary a little, so explore various options like "Advanced", "Network", or "Security" to find it.
Step 4: When you locate it, create a "New Rule" and enter the subsequent details like:
• Protocol: TCP
• External Port: 3389 (might vary)
• Internal Port: 3389
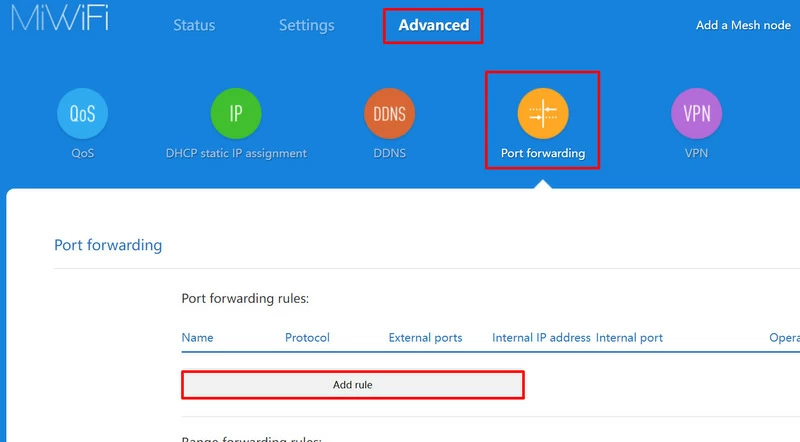
Step 5: Hit Add and voila, you're done. Now, you can establish a remote desktop connection over the internet through the specified port.
Free Remote Desktop Connection Over Internet
Coming to the final step:
- Open the Remote Desktop Connection app on your host computer and enter your network's public IP address.
- Type in the username and password of the account you have configured for remote access.
- Click Connect to begin the remote session.
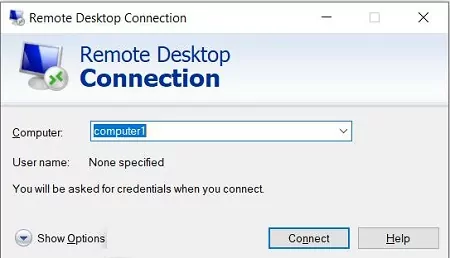
And that's how to get a free remote desktop connection over the internet.
Tips
Port forwarding poses serious security concerns. We recommend users to:
- Set up a strong password for remote desktop access.
- Make sure a professional security tool is installed on your PC to shield against online threats.
- Enable the two-factor authentication wherever possible.
- Try using a VPN tool for additional security (explained in the next section).
VPN Solution
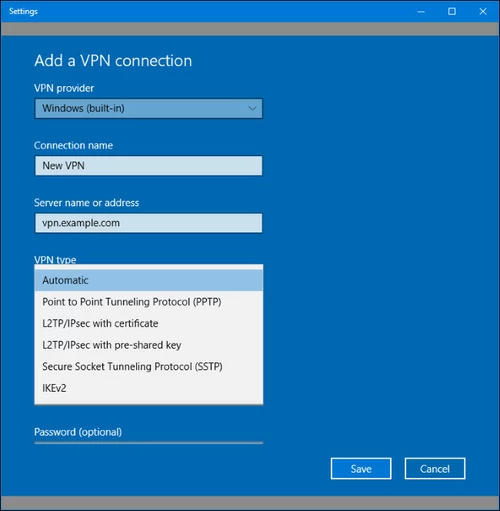
Using a VPN is the best way to connect to a PC remotely over the internet without compromising your security. Luckily, you can easily integrate a VPN tool into Windows 10/11 as demonstrated below:
Step 1: Open Windows Settings and head to Network & Internet > VPN > Add a VPN connection.
Step 2: On the next interface, mention the required information in the corresponding boxes.
Note: You'll find these details in the settings of your preferred VPN tool.
Step 3: Click Save to add it to your connection list.
Step 4: Now, simply enable the VPN before trying to access a PC remotely over the internet to hide your identity.
Best VPN Tools in 2024
Based on user feedback, we have shortlisted the 3 reliable VPNs for our readers.
VPN 1: Tailscale
Tailscale is a peer-to-peer mesh VPN which supports direct connection between the devices over the network. With its cutting-edge protection mechanism, you never have to worry about security risks on public networks. However, expect a small lag or pause when connecting to a remote desktop over the internet with this tool.
VPN 2: WireGuard
Compatible with iOS, macOS, iPadOS, Android, and Windows, this VPN promises a superior security mechanism coupled with faster speed. Setting up WireGuard for accessing remote devices over the internet is fairly simple.
However, users often complain of occasional blocking of WireGuard on the public networks when securing a connection.
VPN 3: ZeroTier
ZeroTier is an outstanding modern VPN that you can employ in today's remote connection with 100% reliability. The free version serves individual requirements with limited features, but to unlock premium capabilities, you need to get a paid subscription.
Try Alternative
For someone needing to secure remote desktop connection via the internet to different PCs frequently, VPN and port forwarding are not go-to options. The best practice is to get a professional remote desktop solution like the ones listed below.
Tool 1: Chrome Remote Desktop
If you want to go to the free route, Chrome Remote Desktop is an ideal option. It allows users to connect to a remote desktop via internet directly from the browser. The program automatically authenticates your Google account to ensure utmost security.

Why Choose
- Completely free to use
- No installation is needed on the local device
- Handle basic remote access features like screen sharing and file access.
- It is among the simplest of remote web tools available.
Tool 2: TeamViewer
TeamViewer is a popular name in the world of remote desktop solutions for accessing remote desktops over the internet. It offers some of the most useful features like multiplatform access, in-session automation, file transfer, and more.
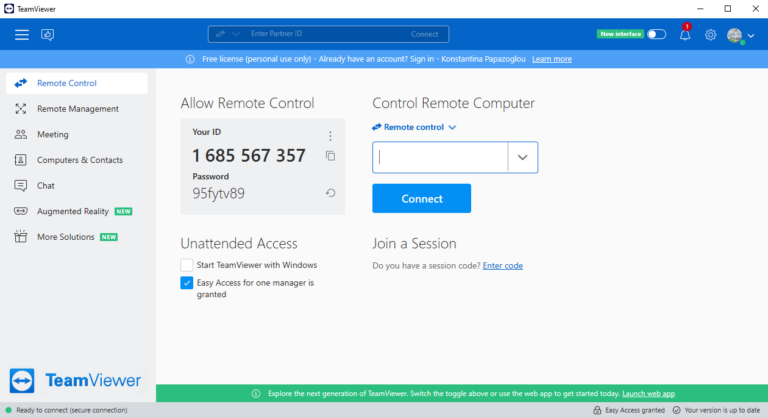
Why Choose TeamViewer
- Conduct remote video conferences
- Create time-saving shortcuts
- Remote session recording
- Black security screen on the controlled end
Tool 3: AirDroid Remote Support
Arguably the best remote desktop solution available in 2024 because of its wide range of features and remarkable convenience. Offering support for both attended and unattended access, AirDroid is a one-in-all solution to connect to a Windows 11 remote desktop over the internet.
It is ideal for providing troubleshooting tips to remote PCs as well as managing multiple devices from a single interface.
Here's how to remote access another computer over the internet with AirDroid Remote Support:
Why Choose AirDroid
Convenience: One-click procedure to begin the attended or unattended session. Despite being feature-rich, its interface is very easy to navigate even for a beginner.
User Privacy: It boasts an advanced encryption protocol to guarantee users' privacy and digital security.
Economic Plans: Its premium packages cater to both individuals and business owners.
Advanced Remote Features: Allows multi-device file transfer, real-time screen share, voice chat, black security screen, iOS/Android remote camera, and more.
Key Considerations
To access a PC remotely over the internet without facing connectivity issues and delays, consider the following tips:
1. Microsoft Remote Desktop or third-party software: Windows comes with a built-in Remote Desktop tool to help users remote access a device over the internet for free. But it's not the only option you have.
| Remote App | Best for | Requirements | Cons |
|---|---|---|---|
Microsoft Remote Desktop |
| Windows only | Limited functionality |
AirDroid Remote Support |
| Access remote Windows from all devices | Premium features require a subscription |
TeamViewer |
| Same as AirDroid | Complicated permission settings and frequent connectivity issues |
Chrome Remote Desktop |
| Chrome browser | Basic-level functions |
3. Network Configuration: For uninterrupted remote access, ensure a consistent internet supply to both devices. Also, make sure the firewall settings are not blocking the remote connection request.
4. Security Measures: A desktop remote connection also exposes your device to the threats of security breaches or malware attacks. To ensure digital safety, keep your remote desktop passwords and keys safe. It's best to enable 2-factor authentication wherever available.
5. Device Compatibility: Check beforehand if your device is compatible with the remote desktop tool of your choosing. For instance, very few programs support accessing a remote Mac device.
FAQs
Q1: Which is more secure, VPN or port forwarding?
Using a VPN is 100% more secure and reliable for remotely accessing a computer over internet compared to port forwarding.
Q2: Can someone remotely access my computer without the Internet?
No, an outsider cannot secure access to your device when you're offline. But the best approach is a total shutdown as malware can still run offline.
Q3: How do you change the default Remote Desktop port number?
To change the default port number on the remote desktop:
- Search and open Registry Editor and go to:
HKEY_LOCAL_MACHINE. System. CurrentControlSet. Control. TerminalServer. WinStations. RDP-Tcp. PortNumber.
- Double click PortNumber and choose Decimal.
- Now, type in a new port number and hit Ok.


Leave a Reply.