Remote Support


How to Setup Remote Desktop Gateway? Step-by-Step Tutorial
Are you looking for a secure way to allow remote access to your internal network? Wondering how can your workers safely connect to company resources from anywhere?
Setting up a remote desktop gateway can be the solution you need to provide encrypted connections without compromising your network’s security.
Let’s explore the process of configuring an RD gateway, covering everything from installation to configuring SSL certificates and user policies.
What is a Remote Desktop Gateway?
Remote desktop gateway is a role service that enables authorized remote users to securely access internal network resources from any device using the client connection.
Instead of exposing your internal network directly, RD Gateway acts as an intermediary, encrypting connections using HTTPS (port 443).
It is particularly valuable for businesses that need to provide access to remote employees, contractors, or partners, as it maintains strict control over who can connect. By using SSL encryption, it safeguards sensitive data from being exposed or intercepted during remote access sessions.
Without a gateway, remote connections to a Terminal Server over port 3389 are unencrypted, posing a security risk.
How Does Remote Desktop Gateway Work?
RD gateway works by encapsulating Remote Desktop Protocol (RDP) traffic within HTTPS. It uses SSL encryption to secure communication between clients and the server.
The gateway must be accessible via a public IP address and allow inbound TCP connections on port 443 for HTTPS access. An SSL certificate is required; either a verified provider certificate or a self-signed certificate can be used.
The RD Gateway server should be installed separately from the Terminal Servers. Once connected, port 3389 is used within the internal network for further communication.
How to Setup Remote Desktop Gateway?
Setting up a remote desktop gateway allows secure remote access to your internal network while ensuring that your data is protected through encryption. Here are some steps to follow for smooth implementation and improve usability for remote users.
1 Install the Remote Desktop Role
- Step 1.Start by connecting to the host server to RDP using admin credentials.
- Step 2.Log into the server where you want to install RD Gateway and open the Server Manager.
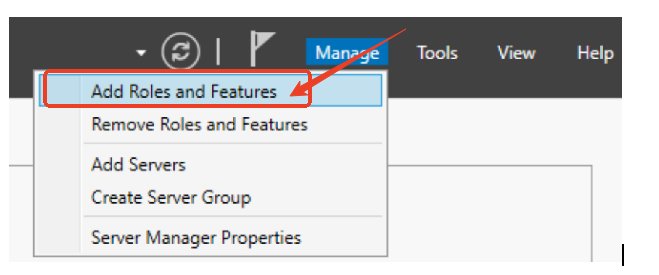
- Step 3.Click Manage in the top right corner and select Add Roles and Features.
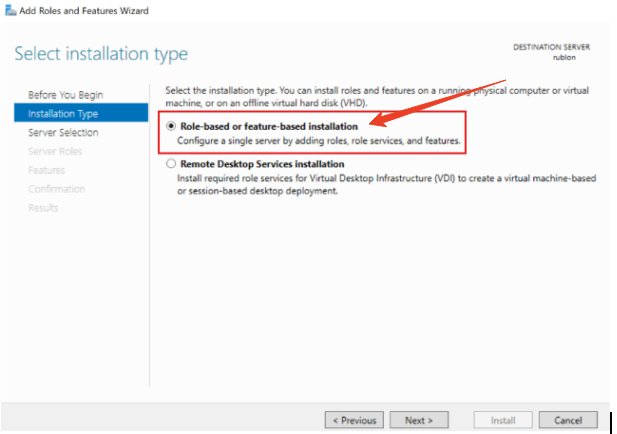
- Step 4.In the Installation Type screen, choose Role-Based or Feature-based Installation and click Next.
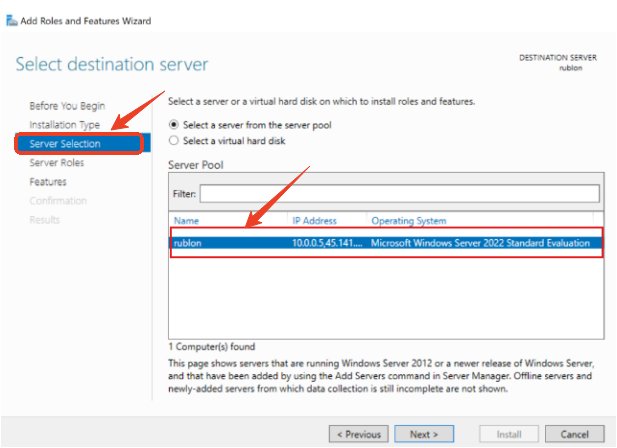
- Step 5.On the Select Destination Server page, choose the server you want to install the RD Gateway role on and click Next.
- Step 6.From the list of roles, check the Remote Desktop Services box, and click Next until you reach the Role Services.
- Step 7.Under the Remote Desktop Services section, check the Remote Desktop Gateway role service. Click Next, then Install. The installation process may take a few minutes.
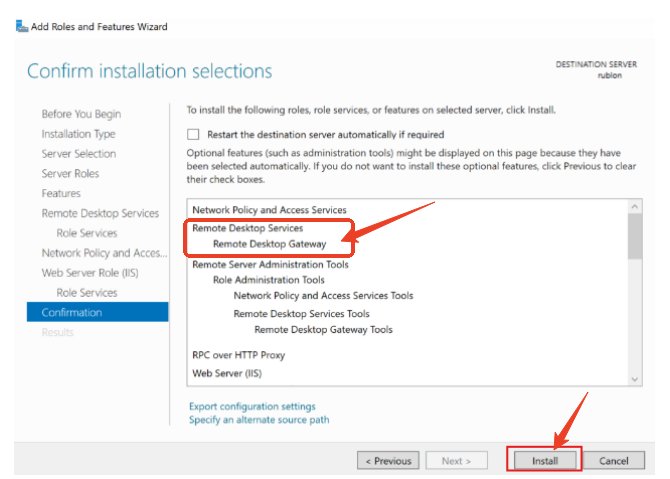
- Step 8.After installation, restart the server if prompted.
2Configure the Remote Desktop Gateway
- Step 1.Once the role is installed, open Remote Desktop Gateway Manager from the Start Menu.
- Step 2.In the RD Gateway Manager, expand the server’s name.
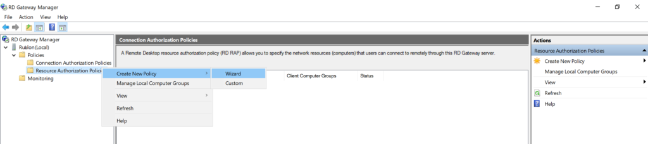
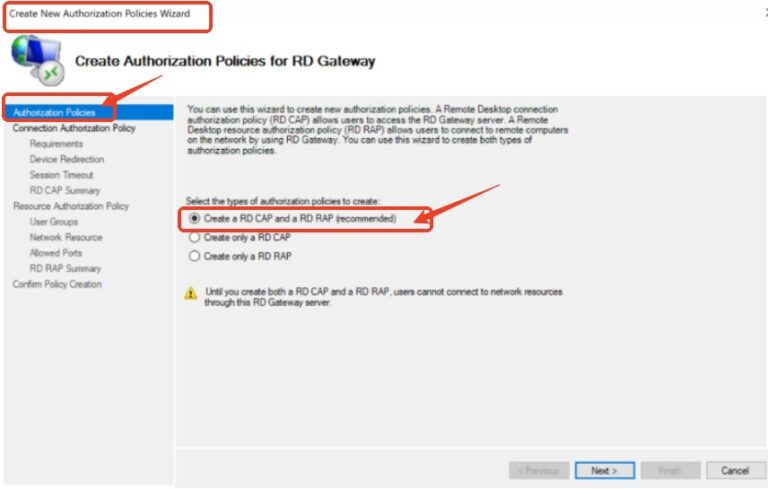
- Step 3.Right-click Policies, select Create New Authorization Policies, and choose RD CAP and RD RAP.
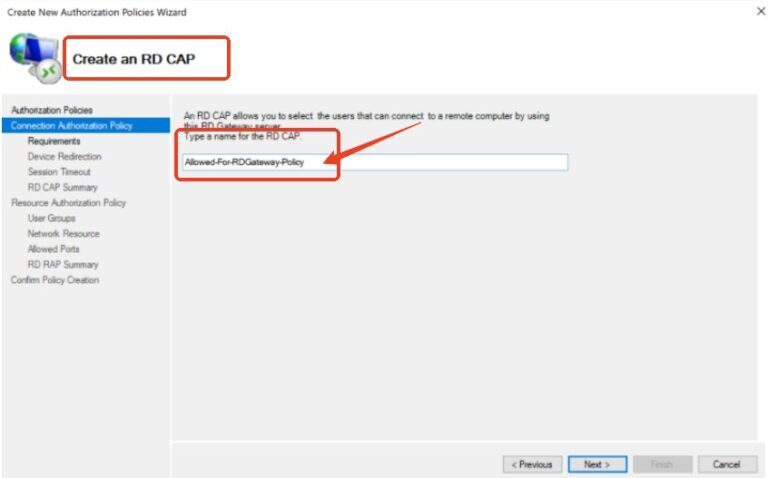
- Step 4.Configure the CAP (Connection Authorization Policy):
1. Give a name to the CAP(e.g., “Allowed-For-RDGateway-Policy”).

2. Add the groups of users who will be allowed to connect through the RD Gateway. You can use domain groups such as “Domain Users” or create a custom group for remote access users.
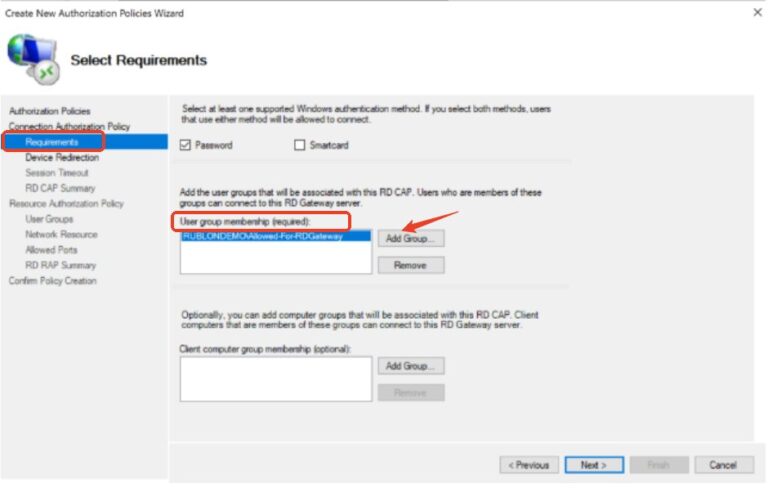

3. Decide whether to allow the RD Gateway to transfer local resources (e.g., printers, ports) to the remote desktop. You can leave this setting as-is unless you need to make specific changes. Click Next.
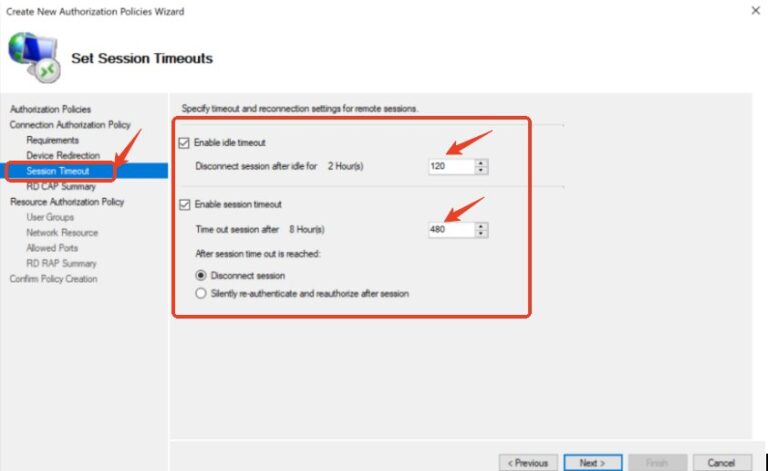
4. Enable both idle timeout and session timeout options to control how long a session can remain idle or active before being disconnected. Click Next.

5. Review the summary of your RD CAP configuration and click Nextto finalize the policy setup.
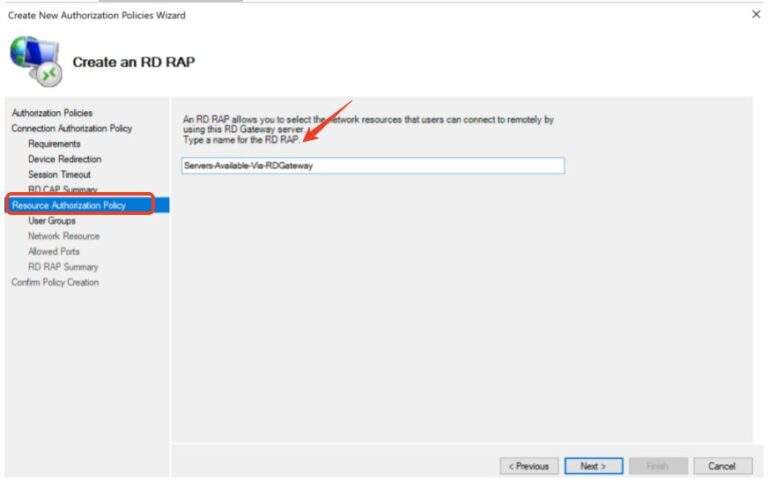
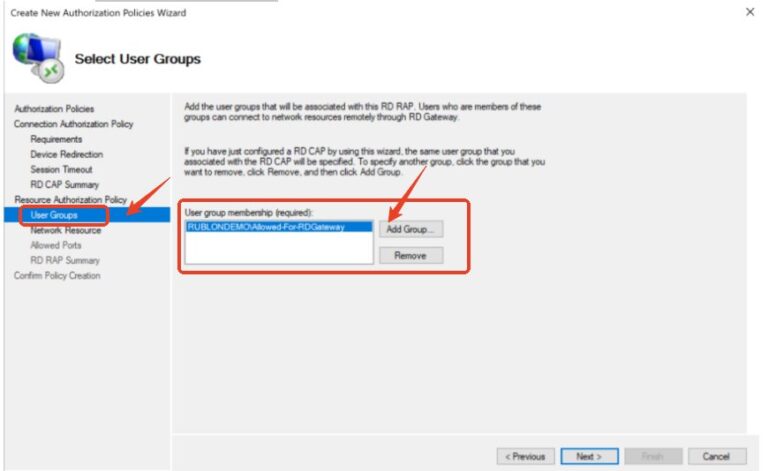
- Step 5.Configure the RAP (Resource Authorization Policy):
1. Name your RAP(e.g., “Servers-Available-Via-RDGateway”).

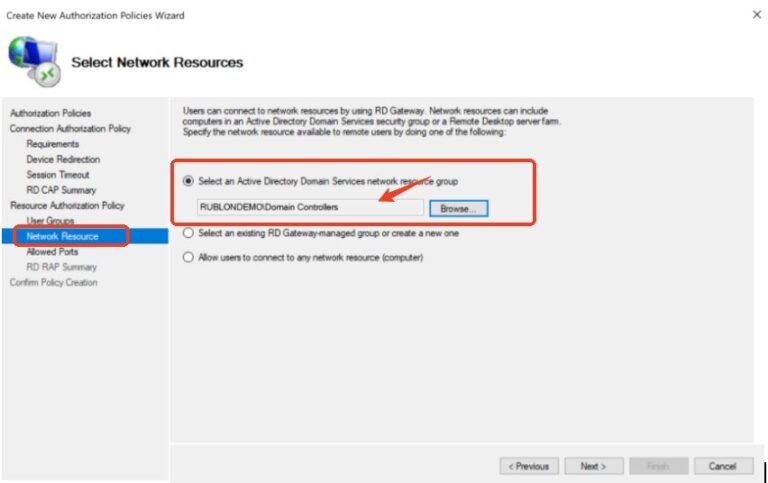
2. Specify the resources that users will be allowed to access through the RD Gateway. You can choose specific Remote Desktop Services (RDS) servers or the entire network.

3. Add the user groups that will be authorized to connect to resources.
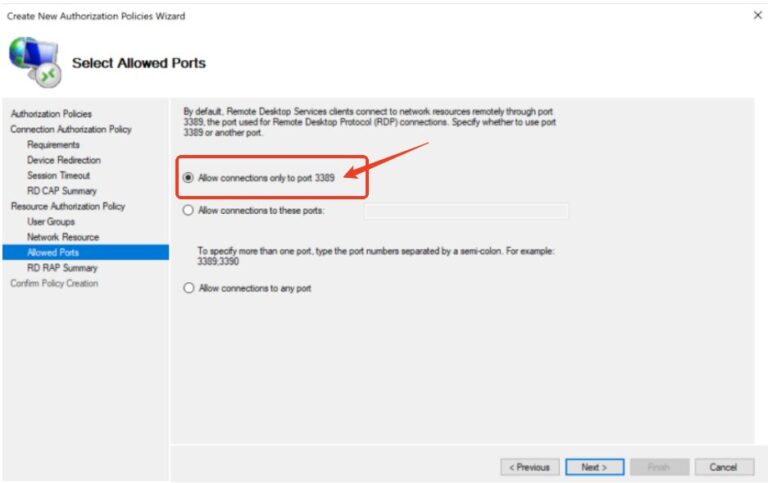
4. If you modified the default Remote Desktop port, select Allow connections to these ports and enter the specific port number. Otherwise, choose Allow connections only to port 3389.
5. Click on Next, and in RD RAP Summary, hover to Finish and click it.
3Install an SSL Certificate
RD Gateway requires an SSL certificate to secure the connection between the client and server. You can get a certificate from a trusted Certificate Authority (CA) or create a self-signed certificate.
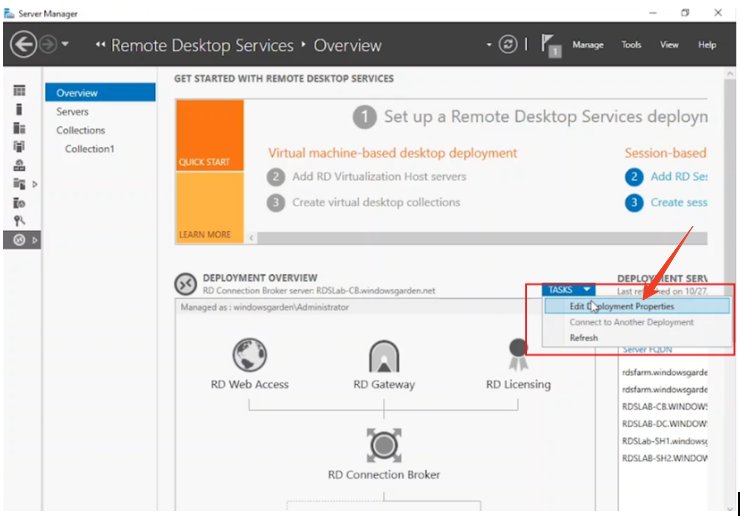
- Step 1.Open Server Manager, and go to Remote Desktop Services > RD Gateway.
- Step 2.Under Tasks, select Edit Deployment Properties.
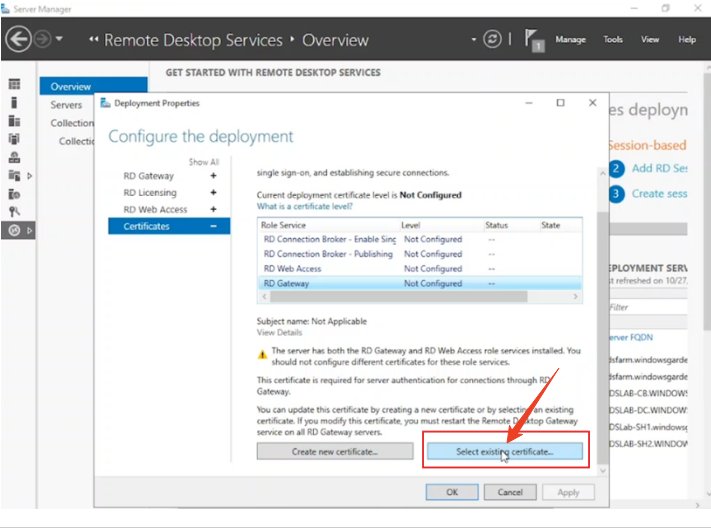
- Step 3.Go to the RD Gateway tab and click Select an existing certificate to import your SSL certificate.
- Step 4.In the RD Gateway Manager, right-click the server’s name and choose Properties.
- Step 5.Go to the SSL Certificatetab, select Import a certificate, and bind the SSL certificate to your RD Gateway.
4Test the Remote Desktop Gateway Setup
Now, to test your connection and configure the remote desktop clients, you need to:
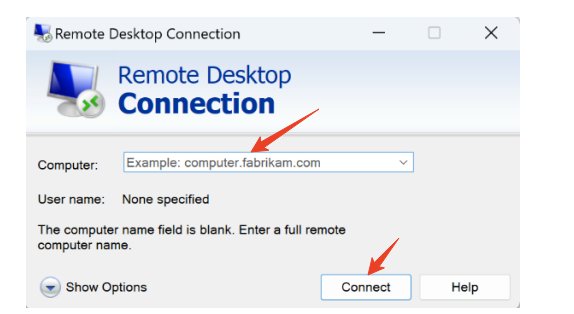
- Step 1.On a client machine, open Remote Desktop Connection.
- Step 2.In the Advanced tab, click Settings under Connect from anywhere.
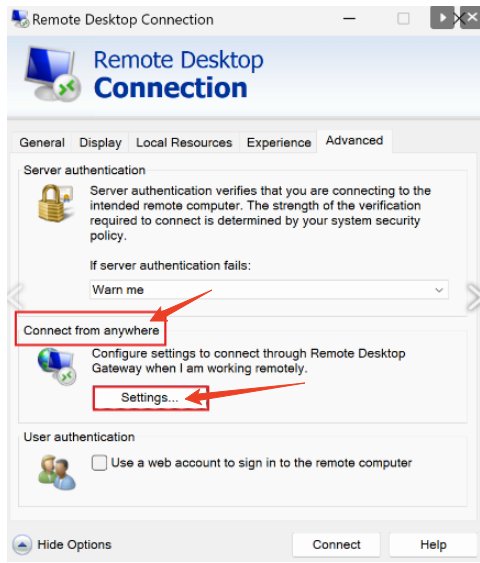
- Step 3.Select Use these RD Gateway settings and enter the RD Gateway server’s address (the public IP or domain name of your server).
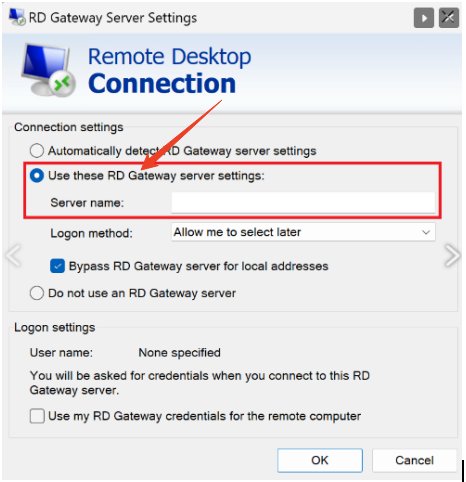
- Step 4.Enter your username and password when prompted.
Try connecting to a remote desktop using your RD Gateway. If everything is configured correctly, the client will connect through the RD Gateway to the remote resource securely.
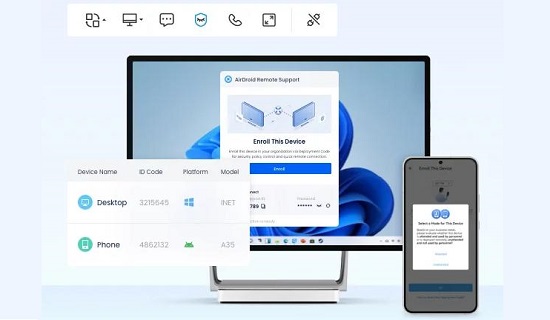
Best Alternative for Remote Desktop - AirDroid Remote Support
When it comes to remote access solutions, AirDroid Remote Support stands out as an excellent alternative. Designed to facilitate seamless remote connections, AirDroid offers a range of features that enhance productivity and streamline remote assistance.
Pros
- Cross-Platform Compatibility: AirDroid allows remote access across various devices and platforms, including Windows, Mac, Android, and iOS, ensuring flexibility and convenience for users.
- Easy Setup and Use: Unlike some RDP solutions that require complex configurations, AirDroid is user-friendly and can be set up quickly. Hence, accessible for users with varying levels of technical expertise.
- Real-Time File Transfer: Users can easily transfer files between devices in real-time, simplifying collaboration and support tasks.
- Remote Control and Support: AirDroid enables users to remotely control devices, troubleshoot issues, and provide assistance without being physically present.
- Secure Connections: With end-to-end encryption, AirDroid ensures that all data transmitted during remote sessions is protected, mitigating security concerns associated with remote access.
- Chat Functionality: The built-in chat feature allows users to communicate directly during remote sessions, improving the support experience.
AirDroid Remote Support is an excellent choice for those seeking a flexible, secure, and user-friendly remote access solution. It can significantly enhance productivity and support capabilities, making it ideal for both individuals and organizations.
Conclusion
Setting up a remote desktop gateway can provide secure and efficient remote access to your internal network resources. By following our guide, your remote users can connect safely while minimizing security risks associated with unencrypted connections.
The RD gateway not only improves security and controls access but also streamlines the remote work experience for your employees. With proper configuration and monitoring, it will facilitate your applications and systems, contributing to the flexible work environment.
Embrace the power of remote access while keeping your network secure!


Leave a Reply.