2025|How to Access Remote Desktop on Windows 7?
Remote Desktop is a feature in Windows operating systems that allows you to access and control another computer remotely, as if you were sitting directly in front of it.
Even though Microsoft ended official support for Windows 7 in January 2020, this operating system is still used in certain environments, especially in legacy systems within organizations that rely on older software or hardware configurations. Many users continue to benefit from Windows 7's stability and simplicity, making it crucial to know how to enable and use Remote Desktop on windows 7.
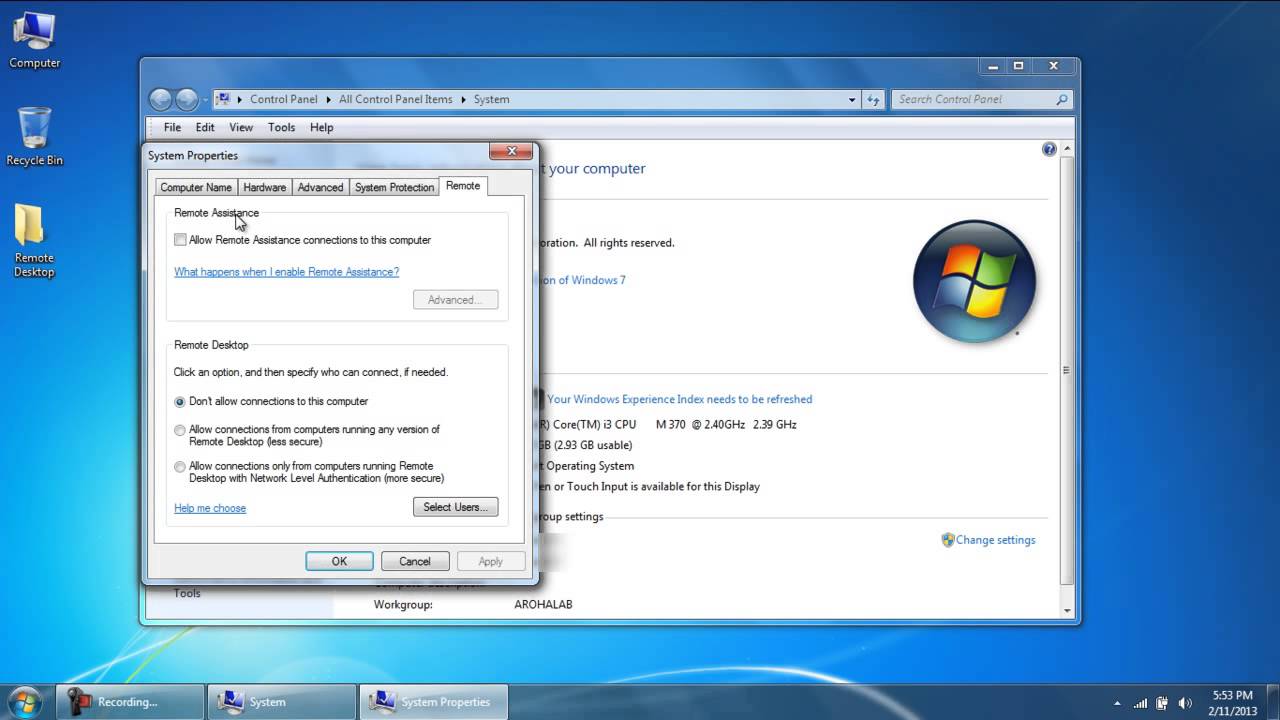
Before setting up and using Remote Desktop on Windows 7, you need to ensure the following prerequisites are met:
- Right Version: The computer you want to access (the host) must run Windows 7 Professional, Ultimate, or Enterprise.
Windows 7 Home Premium or Home Basic can only act as a client, meaning you can use them to connect to another device but cannot host a Remote Desktop session. - Internet Connection: Both the host and the computer you're connecting from (the client) must be connected to the same network.
- User Permissions:The user account on the host computer must have the necessary permissions to allow remote access.
- Configure Appropriate Settings: Ensure that Remote Desktop is enabled and allowed to pass through Windows Firewall.
How to Emable Remote Desktop on Windows 7
1Access Remote Desktop in Remote Settings
Enabling Remote Desktop on Windows 7 involves a few simple steps:
Step 1: To start, click the button that says "Start" and open "Control Panel."
Step 2: Navigate to "System and Security," then click on "Allow remote access."
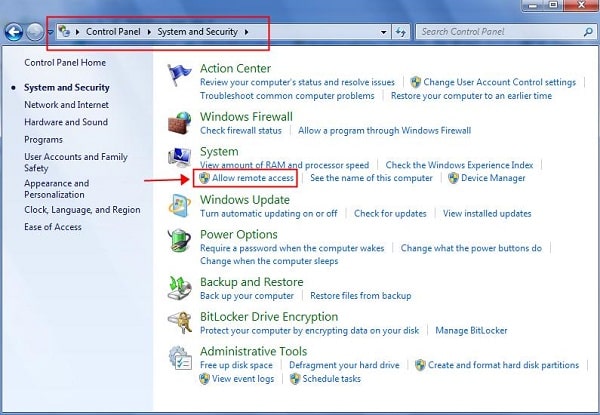
Step 3: Go to "Remote" settings on the left side of the screen — this will unveil the mysterious "System Properties" dialog box.
Step 4: Look for the "Remote" tab and click on it. You will see many choices. Find the one that says "Remote Desktop."
Step 5: Choose to "Allow connections from computers running any version of Remote Desktop."
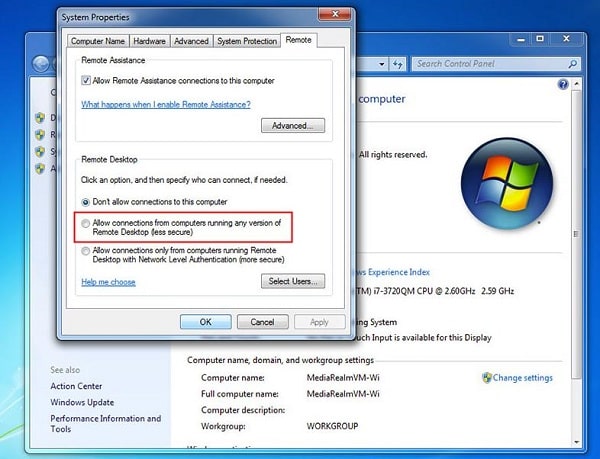
Step 6: Select "Apply" and "OK" to save changes.
2Add Connected Users
By default, administrators of the local computer can connect via Remote Desktop. You can also specify who can connect with Remote Desktop enabled. Here's how you can add users who are allowed to connect:
Step 1: Navigate to the "Remote" tab under the "System Properties" dialog box. Click "Select Users."
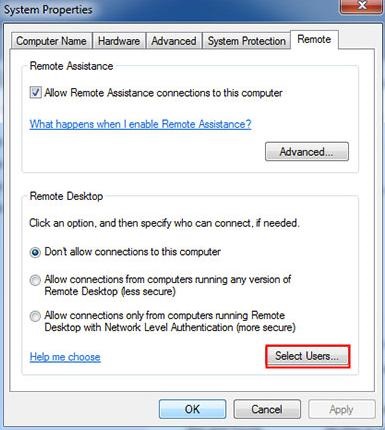
Step 2: You can now search for and add users to the list of people who are authorized to connect.
3Allow Remote Desktop through Windows Firewall
When you consider enabling Remote Desktop through your Windows Firewall, some points should come to your attention:
Step 1: Go back to the "Control Panel" and select "Windows Firewall."
Step 2: Click "Allow a program or feature through Windows Firewall" on the left side.
Step 3: Click "Change settings" and scroll to find "Remote Desktop."
Step 4: Check the boxes next to "Remote Desktop" to allow it on private and public networks.
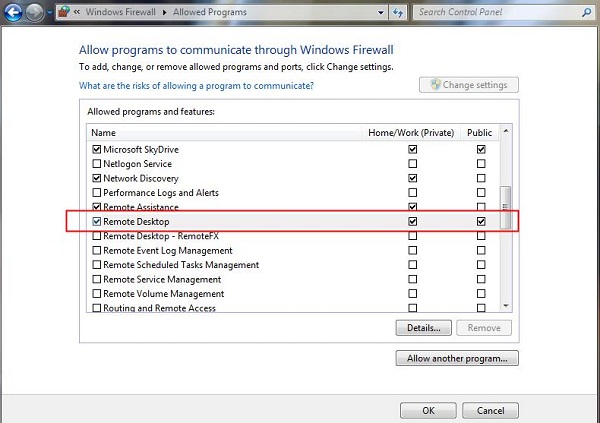
Step 5: Click "OK" to save these settings.
How to Remote Desktop Connection Windows 7
Take Windows 10 connecting to Windows 7 as an example.
1Open Remote Desktop Connection on Windows 10
Step 1: Press Win + S to open the search bar.
Step 2: Type "Remote Desktop Connection" and select it from the list.
Step 3: The Remote Desktop Connection window will pop up, providing the interface to establish a connection to a remote Windows 7 PC.
2Enter the Windows 7 Hostname or IP Address and Connect
Step 1: In the Remote Desktop Connection window, you must enter the hostname or IP address of the Windows 7 computer you want to connect to.
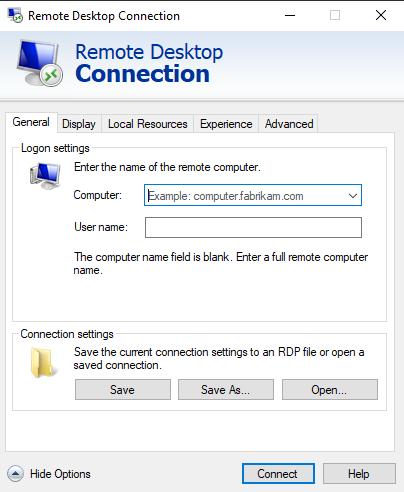
Step 2: After entering the necessary details, click on the "Connect" button.
Step 3: If prompted, you must enter the username and password for the Windows 7 machine to authenticate the connection.
Troubleshooting: Connecting Windows 10 to Windows 7
There are many users mentioning that remote connection from Windows 10 to Windows 7 is not working and seeking solutions on various forums. We are here to provide some troubleshooting tips to help you solve the problem.
Check the Computer Edition
Ensure that the Windows 7 PC is running either the Professional, Ultimate, or Enterprise editions, as these are the editions that support Remote Desktop. Windows 7 Home Edition can only initiate remote connection but not accept it.
Disable Sleep Mode
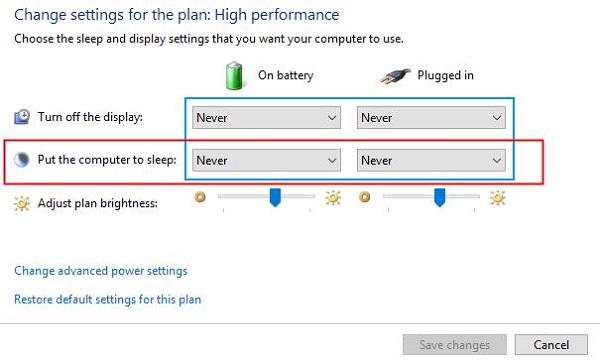
On the Windows 7 PC, navigate to "Control Panel" > "Hardware and Sound" > "Power Options."
Set the sleep settings to "Never" to ensure that the PC doesn't go to sleep, both when on battery power and when plugged in.
Add the Local Win 7 Account to the Remote Desktop Users Group
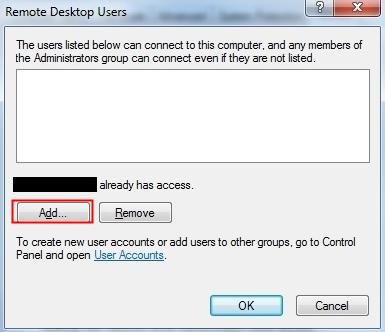
On the Windows 7 PC, open "Computer Management."
Navigate to "Local Users and Groups" > "Groups."
Double-click on "Remote Desktop Users," click "Add," and enter the username of the account you want to grant access to. Click "OK" to finalize.
Disconnect the VPN Connection
If a VPN connection is active on the Windows 10 PC, it could potentially interfere with Remote Desktop connections.
To disconnect from the VPN, go to "Settings" > "Network & Internet" > "VPN," select the active VPN connection, and click "Disconnect." This ensures a direct connection for the Remote Desktop.
Troubleshooting Common Issues
While Remote Desktop on Windows 7 is a powerful tool, users may encounter common issues during setup or usage. Below are detailed troubleshooting steps for resolving connectivity and configuration problems:
| Issues | Check the Basics | solution |
|---|---|---|
| Remote Desktop Is Not Connecting | Powered On Network Firewall Credentials | Confirm computer is not in sleep, connected to the same network and ensure the required TCP port/ credentialsv is correct. |
| (NLA) Issues | Disable NLA Update RDP Group Policy | Temporarily disable NLA and Ensure the Remote client software on the connecting device is up-to-date, ensure NLA requirements. |
| Port 3389 Conflicts | Port Conflicts Default RDP Port Restart | Check if TCP port 3389 is being used, If conflicts persist, manually change the default RDP port to alternative, Restart and Verify. |
By following these troubleshooting steps, you can resolve most common issues with Remote Desktop on Windows 7. If problems persist, consider consulting your network administrator or upgrading to a more modern and supported operating system, such as Windows 10 or 11, for enhanced security and performance.
The Free remote control software for windows 7
Although Windows 7 has reached the end of its official support, it remains a popular choice in many environments due to its reliability and compatibility with legacy systems.
For users still operating on Windows 7, I recommend you to use AirDroid Remote Support , It is fully compatible with Windows 7 and above and provides the following features:
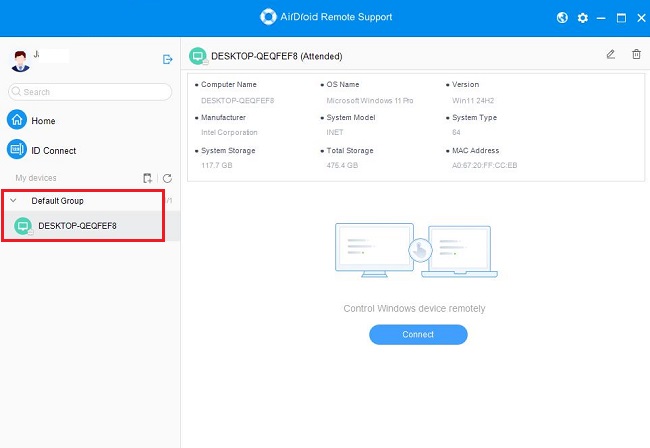
Airdroid Remote Support software features
- Features 1.Easy-to-Use Interface:
- A simple setup process and intuitive controls to facilitate remote access without technical complications.
- Features 2.Compatibility with Older Systems:
- Full support for Windows 7, including both 32-bit and 64-bit architectures, ensuring functionality without requiring an upgrade to newer operating systems.
- Features 3.Robust Security Features:
- Encryption protocols and secure authentication to protect your remote sessions from unauthorized access.
- Features 4.Advanced Functionality:
- Options like file transfer, multi-screen support, and remote printing to enhance efficiency during remote sessions.
Conclusion
That’s all about How to Access Remote Desktop on Windows 7, Although the remote function of Windows 7 is very powerful, for security reasons, Leveraging the right remote control software ensures that you can securely access your system, manage files, and troubleshoot issues from anywhere.
Use AirDroid Remote Support, you can continue to maximize the value of your Windows 7 system, Click now for a free 14-day trial!


Leave a Reply.