How to Record Screen & Session with Splashtop [Step-by-Step Guide]
Splashtop’s screen recording feature allows you to record remote sessions that can be used for training or auditing purposes. Recorded files are stored on the local computer and can be easily viewed.
This comprehensive guide focuses on Splastop screen and session recording methods that make it easier to show end users how to perform tasks and allow other IT technicians to solve technical problems. Let's get started!
How to Record Session Remotely from Splashtop Business
Splashtop screen recording has different methods for various devices and can also be configured in team policies for session recording, which can be confusing for many users. Next, let's learn how to record screens and sessions on Splashtop Business.
System Requirements
Meeting system and device requirements is a key to smooth screen recording.
- First, a system must have the Splashtop Business app version v3.3.0.0 or later.
- Windows 7+ or MacOS 10.10 is compulsory on your computer to run the Splashtop Business app.
- Android devices from v3.5.1.10 are compatible with Splashtop's session recording feature.
- Here are a few supported Splashtop subscriptions, including Business Access (Pro, Performance), Remote Support (Plus or Premium), Splashtop SOS (basic SOS, SOS+10, SOS Teams, or SOS+Unlimited), and Splashtop Enterprise.
Steps of Screen Recording
This section includes a step-wise guide to record sessions with Splashtop manually and automatically. Let’s walk through the detailed method.
Manual Screen Recording
Here's how to record your screen manually, including Windows, Mac and Android.
*For Windows/Mac
Step 1: Connect your device with the remote computer.
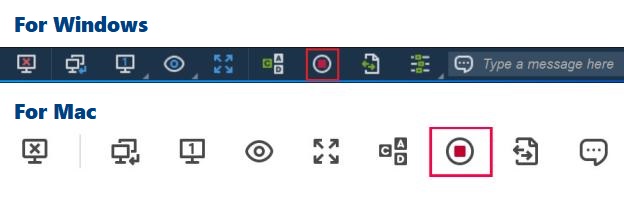
Step 2: Once connected, tap on the "Record" button.

Step 3: Perform what you intend to do here and tap on the "Stop Record" option.
Step 4: The video file is saved on the local computer's Splashtop Business (purple icon) side.
*For Android
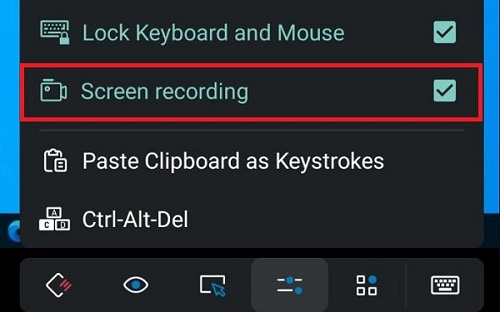
Step 1: Navigate to the "Adjustment" symbol in the menu bar.

Step 2: Check the "Screen recording" option to enable it. The recording will be displayed in the upper left corner.
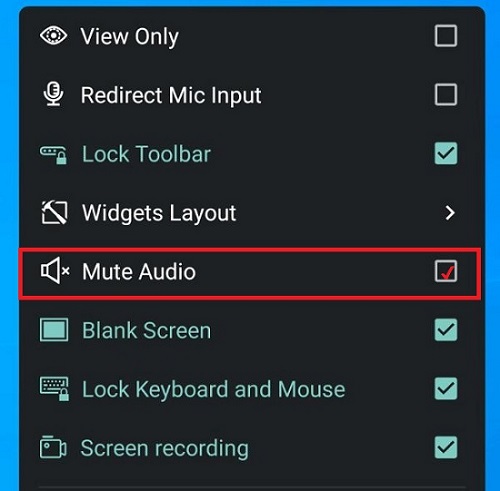
Step 3: Audio saving is also allowed for Android devices, but if you don't want to record audio, go for the option "Mute Audio."
Automatic Screen Recording
Here's how to set up automatic screen recording for Splashtop Business.
Step 1: Open the Splashtop Business app and navigate to "File". Scroll down and find "Options" and click on it.
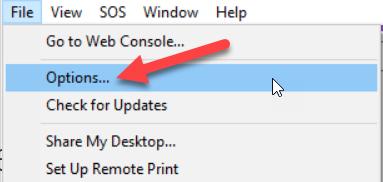
Step 2: Afterward, move toward the option "Advanced" and turn on "Start recording automatically."
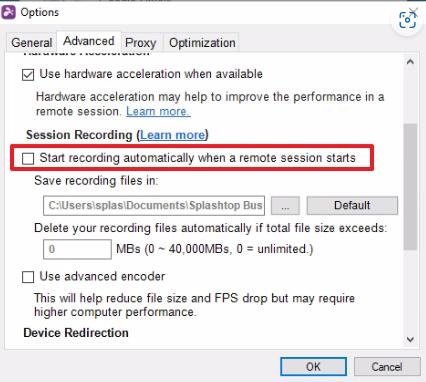
Step 3: In this step, make and use remote connections. Screen recording will be enabled automatically.
Step 4: The video file is saved in the assigned path on your local computer's Splashtop Business (purple symbol) side.
Assign and Enable Session Recording for Teams
Splashtop Business also adds a policy in Team Settings to assign and enable screen recording for the entire team members. The policy includes assigning the path and size limit of the stored file and controlling it to automatically start recording for all team members.
Step 1: Log into your account on Splashtop and go to "Management"-"Settings"-"Team."
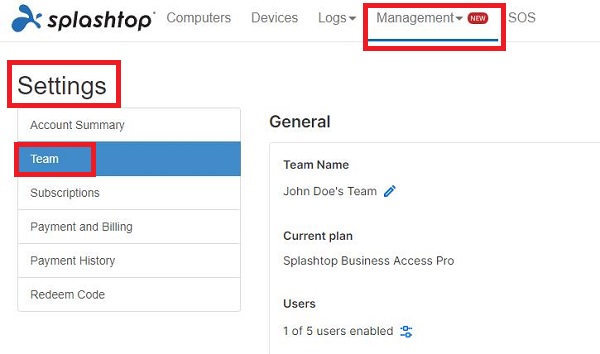
Step 2: Find "Session recording" in "Feature Configuration" and click "Detailed setup."
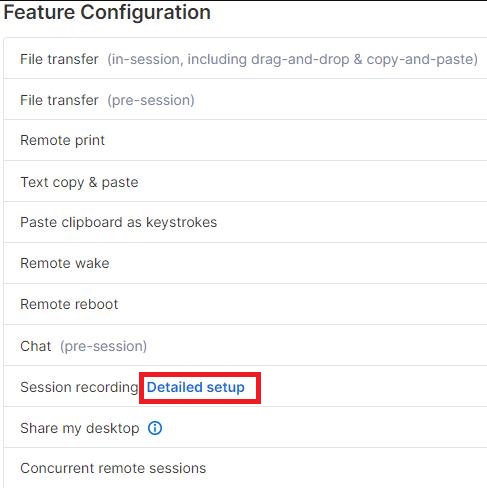
Step 3: Then, administrators can specify recording policies for each platform (including Windows, Mac, and Android).
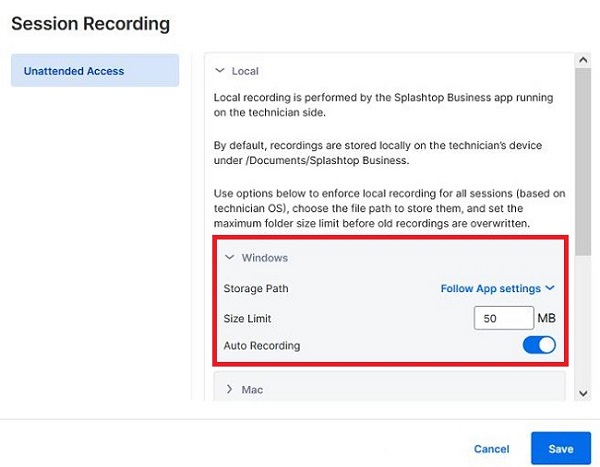
Once configured, team members can start an automatic recording session as soon as they connect to the remote computer.
Related Information on Recording Files
Recorded files are stored in the Documents/Splashtop Business folder on your local computer in WebM media file format on Windows or mp4
In the "Advanced" settings, you can also modify the storage path for the recording file and the size limit for that path. You can even save the recording file directly to a third-party cloud storage program on your computer. Please refer to the official link for detailed operation.
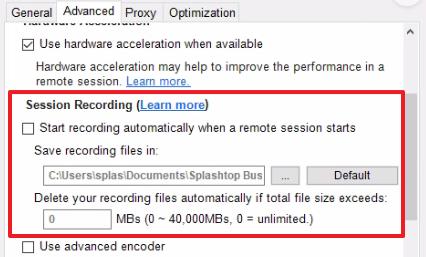
How to Record Session Remotely from Splashtop On-Prem
Splashtop On-Prem users can also record sessions in the desktop client application, here are the detailed steps:
Manual Session Recording
It’s too much convenient to start a screen record session manually. Take a start by tapping on the "Start Recording" option in the menu bar. This facility is accessible at any point of your remote control session. It’s beneficial for users if automatic session recording gets disabled by default.

Automatic Session Recording
A Splashtop On-Prem user can use automatic session recording in the Splashtop On-Prem client app.
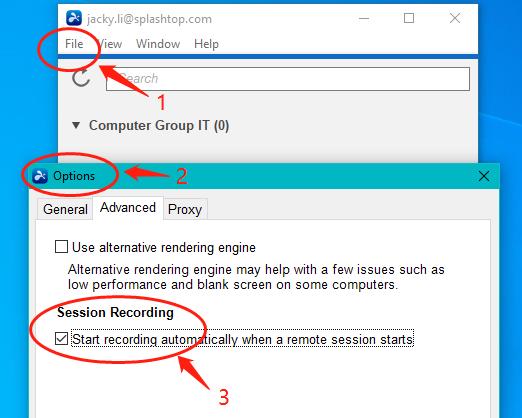
Step 1: Access the option from "File" and select "Options" here.
Step 2: Go ahead by clicking on the "Advanced" tab.
Step 3: Check "Start recording automatically." After that, automatic screen recording will be started for every remote session.
Related Information on Recording Files
Recording files are stored in the /Documents/Splashtop On-Prem folder in the Splashtop On-Prem client application. The recorded files are saved in the WebM format. If Windows Media Player is unable to open the WebM file, you can drag the file onto a Chrome tab and play it.
But notice a few points related to the session recording:
- Recording files from different recording sessions will be merged into one file as long as they link to the same remote control session.
- Audio capturing is not supported with the screen recording.
- Turn on the "Remote Cursor" option to include the cursor in the video.
Solved: MacOS Not Allowing Splashtop Screen Recording
Despite understanding how Splashtop screen and session recording work, several users still have trouble using it. A user had raised the issue of not being able to allow Splashtop screen recording on Reddit:
"When launching Splashtop from the Addigy management page for a particular macbook computer, I receive the getting started prompt for allowing the various permissions. All of them work except for "Screen Recording." When I click the Allow button, nothing happens. Splashtop is also not in my list of enableable apps under the Screen Recording menu."
In fact, starting with MacOS version 10.15, Apple forces users to physically click the "Allow Screen Recording" button locally for security reasons. This cannot be done remotely or automated. Let's see how it should be done.
How to Resolve Splashtop Screen Recording Error on MacOS
Step 1: Once you download and then the Splashtop_Streamer_INSTALLER.dmg, you have to enable the following permissions for Splashtop Streamer, located under the "Security & Privacy" option in "System Preferences." The guidance window helps to glide through each section. Tap on the "OK" and then the "Allow" option and follow the guide.
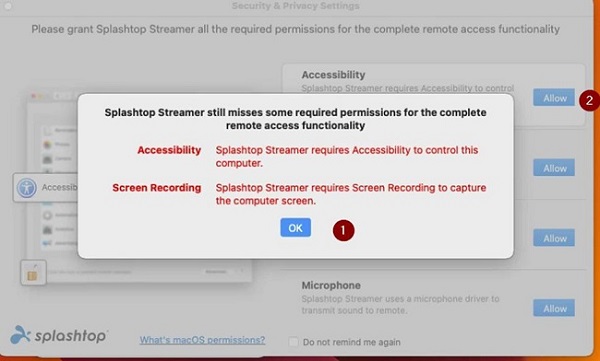
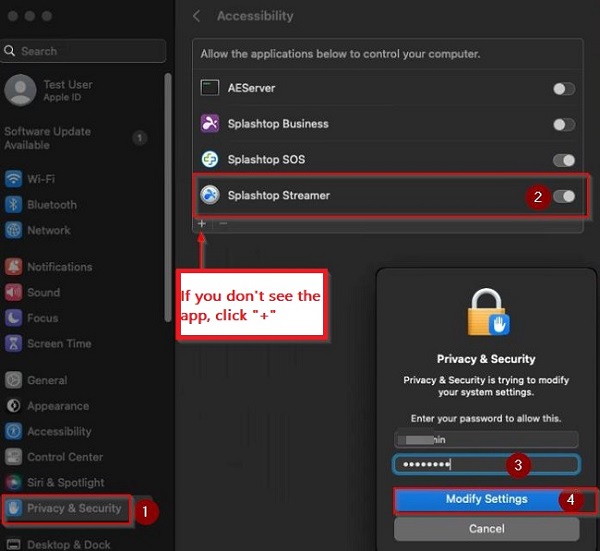
Step 2: Then, add the Streamer app by tapping on the "+" symbol or toggle Splashtop Streamer if it already exists. This is accessible under "Accessibility" (needed for keyboard and mouse control of this computer via a remote session). A notification is shown here to ask you to enter your system password and press "Modify Settings."
Step 3: You are required to process the same for the leftover permissions:
**Screen Recording (permission is required for the MacOS device's screen to be watched in a remote session)
**Full Disk Access (permission is required for availing of features such as file transfer and drag-and-drop files to work)
**Microphone (permission is required for audio capturing and microphone passthrough to run on your Mac device)
Step 4: After that, you succeed in getting the victory window with 3 green check marks. Then, you are able to have full control of your Mac.
Best Splashtop Alternative: Another Solution for Remote Screen Recording
Regarding remote screen recording, a great solution besides Splashtop is AirDroid Remote Support. This mobile device-focused remote support software is a one-stop solution for commercial and non-commercial users looking for potential screen recording capabilities for archiving or auditing.
Using this tool, you can make screen recordings during a remote session. This recorded data can then be shared with other colleagues or IT technicians for troubleshooting in case of errors. Additionally, you can enjoy advanced features such as an AR camera and tutorial gesture to increase efficiency greatly.
To record screen & session at AirDroid Remote Support, there are only three steps:
Step 1: Initiate a remote support session.
Step 2: Launch screen sharing. Both the support specialist's end and the customer's end can initiate screen sharing.
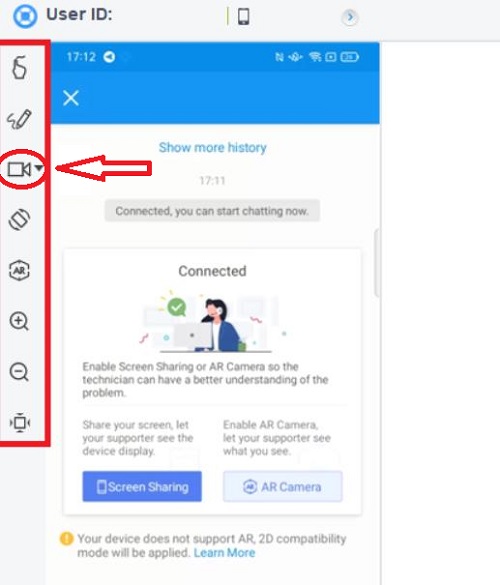
Step 3: Click on "Start recording" icon in the left column on the desktop client for screen/session recording.
Conclusion
Undoubtedly, Splashtop has recently ranked among the top-rated remote support tools for screen recording. We have wrapped up this guide with step-by-step methods of Splashtop screen recording, either manual or automatic. But beware of the MacOS Splashtop error that most users face when recording screens.
To end users’ search for a great Splashtop alternative, this comprehensive guide sheds light on AirDroid Remote Support, a cost-effective screen recording solution, along with a beginner-friendly interface. To meet the raised remote support standards in this digital era, AirDroid is worth trying.


Leave a Reply.