A Comprehensive Guide to TeamViewer Audio Sharing
Have you ever wished you could effortlessly share audio during remote work sessions, presentations, and online meetings? With TeamViewer audio sharing, this vision becomes reality. However, navigating the world of audio configurations and troubleshooting potential issues can feel daunting. Fear not, for this comprehensive guide is here to empower you! Step into a world of seamless audio collaboration with TeamViewer, where crystal-clear communication becomes the norm. Let's dive into the details!
Which Devices Can TeamViewer Share Audio On
Let's talk about which devices can use TeamViewer to share sound. TeamViewer is super handy for sharing audio, but there's a catch. TeamViewer sound sharing is currently only available to Windows users and is connected to devices under Windows. This means you can only enjoy TeamViewer audio sharing on Windows. However, if your remote computer is a Windows system, you can also get the sound of a Windows remote computer from Mac or Linux.

But, if you are using a device such as an Android phone, iPhone, Mac computer or Ubuntu, TeamViewer audio sharing is not yet possible due to technical limitations. Although you can't do TeamViewer audio sharing on macOS, some users have found third-party solutions to achieve the same effect. The next section will provide guidance on this. In addition, we will also introduce you to the operation methods and solutions of TeamViewer sound sharing on Windows computers.
How to Share Audio on TeamViewer
Now, let's dive into the exciting part – how to share audio using TeamViewer. We'll make it super easy for you with step-by-step instructions.
For Windows
How to enable audio sharing on Windows? Some users are still confused about this, we have detailed instructions for two settings to enable TeamViewer audio sharing here.
Setting in Remote Control Sessions
Here's a step-by-step guide for audio sharing on TeamViewer during remote control sessions on Windows:
Step 1: Launch TeamViewer on your Windows computer. Confirm you have the latest version installed for optimal performance.
Step 2: After launching TeamViewer, navigate to the main window and click on Extras > Options.
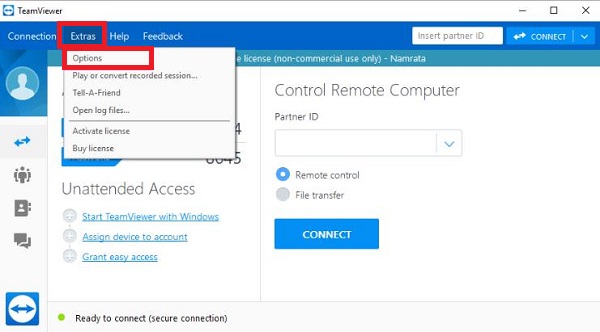
Step 3: Select Remote Control and check the Play computer sounds and music box.
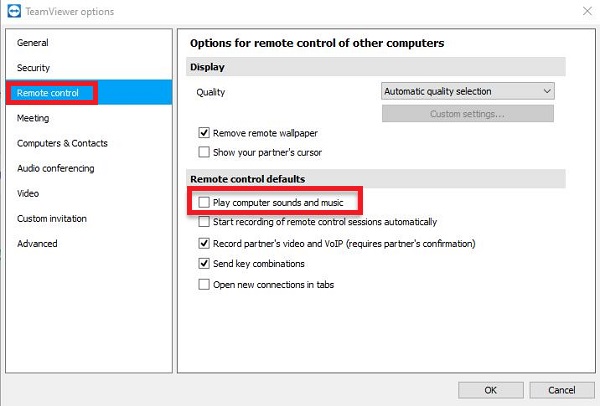
To ensure audio functions are correct during remote control sessions, it's important to keep the above option enabled on both computers.
Setting in TeamViewer Meeting
In TeamViewer Meeting, you can conveniently access audio settings directly from the meeting interface, eliminating the need to navigate away from your screen.
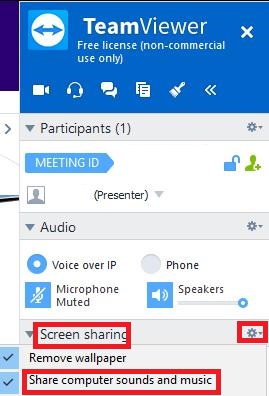
Once your meeting is underway, simply click on the Cog icon within the Screen sharing section. From there, choose Share computer sounds and music. It's as simple as that! Your counterparts on the other end will swiftly experience the shared audio without any delay.
Similarly, you can check the appropriate option in the TeamViewer Meeting settings. Navigate to the main window and click "Extras" > "Options," click the Meeting tab and check Share computer sounds and music.
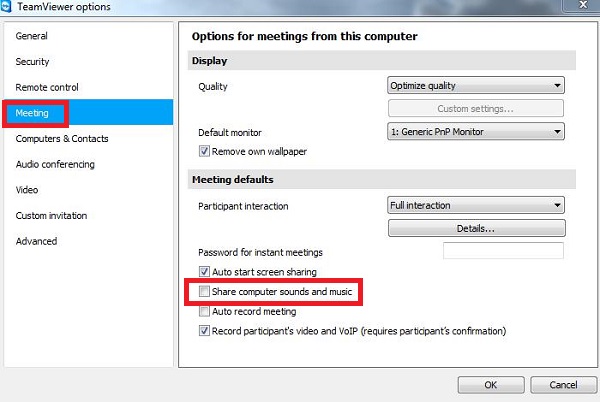
These are the two most important points of TeamViewer audio settings, and as long as you enable the appropriate options, you can enjoy audio sharing on TeamViewer. Also, if you want to disable shared sound in TeamViewer, you can just follow the above steps to uncheck the corresponding options.
For Mac (Third-Party Solutions)
TeamViewer doesn't natively support audio sharing from Macs, but you can use a virtual audio device like Loopback and Soundflower to route audio to other applications. Here's a step-by-step guide:
Solution: Install Loopback on Mac
Instead of using TeamViewer to share audio, you can choose other applications such as Skype or Discord for voice communication. Have two computers talking on Discord and change the input device in Mac System Preferences. The software needed for this entire process is Loopback.
Step 1: Visit the Loopback website at https://rogueamoeba.com/loopback/. Click on the "Free Download" button to download the Loopback application.

Step 2: Open the downloaded file and follow the on-screen instructions to install Loopback on your Mac. Drag the Loopback icon to your Applications folder to complete the installation.
Step 3: Open Loopback from your Applications folder. You'll see an interface with blocks representing audio sources and destinations.
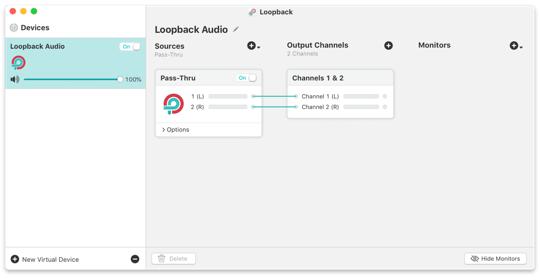
Step 4: Click the "+" button in the bottom left corner to create a new virtual device.

Step 5: Add the software that needs to be recorded in the Sources section.

Step 6: Go to Mac System Preferences > Sound > Input and change the input device to Loopback.
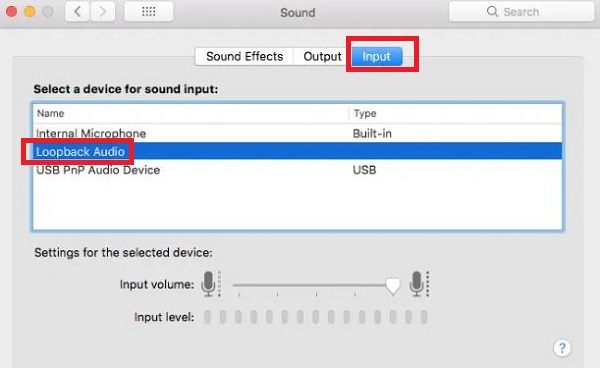
Step 7: Finally, you can log into a third-party application such as Discord on both your computer and the remote computer, and you'll be able to hear voices during voice calls.
Soundflower is also an audio transfer solution that uses Mac as the remote end. The method of using it is also similar to Loopback's above, and you can learn how to use it at the app's official website. In conclusion, TeamViewer audio sharing is impossible on Mac and utilizing third-party solutions is complicated.
How to Fix TeamViewer Sound Not Working
If you're facing issues with TeamViewer sound not working, here's a simple guide to help you get it back on track:
Enable Related Options
Check to see if your TeamViewer settings have the appropriate options checked as described in the previous section. To fix the problem of TeamViewer audio not working, start by making sure that the "Play computer sounds and music" and "Share computer sounds and music "settings are turned on.
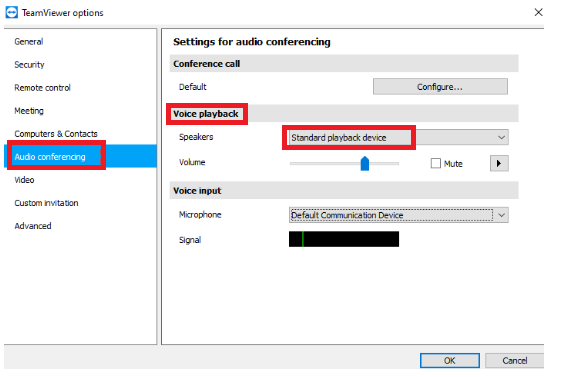
Change the "Speakers" Option to "Standard Playback Device"
Some users have encountered the problem of no sound from the remote computer, so you may need to adjust the "Speaker" options. This option handles speech from the remote device and controls how all sounds from the remote device are played.
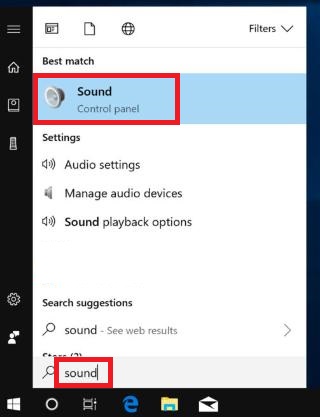
Step 1: To begin, open the Start menu on your Windows computer. Type "sound," and then click on Sound from the search results.
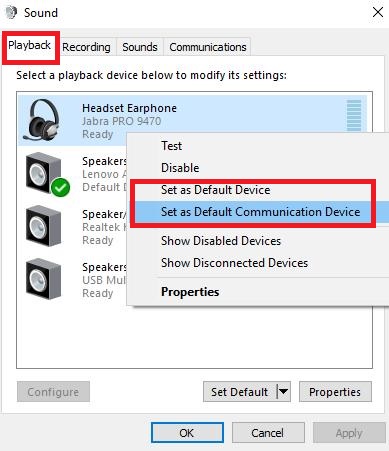
Step 2: Check the Playback tab to see which devices are playing music. Right-click and select Set as Default Device and Set as Default Communication Device.
Step 3: Navigate to TeamViewer main window and click on "Extras" > "Options."
Step 4: In the Options menu, navigate to Audio conferencing. Under Voice playback, change the Speakers option to Standard playback device instead of Default communication device.
Configure Audio Settings in VLC or Other Apps
If you are having problems playing sound from an application such as VLC or Windows Media Player, then you should configure the appropriate audio settings on the application such as VLC. Here is how you can fix it.
Step 1: Open VLC, go to Tools > Preferences and select the Audio tab.

Step 2: In Audio Settings, go to the Output section and set the Output Module to WaveOut audio output.

Follow these straightforward instructions to unmute VLC and activate audio.
Check the Sound Driver and Remote Microphone for Proper Operation
Make sure your sound driver and microphone work correctly to make use of TeamViewer comfortable. Check the local sound driver in the Device Manager, check the status, and update if necessary. Verify that the local microphone is not muted and is working correctly.
If you are connected to a remote computer with TeamViewer, check and adjust remote microphone settings to ensure optimal audio performance. Quickly evaluate these components for seamless and effective voice collaboration via TeamViewer.
Restart the Device or Software
To resolve TeamViewer sound issues quickly, consider restarting your device or TeamViewer software. Restart your device to refresh your system settings, and restart TeamViewer to fix temporary interruptions, ensuring a smoother audio experience. This simple procedure often addresses sound-related issues quickly and enables uninterrupted voice communication during remote sessions on TeamViewer.

Upgrade TeamViewer to the Latest Version
Consider exalting to the latest version of the software to use TeamViewer efficiently and without trouble. Regular updates often include bug fixes, modifications, and optimized features to ensure smoother performance. Using the latest version not only benefits from enhancements, but also reduces the likelihood of sound problems and other technical failures during TeamViewer sessions. Upgrade now and enjoy all the features and improvements that TeamViewer's latest release offers.
Best Practices for TeamViewer Audio Sharing
To ensure that you have a good experience during TeamViewer audio sharing, you can refer to the following ways to improve TeamViewer for audio-related matters.
Software Updates
Just like the previous section talked about how to fix TeamViewer audio sharing not working, updating the software to the latest version can reduce a lot of audio sharing errors and lead to a better experience.
You can regularly update TeamViewer software for the latest features, improvements, and bug fixes. The latest software minimizes the risk of audio problems.
Configure Audio Settings in Advance
Configure voice settings on both your local and remote devices with pre-voice settings before a TeamViewer session. Mute the microphone and make sure the speaker is selected correctly.

Test Your Audio before a Meeting
Perform a simple voice test before starting an important meeting or presentation. This allows you to recognize and address potential sound issues in advance.
Coordinate with Remote Users
Communicate with remote users to ensure that their audio settings are optimized for TeamViewer. Make sure the microphone works, and the speaker is properly configured.
Close Unnecessary Applications
Exit unnecessary applications on both local and remote devices to reduce the possibility of interference. This will prioritize TeamViewer resources and ensure optimal audio performance.
Consider Third-Party Solutions
To enhance voice sharing capabilities, consider third-party audio solutions, especially on non-Windows systems. Some applications offer additional features, such as Loopback and Soundflower.
Bonus: Remote Assistance via Screen Sharing and Live Chat
TeamViewer offers excellent voice sharing for clear and easy-to-understand remote assistance, but another notable option is AirDroid Remote Support. This alternative achieves the same effect by focusing on screen sharing and live chat functionality.
With AirDroid Remote Support, users can seamlessly share their screens, providing visual and intuitive troubleshooting and assistance. The live chat feature further enhances communication and ensures a comprehensive remote support experience.
Exploring tools like AirDroid Remote Support, depending on your preferences and specific needs, complements TeamViewer's voice sharing capabilities and provides flexibility in remote assistance methods.
Key Features
- Screen Sharing: AirDroid Remote Support provides robust screen sharing, enabling users to view and interact with remote devices in real-time. This visual assistance enhances troubleshooting and assistance.
- Live Chat: Tackle and resolve complex issues by communicating directly with real-time voice chat and screen viewing. If the user is not available to take a call, you can communicate through voice messaging or text.
- AR Camera & 3D Marker: Allows you to see through the customers' device camera and guide your customers by placing 3D markers onto real-world objects.
- Tutorial Gesture: Swipe or tap on the shared screen, the tutorial gesture will appear on your customer's device. (Only available for Android devices)
- User-Friendly Interface: AirDroid's user-friendly interface simplifies the remote assistance process. Intuitive control and easy-to-understand design contribute to an easy-to-use experience for both supporters and users seeking assistance.
- Secure and Encrypted Connections: With security priority, AirDroid Remote Support establishes secure and encrypted connections. This ensures confidentiality and protection of sensitive information during remote assistance sessions.
Final Thoughts
While TeamViewer audio sharing is powerful, it also has limitations, such as the inability to support sound sharing across all devices. So, users have to consider other alternatives to fulfill their needs.
TeamViewer audio sharing is excellent in providing clear and easy-to-understand remote assistance. Its seamless communication sets the criteria for efficiency. In parallel, AirDroid Remote Support provides a compelling alternative, highlighting screen sharing and live chat capabilities for enhanced visual and auditory experiences.


Leave a Reply.