[Fixed] TeamViewer Connection Could Not Be Established Error
“Trying to connect to my PC – ‘a connection could not be established’ - how do I fix this?”
It’s fairly common to encounter connectivity errors like “TeamViewer connection could not be established” when using this application. This type of error occurs for various reasons, including internet connectivity, pending updates, and misconfigured settings on TeamViewer.

Let’s deep dive into these reasons and explore possible solutions to help you establish a stable remote connection. Additionally, you can always rely on a more efficient TeamViewer alternative for an error-free remote working experience.
Part 1: Overview of Problem – Causes and Solutions
The error message “a connection could not be established TeamViewer – unknown reason” signifies that TeamViewer is unable to connect to the remote client. The issue can be on either the remote or local end. So, it’s crucial to analyze the overlying factors while trying to troubleshoot the problem.
- Network connectivity problem: Poor or unstable internet connection on either device hinders the TeamViewer remote connection.
- App issues: Sometimes, the problem lies within the TeamViewer app which leads to connectivity issues like “TeamViewer, a connection could not be established.”
- Misconfigured settings: Improper settings on the app or your PC (remote or local) will eventually block the remote connection.
- Pending Updates: It’s recommended to install the pending updates on the TeamViewer app as well as your Windows/Mac for a hassle-free experience.
- Firewall settings: If the security software on the remote client is blocking TeamViewer communication, it will give a connection problem.
Part 2: Quick Troubleshooting Tips
Coming to the main part, we have shortlisted a few quick solutions to restore the TeamViewer functionality.
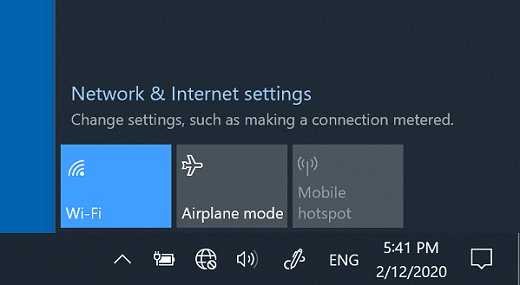
1. Check your internet connection
Make sure both devices get a stable and consistent internet supply. Use a third-party tool like OOKLA to check the internet speed. If you’re having any issues, restart the router and modem or contact the supplier.
2. Update TeamViewer on both devices
An outdated TeamViewer app on either device is a leading cause of the “a connection could not be established – TeamViewer” error. It’s best to check and update TeamViewer to its latest version.
For that:
Step 1: Open TeamViewer and head to Help > Check for new versions.
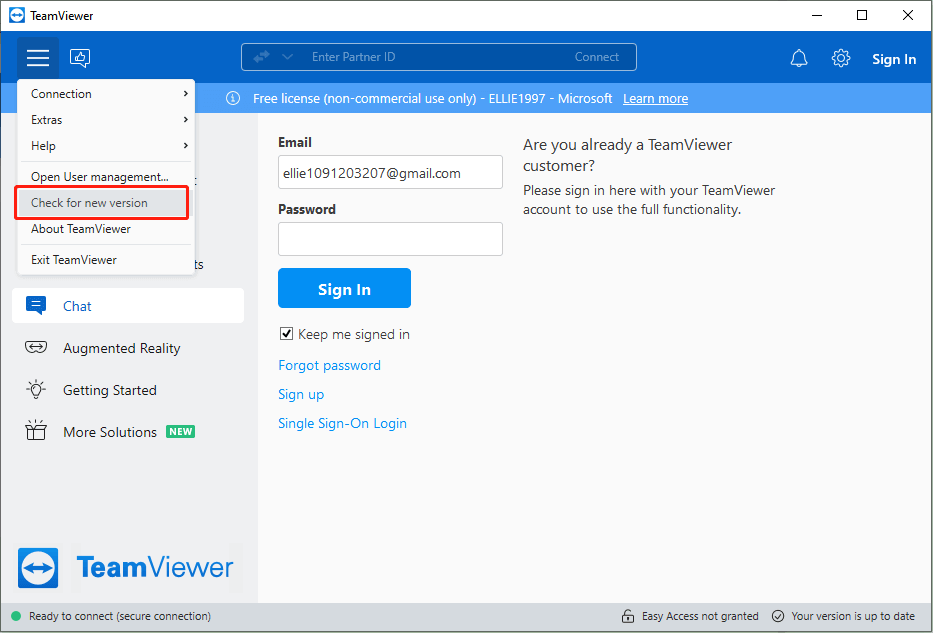
Step 2: Install the updates, if available.
Step 3: Do it on both devices.
3. Restart TeamViewer session
Still facing difficulty in connecting devices via TeamViewer? Try restarting the remote session as a quick way to overcome the “TeamViewer could not establish connection” error.
On Windows
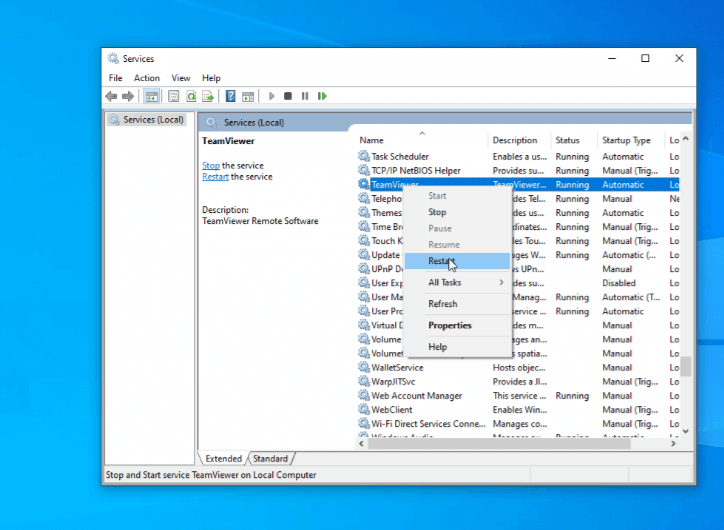
Step 1: Open Run and type in services.msc.
Step 2: On the Services menu, scroll down and find the TeamViewer option.
Step 3: Right-click and hit Restart.
On Mac, simply quit TeamViewer completely and restart it.
4. Enable Access Settings on TeamViewer
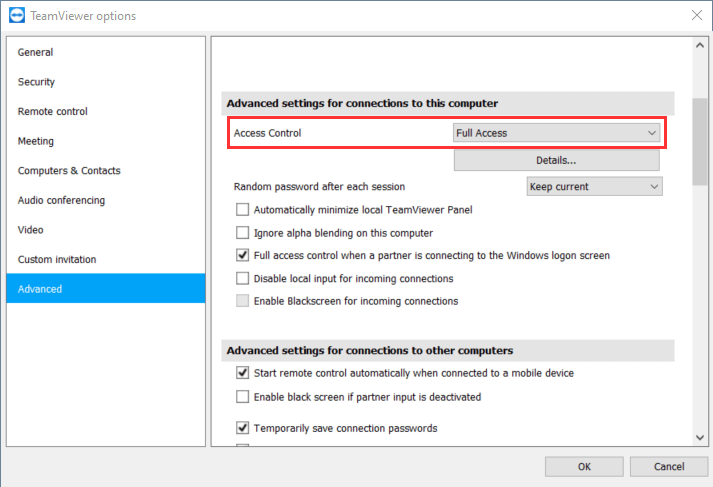
The next method involves checking the access settings of TeamViewer to confirm the remote device is not denying the incoming connection request. You need to grant “Full Access” to the devices for accepting remote connection as demonstrated below:
Step 1: Open TeamViewer and navigate to Options > Advanced.
Step 2: Next to “Access Control”, select Full Access.
Step 3: Also, tick the “Full access control when a partner is connecting to the Windows login screen” box.
5. Force a password change on both clients
Many users have verified that changing the TeamViewer password on each device removes the “TeamViewer connection could not be established” error message. All you need to do is:
Step 1: Click the User icon at the top-right and select “Edit account.”
Step 2: Now, go to Accounts and set a new password in the respective fields.
Step 3: Do it on both devices, restart them, and try to connect again.
Part 3: Additional Workable Solutions
If the aforementioned methods haven’t worked, fret not. Refer to the below solutions for advanced troubleshooting tips:
Solution 1: Uninstall TeamViewer Completely and Re-Install
As per official TeamViewer customer support service, re-installing TeamViewer is the quickest way to troubleshoot the “connection could not be established on TeamViewer” error. However, uninstalling the app alone is not enough as you have to completely remove its files as well.
Here are the steps to do that:
Step 1: Uninstall TeamViewer
- First, head to Control Panel > Programs & Features.
- Find and uninstall TeamViewer from your system.
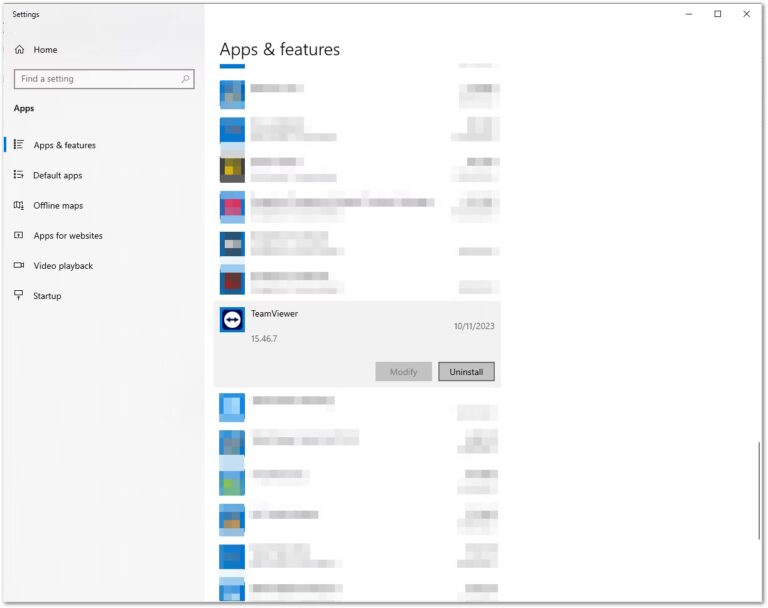
Step 2: Delete the TeamViewer folder
Now, navigate to the below location and delete the TeamViewer folder:
C:\Program Files (x86)\TeamViewer
 %appdata%\Teamviewer
Step 3: Delete TeamViewer keys in Registry
- Open Run (by pressing Win + R keys simultaneously).
- Now, head to the below locations and delete the keys:
HKEY_LOCAL MACHINE -> SOFTWARE -> TeamViewer [32 bit OS]
 HKEY_LOCAL MACHINE -> SOFTWARE -> Wow6432Node -> TeamViewer [64 bit OS]
 HKEY_CURRENT_USER\Software\TeamViewer
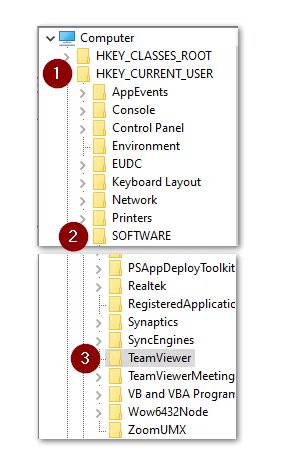
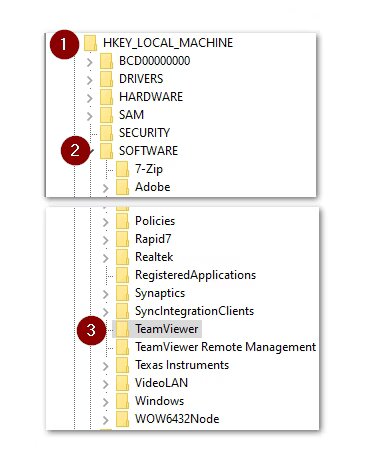
Be sure to carefully implement this step as deleting any other key can affect the functionality of your operating system. Once done, exit Registry and restart your computer.
Step 4: Install and Set up TeamViewer
- Finally, head to the TeamViewer official site and install its latest version on both devices.
- Set up your account
Solution 2: Install Pending Windows/Mac Updates
Not installing the pending OS updates can interrupt the normal functioning of the TeamViewer app. So, the next step is to install the pending on the device you’re using TeamViewer, be it Mac, Windows, or a smartphone.
To update Windows:
Step 1: Search and open Settings > Windows Update.
Step 2: Click “Check for Update” and install the pending updates.

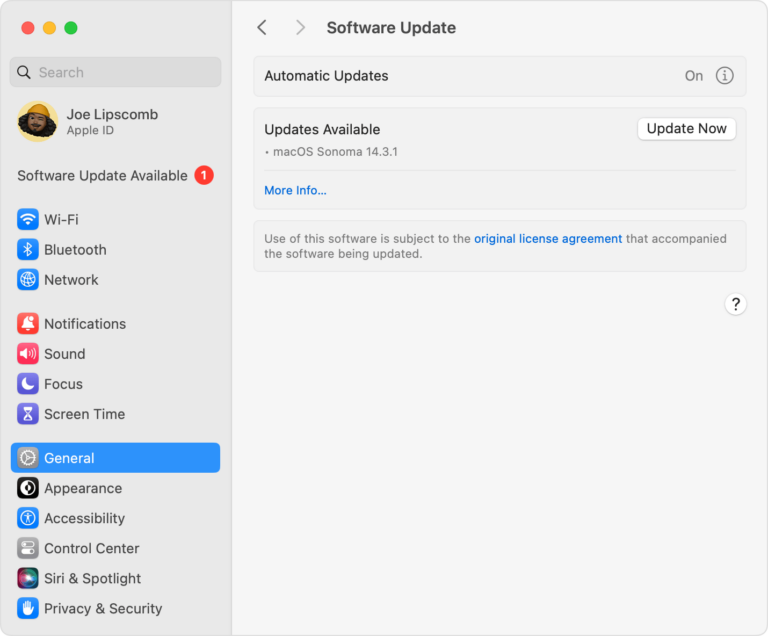
To update on Mac:
Step 1: Click the Apple menu and head to System Settings.
Step 2: Now, click General > Software Update.
Step 3: It will automatically begin searching for the new updates. If available, install them right away.
Solution 3: Configure Firewall Settings
In many cases, the firewall or the security software settings on the remote machine block the TeamViewer connection. If this happens, you’ll get the “connection could not be established on TeamViewer” error. Thus, you need to check and customize the firewall settings, if needed.
To do that:
Step 1: Head to the Control Panel and click "System and Security."
Step 2: Now, select "Windows Defender Firewall" > "Allow an app or feature through Windows Defender Firewall."
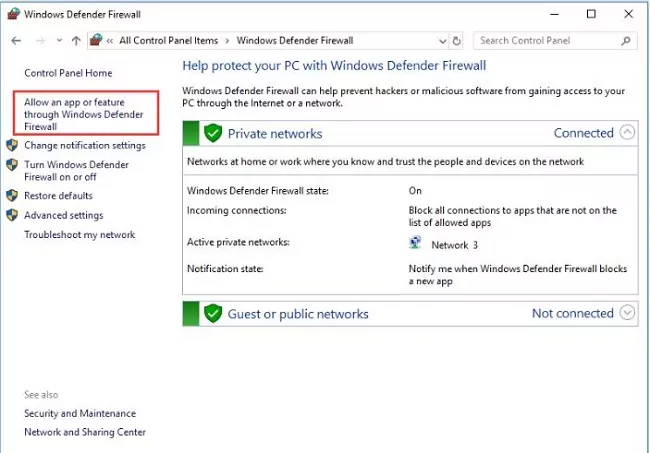
Step 3: Hit Change Settings and find TeamViewer in the list of apps.
Step 4: Make sure both the "Private" and "Public" options are checked.
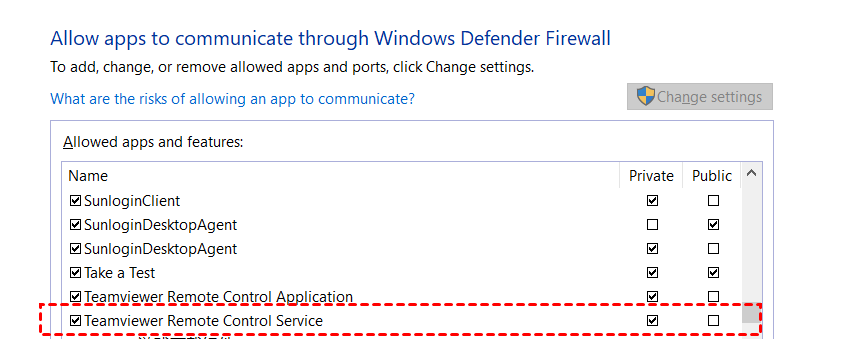
Are you using a third-party security tool on your machine? If yes, open it and find the option like preferences or settings. Next, locate the firewall or network-related settings and add TeamViewer in the "Add an exclusion" option.
Now, try connecting to the remote client. Hopefully, you won’t get the “TeamViewer, the connection could not be established” issue.
Bonus Tip: Use a TeamViewer Alternative to Avoid Connectivity Errors
Fixing TeamViewer connectivity issues is a lengthy and cumbersome procedure. If you want to enjoy an error-free remote experience, get assistance from AirDroid Remote Control. This multi-feature program provides a stable, secure, and uninterrupted remote connection.
It comes loaded with comprehensive functionalities like unattended access, black security screen, multi-device remote management, file sharing, and voice chatting. On top of that, AirDroid is known for its spectacular high-end security and ease of use.
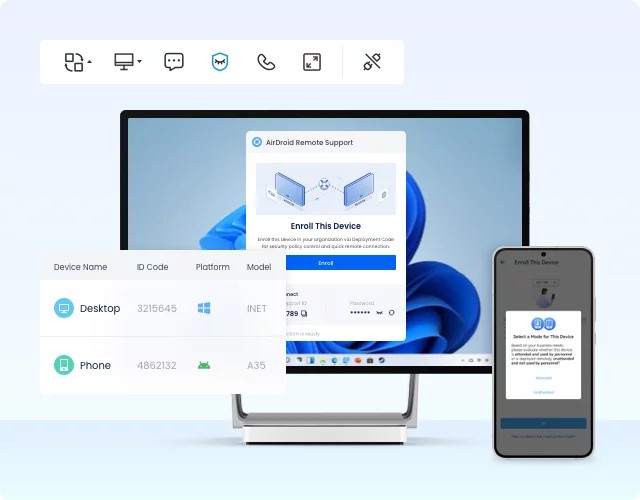
You can easily install it on a Windows PC and access it remotely from any device including Windows, Mac, Android, or iOS. Try its free 14-day trial before making a decision.
Why Use AirDroid Remote Support
AirDroid stands out as the most outstanding and comprehensive remote desktop tool for its rich features and sleek interface. Some of the prominent features include:
- Offers a one-click unattended remote access.
- Supports real-time correspondence with features like voice chatting and screen sharing.
- Tutorial Gesture on Android devices to provide tips and instructions.
- With its AR camera tool on Android/iOS devices, you can see through the customer’s phone camera.
FAQs
Q1. Why do I get TeamViewer error "Not Ready, Please Check Your Connection"?
The possible reasons for this error include unstable internet connection, firewall blockage, misconfigured access setting on the remote TeamViewer app or the device.
Q2. Can I use TeamViewer without an internet connection?
Yes, TeamViewer allows users to secure remote access by setting up a LAN connection without needing an internet. However, both devices must be on the same network for the connection to establish.
Q3. How do I check if TeamViewer ports are blocked?
Use an online port-checking website to confirm if ports 5938, 443 or 80 are blocked or not. Else, use the command prompt netstat -a –n on Command Prompt to get a list of the ports being used and otherwise.
Final Remarks
In short, this article summarizes various proven solutions to deal with the “TeamViewer connection could not be established” error. To avoid facing such issues permanently, use an alternative tool like AirDroid Remote Control.
It offers a more personalized and seamless experience to manage all your remote tasks effortlessly from anywhere. With its rich collection of features, AirDroid is an ideal choice for both personal and commercial use.
Feel free to ask any questions in the comment section.


Leave a Reply.