Resolving 'TeamViewer Not Ready Check Your Connection' Error: A Comprehensive Guide
- Check general setup, such as internet access and computer system version.
- Delete TeamViewer entries from the hosts file and allow TeamViewer as an exception in third-party antivirus software.
- Disable the new user interface in TeamViewer to revert to the classic interface.
- Consider using AirDroid Remote Support as a stable alternative to TeamViewer
In today's interconnected world, remote access and support tools like TeamViewer have become essential. However, encountering the "TeamViewer Not Ready Check Your Connection" error can be frustrating.

In this guide, we'll explore the common issues leading to this error and provide step-by-step solutions to resolve it.
Things to Check for "TeamViewer Not Ready Check Your Connection" Error
When encountering the "TeamViewer Not Ready Check Your Connection" error, it's essential to perform a series of checks to identify the root cause. Below, we provide instructions for each check, along with corresponding solutions.
1. Check General Setup
This check focuses on verifying the fundamental aspects of your system's setup, such as those that pertain to general network configurations and accessibility. Can you make sure that Internet access is working properly and that you have proper access to tools like file shares or printers? Or, have you configured TeamViewer correctly?
You can try loading a web page or other web-based application, or check the settings in your computer's host and related software. If you have problems with the general settings, please refer to the following solutions.
Solution 1: Restart the Computer or Update the Computer System Version
A simple system restart can often refresh network settings and resolve minor connectivity problems. However, if the issue persists, it might be related to your computer's operating system.

Solution 2: Delete TeamViewer Entries from the Hosts File
The hosts file on your computer contains entries that map hostnames to IP addresses. Incorrect or blocked entries related to TeamViewer in this file can disrupt network connections.
Step 1: On Windows, press Windows Key + E to open File Explorer.
Step 2: Go to C:\Windows\System32\drivers\etc. You'll find a file named "hosts" without a file extension. Right-click on it and select "Open with" and choose a text editor like Notepad.
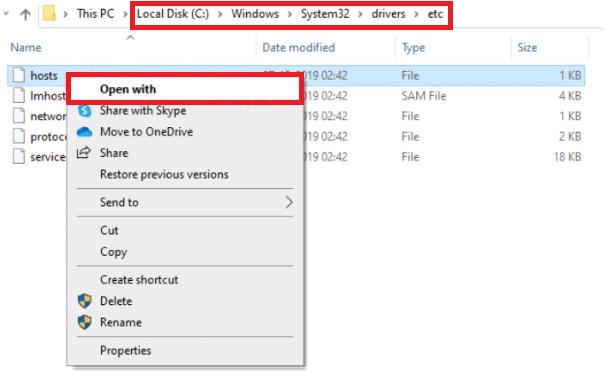
Step 3: Once the hosts file is open, you'll see a list of entries. Each entry consists of an IP address followed by one or more hostnames.
Step 4: After selecting the entries for TeamViewer, press the "Delete" key on your keyboard to remove the entries.
Solution 3: Allow TeamViewer as an Exception in Third-Party Antivirus
Third-party antivirus software is designed to protect your computer from potentially harmful applications, including those that access the internet. In doing so, it may inadvertently block TeamViewer's network connections, leading to the "TeamViewer Not Ready Check Your Connection" error.
Step 1: Within the antivirus software, look for settings, preferences, or options.
Step 2: Find the section related to the firewall or network settings.
Step 3: Look for an option to add exceptions or exclusions.
Step 4: You should see a list of programs or applications installed on your computer. Search for TeamViewer and select it.
Step 5: If TeamViewer is not in the list, you might need to manually add it. Look for an option like "Browse" or "Add an application." You will then need to navigate to the location where TeamViewer is installed on your computer.
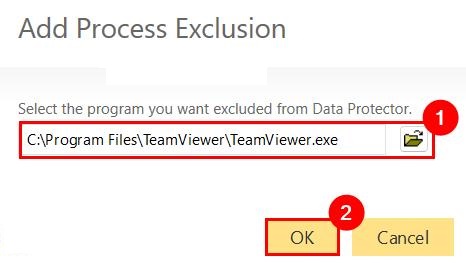
Step 6: After selecting TeamViewer, you'll typically be prompted to set permissions for it. Ensure that you allow both incoming and outgoing network connections.
Step 7: Once you've configured the exception for TeamViewer, save your changes.
Solution 4: Disable the New User Interface in TeamViewer
When you encounter the "TeamViewer Not Ready Check Your Connection" error, this new interface might be the culprit. Disabling the new user interface allows you to revert to the classic interface, which is known for its stability and reliability.
Step 1: Launch the TeamViewer application on your computer.
Step 2: In the TeamViewer window, click on the Extras>Options.
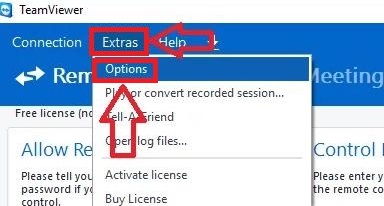
Step 3: In the TeamViewer Options window, you'll see several tabs. Click on the Advanced tab on the left-hand side.
Step 4: In "General advanced settings", you'll find "Use new user interface".
Step 5: To disable the new user interface and revert to the classic interface, uncheck the box next to "Use new user interface."
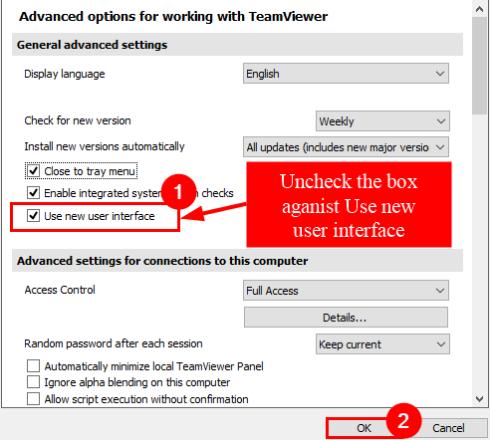
Step 6: After unchecking the box, click the OK button.
2. Check IT Setup
When encountering the "TeamViewer Not Ready Check Your Connection" error, it's vital to inspect the IT-related configurations on your system. This check focuses on verifying the technical aspects of your computer's setup, particularly elements that are critical for TeamViewer's proper operation.
Therefore, if you think that your computer port connection is incorrect, or there is a problem with the DNS address and other factors, please refer to the following solutions.
Solution 1: Open Port 5938 for Outgoing Connections
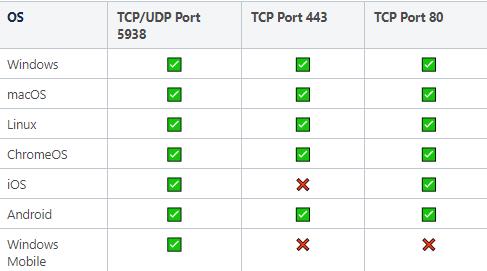
In some enterprise environments, a firewall may be set up to block all unknown outbound connections. In this case, you will need to configure the firewall to allow TeamViewer to connect through it.TeamViewer prefers to establish outbound TCP and UDP connections through port 5938 because this is the primary port it uses and TeamViewer has the best performance using this port.
So make sure you open port 5938 for outgoing connections. By allowing this port, you ensure that TeamViewer can freely communicate over the network. The following chart shows the number of ports used by each operating system.
Solution 2: Change the DNS Address
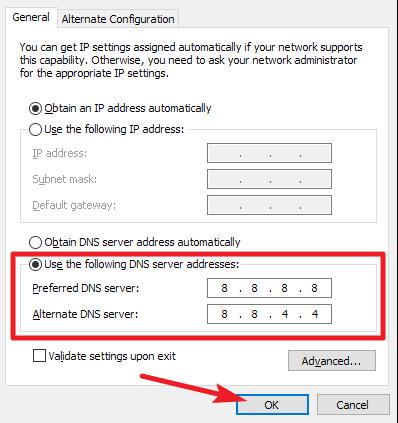
To address this issue, you can manually change your DNS address to a more reliable and widely-used DNS server, such as Google's DNS (8.8.8.8 and 8.8.4.4) or OpenDNS (208.67.222.222 and 208.67.220.220).
Step 1: Click on the Windows Start button and select the Settings>Network & Internet.
Step 2: Find the "Change adapter options" link under the "Advanced network settings." Click on it.
Step 3: You'll see a list of network connections. Right-click on the one you're currently using and select Properties. It's usually labeled as "Wi-Fi" if you're on a wireless connection or "Ethernet" if you're using a wired connection.
Step 4: Scroll down and find "Internet Protocol Version 4 (TCP/IPv4)." Select it and click on the Properties button.
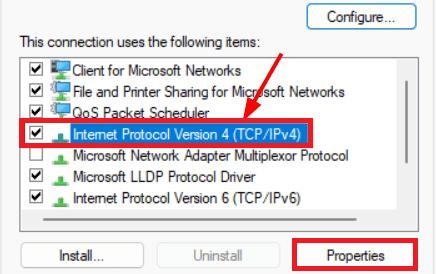
Step 5: Select the second option "Use the following DNS server addresses."
Step 6: For Google's DNS, enter 8.8.8.8 in the "Preferred DNS server" field and 8.8.4.4 in the "Alternate DNS server" field.
Step 7: For OpenDNS, enter 208.67.222.222 in the "Preferred DNS server" field and 208.67.220.220 in the "Alternate DNS server" field.
Step 8: Click OK to save the changes and close all the windows.
Solution 3: Disable IPv6
To resolve potential conflicts related to IPv6, you can disable IPv6 on your computer. This ensures that your system relies on IPv4, which may be more compatible with TeamViewer and other applications.
Step 1: Click on the Windows Start button and select the Settings>Network & Internet.
Step 2: Find the "Change adapter options" link under the "Advanced network settings." Click on it.
Step 3: You'll see a list of network connections. Right-click on the one you're currently using and select "Properties".
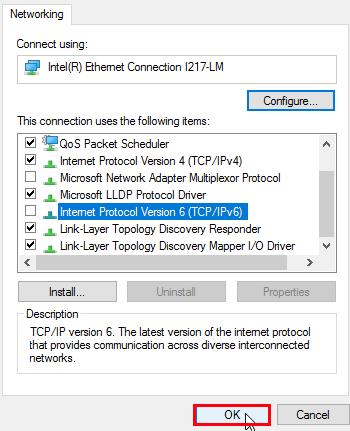
Step 4: Look for "Internet Protocol Version 6 (TCP/IPv6)" and uncheck the box next to it.
Step 5: Click "OK" to save the changes and close all the windows.
3. Check Proxy Settings
When facing the "TeamViewer Not Ready Check Your Connection" error, it's essential to examine your proxy settings. Proxy servers act as intermediaries between your computer and the internet, and they can sometimes introduce connectivity issues. The error may occur if your computer's proxy settings are misconfigured or if there are conflicts between the proxy server and TeamViewer's network requirements.
Solution 1: Change Proxy Settings
If you find that your computer's proxy settings are misconfigured, you need to change the proxy settings in Windows Settings.
Step 1: Click on the Windows Start button and select the Settings>Network & Internet.
Step 2: In the Network & Internet settings, on the left-hand side, click on "Proxy."
Step 3: Under the "Manual proxy setup" section, toggle the switch to turn on the "Use a proxy server" option.
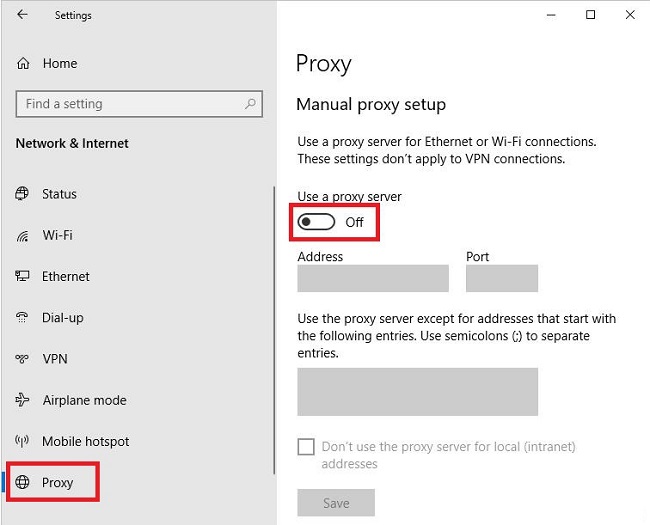
Step 4: In the Address field, enter the proxy server address provided by your network administrator or Internet Service Provider (ISP).
Step 5: In the "Port" field, enter the corresponding port number for the proxy server.
Step 6: After entering the proxy information, click "Save."
Solution 2: Configure' No Proxy' in TeamViewer
If you find that there is a conflict between the proxy server and TeamViewer's network requirements, you need to configure "No Proxy" in TeamViewer.
Step 1: Open the TeamViewer application on your computer.
Step 2: In the TeamViewer main window, click on the Extras>Options.
Step 3: In the Options window, click on "General" to access general settings.
Step 4: Within the General settings, you'll find the "Network settings" section. Look for the "Proxy settings" option.
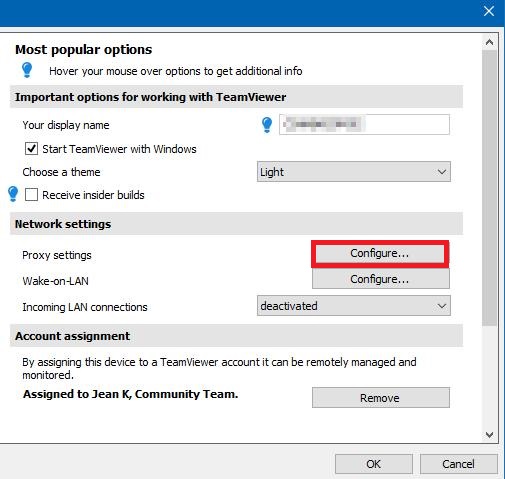
Step 5: Under the "Proxy settings" section, you'll see a dropdown menu with different proxy configuration options. Select "No proxy."
Step 6: After selecting "No proxy," click the "OK" button to apply the changes.
4. Check TeamViewer Status
This check is crucial when encountering the "TeamViewer Not Ready Check Your Connection" error. It's essential to verify the status of TeamViewer's services and servers. The error might not necessarily be related to your computer's settings. Still, it could be a result of server issues on TeamViewer's end.
Solution 1: Update or Reinstall TeamViewer
If your computer is set up correctly, there may be a problem with TeamViewer's own connection. You can try updating or reinstalling TeamViewer. If the problem still cannot be solved, please refer to the following solutions.
Solution 2: Delete TeamViewer Processes or Restart TeamViewer
To Delete TeamViewer Processes:
Sometimes there are too many processes in Windows system, which will take up the memory and internet speed and affect the system running speed. At this time, you can delete TeamViewer process to ensure a more stable connection.
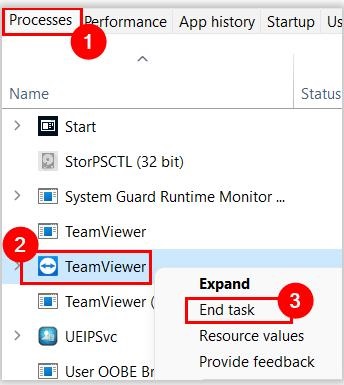
Step 1: To open the Task Manager, simultaneously press Ctrl+Alt+Delete and choose "Task Manager" from the options menu.
Step 2: Find the "Processes" tab. Look for any processes related to TeamViewer. They may be listed as "TeamViewer," "TeamViewer_Service," or similar.
Step 3: Select each TeamViewer-related process, one at a time, and click the "End Task."
Other Solutions for "TeamViewer Not Ready Check Your Connection" Error
If the generic solutions provided above do not resolve the "TeamViewer Not Ready Check Your Connection" error, you can explore platform-specific solutions for different operating systems. The following solutions are tailored for Windows and Linux systems:
"TeamViewer Not Ready Check Your Connection" Error on Windows
This section addresses the error on Windows-based systems. If you're still encountering the issue after trying the general solutions, follow these Windows-specific steps:
Solution 1: Reset Winsock
Winsock is a very useful tool when troubleshooting networks and solving network connectivity problems. By resetting the Winsock configuration, you can fix many of the problems associated with network connectivity and ensure that your computer is able to connect to the network properly.
Steps:
1. Press the Windows key and type "cmd" in the search bar. Right-click on "Command Prompt" and select "Run as administrator."
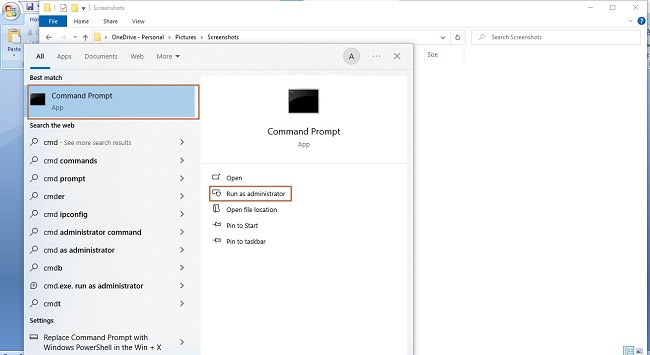
2. In the Command Prompt window, type the following command and press Enter: netsh winsock reset and restart your computer to check if the error is resolved.

Solution 2: Allow TeamViewer in Windows Defender Firewall
Firewall is a form of security. If you don't allow it to access the application, the firewall will block incoming connections and the application may not function properly. So if you trust an application and want to use all its features, you should allow access.
Steps:
1. Open the Windows Control Panel and navigate to "System and Security."
2. Click on "Windows Defender Firewall."
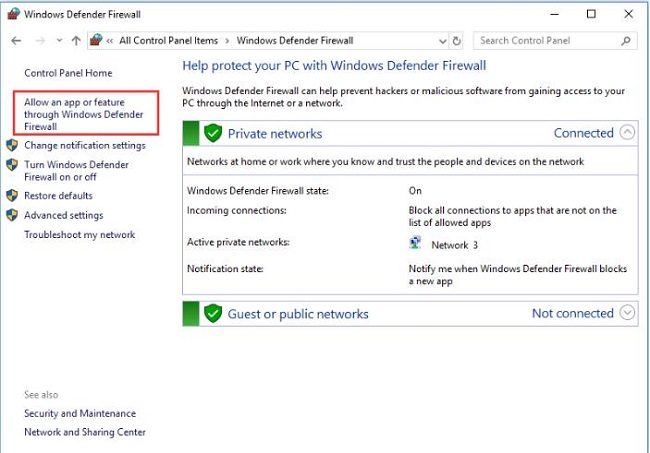
3. In the left pane, select "Allow an app or feature through Windows Defender Firewall."
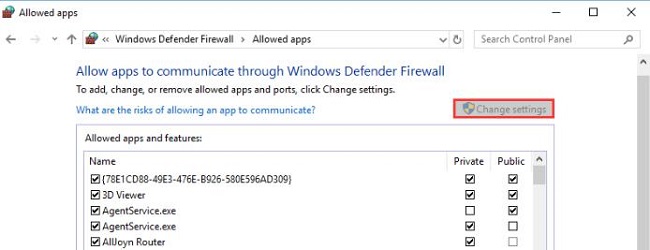
4. Click "Change settings" and locate "TeamViewer" in the list of apps. Make sure both "Private" and "Public" options are checked.
"TeamViewer Not Ready Check Your Connection" Error on Linux
Suppose you're encountering the error on a Linux system. In that case, you can follow the steps provided in the linked discussion for a specific solution:
Step 1: Sign into the TeamViewer website using your work email and password.
Step 2: Authorize your home computer using the email sent to your work account.
Step 3: Execute the command "sudo killall TeamViewer" in your terminal.
Step 4: Start the TeamViewer daemon with the command systemctl start teamviewerd.service.

Step 5: Launch the TeamViewer user interface (UI).
Tip: TeamViewer Alternative for More Stable Connections
If none of the above tips has solved the issue or you just want to explore more efficient TeamViewer alternatives, try AirDroid Remote Support. This multi-feature program is designed to offer a fast remote connection without any connectivity errors.
It is incredibly easy to use for everyone without needing a prior knowledge. Having over a million active users, AirDdroid is known for stellar remote control features, including unattended access, file transfer, and voice chat, real-time screen sharing, and a remote camera for Android/iOS devices.
Conclusion
Fixing the "TeamViewer Not Ready Check Your Connection" error is key to maintaining smooth remote access. This guide covered everything from basic setup checks to specific fixes for Windows and Linux. By following these steps, users can successfully troubleshoot and solve the issue, ensuring a stable connection.
We also suggested AirDroid Remote Support as a solid alternative for mobile device support. With its focus on mobile and reliable connections, AirDroid provides a dependable option for remote assistance, making it a great substitute for TeamViewer.


Leave a Reply.