A Full Guide on How to Remote Control in Webex
Webex, a leading platform in the realm of online meetings and conferences, offers a robust remote control feature that enhances collaboration. As businesses and individuals continue to steer the evolving demands of remote work, Webex's remote control stands out as a game-changing tool. It facilitates troubleshooting, collaboration, and presentations, creating an immersive and interactive virtual experience.
Before delving into the step-by-step guide, it's essential to understand the conditions and scenarios in which Webex remote control thrives. This guide will teach you the complexities of Webex remote control, ensuring you harness its full potential for a more efficient and interactive virtual experience.
What Is Webex Remote Control
Organizations and individuals all over the world are adopting a remote work culture. This is why tools like Webex are so popular. Webex remote control not only allows you to connect and work remotely, but it also saves you money and time when traveling.
As an online conferencing platform, Webex has also achieved great results in remote control. Webex remote control is a powerful collaboration feature that allows users to control another person's desktop during a shared screen session. You can grant others access to your screen using the mouse and keyboard and request access to others' screens when they share. This is very useful for remote assistance.

Conditions of Webex Remote Control
However, if you want to remote control on Webex, certain conditions remain. You and others must be using the desktop application and already be in a shared screen session. In addition, you must be sharing the entire screen, not a specific application. A shared screen session can be during a meeting, call, or in a space with others.
Some users have reported being unable to get remote control in a Webex meeting because if you join a meeting using a Web browser rather than an application, you can't grant remote control of your device to anyone else in the meeting.
Remote Control in Webex Meeting
When you're in a meeting where you share your screen, you can let someone else use your mouse and keyboard. And if someone else is sharing their screen, you can ask to use their mouse and keyboard, too. This is handy for fixing problems or learning together. Let's have a look at how to remote control in a Webex meeting:
Provide Remote Desktop Control
Here's how to give someone else Remote Desktop control in Webex:
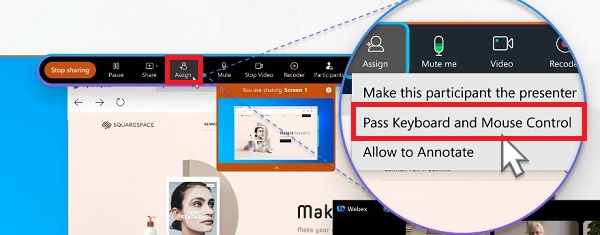
Step 1: Click on "Assign" and then choose "Pass Keyboard and Mouse Control" when you're sharing your screen. After that, pick the names of the people you want to let control your computer remotely.
Step 2: When a message appears on the screen, click on "Grant Control." That's it!
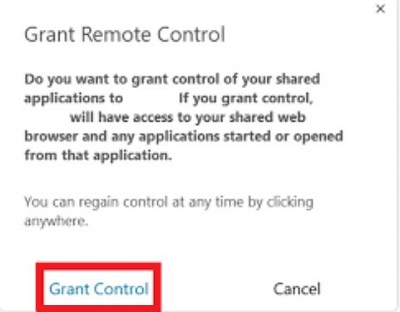
Once you've completed these steps, a message will appear on the attendees' screens, allowing them to take control remotely in Webex. This is how you give someone control in Webex. After the attendee has gained remote control of your computer, your mouse won't work anymore.
Request Remote Desktop Control
If you're attending a Webex meeting and wish to control the presenter's screen, follow these steps to request control:
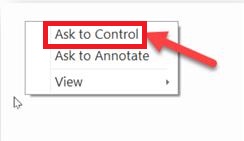
Step 1: When someone shares their screen, click on "Ask to Control."
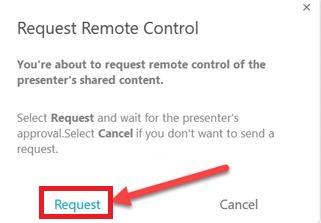
Step 2: A box will pop up on your screen; click on "Request." This sends a message to the presenter, letting them know you want remote control in Webex.
Step 3: Once they accept your request, click on "Take Control."
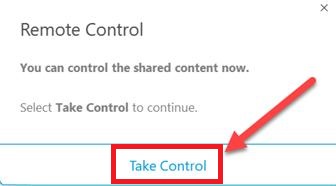
That's how you can ask for control in Webex and operate the presenter's computer remotely.
Remote Control in Webex Call
Remote control is also available when you share your screen with others in a call or space. This can help troubleshoot technical issues, demonstrate software features, or collaborate on documents. Make sure you have the suite available and the relevant settings enabled, and let's explore how to remote control together:
Provide Remote Control
Step 1: Begin by sharing your screen with the participants in the meeting. You can share your complete screen, a specific application, or a whiteboard.
Step 2: Find "Give remote control to..." in the Remote Control icon in the toolbar and select the person you want to give control to.
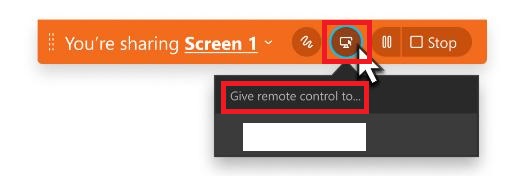
Step 3: You can click "End Remote Control" or click the "Stop" icon next to the Remote Control icon to end the shared screen session.
Request Remote Control
Step 1: While someone is sharing their screen, click on the "Request control" in the sharing toolbar.
Step 2: In the verification dialog box, click on "Request." The screen sharer will receive a notification asking them to grant or deny your Request.

If the other person accepts your request, you can control their shared screen. This will allow either side to control the mouse. However, you will not be able to use annotations and whiteboards during this time.
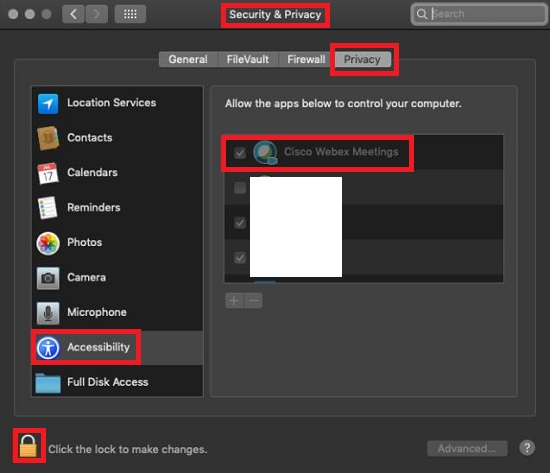
How to Enable or Disable Remote Control for Calling
Customers and partners who have full administrator permissions can turn on or off Remote Desktop Control (RDC) on Webex Calling and manage other services in the Webex application. This applies to all Webex Calling licenses. Additionally, RDC settings are set up either for individual users or at the organizational level in Webex Control Hub.
Now, let's go through the steps to request control or grant access in Webex Calling.
For Organization
At the organizational level, settings are automatically applied when a user name is created. To enable Remote Desktop Control (RDC) as the default for the entire organization, you can do this in the Control Hub. If you need to make specific exceptions for certain users, you can customize this in User Settings.
Step 1: Visit the "Services" section on the customer view by going to this URL: https://admin.webex.com/.
Step 2: From there, select "Calling" and then "Client Settings."
Step 3: To manage the default settings for Remote Desktop Control (RDC), navigate to "In-call experience" and use the toggles for "Request control" or "Give control" to enable or disable the respective features.

For User
To give or request mouse control in Webex for users, follow these steps:
Step 1: Visit https://admin.webex.com/. Find the customer view and click on "Users."
Step 2: Pick the user you want to modify and click on "Calling."
Step 3: Under "Client settings," click on "In-call experience."
Step 4: Choose a toggle – either "Request control" or "Give control" – to enable or disable Remote Desktop Control (RDC) options.
Just like at the organization level, once you set up the RDC setting for the user, it won't revert to the default setting.
Extra: Best Remote Support Software for Android Remote Control
While Webex is a popular choice for implementing remote control in online meeting software, exploring solutions that are better suited to your specific needs is critical. If you need to control your Android device remotely, choose AirDroid Remote Support, a powerful remote support software designed for Android devices.
AirDroid Remote Support offers a user-friendly platform for providing efficient remote assistance on Android devices. Whether you're troubleshooting technical issues, offering customer support, or managing devices in a business setting, AirDroid Remote Support simplifies the process with its intuitive features. What's more, you can enjoy advanced remote support options on AirDroid Remote Support, such as AR camera, tutorial gesture, unattended access, live chat, and more.
Below, we'll guide you through the steps to enable remote control on AirDroid Remote Support.
How to Remote Control in AirDroid Remote Support
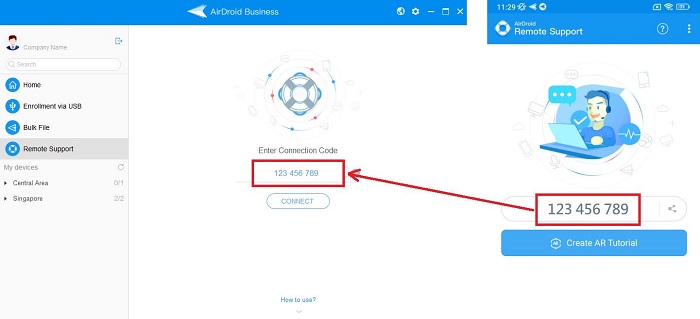
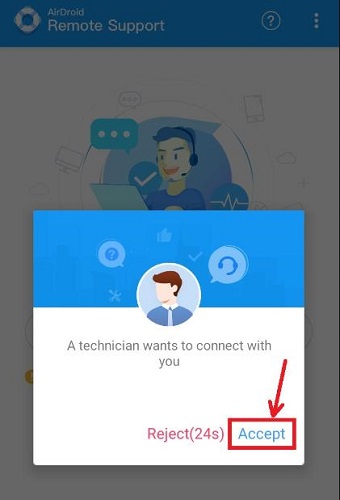
Step 1: From the AirDroid Business Desktop Client (supporter), enter the 9-digit code which conducts from the client’s mobile device. And the client needs to click "Accept" for the remote support session.
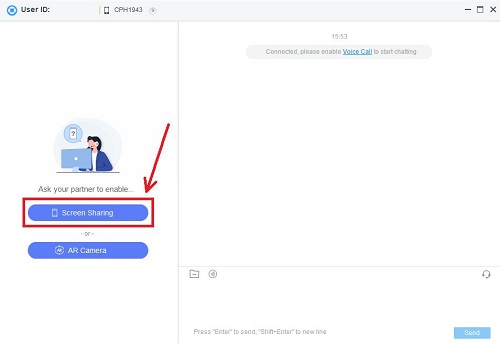
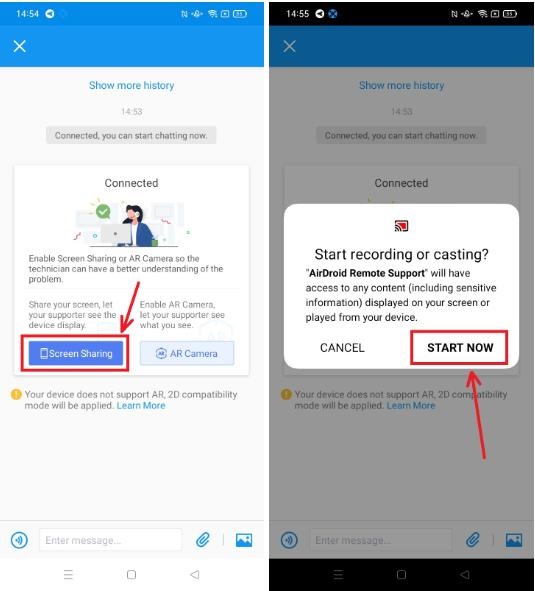
Step 2: Please click "Screen Sharing" first. It can be enabled from the Desktop Client or the mobile device. And ask the client to click "Start Now" on the mobile device to enable screen sharing.
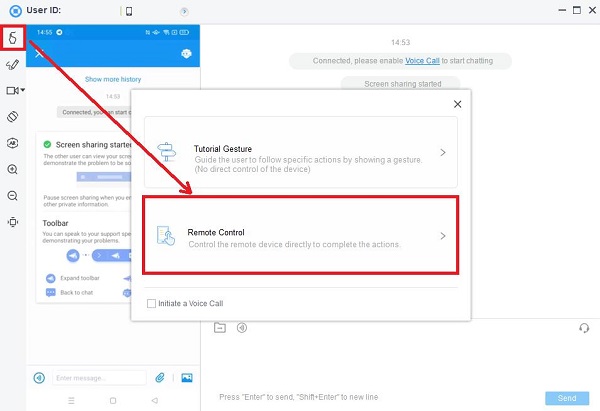
Step 3: From the AirDroid Business Desktop Client (supporter), tap the "Tutorial Gesture" icon on the left-hand side, then tap "Remote Control" to enter remote control mode.
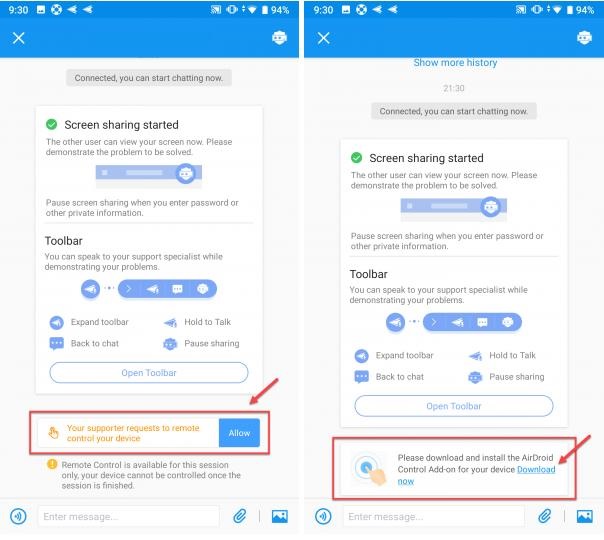
Step 4: Ask your client to tap the "Allow" and "Download now" buttons on their AirDroid Remote Support app, which will initiate the remote control add-on download process.
Step 5: Once the add-on is downloaded and installed, ask the client to return to the AirDroid Remote Support app and proceed with the following steps, "Enable permission" > "Installed services" > "Allow", for the add-on to work properly.
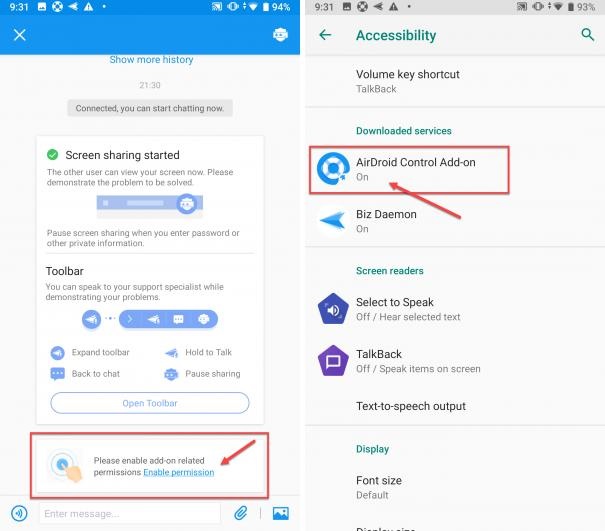
Step 6: After the add-on grants permission, the remote control will be enabled automatically.
Conclusion
Mastering remote control features is vital in today's virtual landscape. Webex excels in empowering users for effective troubleshooting and collaboration. This comprehensive guide navigates Webex's remote control intricacies, from granting and requesting control to organizational and user-level management.
As a bonus, consider AirDroid Remote Support for Android users. Its user-friendly platform, real-time control, file transfers, and robust security provide a compelling alternative. Elevate your remote collaboration experience with these versatile tools, revolutionizing the way we connect and work in our digital age.


Leave a Reply.