- Real-Time Fast Support
- All-around Remote Access & Remote Support Solution for Enterprises & Personal
- Always-On Unattended Remote Access
- Lightweight Remote Management
- Messaging & File Transfer
- AR Camera
What Is DNS and How to Configure It? (Windows + Linux)
Does your internet sometimes feel sluggish, even with a fast connection? Ever wondered why certain websites don’t load properly or you keep getting redirected to the wrong pages? These issues often point to one culprit: DNS settings.
DNS, the backbone of your internet experience, can either speed things up or slow them down depending on how it's configured.
Whether you're on Windows or Linux, learning about DNS and configuration can give you more control over your internet experience. You can attain faster browsing, improved security, and a customized setup.
Let’s explore it in detail and troubleshoot your connectivity issues!
What is DNS?
DNS (Domain Name System) is a system that translates human-readable domain names (like example.com) into IP addresses (like 192.0.2.1) that computers use to identify each other on the network.
DNS acts as the internet’s phonebook, allowing users to access websites using easy-to-remember names instead of complex IP addresses. It also caches responses to make future lookups faster, reducing the need for repeated queries across the network.
Server: A server is a device or software that provides services to other programs, which are called 'clients.' DNS clients are built into most desktop and mobile operating systems, allowing web browsers to communicate with DNS servers.
- All-around Remote Access & Remote Support Solution for Enterprises
- Real-Time Fast Support
- Always-On Unattended Remote Access
- Lightweight Remote Management
How Does the DNS Server Work?
DNS operates in a structured process involving several steps, broken down as follows:
- User Request (DNS Query): When you enter a website name (e.g., www.example.com), a query is sent to find its IP address.
- DNS Recursive Resolver: The query is first directed to a DNS resolver, usually managed by your ISP or a third-party DNS service (like Google or Cloudflare), which begins searching for the IP.
- Root Nameserver: The resolver asks for a root nameserver, which directs it to the appropriate Top-Level Domain (TLD) server (e.g., .com).
- TLD Nameserver: The TLD server points the resolver to the domain's authoritative nameserver.
- Authoritative DNS Server: The authoritative server provides the resolver with the correct IP address for the domain.
- IP Address Returned to Browser: The IP address is sent back to the browser, allowing the website to load.
Once the DNS resolver has gathered the correct IP address, it passes it back to the client. The client then uses this IP to connect directly with the origin server, which in turn responds with the website data that can be displayed in the web browser.
This process, known as DNS resolution, typically occurs in a matter of milliseconds.
Key Components of DNS
The main components of the domain name system include:
Main Components:
- DNS Resolver: Acts as the middleman between your device and the DNS system.
- Root DNS Server: The highest level of the DNS hierarchy, which directs queries to the correct TLD server.
- TLD DNS Server: Handles domains with specific top-level extensions like .com, .org, etc.
- Authoritative DNS Server: The server that holds the definitive IP address for a domain.
Why Should You Change Default DNS Configuration?
DNS configuration involves adjusting the settings of DNS servers used by your device or network. It involves specifying the IP addresses of these servers and various DNS-related parameters.
Misconfigured or unresponsive DNS servers can lead to slow internet access due to failures in domain name resolution.
Here are some reasons you might want to change your DNS settings:
- Speed Improvements: Custom DNS settings can enhance domain name resolution times, leading to quicker webpage load times.
- Security: Certain DNS servers block malicious sites and can help protect against phishing, malware, and DNS spoofing attacks.
- Better Privacy: Many ISPs log your DNS queries, which can compromise your privacy. Focused DNS providers like Cloudflare do not log or track your browsing activity, improving privacy.
- Customized Experience: DNS settings can be configured to block specific web pages or redirect domain names. It creates a safer, more family-friendly internet environment.
- Troubleshooting: Changing DNS servers can help resolve DNS-related issues.
- Access to Restricted Content: Some DNS services allow you to bypass geographical restrictions or government-imposed website blocks by directing your traffic through different servers.
- Parental Controls: DNS servers offer filtering options to block access to inappropriate or harmful content, making it useful for families.
Which DNS Resolvers Should You Choose?
Many free DNS addresses are available. Some of them focus on speed improvements while others offer additional security and filtering features.
| DNS Provider | IPv4 Addresses | IPv6 Addresses | Purpose |
|---|---|---|---|
| Google Public DNS | 8.8.8.8, 8.8.4.4 | 2001:4860:4860::8888, 2001:4860:4860::8844 | Fast resolution of domain names Protection against spoofing attacks Performance and security-focused |
| Cloudflare DNS | 1.1.1.1, 1.0.0.1 | 2606:4700:4700::1111, 2606:4700:4700::1001 | Faster performance No IP address logging Privacy-focused |
| OpenDNS Home | 208.67.222.222, 208.67.220.220 | 2620:119:35::35, 2620:119:53::53 | Basic free plan Security filtering and customizable options |
Though a lot of people use IPv4 addresses, the transition to IPv6, which offers a vastly larger address range, is underway. The adoption is still in progress and not many ISPs are fully supporting it yet. You can check your ISP's IPv6 support, and use it easily.
How to Configure a DNS Server?
To configure a DNS server, you should have a stable internet connection, administrator privileges, and access to the command line. Changing DNS settings involves modifying the DNS server IP addresses, which are usually set during IP address allocation.
Follow the specific steps depending on your operating system to update these settings.
1For Windows
To update the DNS settings on a Windows Server, follow these steps:
- Step 1.Open the Start menu.
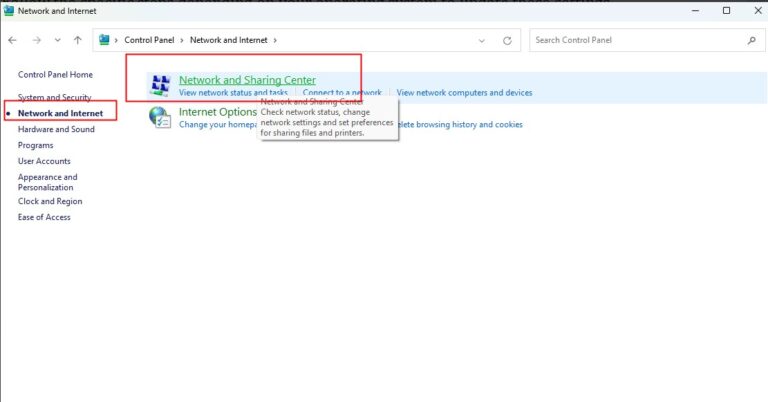
- Step 2.Go to Control Panel> Network and Internet > Network and Sharing Center.
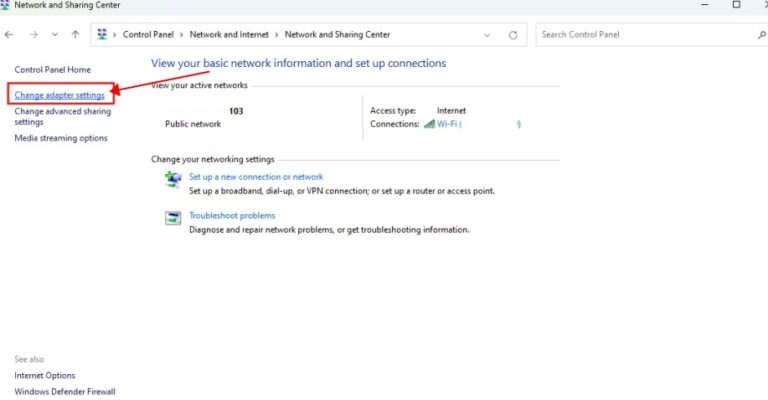
- Step 3.Click Change adapter settings in the left pane.
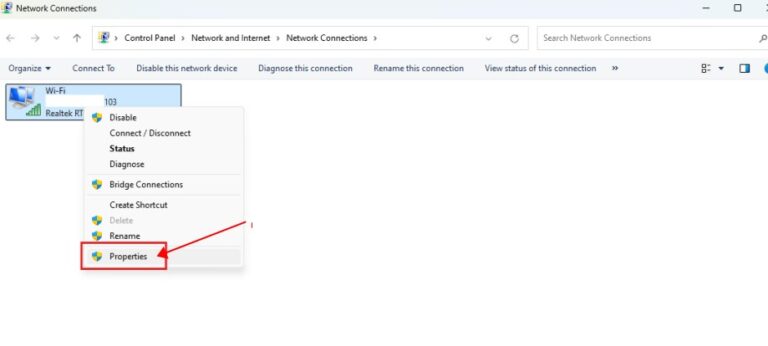
- Step 4.Right-click your connection and select Properties.
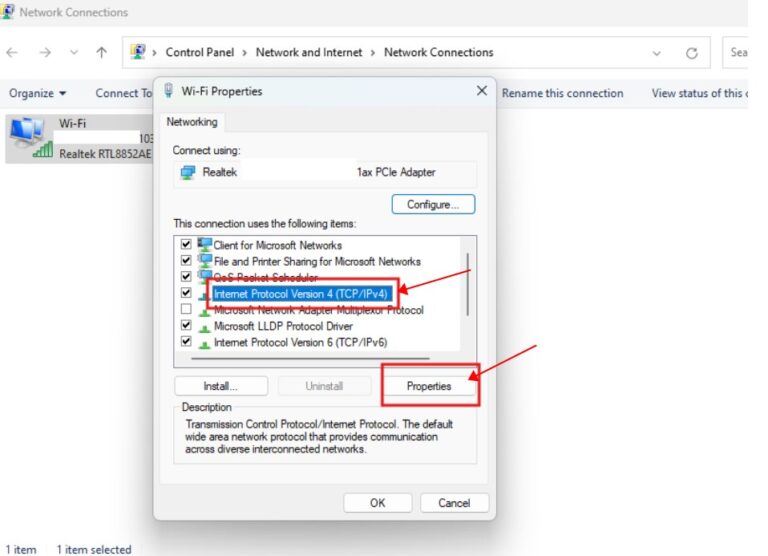
- Step 5.Choose Internet Protocol Version 4 (TCP/IPv4)from the list. Click on Properties.
- Step 6.Select Use the following DNS server addresses.
- Step 7.Enter your preferred DNS (e.g., 8.8.8) and alternate DNS (e.g., 8.8.4.4).
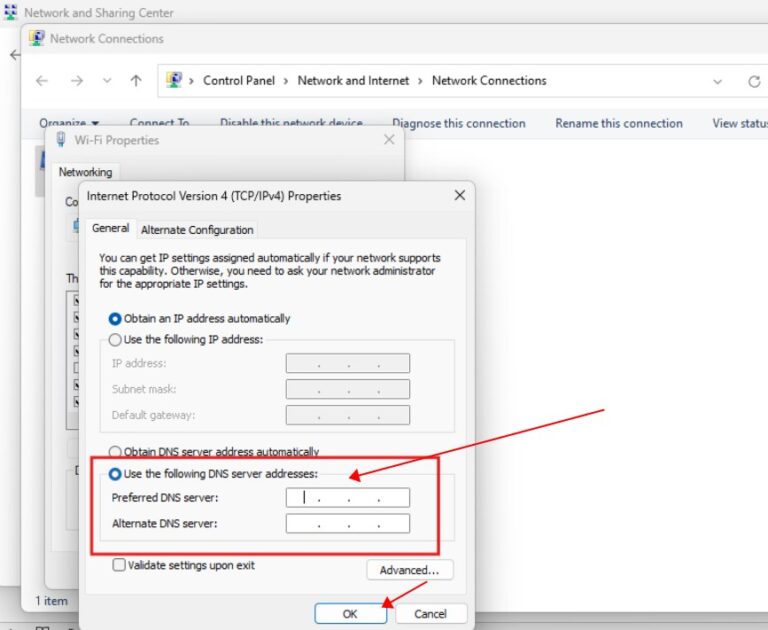
- Step 8.Click OK to save.
- Step 9.Restart your browser to apply changes.
2For Linux
To permanently change DNS settings on Ubuntu 22.04, follow these steps. Note that procedures may vary slightly for other Linux distributions.
- Step 1.Open the terminal by pressing the keys Ctrl+Alt+T.
- Step 2.Use a text editor like nano to open the conf file:
sudo nano /etc/resolv.conf
- Step 3.Add your preferred DNS addresses above the existing entries:
nameserver 8.8.8.8
nameserver 8.8.4.4

- Step 4.Replace these IPs with the DNS servers of your choice.
- Step 5.Save the changes and exit nano by pressing Ctrl+X, then Y, and Enter.
- Step 6.To check if changes persist, install resolvconf with the following command:
sudo apt install resolvconf
- Step 7.Then, start and enable the resolvconf service:
sudo systemctl start resolvconf.service
sudo systemctl enable resolvconf.service

- Step 8.Then, edit the resolvconf configuration file:
sudo nano /etc/resolvconf/resolv.conf.d/head
- Step 9.Add your DNS addresses:
nameserver 8.8.8.8
nameserver 8.8.4.4
- Step 8.Then, edit the resolvconf configuration file:

- Step 10.Save and close the file.
- Step 11.Apply changes by restarting the service:
sudo systemctl restart resolvconf.service
- Step 12.Verify changes by checking the DNS settings with:
resolvectl status
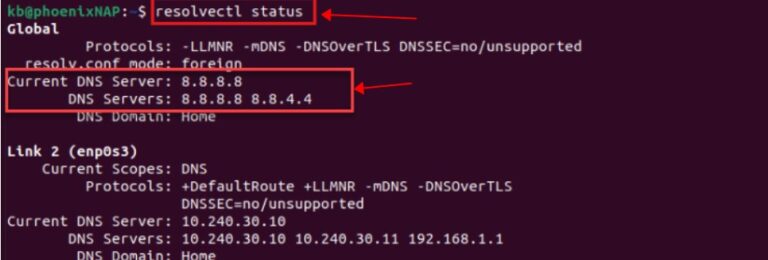
- Step 13.Alternatively, use dig to verify:
dig phoenixnap.com
- Step 13.Alternatively, use dig to verify:
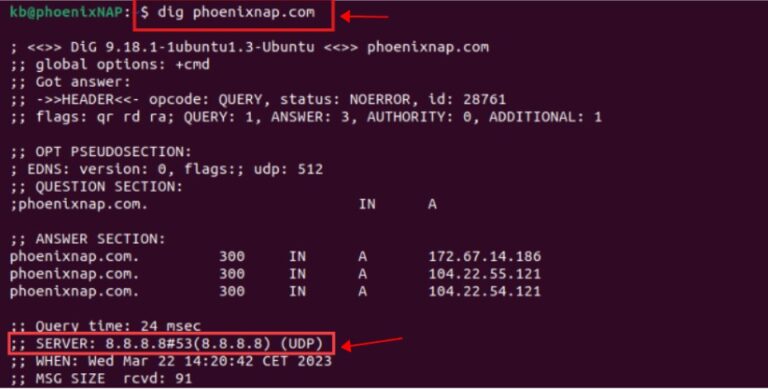
- Step 14.In the output, the DNS addresses should reflect your new settings.
3Configuration Through PowerShell
PowerShell is a powerful tool that can manage multiple system configurations, including DNS settings. If you’re new to PowerShell, these basic commands will help you modify your DNS settings.
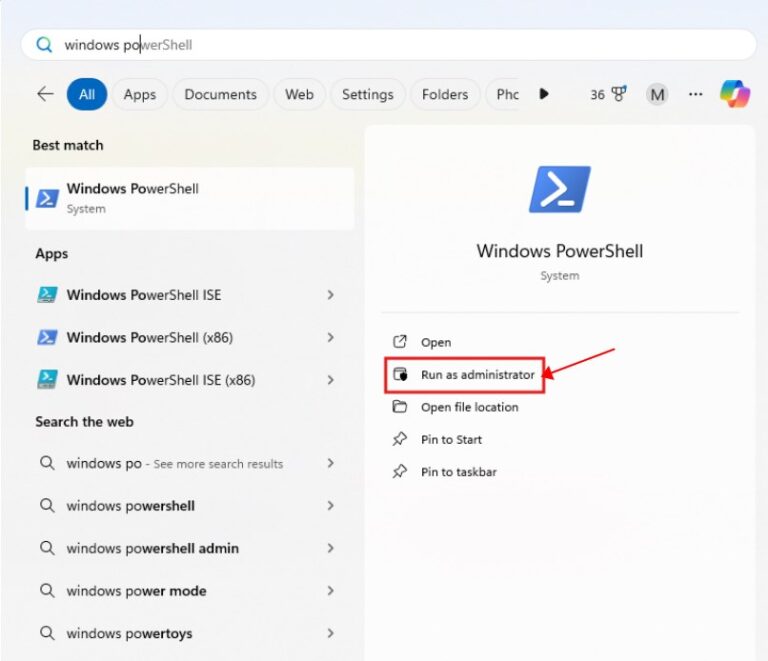
- Step 1.Click the Windows button and search for Windows PowerShell (Admin), right-click it, and tap on the Run as administrator.
- Step 2.Click Yes if prompted by the User Account Control dialog.
- Step 3.To view your network interface details, enter: Get-NetIPConfiguration.
- Step 4.Find your InterfaceIndex number from the output (e.g., 6).
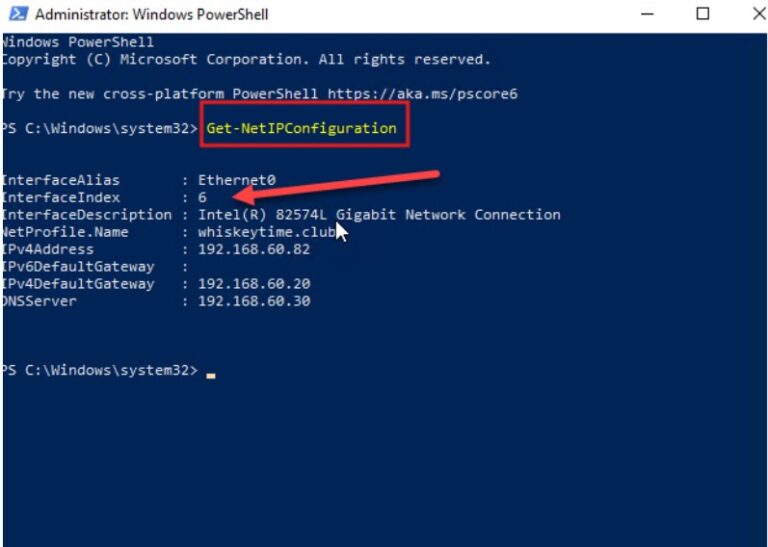
- Step 5.Replace 6 (your InterfaceIndex number) with the command: Set-DnsClientServerAddress -InterfaceIndex 6 -ServerAddresses 8.8.8.8, 8.8.4.4.
- Step 6.At the end of the command, there are your desired DNS server addresses (8.8.8.8, 8.8.4.4).
- Step 7.ERe-enter the command: Get-NetIPConfiguration.
- Step 8.It will confirm that the DNS settings have been updated.
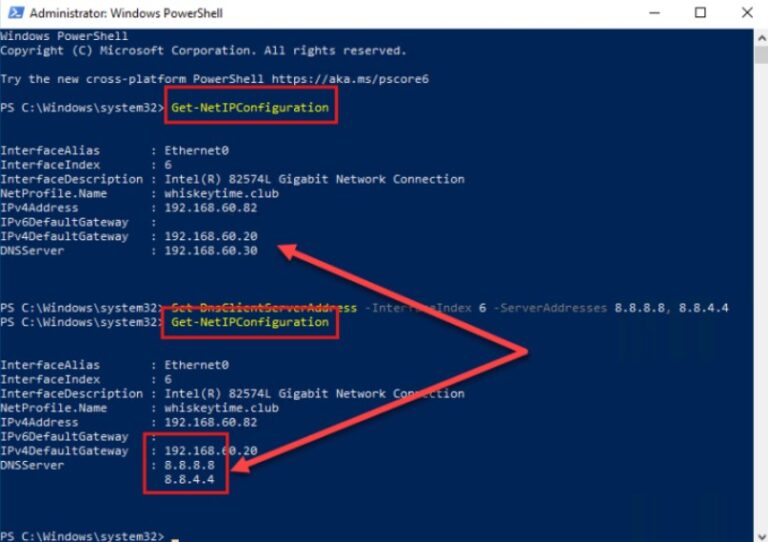
With these steps, you can change your DNS server using PowerShell. Your system will begin using the new DNS server addresses to translate domain names into numeric IP addresses that your device can understand.
Conclusion
DNS translates human-readable domain names into IP addresses that computers use to communicate. Configuring it can improve browsing speed, and security, and offer better control over privacy.
On Windows, you can easily modify the DNS settings via the Network and Sharing Center or using PowerShell. While on Linux, you can adjust the settings by editing the resolv.conf file and using the resolvconf service for permanent changes.
Specify your preferred DNS server addresses, offered by Google Public DNS or Cloudflare, and check that the settings persist across system restarts.
Set up a reliable DNS server and enjoy a faster, more secure, and customized internet experience!


Leave a Reply.