How to Screen Share on Zoho Meeting [Step-by-Step Guide]
Screen sharing is a powerful feature that allows you to share your screen with other participants in an online meeting or webinar. It can be used for various purposes, such as presenting slides, demonstrating software, collaborating on documents, or providing remote support.
One of the best tools for screen sharing is Zoho Meeting, a web-based online meeting software that lets you share your screen online directly from your browser. In this article, we will show you how to use Zoho Meeting for effective screen sharing in different scenarios.
How Presenter Screen Share on Zoho Meeting
Screen sharing is an essential feature for online meetings and webinars. It becomes possible for presenters to share their screen or specific application windows with participants.
Zoho Meeting comes with different options for screen sharing across different devices and platforms. Here's how you can screen share on Zoho Meeting:
On Windows
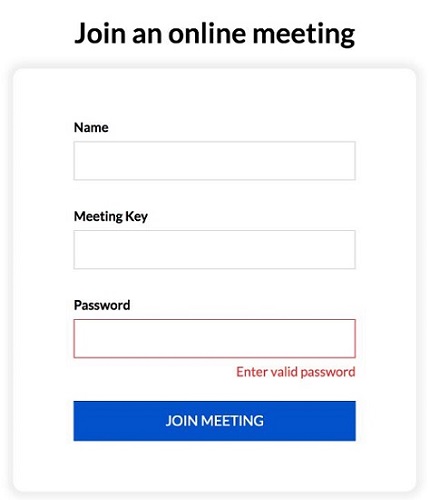
Step 1: Start or join an online meeting on Zoho Meeting.
Step 2: Click the "Share screen" button on the bottom meeting toolbar.

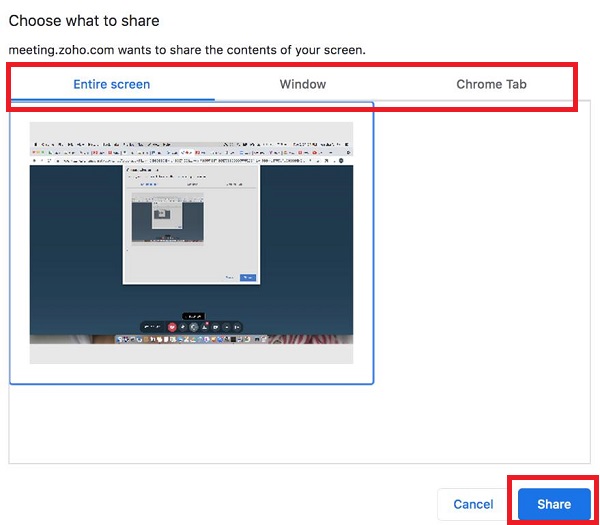
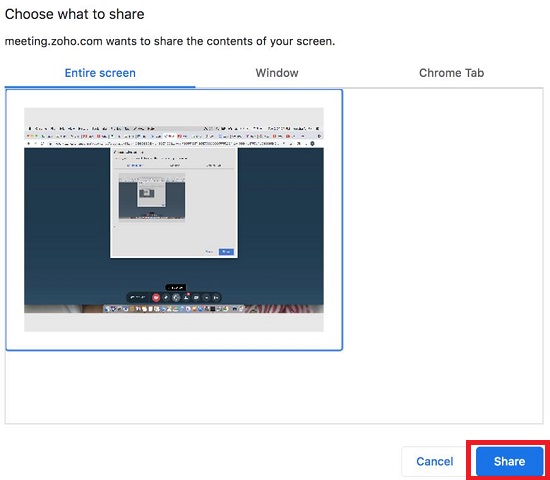
Step 3: You can choose to share the Entire screen, Window, or just the Chrome Tab. Once you've selected what you want to share, click "Share."
Step 4: Now, the meeting participants can see the screen you shared. To end screen sharing, click "Stop Sharing" at the top of the screen.

On Mac
macOS requires granting the appropriate permissions for Zoho Meeting due to system limitations. Follow the steps below:
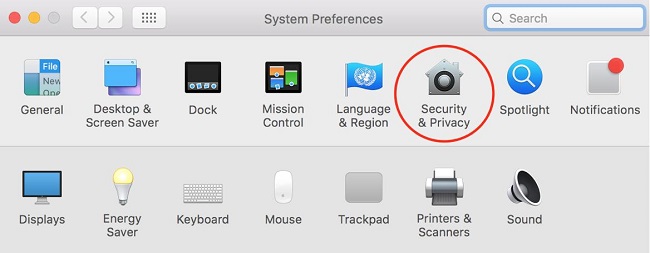
Step 1: Open "System Preferences" and navigate to "Security & Privacy" on your Mac.
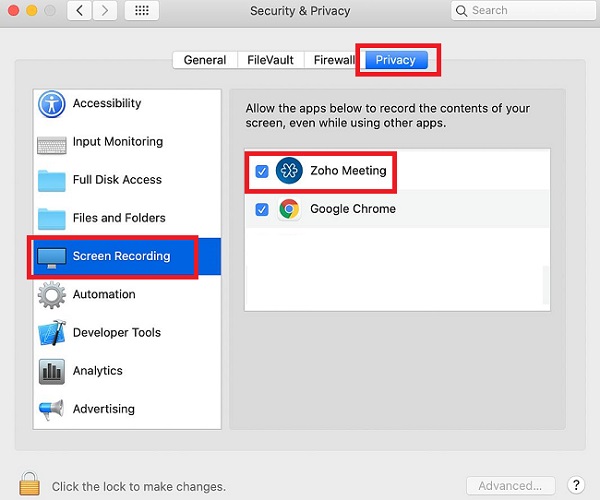
Step 2: In the "Privacy" tab, select "Screen Recording" and check the box next to Zoho Meeting to allow screen recording by this application.
Step 3: Start or join an online meeting on Zoho Meeting.

Step 4: Click the "Share screen" button on the bottom meeting toolbar.

Step 5: You can choose to share the Entire screen, Window, or just the Chrome Tab. Once you've selected what you want to share, click "Share."

Step 6: Now, the meeting participants can see the screen you shared. To end screen sharing, click "Stop Sharing" at the top of the screen.

On Android
Step 1: Join or start a Zoho Meeting session on Android.
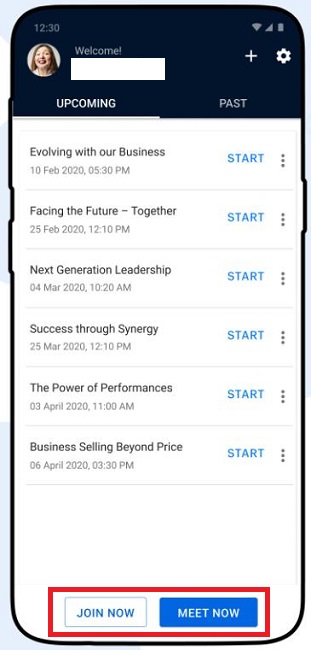
Step 2: Click the "Share screen" button on the bottom meeting toolbar.

Step 3: Click "Yes" in the pop-up window to confirm screen sharing.
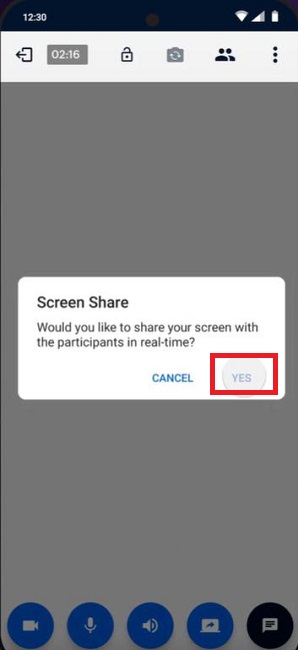
Step 4: In the pop-up window of whether to start recording on Android, select "Start Now. "
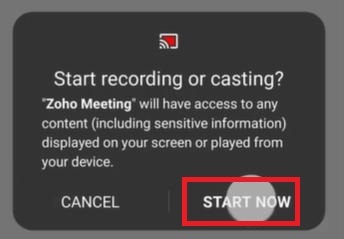
Step 5: Now, the meeting participants can see the screen you shared.
On iOS
Screen sharing on iOS devices also requires additional steps. Follow the steps below:
Step 1: Go to "Settings" > "Control Center" > "Customize Controls."
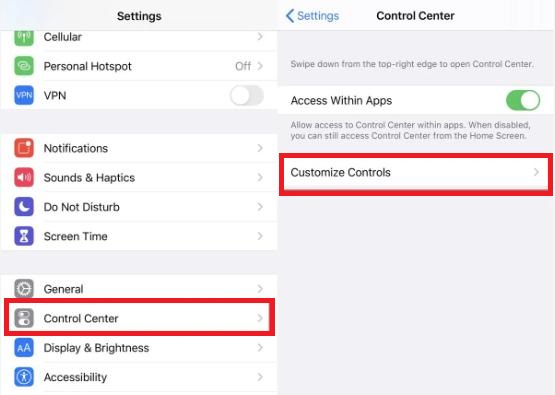
Step 2: Click the plus sign "+" next to "Screen Recording" to add it to the Control Center.
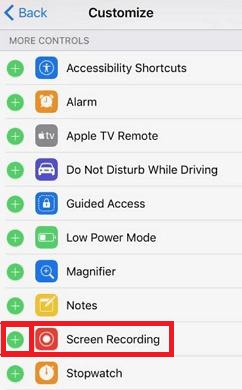
Step 3: Join or start a Zoho Meeting session. Click the "Share screen" button on the bottom meeting toolbar.

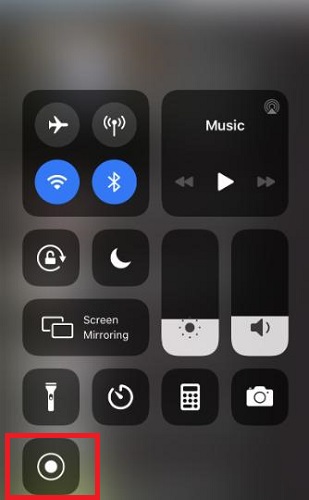
Step 4: Swipe up on your iOS device to view Control Center. Click on the "Screen Recording" button.
Step 5: Select Zoho Meeting and click "Start Broadcast."
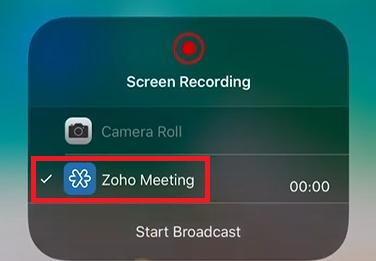
Step 6: Now, the meeting participants can see the screen you shared.
On Web
You can also share a screen or selected application windows for collaboration during an online meeting or webinar. Below are instructions on how to share a screen or application on Chrome, Firefox, and Safari.
Chrome
Step 1: Join a Zoho Meeting session.
Step 2: Select the audio options you need and click the "Share Screen" button.
Step 3: Select the content you want to share and click "Share. "
Firefox
Step 1: Join a Zoho Meeting session.
Step 2: Select the audio options you need and click the "Share Screen" button.
Step 3: Select the content you want to share and click "Allow. "
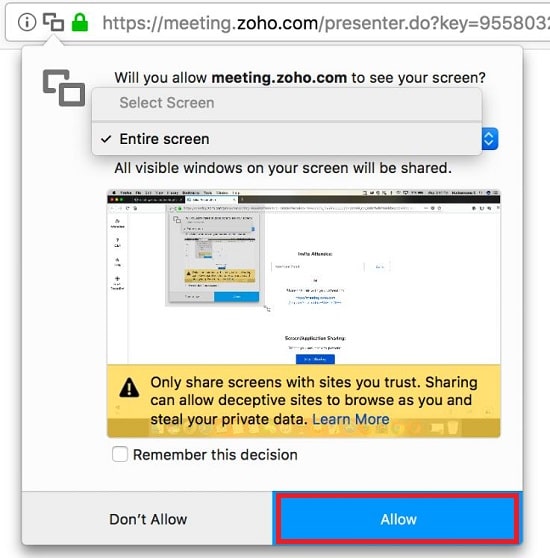
Safari
Step 1: Join a Zoho Meeting session.
Step 2: Select the audio options you need and click the "Share Screen" button.
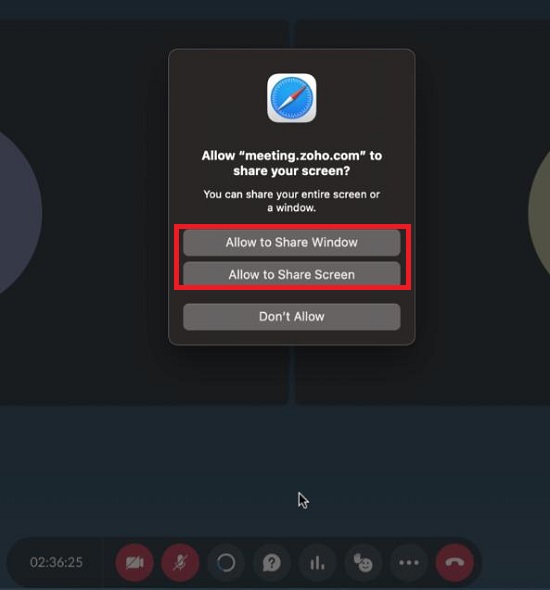
Step 3: Select what you want to share and click "Allow to Share Window" or "Allow to Share Screen" depending on your preference.
How Participant Screen Share on Zoho Meeting
With Zoho Meeting, both the host and participants can be presenters and share their screens during online meetings and webinars. This feature promotes collaboration and allows for a more interactive and engaging experience.
For Participants
As a participant, you can request to share your screen with the host. Here's how you can do it:
Step 1: Join the Zoho Meeting session.
Step 2: Click on the "Share Screen" icon in the meeting toolbar.
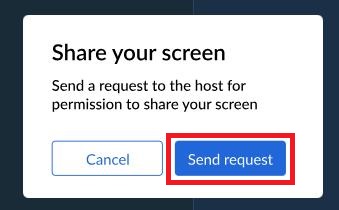
Step 3: A pop-up window will appear, prompting you to request screen sharing from the host.
Step 4: Click "Send request" to send a screen-sharing request to the host.
Step 5: Once the host approves your request, you will be able to share your screen with the other participants.
Step 6: Select whether you want to share your entire screen or a specific application window, and click "Share."
Step 7: Your screen or application window will now be visible to all participants.
Step 8: When you're done presenting, click the "Stop Sharing" button to stop sharing your screen.
For the Host
As the host, you have control over who can share their screen during the meeting. By default, only the host can initially share their screen. However, you can allow participants to share their screens by approving their requests.
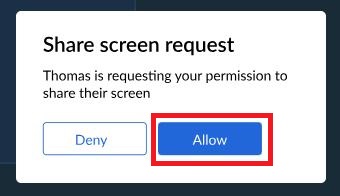
Step 1: When a participant requests to share their screen, you will receive a notification.
Step 2: You can either approve or reject the request by clicking the "Allow" button.
Step 3: If you approve the request, the participants will be able to share their screens with the rest of the participants.
Step 4: If you reject the request, the participant will not be able to share their screen during that particular meeting.
By allowing participants to share their screens, you can facilitate discussions, presentations, and collaborative work during online meetings and webinars. Zoho Meeting's screen-sharing feature enhances engagement and productivity for all attendees.
Solved: Having Trouble with Screen Sharing on Zoho Meeting
Despite mastering the method of sharing screens in Zoho Meeting, there are still some users who encounter error problems and get confused during use. The following summarizes the two most helpful issues and provides solutions.
Issue 1: How to View Both My Own and Participan's Video Feeds While Sharing the Screen
When you share your screen during a Zoho Meeting session, you may notice that the video feeds of other participants are no longer visible. This can make it challenging to maintain eye contact and gauge the reactions of your audience while presenting.
Solution: Enable Picture-in-Picture (PiP)
The Picture-in-Picture feature solves this problem by allowing you to view the video feeds in a floating window while you share your screen. Follow these steps to enable Picture-in-Picture and view both your own and participants' video feeds while screen sharing:
Step 1: Start or join your Zoho Meeting session.
Step 2: Click the "Share Screen" button in the meeting toolbar.
Step 3: Select the screen or application window you want to share, and click "Share."
Step 4: Once your screen is being shared, click the "More (three dots)" - "Picture-in-Picture" button in the meeting toolbar.
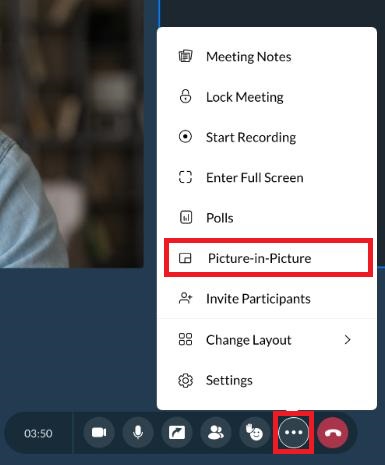
Step 5: A floating window will appear, displaying the video feeds of all participants, including your own.
Step 6: You can resize and move the floating window as needed, ensuring that it does not obstruct your presentation or screen sharing.
Step 7: When you're done presenting, click the "Stop Sharing" button, and the Picture-in-Picture window will automatically close.
Auto-launch Picture-in-Picture for All Meetings
If you prefer, you can enable the "Automatically launch Picture-in-Picture" setting to have the video feeds automatically appear in a floating window whenever you share your screen during a meeting. Here's how:
Step 1: Start or join your meeting.
Step 2: Click the "More (three dots)" - "Settings" button in the meeting toolbar.
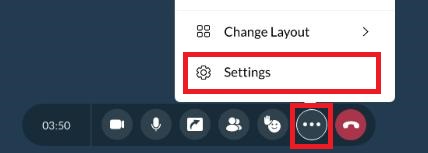
Step 3: Select "Preferences."
Step 4: Turn on the "Automatically launch picture in picture" setting.
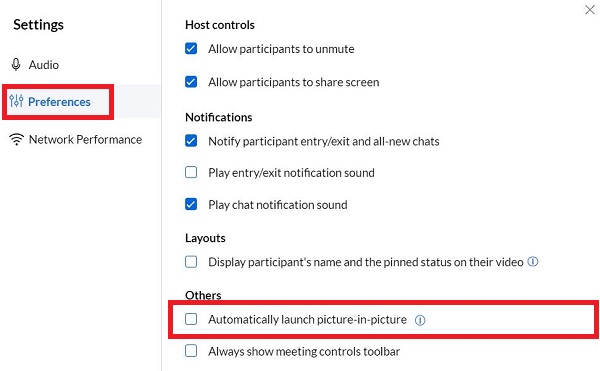
By enabling this setting, you won't have to manually activate the Picture-in-Picture feature every time you share your screen, providing a seamless experience during your online meetings and presentations.
The Picture-in-Picture feature in Zoho Meeting ensures that you can maintain visual contact with your audience while sharing your screen, enhancing the overall engagement and effectiveness of your online presentations and collaborations.
Issue 2: Attendees See Only the First Slide of My Presentation
Sometimes, when sharing PowerPoint or Keynote presentations during a Zoho Meeting session, attendees may only see the first slide, even as they progress through the presentation.
This issue can be frustrating and hinder the effectiveness of your presentation. Fortunately, Zoho Meeting provides two solutions to overcome this problem.
Solution 1: Enable Play Mode and Share the Application
Follow these steps to share your presentation correctly:
Step 1: Start your Zoho Meeting or webinar session.
Step 2: Open your PowerPoint or Keynote presentation in play mode (full-screen presentation view). You can click the "Slide Show" tab in the ribbon at the top of the window and then click "From Beginning." Or press Shift + F5 to start the slide show from the current slide.
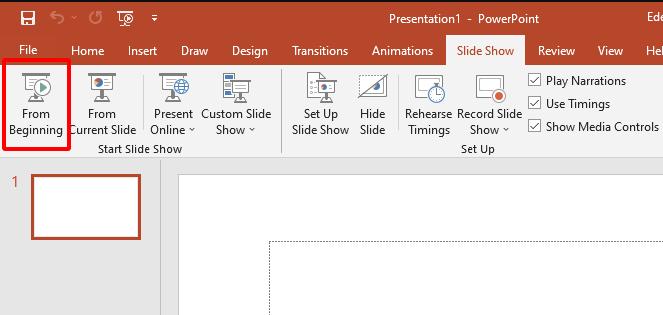
Step 3: Use Alt+Tab (Windows) or Command+Tab (macOS) to switch back to your Zoho Meeting screen.
Step 4: Click the "Share Screen" button in the meeting toolbar.
Step 5: Select the option to share the specific application window.
Step 6: Choose the presentation application that is currently in play mode.
Step 7: Click "Share."
By sharing the presentation application in play mode, attendees will now be able to see your slides as you navigate through the presentation.
Solution 2: Use Two Monitors
If you have access to a dual-monitor setup, you can use the following method:
Step 1: Start your Zoho Meeting or webinar session.
Step 2: Open your PowerPoint or Keynote presentation in play mode on one of the monitors.
Step 3: In the Zoho Meeting window, click the "Share Screen" button.
Step 4: Select the option to share an entire screen.
Step 5: Choose the monitor displaying your presentation in play mode.
Step 6: Click "Share."
With this method, Zoho Meeting will share the entire monitor displaying your presentation, ensuring that attendees can see all the slides as you progress through the presentation.
By following either of these solutions, you can overcome the issue of attendees only seeing the first slide of your presentation during a Zoho Meeting session. This will ensure a smooth and uninterrupted presentation experience for both you and your attendees.
Bonus: Remote Support with Screen Sharing & Voice Chat
Zoho Meeting screen sharing feature is suitable for remote meetings or training scenarios. If you want to use screen sharing to provide remote assistance to others, try AirDroid Remote Support, which also combines voice chat to improve troubleshooting efficiency.
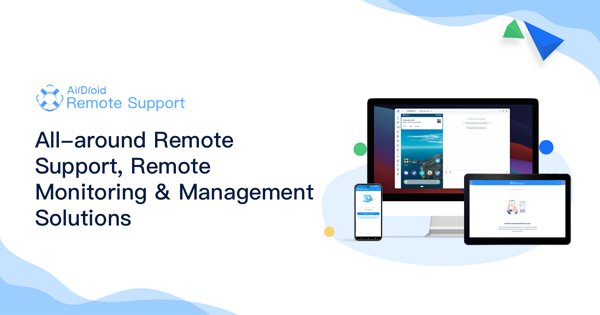
AirDroid Remote Support is a remote support software that allows you to connect to another device and control it remotely. It works on Android and iOS and supports tutorial gesture, AR camera & 3D marker, and more. You can use it to help your friends, family, or customers with their technical issues, such as installing apps, setting up devices, or fixing bugs.
Last Words
Sharing your screen during online meetings is super helpful, and Zoho Meeting makes it easy on different devices. Whether you're using a computer or a phone, you can quickly show your screen to others.
If you need to help someone with their tech issues remotely, AirDroid Remote Support is a great tool. It lets you share screens and chat with voice to fix problems faster.
These tools are simple to use and can make your online meetings and support sessions much smoother!



Leave a Reply.