How to Share Your iPhone or Mac Screen on FaceTime?
Ever wished you could show someone exactly what’s on your screen instead of trying to explain it? Whether you’re helping a friend troubleshoot their iPhone, presenting something for work, or just sharing a funny meme, FaceTime’s screen-sharing feature makes it super easy.
With just a few taps on your iPhone or clicks on your Mac, you can easily bring your screen into the conversation. Ready to make your FaceTime calls more interactive? Let’s get started and explore how quick it is to share your screen!
- Part 1 :Basic FaceTime Screen Sharing Requirements
- Part 2 :How to Screen Share with FaceTime Using Mac
- Part 3 :How to Screen Share with FaceTime on iPhone and iPad
- Part 4 :Why Is FaceTime Screen Share Not Working?
- Part 5 :Best Alternative for FaceTime Screen Sharing: AirDroid Cast


- Part 6 :FAQs about FaceTime Screen Sharing
Basic FaceTime Screen Sharing Requirements
Before you get too excited about screen sharing, here are a few must-know details.
- Both you and the person you’re connecting with need updated devices.
- For iPhones and iPads, that means iOS or iPadOS 15.1 or later. Mac users need macOS 12.1 or later.
- An Apple ID is a requirement for both parties too.
- Keep in mind that you can’t share content from apps that need a subscription. For those, use SharePlay instead.
Screen sharing is awesome for troubleshooting or showing someone how to do something step by step. But always be cautious.
Even though your notifications stay hidden while you share, sensitive information on your screen might still be visible. Taking a few extra precautions can make your FaceTime experience smoother and safer.
How to Screen Share with FaceTime Using Mac
Screen sharing on FaceTime is simple and fun. You can easily show your content during a FaceTime call on your Mac. Plus, you can let someone else control your screen if you need help or want to guide them through something. Here’s how to do it step by step.
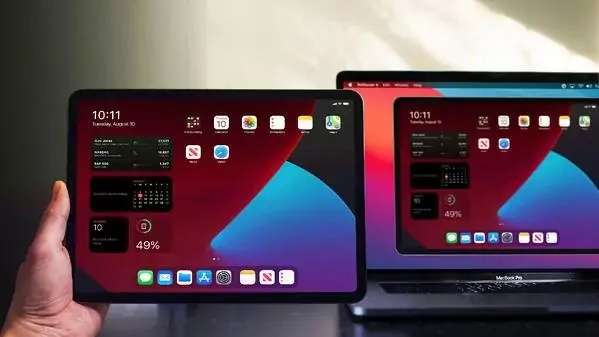
- Step 1. Open FaceTime and start a call with the person you want to share your screen with. Hover your mouse over the FaceTime window to reveal the call controls.
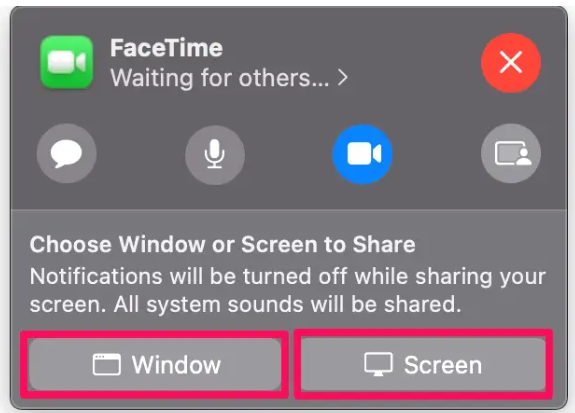
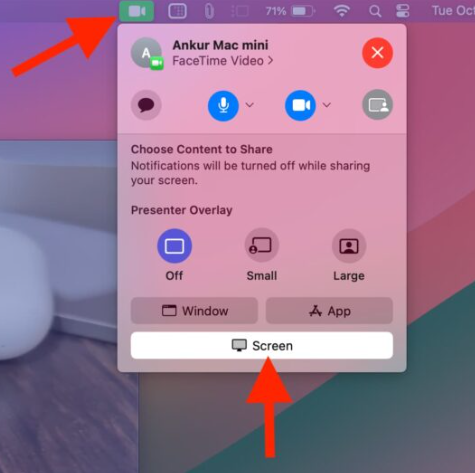
- Step 2. Look for the screen share icon in the toolbar. Click it to start the process.
![]()
![]()
- Step 3. A prompt will appear. You can choose to share a single window or your entire screen.
- Single Window: Hover over your open windows and click on the one you want to share.
- Entire Screen: Click anywhere on your screen. If you have more than one monitor, choose which screen you want to share. Everything on that screen will be visible to your call partner exactly as you see it.
- Step 3. A prompt will appear. You can choose to share a single window or your entire screen.
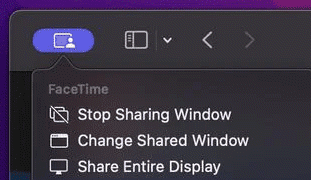
- Step 4. When you’re ready to stop sharing, return to the FaceTime window and click the screen share icon again. A menu bar window will pop up at the top. Choose “Stop Sharing Screen” to end the session.
Requesting and Accepting Remote Control
Sometimes, you might need more than just screen sharing. You might want to allow the other person to control your screen. This feature works during one-on-one FaceTime calls on a Mac running macOS 14 or later. Here’s how to do it:
- Step 1. Ensure you're on a one-on-one FaceTime video call. The person who needs assistance should click the Share Screen button in the FaceTime window.
- Step 2. Notice that the Allow Control option is already highlighted in blue. Leave it as is.

- Step 3. The helper, who can now see the shared screen, should click the Control Screen button in their viewing window to request remote access.
- Step 4. The person sharing their screen will receive an alert asking, “Would you like to allow this person to control your screen?” They need to click Allow. Once approved, the helper can navigate apps, open folders, and perform other tasks remotely.

- Step 5. To end the remote control, click the screen control button in the top menu bar of the Mac and select Allow Control. The icon will change from blue to gray, indicating that the remote control has been disabled.
Remember, the person controlling your screen can interact with it by opening windows, files, or changing settings. However, some actions, like changing your Apple Account settings or making payments, are restricted. Always be cautious and only allow remote control from people you trust.
How to Screen Share with FaceTime on iPhone and iPad
Sharing your screen on an iPhone or iPad is super simple. With iOS or iPadOS 15.1 or later, you can easily show your content during a FaceTime call. Let’s walk through the steps together.
- Step 1. Open FaceTime and start a call with the person you want to share your screen with. Once the call is live, tap anywhere on the screen to reveal the control bar.
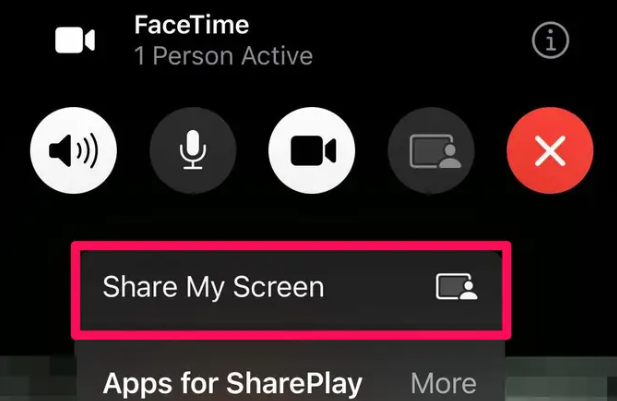
- Step 2. Look for the Share icon. It looks like a rectangle with a person in front of it. Tap this icon to open the sharing options.
![]()
![]()
- Step 3. Tap “Share My Screen”,then, tap the Share My Screen. You will see a three-second countdown on the button. This lets you prepare for what’s about to happen.
- Step 4. After the countdown, a small image of your screen appears on the other person’s device. If you’re using an iPhone, your camera will turn off during screen sharing. On an iPad, the camera stays on.
- Step 5. Now, swipe up or press the Home button. This action brings up your home screen. You can choose the app, document, or webpage you’d like to share. Everything you select appears live for the other person.
- Step 6. If someone else is already sharing their screen, tap Open next to Join Screen Sharing during the call. This lets you jump into the session and see what they’re sharing.
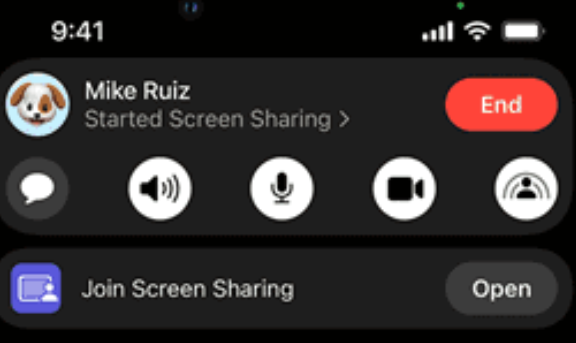
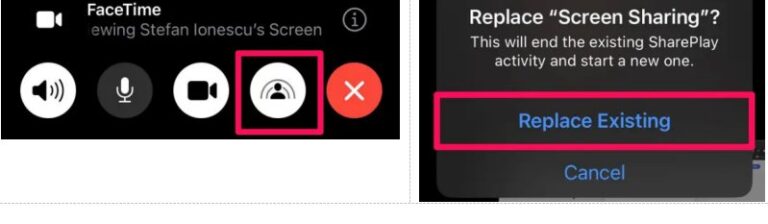
- Step 7. Sometimes you might need to take control of the screen sharing session from someone else. To do this, tap the Share Content button again and then select Replace Existing. This action gives you control and lets you share your screen instead.
- Step 8. When you’re finished sharing, simply tap the Share Content button one more time. This stops your screen-sharing session immediately. Everyone on the call will see that your screen is no longer being shared.
A Few Extra Tips:
- While sharing, others can see everything on your screen but cannot interact with it or control your device.
- Notifications and sensitive information remain hidden, so you can share them with confidence.
- You can also enjoy watching videos, listening to music, or even exercising together through supported apps.
FaceTime screen sharing makes it easy to collaborate, troubleshoot, or simply show off photos and apps. With these steps, you’ll be able to share your screen or even take over a session smoothly.
Why Is FaceTime Screen Share Not Working?
If you’re having trouble sharing your screen on your iPhone or iPad via Facetime, you can fix it with a few simple steps.
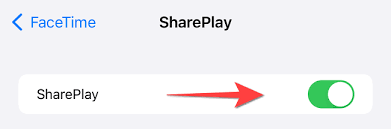
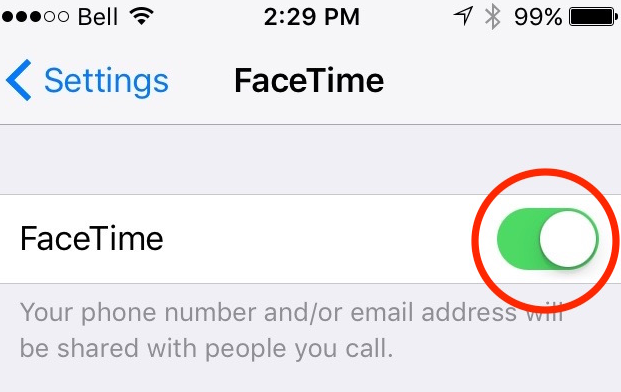
- Step 1.First, check if SharePlay is turned on. Go to Settings > FaceTime > SharePlay and toggle it on. Sometimes it gets accidentally turned off, which stops screen sharing.
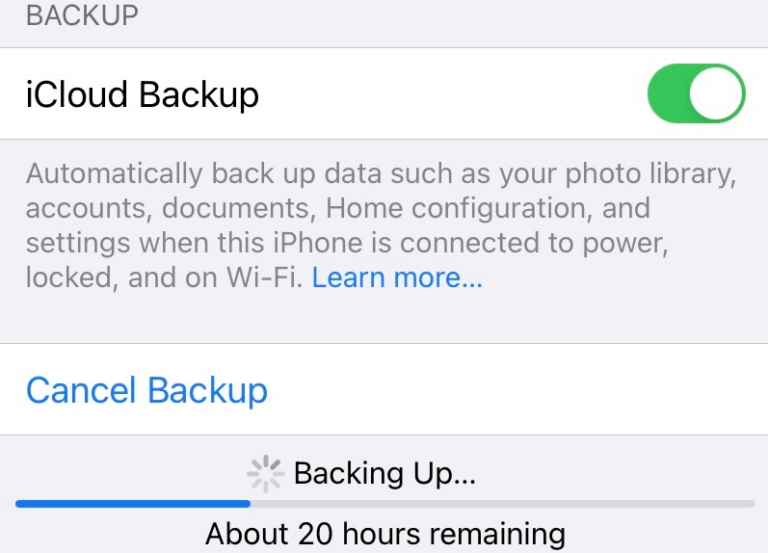
- Step 2.Make sure iCloud Sync is active. Open Settings, tap your Apple ID, and then iCloud. Ensure that FaceTime is allowed to use iCloud. Also, turn on the backup as it helps the feature work smoothly.
- Step 3.Try turning FaceTime off and back on. Head to Settings > FaceTime, switch it off, wait a few minutes, and then turn it on again. This simple restart can clear up many issues.
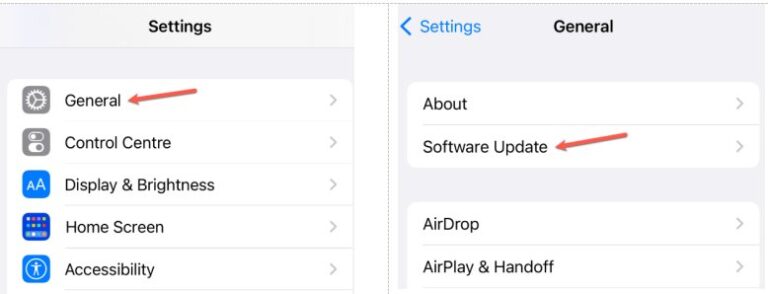
- Step 4.Check for software updates. Go to Settings > General > Software Update and install any available updates. Both you and the person you’re calling should have the latest version for screen sharing to work properly.
- Step 5.A strong internet connection is vital. Use WiFi instead of cellular data if possible. A weak connection can disrupt screen sharing.
If these fixes don’t work, try restarting your device or signing out and back into your Apple ID. Resetting your network settings might also help if the problem persists. AirDroid Cast is also a perfect choice for u when sharing screen.
Best Alternative for FaceTime Screen Sharing: AirDroid Cast
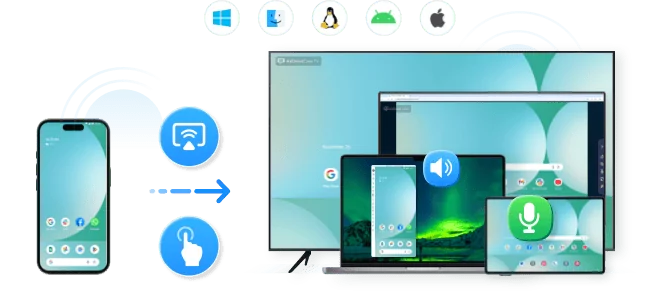
If FaceTime screen sharing isn’t cutting it for you, try AirDroid Cast. Our powerful, all-in-one app lets you mirror and control screens across multiple platforms.
Unlike FaceTime, which is limited to Apple devices, AirDroid Cast works on Windows, Mac, Android, iOS, and even Smart TVs. You can share multiple screens at once, and enjoy seamless collaboration no matter your device.
| Feature | FaceTime | AirDroid Cast |
|---|---|---|
| Platform Support | Apple devices only | Cross-platform (Windows, Mac, Android, iOS, Smart TV) |
| Multi-screen Sharing | Single screen only | Share up to 5 screens simultaneously |
| Remote Control | Limited to Apple devices | Remote control for both Android and iOS |
| Network Flexibility | WiFi required | Works on WiFi, cellular, or local networks |
| User Experience | Basic sharing features | Rich features with low latency and audio support |
How to Screen Share with AirDroid Cast
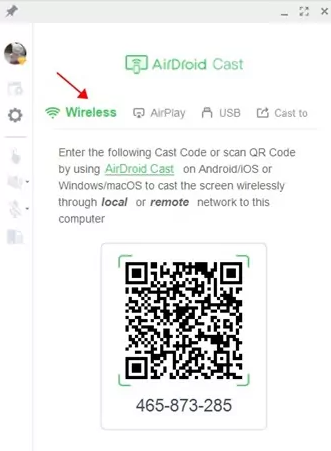
- Step 1.Download AirDroid Cast from our website and install it on your devices.
- Step 2.Open the app, scan the QR code, or enter the 9-digit code to connect.
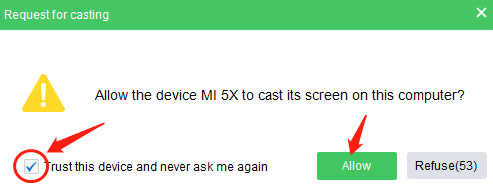
- Step 3.Accept the request for casting and enable permission on your device.
- Step 4.Click the “Start Now” button to mirror your screen. Enjoy smooth, real-time sharing and control.
AirDroid Cast offers a robust, cross-platform solution for screen sharing and remote control. Try it today and elevate your collaboration experience!
FAQs
Summing Up
Screen sharing on FaceTime is a great way to collaborate, teach, or just have fun with friends. But it only works within Apple’s ecosystem. If you need a more flexible solution, AirDroid Cast is the way to go. It works across platforms, supports multiple screens, and offers remote control features.
Whether you're presenting, teaching, or just watching videos on a bigger screen, AirDroid Cast makes it simple. No more device restrictions. No complicated setup. Just smooth, seamless screen sharing.


Leave a Reply.